Huawei NetCol5000-C Series User Manual
In-row chilled water smart cooling product
Hide thumbs
Also See for NetCol5000-C Series:
- User manual (152 pages) ,
- User manual (198 pages) ,
- User manual (86 pages)

Related Manuals for Huawei NetCol5000-C Series


Summary of Contents for Huawei NetCol5000-C Series
- Page 1 NetCol5000-C(065, 080) In-row Chilled Water Smart Cooling Product User Manual Issue Date 2020-03-16 HUAWEI TECHNOLOGIES CO., LTD.
- Page 2 Notice The purchased products, services and features are stipulated by the contract made between Huawei and the customer. All or part of the products, services and features described in this document may not be within the purchase scope or the usage scope. Unless otherwise specified in the contract, all statements, information, and recommendations in this document are provided "AS IS"...
-
Page 3: About This Document
Indicates a hazard with a medium level of risk which, if not avoided, could result in death or serious injury. Indicates a hazard with a low level of risk which, if not avoided, could result in minor or moderate injury. Issue 07 (2020-03-16) Copyright © Huawei Technologies Co., Ltd. - Page 4 Added the description of installing a water sensor. Issue 03 (2019-01-15) Updated the manual name and so on. Issue 02 (2018-09-15) Canceled the configuration of the condensate pump. Issue 01 (2018-01-25) This issue is the first official release. Issue 07 (2020-03-16) Copyright © Huawei Technologies Co., Ltd.
-
Page 5: Table Of Contents
3.1.3.2 (Optional) Condensate Pump Drainpipe ......................30 3.1.3.3 (Optional) Humidifier Water Inlet Pipe ......................31 3.1.3.4 Chilled Water Inlet and Outlet Pipes ........................32 3.1.3.5 Pipe Support ..............................32 3.1.3.6 Cables ................................33 3.1.4 Structural Specifications ............................34 Issue 07 (2020-03-16) Copyright © Huawei Technologies Co., Ltd. - Page 6 3.12.7 (Optional) Installing a Differential Pressure Sensor ..................61 3.13 Checking After Installation ..........................62 4 Commissioning........................64 4.1 Power-On ................................64 4.2 Home Screen ................................69 4.3 Initial Configuration .............................71 4.3.1 Setting Temperature and Humidity Values and (Optional) Enabling T/H Sensors..........71 Issue 07 (2020-03-16) Copyright © Huawei Technologies Co., Ltd.
- Page 7 6.4.15 Replacing the Controller Panel ........................173 7 FAQ ............................175 7.1 Operations on the LCD ............................175 7.1.1 Querying Temperature and Humidity Curves ....................175 7.1.2 Querying Logs ..............................176 7.1.3 Querying Component Status..........................176 Issue 07 (2020-03-16) Copyright © Huawei Technologies Co., Ltd.
- Page 8 7.2.7 How Can I View Version Information? ......................206 A Glycol Adding Requirements.................... 207 B Acronyms and Abbreviations .................... 208 C Base Dimensions ......................... 209 D Electrical Conceptual Diagram ..................210 Issue 07 (2020-03-16) Copyright © Huawei Technologies Co., Ltd.
-
Page 9: Safety Information
The "NOTICE", "CAUTION", "WARNING", and "DANGER" statements in this document do not cover all the safety instructions. They are only supplements to the safety instructions. Huawei will not be liable for any consequence caused by the violation of general safety requirements or design, production, and usage safety standards. - Page 10 Keep irrelevant people away from the equipment. Only operators are allowed to access the equipment. Use insulated tools or tools with insulated handles, as shown in the following figure. Issue 07 (2020-03-16) Copyright © Huawei Technologies Co., Ltd.
- Page 11 To avoid electric shock, do not connect safety extra-low voltage (SELV) circuits to telecommunication network voltage (TNV) circuits. Issue 07 (2020-03-16) Copyright © Huawei Technologies Co., Ltd.
-
Page 12: Personnel Requirements
Do not power on the equipment before it is installed or confirmed by professionals. 1.2 Personnel Requirements Personnel who plan to install or maintain Huawei equipment must receive thorough training, understand all necessary safety precautions, and be able to correctly perform all operations. - Page 13 When selecting, connecting, and routing cables, follow local safety regulations and rules. The static electricity generated by human bodies may damage the electrostatic-sensitive components on boards, for example, the large-scale integrated (LSI) circuits. Issue 07 (2020-03-16) Copyright © Huawei Technologies Co., Ltd.
-
Page 14: Installation Environment Requirements
Ensure that the equipment room provides good heat insulation, and the walls and floor are dampproof. Install a rat guard at the door of the equipment room. Issue 07 (2020-03-16) Copyright © Huawei Technologies Co., Ltd. -
Page 15: Mechanical Safety
Before hoisting objects, ensure that hoisting tools are firmly secured onto a load-bearing object or wall. Ensure that the angle formed by two hoisting cables is no more than 90 degrees, as shown in the following figure. Issue 07 (2020-03-16) Copyright © Huawei Technologies Co., Ltd. - Page 16 Do not climb higher than the fourth rung of the ladder from the top. Ensure that your body's center of gravity does not shift outside the legs of the ladder. Issue 07 (2020-03-16) Copyright © Huawei Technologies Co., Ltd.
- Page 17 Metal shavings from drilling may short-circuit boards inside the equipment. Obtain the consent from the customer, subcontractor, and Huawei before drilling. Wear goggles and protective gloves when drilling holes. ...
-
Page 18: Cooling System Safety
The dealer can help you recycle devices in a safe and environment-friendly way. 1.7 Others Exercise caution when shutting down the smart cooling product. Doing so may cause equipment and room overheating, which will damage the equipment. Issue 07 (2020-03-16) Copyright © Huawei Technologies Co., Ltd. -
Page 19: Product Description
NetCol5000-C(065, 080) In-row Chilled Water Smart Cooling Product User Manual 2 Product Description Product Description 2.1 Model Description Issue 07 (2020-03-16) Copyright © Huawei Technologies Co., Ltd. -
Page 20: Component
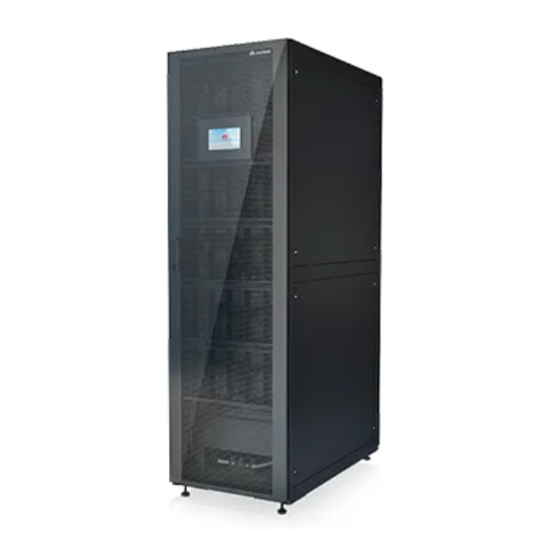
NetCol5000-C(065, 080) In-row Chilled Water Smart Cooling Product User Manual 2 Product Description 2.2 Component 2.2.1 Appearance and Components Appearance Figure 2-1 NetCol5000-C065 Issue 07 (2020-03-16) Copyright © Huawei Technologies Co., Ltd. - Page 21 The I-type finned-tube exchanger with a high cooling efficiency adopts the synergy field principle and computational fluid dynamics (CFD) to optimize the flow path design, which greatly improves the heat exchange efficiency. Chilled water valve Issue 07 (2020-03-16) Copyright © Huawei Technologies Co., Ltd.
-
Page 22: Controller
If alarms of different severities (critical, major, minor, or warning) are raised simultaneously, the indicator status corresponds to the alarm with the highest severity level and the buzzer status corresponds to the unacknowledged alarm with the highest severity level. Issue 07 (2020-03-16) Copyright © Huawei Technologies Co., Ltd. - Page 23 Buzzer The device is operating properly, or a Green No buzzing warning is generated. There is an unacknowledged major Yellow Intermittent buzzing alarm. There is an unacknowledged critical Constant buzzing alarm. Issue 07 (2020-03-16) Copyright © Huawei Technologies Co., Ltd.
- Page 24 (Applicable to V200R001C20 and later versions) NOTE Only Huawei service engineers or authorized service engineers are allowed to use the WiFi module. To ensure security, remove the WiFi module immediately after use. ...
-
Page 25: Functions And Features
O&M personnel can view the unit operating status onsite. A comprehensive power monitoring function is provided. Faults such as overvoltage, undervoltage, mains power failure, high frequency, and low frequency are diagnosed and Issue 07 (2020-03-16) Copyright © Huawei Technologies Co., Ltd. -
Page 26: Monitoring System
Fans can be maintained without power-off so that the normal operations of other fans will not be affected. 2.2.3 Monitoring System The monitoring system provides logic control, data collection, control demand delivering, alarm reporting, data storage, user right management, and teamwork control functions. Issue 07 (2020-03-16) Copyright © Huawei Technologies Co., Ltd. - Page 27 (CAN) port for teamwork to save energy and extend the service life. Any smart cooling product can be set as the master unit. The following figure shows the monitoring system network diagram. Figure 2-6 FE teamwork network diagram Figure 2-7 FE monitoring network diagram Issue 07 (2020-03-16) Copyright © Huawei Technologies Co., Ltd.
-
Page 28: Application Conditions
Do not install the smart cooling product near a noise-sensitive place such as an office or a conference room. Pipe Ports The following table describes the ports reserved on the device. Issue 07 (2020-03-16) Copyright © Huawei Technologies Co., Ltd. - Page 29 Total hardness (in CaCO Power distribution Leakage circuit breakers are not used for the main power route. If leakage circuit breakers are required by the customer or by local regulations, use the residual current Issue 07 (2020-03-16) Copyright © Huawei Technologies Co., Ltd.
- Page 30 Return air: 18–45° C Supply air: 15–35° C Temperature adjustment precision ± 1° C Humidity adjustment range 20%–80% RH Humidity adjustment precision ± 5% RH Air outlet static pressure 0–50 Pa Issue 07 (2020-03-16) Copyright © Huawei Technologies Co., Ltd.
-
Page 31: Technical Specifications
Table 2-7 Technical specifications of NetCol5000-C080 Item NetCol5000-C080H9B20200 NetCol5000-C080H9B2 30D0 02W030D0 Power system 220–240 V AC, 1 PH, 50/60 Hz Number of fans Cooling capacity (kW) Air volume (m 12000 Water flow (m Issue 07 (2020-03-16) Copyright © Huawei Technologies Co., Ltd. -
Page 32: Performance Curves
Figure 2-10 Cooling capacity derating coefficient curve in proportion to the altitude When the altitude is within 1000 m, the cooling capacity deviation is in the tolerance range and can be ignored. Issue 07 (2020-03-16) Copyright © Huawei Technologies Co., Ltd. - Page 33 Cooling Capacity Curve in Proportion to the Glycol Solution Density The cooling capacity is obtained by multiplying the glycol solution density by the rated cooling capacity. Figure 2-11 Cooling capacity curve in proportion to the glycol solution density Issue 07 (2020-03-16) Copyright © Huawei Technologies Co., Ltd.
-
Page 34: Installation
Install the water inlet and outlet pipes to the predefined paths and reserve proper length for connecting water inlet and outlet pipes. Figure 3-1 Maintenance space Issue 07 (2020-03-16) Copyright © Huawei Technologies Co., Ltd. -
Page 35: Tools
Step ladder (2 m) ESD gloves PVC insulation tape Vacuum cleaner Steel wire brush Multimeter Claw hammer Level Hot melt device (used when water pipes are made of PPR or aluminum-plastic material) Issue 07 (2020-03-16) Copyright © Huawei Technologies Co., Ltd. -
Page 36: Pipe Connection
Table 3-3 Nitrogen injection and pressure preservation tools Appearance, Parameter, and Name Nitrogen cylinder Pressure gauge Fluorine injection Reducing valve hose 3.1.2 Pipe Connection NetCol5000-C pipes are routed from the bottom onsite, as shown in Figure 3-2. Issue 07 (2020-03-16) Copyright © Huawei Technologies Co., Ltd. -
Page 37: Material Preparations
Optional: materials that can be purchased from Huawei or any other vendor (if you have ordered the materials from Huawei, you do not need to purchase them elsewhere). For details about the specifications of such materials to be purchased, see the following sections. -
Page 38: Optional) Condensate Pump Drainpipe
If condensate water needs to be drained by using a water pump, you can customize a condensate pump. The water pump drainpipe uses the hose connection, as shown in the following figure. Issue 07 (2020-03-16) Copyright © Huawei Technologies Co., Ltd. -
Page 39: Optional) Humidifier Water Inlet Pipe
(4) Pagoda connector: G 1/2 inch; (5) Hose clamp (6) Hose: made of connected to a pagoda connector EPDM or other with outer screw threads materials Issue 07 (2020-03-16) Copyright © Huawei Technologies Co., Ltd. -
Page 40: Chilled Water Inlet And Outlet Pipes
41 mm (engineering purchase) 3.1.3.5 Pipe Support Supports for pipes and water pipes as shown in the figure. The actual appearance of the supports will be different based on onsite situations. Issue 07 (2020-03-16) Copyright © Huawei Technologies Co., Ltd. -
Page 41: Cables
4 A, IEC Specification, delivered with the 0.03 ohm, 38.7 A x A x product Sec, UL/CSA Approved OT terminal Naked Crimping 6 PCS Standard configuration; Terminal, OT, 6 mm delivered with the Issue 07 (2020-03-16) Copyright © Huawei Technologies Co., Ltd. -
Page 42: Structural Specifications
Anti-Freeze, Black product 3.1.4 Structural Specifications 3.1.4.1 NetCol5000-C065 external structure Figure 3-8 NetCol5000-C065 external structure (1) Controller panel (2) Door lock (3) Front door (4) Side panel (5) Rear door Issue 07 (2020-03-16) Copyright © Huawei Technologies Co., Ltd. -
Page 43: Netcol5000-C080 External Structure
(1) Controller panel (2) Door lock (3) Front door (4) Side panel (5) Rear door 3.1.4.3 Cabinet Holes Figure 3-10 Top view (unit: mm) (1) Power cable hole (2) Signal cable hole Issue 07 (2020-03-16) Copyright © Huawei Technologies Co., Ltd. -
Page 44: Unpacking
Step 3 Check the type and quantity of fittings against the packing list. If fittings are missing or inconsistent with those in the packing list, contact your local Huawei office immediately. ----End Issue 07 (2020-03-16) -
Page 45: Installation Process
You can open or close the exhaust valve using a flat-head screwdriver. Procedure Step 1 Open the door lock using a key, and open the cabinet rear door. Step 2 Unfasten the rotating baffle plates, and remove the air filters. Issue 07 (2020-03-16) Copyright © Huawei Technologies Co., Ltd. - Page 46 100% state, as shown in Figure 3-14. Figure 3-14 Adjusting the chilled water valve Step 5 Use a screwdriver to open the exhaust valve shown in Figure 3-15 and discharge gas through the hose. Issue 07 (2020-03-16) Copyright © Huawei Technologies Co., Ltd.
-
Page 47: Removing The Pallet
If gas emits, the system is normal. Slowly open the exhaust valve to discharge nitrogen and close the valve when there is no airflow through the valve. If no gas emits out of the valve, contact Huawei technical support. Figure 3-15 Checking the nitrogen pressure ----End... -
Page 48: Leveling And Combining Cabinets
Ensure that the leveling feet touch the floor after adjustment, as shown in Figure 3-17. Issue 07 (2020-03-16) Copyright © Huawei Technologies Co., Ltd. - Page 49 Do not remove the leveling feet. Otherwise, you need to rework them for use. Step 2 Combine cabinets, as shown in the following figure. Figure 3-18 Combining cabinets (front door) Issue 07 (2020-03-16) Copyright © Huawei Technologies Co., Ltd.
-
Page 50: Securing The Netcol5000-C
Secure the smart cooling product to the base. If there are no bases onsite, prepare one by referring to C Base Dimensions. 3.8 Connecting Water Pipes 3.8.1 Connect Automatic Drainpipe Context Issue 07 (2020-03-16) Copyright © Huawei Technologies Co., Ltd. - Page 51 1 in Figure 3-21. Then wrap the pipes with tape or use other materials to secure them, as shown by step 2 in Figure 3-21. Issue 07 (2020-03-16) Copyright © Huawei Technologies Co., Ltd.
-
Page 52: Optional) Connecting The Water Pump Drainpipe
Step 2 Connect the hose, and use a Phillips screwdriver to re-tighten the screw on the water pump drainpipe to secure the hose clamp. Issue 07 (2020-03-16) Copyright © Huawei Technologies Co., Ltd. -
Page 53: Optional) Connecting The Humidifier Water Inlet Pipe
Step 1 Straighten the water inlet pipe delivered with the smart cooling product, and route it from the inside to the outside through the water inlet hole at the bottom of the smart cooling product. Issue 07 (2020-03-16) Copyright © Huawei Technologies Co., Ltd. -
Page 54: Connecting The Chilled Water Inlet And Outlet Pipes
3.8.4.1 Connecting Seamless Steel Pipes Procedure Step 1 Open the rear door and remove the air filter. Step 2 Knock off the knock-out holes for the chilled water inlet and outlet pipes. Issue 07 (2020-03-16) Copyright © Huawei Technologies Co., Ltd. -
Page 55: Connecting Aluminum Plastic Pipes
3.8.4.2 Connecting Aluminum Plastic Pipes Procedure Step 1 Open the rear door and remove the air filter. Step 2 Knock off the knock-out holes for the chilled water inlet and outlet pipes. Issue 07 (2020-03-16) Copyright © Huawei Technologies Co., Ltd. - Page 56 Step 8 After pipes are connected, seal the gaps between the knock-out holes and the pipes using sealant or foaming agent. Figure 3-25 Connecting the water inlet and outlet pipes ----End Issue 07 (2020-03-16) Copyright © Huawei Technologies Co., Ltd.
-
Page 57: Optional) Performing A Leakage Test With Nitrogen
If the pressure decreases, find out and repair the leakage point by using soap bubbles. If the pressure is preserved properly, exhaust nitrogen and wrap pipes and joints with thermal insulation foams. ----End Issue 07 (2020-03-16) Copyright © Huawei Technologies Co., Ltd. -
Page 58: Injecting Water To Expel Gas
Step 4 Adjust the air exhausting speed until no bubble flows out of the hose. Step 5 After air is expelled, manually turn the chilled water valve to the 0 state. Step 6 Close the exhaust valve. ----End Issue 07 (2020-03-16) Copyright © Huawei Technologies Co., Ltd. -
Page 59: Optional) Leakage Test With Water
3.12.2 Connecting Power Cables Prerequisites Check that the voltage is less than 1 V between wires by using a multimeter before connecting power cables. Issue 07 (2020-03-16) Copyright © Huawei Technologies Co., Ltd. - Page 60 If there is a short circuit, remove the cable and reconnect it using the method described Step 2.1. After verifying the connection, perform Step If there is no short circuit, perform Step Step 4 Check that the cable connections are secure. Issue 07 (2020-03-16) Copyright © Huawei Technologies Co., Ltd.
-
Page 61: Connecting An Equipotential Pe Cable
Connect the PE cable to the marked position in the lower part of the cabinet, and connect the cable to the external ground system, as shown in Figure 3-29. Figure 3-29 Connecting an equipotential PE cable Issue 07 (2020-03-16) Copyright © Huawei Technologies Co., Ltd. -
Page 62: Teamwork Networking And Monitoring
(5) COM_IN (RS485 communications port) (6) COM_OUT (RS485 communications (used for connecting to the monitoring port) (used for connecting to the monitoring system) system) (7) FE (used for connecting to the monitoring system) Issue 07 (2020-03-16) Copyright © Huawei Technologies Co., Ltd. -
Page 63: Signal Ports
The smart cooling product supports two teamwork networking modes: FE teamwork networking and CAN teamwork networking (hand-in-hand). 3.12.4.3.1 Connecting the FE Teamwork Network Cable Procedure Step 1 (Optional) Make FE teamwork network cables by referring to Figure 3-32 if required onsite. Issue 07 (2020-03-16) Copyright © Huawei Technologies Co., Ltd. -
Page 64: Connecting The Can Teamwork Cable
In CAN networking, one teamwork network supports a maximum of 32 smart cooling products. If CAN networking is required onsite, set Teamwork CAN resistor enable on the Teamwork settings page for the first and last smart cooling products to Yes. Issue 07 (2020-03-16) Copyright © Huawei Technologies Co., Ltd. -
Page 65: Connecting The Monitoring Network Cable
COM–IN port of the main control module of the first smart cooling product in each group to the RS485 port of the EMS. Issue 07 (2020-03-16) Copyright © Huawei Technologies Co., Ltd. - Page 66 Yes over the LCD. If CAN teamwork networking has been implemented, connect the RS485 monitoring cables, as shown in the following figure. Figure 3-37 Connecting the RS485 monitoring network cable Issue 07 (2020-03-16) Copyright © Huawei Technologies Co., Ltd.
-
Page 67: Connecting The Water Sensor
Procedure Step 1 Connect the T/H sensors outside the cabinet and the T/H sensors at the return air side in series. Figure 3-38 shows how to route the cables. Issue 07 (2020-03-16) Copyright © Huawei Technologies Co., Ltd. - Page 68 DIP switches for T/H sensors. Figure 3-39 DIP switches Table 3-5 DIP switch setting on a T/H sensor Position Name Address DIP Switch ID Return air Return air 2 temp/humid Cold aisle Cold aisle 1 Issue 07 (2020-03-16) Copyright © Huawei Technologies Co., Ltd.
-
Page 69: Optional) Installing A Differential Pressure Sensor
Hot aisle 5 temp/humid The default addresses of T/H sensors purchased from Huawei are 1. Keep the last RS485_R toggle switch at OFF. After the addresses are set, power on the device. On the display's home screen, choose Settings >... -
Page 70: Checking After Installation
Check that the pipe lines have completed pressure preservation and air tightness test. Check that the needle valve plugs and the nuts are tightened. Issue 07 (2020-03-16) Copyright © Huawei Technologies Co., Ltd. - Page 71 User Manual 3 Installation Check that the cabinet is grounded. Check that the power and signal cables are routed correctly and separately. Check that strong- and weak-current cables are bound separately. Issue 07 (2020-03-16) Copyright © Huawei Technologies Co., Ltd.
-
Page 72: Commissioning
Preset Password Permission Description admin (administrator 000001 People can operate all menus. user) operator (common 000001 People can only view parameter settings user) and set a part of parameters in the menus. Issue 07 (2020-03-16) Copyright © Huawei Technologies Co., Ltd. - Page 73 To prevent the effect of misoperation on the system during the O&M, log in as the operator user first before modifying parameters. Confirm with Huawei before modifying parameters that cannot be modified by operator users; otherwise, Huawei will not be liable for any consequences of the unauthorized modification.
- Page 74 Number of Number of the smart Total number of the smart smart cooling cooling products in cooling products in this group. products in this group (1 to 32 Issue 07 (2020-03-16) Copyright © Huawei Technologies Co., Ltd.
- Page 75 Supply air if the cold aisle selected control type T/H sensors are not can be set. configured. When the application scenario is non-aisle containment, you are advised to choose Return air, and Issue 07 (2020-03-16) Copyright © Huawei Technologies Co., Ltd.
- Page 76 The cold aisle sensors outside sensor 1 aisles can be set to the cabinet need to be enabled Enable or Disable. when they are installed. Cold aisle sensor 2 Cold aisle sensor 3 Issue 07 (2020-03-16) Copyright © Huawei Technologies Co., Ltd.
-
Page 77: Home Screen
You can tap the menu items, buttons, or icons on the screen to enter related screens or perform operations, such as Running, Alarms and Settings. The controller main screen is shown in Figure 4-3. User interfaces displayed in this document are for reference only. Issue 07 (2020-03-16) Copyright © Huawei Technologies Co., Ltd. - Page 78 The current critical alarm refers to the current critical alarm and their and their quantity quantity. The current major alarm refers to the current major alarm and their and their quantity quantity. Issue 07 (2020-03-16) Copyright © Huawei Technologies Co., Ltd.
-
Page 79: Initial Configuration
If you need to enable a humidity and temperature sensor, log in as the admin user. This section describes how to enable Cold aisle sensor 1. Procedure Step 1 On the home screen, choose Settings > System Settings > T/H sensor. Figure 4-4 displayed. Issue 07 (2020-03-16) Copyright © Huawei Technologies Co., Ltd. - Page 80 Max value: Select Max value if the temperature is to be controlled based on the maximum data value collected by the collector. Min value: Select Min value if Issue 07 (2020-03-16) Copyright © Huawei Technologies Co., Ltd.
- Page 81 Step 4 Go back to home screen, and tap Running > Device Details > T/H sensor to check that the cold aisle temperature and humidity are displayed and the values are reasonable. Issue 07 (2020-03-16) Copyright © Huawei Technologies Co., Ltd.
-
Page 82: Optional) Setting The Pressure Difference Control
Table 4-5 Parameter description Parameter Description Configuration Principle Indoor fan control type Sets the control type for the Normally, retain R/S air indoor fan. temp diff rate ctrl. If the differential pressure sensors Issue 07 (2020-03-16) Copyright © Huawei Technologies Co., Ltd. -
Page 83: Setting Teamwork Control Parameters
The parameters in this section are for reference only. Set actually parameter values as required. Procedure Step 1 On the home screen, tap > Teamwork Settings, to enter Teamwork Settings page, as shown in Figure 4-6. Issue 07 (2020-03-16) Copyright © Huawei Technologies Co., Ltd. - Page 84 No for other smart cooling products. Teamwork Disable or enable the Set this parameter based Disable function teamwork function. If the on the onsite device heat teamwork function is Issue 07 (2020-03-16) Copyright © Huawei Technologies Co., Ltd.
- Page 85 Rotation Rotation days (1–30). 7 by default 7 day (s) Issue 07 (2020-03-16) Copyright © Huawei Technologies Co., Ltd.
- Page 86 When the requirement control is Indoor fan unified control, all smart cooling product fans in the group rotate at the same speed. Issue 07 (2020-03-16) Copyright © Huawei Technologies Co., Ltd.
- Page 87 Indicates the smart cooling product address. 01 is the master one and the rest are all slave ones. NOTE If the master one offline, the teamwork networking failed. Active/Stand Active: properly responds to the requirement control. Issue 07 (2020-03-16) Copyright © Huawei Technologies Co., Ltd.
- Page 88 After you have completed the settings, perform the following checks to confirm whether the teamwork control is available: Check whether the device number on the topology is the same as the actual device number. − If yes, go to 2. Issue 07 (2020-03-16) Copyright © Huawei Technologies Co., Ltd.
-
Page 89: Setting Communications Parameters
EMS must be unique. ----End 4.3.4.2 Setting Communications Parameters (Modbus TCP Protocol) Context To set communications parameters, log in as the admin user. Issue 07 (2020-03-16) Copyright © Huawei Technologies Co., Ltd. - Page 90 Disable Client. Server Enable, This parameter is configurable when Link mode is set to encryption Disable Server. NMS IP Enter the actual IP address of the EMS. IP addresses of Issue 07 (2020-03-16) Copyright © Huawei Technologies Co., Ltd.
-
Page 91: Setting Communications Parameters (Snmp Protocol)
Step 2 Set SNMP Version based on site requirements, and then tap Submit. If you set SNMP Version to ALL or SNMPv1&v2c, you can set Read Community and Write Community by performing Step Issue 07 (2020-03-16) Copyright © Huawei Technologies Co., Ltd. - Page 92 Tap Add under SNMP V3. Enter a planned value for User Name, select values for Auth Protocol and Prop Protocol from drop-down list boxes, and tap , as shown in Figure 4-11. Issue 07 (2020-03-16) Copyright © Huawei Technologies Co., Ltd.
- Page 93 A password must be different from the corresponding user name or inverted user name. A password must not be a string containing duplicate sections, such as 12a12a12a. Set SHA Password and Confirm Password as planned, and tap , as shown in Figure 4-12. Issue 07 (2020-03-16) Copyright © Huawei Technologies Co., Ltd.
- Page 94 Figure 4-13 Setting an AES password Tap Submit. Step 5 Tap the text box after SNMP Port, as shown in Figure 4-14. Set SNMP Port to the actual port number, tap , and then tap Submit. Issue 07 (2020-03-16) Copyright © Huawei Technologies Co., Ltd.
- Page 95 If SNMP Version is set to SNMPv3, select an SNMPv3 user name, and then tap as shown in Figure 4-15. Figure 4-15 Setting SNMP trap parameters Tap Submit under SNMP Trap. ----End Issue 07 (2020-03-16) Copyright © Huawei Technologies Co., Ltd.
-
Page 96: Optional) Setting Wifi Parameters
WiFi Password Enter the WiFi password when you use a mobile phone to connect to the WiFi. When you enable the WiFi function for the first time, Issue 07 (2020-03-16) Copyright © Huawei Technologies Co., Ltd. -
Page 97: Startup
Enable the WiFi function. The default status is Disable. Step 3 Tap Submit. ----End 4.4 Startup Download the Service Expert app from Huawei app store and runs on Android. Apply for permission after downloading the app. Step 1 Tap Start on the home screen of the ACC. ... - Page 98 Service Expert app for initial startup verification. The Service Expert app can be downloaded from Huawei app store and runs on Android. User interfaces displayed in this document correspond to the APP software version V100R001C00B043T007 and are for reference only.
- Page 99 BarCode. After clicking it and scanning the QR code generated in the Start Password page, the barcode and verify code can be automatically entered into the APP. Issue 07 (2020-03-16) Copyright © Huawei Technologies Co., Ltd.
- Page 100 If you change the login password on the smart cooling product LCD, the password for logging in to the Service Export app will be changed to what you set on the LCD. Issue 07 (2020-03-16) Copyright © Huawei Technologies Co., Ltd.
-
Page 101: Startup Wizard
The startup wizard allows for commissioning of components such as the fan, humidifier and chilled water valve. It also supports component automatic operation and automatic device checking, and can output commissioning report. Issue 07 (2020-03-16) Copyright © Huawei Technologies Co., Ltd. - Page 102 For the non-initial startup wizard, choose Last record and you can view the last startup wizard report. Step 2 Tap Yes. The checking before startup screen is displayed, as shown in Figure 4-25. Issue 07 (2020-03-16) Copyright © Huawei Technologies Co., Ltd.
- Page 103 Except that the indoor fan item is mandatory, you can clear other commissioning items that are not required. Step 5 Tap Yes. The component startup commissioning screen is displayed, as shown in Figure 4-27. Issue 07 (2020-03-16) Copyright © Huawei Technologies Co., Ltd.
- Page 104 Step 6 View the commissioning result. Figure 4-28 is displayed if component commissioning succeeds. Figure 4-28 Commissioning successfully Figure 4-29 is displayed if component commissioning fails, which ends startup wizard commissioning. Issue 07 (2020-03-16) Copyright © Huawei Technologies Co., Ltd.
-
Page 105: Optional) Power-Off
Step 2 Tap Confirm. If the device is successfully shut, the system displays a message, indicating that the command is successfully triggered. Step 3 Turn off the power switch (AC1, AC2). Issue 07 (2020-03-16) Copyright © Huawei Technologies Co., Ltd. -
Page 106: Checking After Commissioning
□ Passed □ Failed The air filter is correctly installed according to the air flow direction on the frame. □ Passed □ Failed Check that the chilled water valve is closed. Issue 07 (2020-03-16) Copyright © Huawei Technologies Co., Ltd. -
Page 107: Webui
Step 4.4. Otherwise, you will fail to access the ECC800. Open the Internet Explorer and choose Tools > Internet Options. Click the Advanced tab and select Use TLS1.1 and Use TLS1.2. Issue 07 (2020-03-16) Copyright © Huawei Technologies Co., Ltd. - Page 108 Step 5 Log in to the WebUI of the smart cooling product. Enter https://IP address (such as IP address https://192.168.0.10) in the address box of the browser, and then press Enter to enter the WebUI login page. Issue 07 (2020-03-16) Copyright © Huawei Technologies Co., Ltd.
-
Page 109: Webui Introduction
An account is logged out due to timeout if no operation is performed within 10 minutes after system login. ----End 5.2 WebUI Introduction For data transmission security, the smart cooling product supports WebUI access through SSL. Issue 07 (2020-03-16) Copyright © Huawei Technologies Co., Ltd. - Page 110 View the temperature and humidity control type and setpoints. Overview View cooling output, fan output, humidifying output, and heating output. View cooling capacity, air volume, recommended supply water temperature, cooling load factor. Active Alarm Query active alarms. Issue 07 (2020-03-16) Copyright © Huawei Technologies Co., Ltd.
- Page 111 Set the Modbus network parameters. Set the SNMP network parameters. Maintenance Upgrade the software of the smart cooling product and its sub-components. Query the version and e-labels. Issue 07 (2020-03-16) Copyright © Huawei Technologies Co., Ltd.
- Page 112 User Manual 5 WebUI Menu Functions Query and export fault information. Manage users, for example, adding and deleting a user. Import and export configuration files to configure devices quickly. Issue 07 (2020-03-16) Copyright © Huawei Technologies Co., Ltd.
-
Page 113: System Operation And Maintenance
Pay attention to the safety symbols on the equipment and all safety instructions in this document. The safety precautions given in this document do not cover all safety precautions. Huawei will not be liable for any consequence caused by violation of the safety operation regulations and design, production, and usage standards. -
Page 114: Routine Maintenance Item
□Passed Check that no foreign Clean the foreign Semi-annual matter exists in the fan. matters. □Failed □Passed Check that the fan Repair the fan Semi-annual Issue 07 (2020-03-16) Copyright © Huawei Technologies Co., Ltd. - Page 115 Check that the thermal Rewrap the thermal Semi-annual insulation foam. insulation foam on the □Failed chilled water pipe is intact. □Passed Check that the pipe Secure the base. Semi-annual support is intact and Issue 07 (2020-03-16) Copyright © Huawei Technologies Co., Ltd.
-
Page 116: Alarm References
3. Measure the 3. The ambient ambient temperature. temperature exceeds Check whether other the upper threshold. causes exist if the alarm persists in a 4. The high temperature Issue 07 (2020-03-16) Copyright © Huawei Technologies Co., Ltd. - Page 117 2. Maintain or replace 2. The temperature and the temperature and humidity sensor. humidity sensor is faulty. a007 Return air 2 Major Generates an 1. The cables to the 1. Check the cables to Issue 07 (2020-03-16) Copyright © Huawei Technologies Co., Ltd.
- Page 118 If it occurs in other places, check the power supply cables. a034 Power Major Generates an The power supply Check the power Issue 07 (2020-03-16) Copyright © Huawei Technologies Co., Ltd.
- Page 119 2. The cables to the cooling product sensor. smoke sensor are loose system. or damaged. 2. Check the cables to the smoke sensor. 3. The smoke sensor is faulty. 3. Maintain or replace Issue 07 (2020-03-16) Copyright © Huawei Technologies Co., Ltd.
- Page 120 7. Maintain or replace 7. The chilled water the chilled water valve is stuck or faulty. valve. Issue 07 (2020-03-16) Copyright © Huawei Technologies Co., Ltd.
- Page 121 6. The chilled water 6. Check the pressure flow is insufficient, or and temperature of the supply water Issue 07 (2020-03-16) Copyright © Huawei Technologies Co., Ltd.
- Page 122 PSU. 2. The PSU is faulty. 2. Maintain or replace the PSU. 3. The communications port of the main control 3. Maintain or replace board is faulty. the main control Issue 07 (2020-03-16) Copyright © Huawei Technologies Co., Ltd.
- Page 123 (Optional) Warning Generates an The water pump Maintain or replace Condensate alarm runtime exceeds the the water pump and threshold. pump exceed clear the accumulated runtime alarm runtime. Issue 07 (2020-03-16) Copyright © Huawei Technologies Co., Ltd.
- Page 124 6. The air filters are 6. Maintain or replace blocked. the air filters. 7. The chilled water 7. Maintain or replace valve is stuck or faulty. the chilled water Issue 07 (2020-03-16) Copyright © Huawei Technologies Co., Ltd.
- Page 125 2. Adjust the supply threshold. water high 2. The supply water temperature alarm threshold. high temperature alarm Issue 07 (2020-03-16) Copyright © Huawei Technologies Co., Ltd.
- Page 126 Generates an 1. The water overflow 1. While configuring water overflow alarm and shuts sensor detects water or the water overflow alarm the sensor is faulty. down the smart sensor, check and Issue 07 (2020-03-16) Copyright © Huawei Technologies Co., Ltd.
- Page 127 Cold aisle 1 Major Generates an 1. The cables to the 1. Check the cables to temperature alarm temperature and the temperature and and humidity humidity sensor are Issue 07 (2020-03-16) Copyright © Huawei Technologies Co., Ltd.
- Page 128 2. The number of smart group. mismatch cooling product units is alarm incorrectly set on the 2. Set the total number master unit. of units on the master Issue 07 (2020-03-16) Copyright © Huawei Technologies Co., Ltd.
- Page 129 2. The humidifier float humidifier. has dropped and is 2. Verify that the jammed. humidifier float can float and drop 3. The humidifier float Issue 07 (2020-03-16) Copyright © Huawei Technologies Co., Ltd.
- Page 130 Wizard startup Warning Generates an Wizard startup is in Wait until wizard is in progress alarm progress. startup is complete or clear the Wizard Issue 07 (2020-03-16) Copyright © Huawei Technologies Co., Ltd.
- Page 131 Major temperature to the water alarm is sensor are loose temperature temperatur triggere or damaged. sensor. e sensor fault 2. The temperature 2. Maintain or sensor is faulty. replace the temperature Issue 07 (2020-03-16) Copyright © Huawei Technologies Co., Ltd.
- Page 132 7. The chilled water 7. Maintain or valve is stuck or replace the faulty. chilled water valve. 1. The temperature 1. Adjust the A003-01 Return air Warnin sensors or positions of the alarm is Issue 07 (2020-03-16) Copyright © Huawei Technologies Co., Ltd.
- Page 133 3. Maintain or 3. The temperature replace the and humidity temperature and sensor is faulty. humidity sensor. 4. The 4. Maintain or communications replace the main port of the main control board. Issue 07 (2020-03-16) Copyright © Huawei Technologies Co., Ltd.
- Page 134 2. Set the DIP failed 2. The DIP switch switch of the of the temperature and temperature and humidity sensor humidity sensor correctly. is set incorrectly. 3. Maintain or 3. The temperature replace the Issue 07 (2020-03-16) Copyright © Huawei Technologies Co., Ltd.
- Page 135 2. Set the DIP 2. The DIP switch switch of the Issue 07 (2020-03-16) Copyright © Huawei Technologies Co., Ltd.
- Page 136 3. The temperature replace the and humidity temperature and sensor is faulty. humidity sensor. 4. The 4. Maintain or communications replace the main port of the main control board. control board is faulty. Issue 07 (2020-03-16) Copyright © Huawei Technologies Co., Ltd.
- Page 137 Indoor fan Warnin The accumulated Maintain or replace 3 exceed alarm is runtime of the the indoor fan and Issue 07 (2020-03-16) Copyright © Huawei Technologies Co., Ltd.
- Page 138 Indoor fan Warnin The accumulated Maintain or replace 12 exceed alarm is runtime of the the indoor fan and Issue 07 (2020-03-16) Copyright © Huawei Technologies Co., Ltd.
- Page 139 PSU 2 Major The input power Check the input power alarm is cables of the PSU power cables of the PSU. input triggere are loose or failure damaged. Issue 07 (2020-03-16) Copyright © Huawei Technologies Co., Ltd.
- Page 140 5. The value 4. Adjust the high detected by the temperature temperature alarm threshold. sensor or temperature and 5. Calibrate or humidity sensor replace the Issue 07 (2020-03-16) Copyright © Huawei Technologies Co., Ltd.
- Page 141 6. Maintain or replace the chilled water valve. 1. The temperature 1. Adjust the A050-01 Cold aisle Critical sensors or positions of the high alarm is Issue 07 (2020-03-16) Copyright © Huawei Technologies Co., Ltd.
- Page 142 2. The thermal load 2. Add smart power is high or cooling products the cooling or contact capacity is Huawei technical insufficient. support. 3. The ambient 3. Measure the Issue 07 (2020-03-16) Copyright © Huawei Technologies Co., Ltd.
- Page 143 1. The 1. Check the PSU 2 Major communications communications communic alarm is cables of the cables of the ation triggere Issue 07 (2020-03-16) Copyright © Huawei Technologies Co., Ltd.
- Page 144 2. Check the cables 2. The cables to the to the indoor fan. indoor fan are 3. Maintain or loose or replace the damaged. indoor fan. 3. The indoor fan is Issue 07 (2020-03-16) Copyright © Huawei Technologies Co., Ltd.
- Page 145 2. Check the cables 2. The cables to the to the indoor fan. indoor fan are 3. Maintain or loose or replace the Issue 07 (2020-03-16) Copyright © Huawei Technologies Co., Ltd.
- Page 146 2. The indoor fan is indoor fan. faulty. 1. The cables to the 1. Check the cables Indoor fan Major indoor fan are to the indoor fan. 3 fault alarm is Issue 07 (2020-03-16) Copyright © Huawei Technologies Co., Ltd.
- Page 147 Indoor fan Major indoor fan are to the indoor fan. 10 fault alarm is loose or triggere 2. Maintain or damaged. replace the 2. The indoor fan is indoor fan. faulty. Issue 07 (2020-03-16) Copyright © Huawei Technologies Co., Ltd.
- Page 148 1. The temperature 1. Adjust the A091-01 Cold aisle Warnin sensors or positions of the Issue 07 (2020-03-16) Copyright © Huawei Technologies Co., Ltd.
- Page 149 3. The ambient 2. Measure the temperature is ambient below the lower temperature. threshold. Check whether 4. The low other causes temperature exist if the alarm alarm threshold persists in a long Issue 07 (2020-03-16) Copyright © Huawei Technologies Co., Ltd.
- Page 150 2. Adjust the 2. The temperature position of the and humidity temperature and sensor is not humidity sensor. installed in a 3. Adjust the low proper position. humidity alarm 3. The low threshold. Issue 07 (2020-03-16) Copyright © Huawei Technologies Co., Ltd.
- Page 151 2. The supply water temperature low temperature alarm threshold. alarm threshold 3. Calibrate or is inappropriate. replace the 3. The supply water supply water temperature temperature displayed is sensor. different from Issue 07 (2020-03-16) Copyright © Huawei Technologies Co., Ltd.
- Page 152 4. Rectify the liquid level detection 5. The water pump fault. is blocked. 5. Replace the water pump. A180-01 Humidifie Warnin The accumulated Maintain or replace Issue 07 (2020-03-16) Copyright © Huawei Technologies Co., Ltd.
- Page 153 2. Check the tube tube of the connection to the differential differential pressure sensor pressure sensor. is reversely 3. Maintain or connected. replace the 3. The differential differential pressure sensor pressure sensor. is faulty. Issue 07 (2020-03-16) Copyright © Huawei Technologies Co., Ltd.
- Page 154 3. Enable the this smart sensor that cooling product. corresponds to the temperature and humidity control type for the master unit on this smart Issue 07 (2020-03-16) Copyright © Huawei Technologies Co., Ltd.
- Page 155 2. The chilled water valve is faulty. 2. Maintain or replace the chilled water Issue 07 (2020-03-16) Copyright © Huawei Technologies Co., Ltd.
- Page 156 2. Maintain or 2. The temperature replace the and humidity temperature and Issue 07 (2020-03-16) Copyright © Huawei Technologies Co., Ltd.
- Page 157 2. Maintain or 2. The temperature replace the and humidity temperature and Issue 07 (2020-03-16) Copyright © Huawei Technologies Co., Ltd.
- Page 158 2. Maintain or 2. The temperature replace the and humidity temperature and Issue 07 (2020-03-16) Copyright © Huawei Technologies Co., Ltd.
- Page 159 5. The high liquid is set to 3. Check that the level sensor is shutdo drainpipe is not faulty. Issue 07 (2020-03-16) Copyright © Huawei Technologies Co., Ltd.
- Page 160 1. Check the power A280-01 Power Major supply frequency supply frequency alarm is is below the frequency, and abnormal triggere lower threshold. ensure that it is within the 2. The SPD Issue 07 (2020-03-16) Copyright © Huawei Technologies Co., Ltd.
-
Page 161: Troubleshooting
1. Ensure that the power supply The fan does not module of the fan is module of the fan is inserted to rotate after the faulty or abnormal the subrack. If the fault persists, NetCol5000-C Issue 07 (2020-03-16) Copyright © Huawei Technologies Co., Ltd. - Page 162 NetCol5000-C. humidity set points. 3. The temperature and 4. Check the alarm causes and clear humidity set points are the alarm manually. improper. 4. Alarms, in-cabinet overflow, smoke sensor, and no Issue 07 (2020-03-16) Copyright © Huawei Technologies Co., Ltd.
-
Page 163: Parts Replacement
2. Replace the water pump. 2. The water pump is 3. Restart the water pump blocked. 3. The water pump is sealed by gas. 6.4 Parts Replacement 6.4.1 Replacement Requirements Issue 07 (2020-03-16) Copyright © Huawei Technologies Co., Ltd. -
Page 164: Replacing The Air Filter
Step 2 Rotate the air filter clip and remove the filter, as shown in the following figure. It requires a step ladder to replace air filters for the NetCol5000-C080 smart cooling product. Issue 07 (2020-03-16) Copyright © Huawei Technologies Co., Ltd. -
Page 165: Replacing The Humidifier Pump
Preparations: The device is only maintained from the rear door and is powered off. Before removing the water pump, block the water inlet pipe and drainpipe of the water pump to prevent water overflowing out of the water pan and water pipe. Issue 07 (2020-03-16) Copyright © Huawei Technologies Co., Ltd. - Page 166 Step 5 Install the air filter and close the rear door. Step 6 Choose Maint > Performance Maint from the main menu to access the Performance Maint screen. Then clear the humidifier runtime. ----End Issue 07 (2020-03-16) Copyright © Huawei Technologies Co., Ltd.
-
Page 167: Replacing The Fan
Step 5 Choose Maint > Fan Maintenance on the home screen to locate the SN of the faulty fan, and tap Power On. Step 6 Tap Maint > Performance Maint on the home screen and clear the fan runtime. ----End Issue 07 (2020-03-16) Copyright © Huawei Technologies Co., Ltd. -
Page 168: Replacing The Wet Film Humidifier
After the replacement is complete, properly install the water inlet pipes to the wet film humidifier. Ensure that the water inlet pipes are secured without leakage risks. Step 7 Open the rear door, installation the air filter, and Turn on the AC1 and AC2 switches. Issue 07 (2020-03-16) Copyright © Huawei Technologies Co., Ltd. -
Page 169: Replacing The Differential Pressure Switch
Step 4 Remove the screws from the differential pressure switch cover, and remove the cable. Figure 6-5 Removing a differential pressure switch Issue 07 (2020-03-16) Copyright © Huawei Technologies Co., Ltd. -
Page 170: Replacing The T/H Sensor
Step 2 Open the rear door and remove the air filter. Step 3 Remove the cable terminals from the RS485_IN and RS485_OUT ports on the T/H sensor. Step 4 Pull out the T/H sensor upwards. Issue 07 (2020-03-16) Copyright © Huawei Technologies Co., Ltd. -
Page 171: Replacing The Return Air Temperature Sensor
Temperature sensors can be replaced with power-on. Recommended tools: diagonal pliers, cable tie, Phillips screwdriver Preparation: Maintain from the rear door. Procedure Step 1 Tap Shutdown on the LCD home screen. Issue 07 (2020-03-16) Copyright © Huawei Technologies Co., Ltd. -
Page 172: Replacing The Supply Air Temperature Sensor
A spare temperature sensor of the same model is available and functional. Context Temperature sensors can be replaced with power-on. Recommended tools: diagonal pliers, cable tie, Phillips screwdriver Preparation: Maintain from the front door. Issue 07 (2020-03-16) Copyright © Huawei Technologies Co., Ltd. - Page 173 Step 5 Secure the new supply air temperature sensor cable to the original position using cable ties, and fix the sensor probe using the R-shaped pipe clip. Step 6 Reconnect the waterproof connector to the sensor cable. Step 7 Close and lock the front door. ----End Issue 07 (2020-03-16) Copyright © Huawei Technologies Co., Ltd.
-
Page 174: Replacing The Water Inlet Or Outlet Temperature Sensor
Figure 6-9. Figure 6-9 Position of water inlet or outlet temperature sensor Step 5 Remove the waterproof connector from the sensor cable. Issue 07 (2020-03-16) Copyright © Huawei Technologies Co., Ltd. -
Page 175: Replacing A Rectifier
Step 3 Flip up the rectifier clip, as shown by (1) in Figure 6-10. Step 4 Take out the handle and pull out the rectifier from the subrack, as shown by (2) in Figure 6-10. Issue 07 (2020-03-16) Copyright © Huawei Technologies Co., Ltd. -
Page 176: Replacing The Water Valve Actuator 1
Step 2 Open the rear door, remove the air filter, and switch off general circuit breakers (AC1 and AC2). Step 3 Disconnect the interconnection terminals from the actuator and ensure that the actuator cable is separated from the smart cooling product. Issue 07 (2020-03-16) Copyright © Huawei Technologies Co., Ltd. -
Page 177: Replacing Water Valve Actuator 2
----End 6.4.13 Replacing Water Valve Actuator 2 Context Recommended materials: a new actuator Preparations: The devices can only be maintained from the rear door, and the power is shut down. Issue 07 (2020-03-16) Copyright © Huawei Technologies Co., Ltd. - Page 178 Step 5 Install a new water valve actuator. Use an actuator handle to remove the locating pin from the hole in the new actuator mounting kit. Issue 07 (2020-03-16) Copyright © Huawei Technologies Co., Ltd.
- Page 179 (2) Actuator (3) Connecting plate (4) Actuator handle Connect cord end terminals 1, 2, 3, and 5 to the actuator, secure them using cable ties, and install the circuit breaker cover. Issue 07 (2020-03-16) Copyright © Huawei Technologies Co., Ltd.
-
Page 180: Replacing The Chilled Water Valve
Step 5 Use a torque wrench and a common wrench to remove the adjustable nuts under the valve, and remove the chilled water valve. Issue 07 (2020-03-16) Copyright © Huawei Technologies Co., Ltd. -
Page 181: Replacing The Controller Panel
Step 1 Tap Shutdown on the LCD home screen. Exercise caution because the device is still energized after it is shut down on the LCD. Step 2 Open the front door with caution to prevent damaging the controller cables. Issue 07 (2020-03-16) Copyright © Huawei Technologies Co., Ltd. - Page 182 Step 4.1 Step 4.2. Step 6 Connect the control signal cables to the controller panel. Close and lock the front door. Step 7 Tap Start on the LCD home screen. ----End Issue 07 (2020-03-16) Copyright © Huawei Technologies Co., Ltd.
-
Page 183: Faq
The temperature curve (upper) and the humidity curve (lower) are displayed on the same screen. The abscissa shows time. The temperature set point is the midpoint temperature on the upper ordinate while the humidity set point is the midpoint humidity on the lower ordinate. Issue 07 (2020-03-16) Copyright © Huawei Technologies Co., Ltd. -
Page 184: Querying Logs
Enter the Device Details screen and then enter the menu of a specific component. All parameters for the component are displayed. Issue 07 (2020-03-16) Copyright © Huawei Technologies Co., Ltd. -
Page 185: Querying System Parameters
T/H Sensor, as shown in Figure 7-4. Figure 7-4 T/H Sensor ----End 7.1.4 Querying System Parameters Procedure Choose Common Function > Operating Info on the home screen, the related screen is displayed. Issue 07 (2020-03-16) Copyright © Huawei Technologies Co., Ltd. -
Page 186: Querying Version Details
Procedure Step 1 On the home screen, select About. Step 2 On the About screen, tap Version Info or E-label. Figure 7-7 Figure 7-8 are displayed. Issue 07 (2020-03-16) Copyright © Huawei Technologies Co., Ltd. -
Page 187: How To View Teamwork Control Information
T/H boards. ----End 7.1.6 How to View Teamwork Control Information Procedure Step 1 On the home screen, choose > . The teamwork control information is displayed, as shown in Figure 7-9. Issue 07 (2020-03-16) Copyright © Huawei Technologies Co., Ltd. -
Page 188: How To Silence The Buzzer
Silencing the buzzer: After the buzzer is silenced, it does not buzz when a new alarm is generated. Procedure Step 1 Tap the icon in the status bar and tap Off to silence the buzzer. After the buzzer is silenced, the icon changes to ----End Issue 07 (2020-03-16) Copyright © Huawei Technologies Co., Ltd. -
Page 189: How Can I Handle Active Alarms
ID to view causes of the alarm and methods used to clear the alarm. Step 2 Click each alarm to open the Details page, which contains Name, Generated, Severity, Location, Cause ID, Code, Possible Causes and Procedure for the alarm. Figure 7-11 Details Issue 07 (2020-03-16) Copyright © Huawei Technologies Co., Ltd. -
Page 190: Deleting Historical Alarms
To delete historical alarms, log in as the admin user. Exercise caution when deleting all historical alarms. Because this operation may cause clearance of all historical alarms and affects device maintenance. Issue 07 (2020-03-16) Copyright © Huawei Technologies Co., Ltd. -
Page 191: Deleting Logs
Step 1 On the home screen, choose Maint > Log Maintenance > Delete Logs > Yes to delete all the logs. After logs are deleted, the log deletion operation is recorded in the first log that is displayed. ----End Issue 07 (2020-03-16) Copyright © Huawei Technologies Co., Ltd. -
Page 192: Clearing The Runtime
22° C, the sensor has an error of 2° C, and the calibration value should be set to –2° C. Procedure Step 1 On the home screen, choose Maint > Sensor Calibration. Step 2 Fill the calibration value based on the measured error. ----End Issue 07 (2020-03-16) Copyright © Huawei Technologies Co., Ltd. -
Page 193: Calibrating The Screen
When calibrating the screen by tapping the screen, tap Maint > Screen Calibration, as shown in Figure 7-15. Figure 7-16 is displayed when the screen calibration is complete. Figure 7-15 Screen calibration page Issue 07 (2020-03-16) Copyright © Huawei Technologies Co., Ltd. -
Page 194: How To Modify A Password
You can only modify the password of the current user. Procedure Step 1 On the home screen, choose Settings > User Settings to enter the User Settings screen, as shown in Figure 7-17. Issue 07 (2020-03-16) Copyright © Huawei Technologies Co., Ltd. - Page 195 Step 2 Tap Password to enter the password changing screen, as shown in Figure 7-18. It is recommended that the password should contain at least two types of characters. Figure 7-18 Modifying the password ----End Issue 07 (2020-03-16) Copyright © Huawei Technologies Co., Ltd.
-
Page 196: How To Set Alarm Parameters
Figure 7-19 Setting alarm parameter 1 Step 2 Tap Threshold following Supply air high temperature alarm. Step 3 Set the value to 45 and tap , as shown in Figure 7-20. Issue 07 (2020-03-16) Copyright © Huawei Technologies Co., Ltd. -
Page 197: How To Commission Single Component
The system automatically exits diagnostic mode when it reaches the maximum diagnostic mode duration. Step 2 Set Indoor fan to 50%. For safe system operation, when smart cooling product components are turned on, the following coupling relationships are presented: Issue 07 (2020-03-16) Copyright © Huawei Technologies Co., Ltd. -
Page 198: Restoring Factory Settings
7.1.17 Restoring Factory Settings Context If you have forgotten the password or need to restore factory settings, you can restore factory settings by pressing the SW key on the main control board. Issue 07 (2020-03-16) Copyright © Huawei Technologies Co., Ltd. - Page 199 To continue restoring factory settings, tap Yes, go on the next step. Otherwise, tap No. If you do not confirm the operation within 30s, the dialog box disappears, and the process of restoring factory settings is terminated. Issue 07 (2020-03-16) Copyright © Huawei Technologies Co., Ltd.
- Page 200 After the system is restored to factory settings, the user password is also reset to the preset password, and must be promptly modified to ensure information security and normal system running. ----End Issue 07 (2020-03-16) Copyright © Huawei Technologies Co., Ltd.
-
Page 201: Which Parameters Are Restored To Default Values After Default Settings Are Operated
If the USB flash drive is not properly connected, the system will display No USB device found. during operations about the USB flash drive. Issue 07 (2020-03-16) Copyright © Huawei Technologies Co., Ltd. - Page 202 Click Finish. Figure 7-26 Screen showing that data export has succeeded Step 4 Click Maint > USB Operations > Remove USB to remove the USB flash drive in safe mode. ----End Issue 07 (2020-03-16) Copyright © Huawei Technologies Co., Ltd.
-
Page 203: How To Export And Import A Configuration File
Step 2 Tap the file where the user saves current data in the Select Path dialog box and tap Next. Then tap Confirm in the displayed dialog box. Step 3 After the data is successfully exported, Figure 7-28 is displayed. Click Finish. Issue 07 (2020-03-16) Copyright © Huawei Technologies Co., Ltd. - Page 204 Step 5 Tap Maint > USB Operations > Import Config on the screen of smart cooling product 2, as shown in Figure 7-29. Figure 7-29 Select file Step 6 Select the file that needs to be imported and tap Next, as shown in Figure 7-30. Issue 07 (2020-03-16) Copyright © Huawei Technologies Co., Ltd.
- Page 205 NetCol5000-C(065, 080) In-row Chilled Water Smart Cooling Product User Manual 7 FAQ Figure 7-30 Confirming the file Step 7 After you tap Confirm and Next, Figure 7-31 Figure 7-32 are displayed. Figure 7-31 Data process 1 Issue 07 (2020-03-16) Copyright © Huawei Technologies Co., Ltd.
-
Page 206: How To Import A Certificate And A Key
You have obtained CA certificate file, local certificate file, and key file into a USB disk that is connected to the USB port located on the side of the screen and has been recognized. Issue 07 (2020-03-16) Copyright © Huawei Technologies Co., Ltd. -
Page 207: Correlation Relationship Of Parameters
If files fail to be imported, the message indicating the cause for failure will be displayed. Rectify the fault according to the message and import files again. ----End 7.1.22 Correlation Relationship of Parameters When setting parameters, pay attention to the following relationships. Issue 07 (2020-03-16) Copyright © Huawei Technologies Co., Ltd. - Page 208 When Indoor fan control type is not set to Pressure diff ctrl, Air-side difference pressure sensor type can not be set to 0~500Pa. Parameters of System Control Cooling start temperature demand > Cooling stop temperature demand Issue 07 (2020-03-16) Copyright © Huawei Technologies Co., Ltd.
-
Page 209: Webui Operations
Log in to the WebUI as an administrator. Choose Maintenance > User Management. The user management page is displayed. Choose the admin user and click Modify. Reset the login password on the displayed page and tap Confirm. Issue 07 (2020-03-16) Copyright © Huawei Technologies Co., Ltd. - Page 210 NetCol5000-C(065, 080) In-row Chilled Water Smart Cooling Product User Manual 7 FAQ Figure 7-35 Changing the login password Input the Login password, and click Submit. Figure 7-36 Recertification Step 2 Add a WebUI user. Issue 07 (2020-03-16) Copyright © Huawei Technologies Co., Ltd.
-
Page 211: How To Install A Network Security Certificate
If the network security certificate is encrypted, select If an encrypted private key is imported, enter the password for decryption, and specify Key cryptography and Confirm key cryptography. Click Submit in the Network Security Certificate area. ----End Issue 07 (2020-03-16) Copyright © Huawei Technologies Co., Ltd. -
Page 212: How Can I View Active Alarms And Historical Alarms
Choose Maintenance > Configuration File. Specify Configuration File Decryption Password. Click Browse on the right of Import a new configuration file. Select the configuration file to be imported, and click Upload. ----End Issue 07 (2020-03-16) Copyright © Huawei Technologies Co., Ltd. -
Page 213: How Can I Export Fault Information
Step 4 In the displayed The WebUI will exit or not respond after the new IP address is set. You need to log in again with the new IP address. Do you want to change the IP address? dialog box, click OK. ----End Issue 07 (2020-03-16) Copyright © Huawei Technologies Co., Ltd. -
Page 214: How Can I View Version Information
Step 3 Choose Maintenance > Version Information and view the version information, software version, and BSP version. ----End Issue 07 (2020-03-16) Copyright © Huawei Technologies Co., Ltd. -
Page 215: A Glycol Adding Requirements
–20° C to –15° C –25° C –25° C to –20° C –30° C –30° C to –25° C –35° C –35° C to –30° C –40° C –40° C to –35° C –45° C Issue 07 (2020-03-16) Copyright © Huawei Technologies Co., Ltd. -
Page 216: B Acronyms And Abbreviations
B Acronyms and Abbreviations Acronyms and Abbreviations Controller Area Network Computational Fluid Dynamics Electronic Commutation fast Ethernet Negative Temperature Coefficient Proportional, Integral, and Derivative Power Supply Unit RCCB Residual Current Circuit Breaker Simple Configuration Issue 07 (2020-03-16) Copyright © Huawei Technologies Co., Ltd. -
Page 217: C Base Dimensions
NetCol5000-C(065, 080) In-row Chilled Water Smart Cooling Product User Manual C Base Dimensions Base Dimensions Figure C-1 Base Dimensions (unit: mm) Issue 07 (2020-03-16) Copyright © Huawei Technologies Co., Ltd.