Huawei NetCol8000-C070 User Manual
In-room chilled water smart cooling product
Hide thumbs
Also See for NetCol8000-C070:
- User manual (254 pages) ,
- Quick manual (32 pages) ,
- Quick manual (22 pages)

Related Manuals for Huawei NetCol8000-C070


Summary of Contents for Huawei NetCol8000-C070
- Page 1 NetCol8000-C(070, 130, 190) In-room Chilled Water Smart Cooling Product User Manual Issue Date 2020-08-30 HUAWEI TECHNOLOGIES CO., LTD.
- Page 2 Notice The purchased products, services and features are stipulated by the contract made between Huawei and the customer. All or part of the products, services and features described in this document may not be within the purchase scope or the usage scope. Unless otherwise specified in the contract, all statements, information, and recommendations in this document are provided "AS IS"...
-
Page 3: About This Document
System engineers ● Hardware installation personnel ● Commissioning engineers ● Data configuration engineers ● Maintenance personnel Symbol Conventions The symbols that may be found in this document are defined as follows. Issue 02 (2020-08-30) Copyright © Huawei Technologies Co., Ltd. - Page 4 Changes between document issues are cumulative. The latest document issue contains all the changes made in earlier issues. Issue 02 (2020-08-30) Updated the installation of the cap and downflow fan. Issue 01 (2020-03-03) This issue is the first official release. Issue 02 (2020-08-30) Copyright © Huawei Technologies Co., Ltd.
-
Page 5: Table Of Contents
3.1.3.4 Pipe Support Preparations............................32 3.1.3.5 Cables....................................33 3.2 System Layout Diagram..............................36 3.2.1 Upflow....................................36 3.2.2 Downflow..................................... 37 3.3 Transportation and Unpacking............................38 3.3.1 Removing the Packing..............................38 3.3.2 Checking Fittings................................38 Issue 02 (2020-08-30) Copyright © Huawei Technologies Co., Ltd. - Page 6 3.6.11 (Optional) Installing a Cap (Applicable to Upflow Units)................72 3.7 Installation Verification...............................75 4 Commissioning........................78 4.1 Preparing for Power-On..............................78 4.2 Power-On....................................78 4.3 Home Screen..................................85 4.4 Menu Structure..................................87 4.5 Initial Configuration................................88 Issue 02 (2020-08-30) Copyright © Huawei Technologies Co., Ltd.
- Page 7 6.7.8 Replacing the Electric Heater............................. 176 6.7.8.1 Replacing the Electric Heater (Upflow)....................... 176 6.7.8.2 Replacing the Electric Heater (Downflow)......................178 6.7.9 Replacing inlet solenoid valve............................ 180 6.7.10 Replacing the LCD................................ 180 Issue 02 (2020-08-30) Copyright © Huawei Technologies Co., Ltd.
- Page 8 7.2.6 How Can I Change the Smart Cooling Product IP Address on the WebUI?..........202 7.2.7 How Can I View Version Information?........................203 A Glycol Adding Requirements....................204 B Base Dimensions......................... 205 C Electrical Conceptual Diagram..................209 D Parameter Description...................... 211 E Acronyms and Abbreviations....................227 Issue 02 (2020-08-30) Copyright © Huawei Technologies Co., Ltd.
-
Page 9: Safety Information
The "NOTICE", "CAUTION", "WARNING", and "DANGER" statements in this document do not cover all the safety instructions. They are only supplements to the safety instructions. Huawei will not be liable for any consequence caused by the violation of general safety requirements or design, production, and usage safety standards. - Page 10 ● Keep irrelevant people away from the equipment. Only operators are allowed to access the equipment. ● Use insulated tools or tools with insulated handles, as shown in the following figure. Issue 02 (2020-08-30) Copyright © Huawei Technologies Co., Ltd.
- Page 11 If there is a probability of personal injury or equipment damage during operations on the equipment, immediately stop the operations, report the case to the supervisor, and take feasible protective measures. Issue 02 (2020-08-30) Copyright © Huawei Technologies Co., Ltd.
-
Page 12: Personnel Requirements
Do not power on the equipment before it is installed or confirmed by professionals. 1.2 Personnel Requirements ● Personnel who plan to install or maintain Huawei equipment must receive thorough training, understand all necessary safety precautions, and be able to correctly perform all operations. ●... - Page 13 24 hours before they are laid out. ● Do not perform any improper operations, for example, dropping cables directly from a vehicle. ● When selecting, connecting, and routing cables, follow local safety regulations and rules. Issue 02 (2020-08-30) Copyright © Huawei Technologies Co., Ltd.
-
Page 14: Installation Environment Requirements
If any liquid is detected inside the equipment, immediately disconnect the power supply and contact the administrator. ● Do not expose the equipment to flammable or explosive gas or smoke. Do not perform any operation on the equipment in such environments. Issue 02 (2020-08-30) Copyright © Huawei Technologies Co., Ltd. -
Page 15: Mechanical Safety
Personnel who fail to stop violations will be forbidden from working. 1.5 Mechanical Safety Hoisting Devices ● Do not walk under hoisted objects. ● Only trained and qualified personnel should perform hoisting operations. Issue 02 (2020-08-30) Copyright © Huawei Technologies Co., Ltd. - Page 16 Ensure that the wider end of the ladder is at the bottom, or protective measures have been taken at the bottom to prevent the ladder from sliding. Issue 02 (2020-08-30) Copyright © Huawei Technologies Co., Ltd.
- Page 17 D ANGER When removing a heavy or unstable component from a cabinet, be aware of unstable or heavy objects on the cabinet. ● Be cautious to avoid injury when moving heavy objects. Issue 02 (2020-08-30) Copyright © Huawei Technologies Co., Ltd.
-
Page 18: Cooling System Safety
● When maintaining or replacing components, pay attention to high-pressure components (such as the compressor and refrigerant pipe) to prevent the refrigerant system from being cracked or exploded due to misoperations. Issue 02 (2020-08-30) Copyright © Huawei Technologies Co., Ltd. -
Page 19: Others
The dealer can help you recycle devices in a safe and environment-friendly way. 1.7 Others Exercise caution when shutting down the smart cooling product. Doing so may cause equipment and room overheating, which will damage the equipment. Issue 02 (2020-08-30) Copyright © Huawei Technologies Co., Ltd. -
Page 20: Product Overview
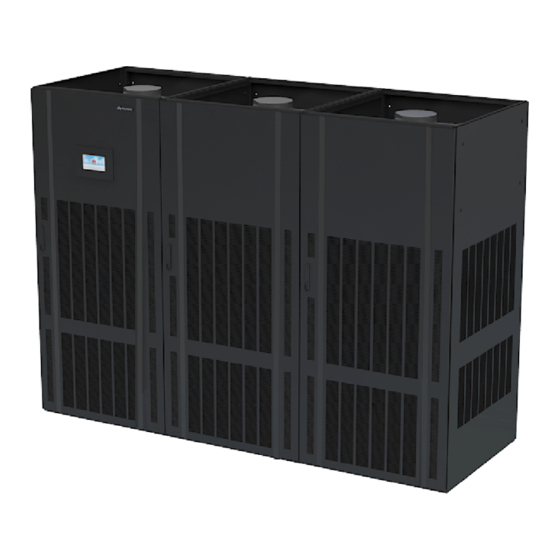
Product Overview 2.1 Model Description Figure 2-1 Naming conventions 2.2 Appearance and Components Appearance The NetCol8000-C has three models: single-door, dual-door, and three-door. The following figures show the appearance of the NetCol8000-C. Issue 02 (2020-08-30) Copyright © Huawei Technologies Co., Ltd. - Page 21 NetCol8000-C(070, 130, 190) In-room Chilled Water Smart Cooling Product User Manual 2 Product Overview Figure 2-2 NetCol8000-C (upflow) Issue 02 (2020-08-30) Copyright © Huawei Technologies Co., Ltd.
- Page 22 NetCol8000-C(070, 130, 190) In-room Chilled Water Smart Cooling Product User Manual 2 Product Overview Figure 2-3 NetCol8000-C (downflow) Issue 02 (2020-08-30) Copyright © Huawei Technologies Co., Ltd.
- Page 23 NO TE The figure uses the NetCol8000-C070U as an example. The preceding figure can be used as a reference for the component structure of the NetCol8000-C130U and NetCol8000-C190U. Issue 02 (2020-08-30) Copyright © Huawei Technologies Co., Ltd.
- Page 24 (4) Heat exchanger (5) Main control module (6) Power module (7) Connection box (8) Humidifier water inlet pipe (9) Drainpipe (10) Water supply and return (11) Water valve actuator (12) Fan pipes Issue 02 (2020-08-30) Copyright © Huawei Technologies Co., Ltd.
- Page 25 (4) Heat exchanger (5) Main control module (6) Power module (7) Connection box (8) Humidifier water inlet pipe (9) Drainpipe (10) Water supply and return (11) Water valve actuator (12) Fan pipes Issue 02 (2020-08-30) Copyright © Huawei Technologies Co., Ltd.
- Page 26 (PID) control with precise adjustment and accurate control. ● EC fan – The EC fan uses a high-end brand and provides high reliability and long service life. Issue 02 (2020-08-30) Copyright © Huawei Technologies Co., Ltd.
- Page 27 The air supply volume is also sufficient, which helps eliminate hotspots and improves reliability. ● Differential pressure switch When the air filter is dirty or blocked, the differential pressure switch triggers an alarm, prompting for air filter replacement. Issue 02 (2020-08-30) Copyright © Huawei Technologies Co., Ltd.
-
Page 28: Controller
Buzzer The device is operating properly, Green Silent or a warning alarm occurs. The buzzer keeps buzzing if a Yellow Beeping intermittently major alarm is not confirmed after the alarm generation. Issue 02 (2020-08-30) Copyright © Huawei Technologies Co., Ltd. - Page 29 ● You can monitor, manage, and upgrade one or more smart cooling products using the remote management software provided by Huawei. ● At least 1500 historical alarms can be stored.
-
Page 30: Monitoring System
SNMP for real-time data collection and alarm reporting. Smart cooling products can be networked over the CAN bus to realize teamwork control, energy conservation, and service life extension. 2.5 Operating Conditions Issue 02 (2020-08-30) Copyright © Huawei Technologies Co., Ltd. - Page 31 If a leakage circuit breaker is required by the customer or local regulations, select the residual current circuit breaker (RCCB) that is insensitive to single-phase DC pulsation and transient impulse current. Issue 02 (2020-08-30) Copyright © Huawei Technologies Co., Ltd.
-
Page 32: Technical Specifications
NetCol8000- NetCol8000- NetCol8000- C070D C130D C190D Power system 380–415V AC, 3PH, 50/60Hz Dual route Cooling capacity 60.1 118.8 182.9 (kW) Maximum 7.3A/16.5A 14A/32.3A 20.7A/39A current (cooling only/full configuration) Number of fans Issue 02 (2020-08-30) Copyright © Huawei Technologies Co., Ltd. - Page 33 310 kg (326 kg) 580 kg (608 kg) 810 kg (838 kg) (cooling only/full configuration) 1: Test conditions: inlet/outlet water temperature: 7°C/12°C; return air dry/wet bulb temperature: 24°C/17°C; static pressure: 0 Pa. Issue 02 (2020-08-30) Copyright © Huawei Technologies Co., Ltd.
-
Page 34: Installation Guide
● To ensure good ventilation, do not place the smart cooling product in the corner of a room or at the end of a long and narrow room. Issue 02 (2020-08-30) Copyright © Huawei Technologies Co., Ltd. - Page 35 ● L indicates the front maintenance distance, and the minimum L is 900 mm. If this requirement cannot be met, the minimum L after front doors are removed can be 800 Issue 02 (2020-08-30) Copyright © Huawei Technologies Co., Ltd.
- Page 36 ● L indicates the front maintenance distance, and the minimum L is 900 mm. If this requirement cannot be met, the minimum L after front doors are removed can be 800 Figure 3-3 Layout of side pipe routing (1) NetCol8000-C Issue 02 (2020-08-30) Copyright © Huawei Technologies Co., Ltd.
-
Page 37: Tools
Socket wrench (13 Pipe wrench Electrostatic Wire stripper mm/15 mm) (18#) discharge (ESD) gloves Needle-nose Diagonal pliers Combination Torch pliers pliers Measuring tape Step ladder Polyvinyl chloride Claw hammer (PVC) insulation tape Issue 02 (2020-08-30) Copyright © Huawei Technologies Co., Ltd. - Page 38 ● Maximum seal gap is less than 0.5 mm. ● The maximum pressure is greater than 1.6 MPa. engineering mechanical the anaerobic adhesive ● Conforms to JB∕T7311-2008 application technology specification profession standard. Issue 02 (2020-08-30) Copyright © Huawei Technologies Co., Ltd.
-
Page 39: Material Preparations
● Optional: materials that can be purchased from Huawei or any other vendor (if you have ordered the materials from Huawei, you do not need to purchase them elsewhere). For details about the specifications of such materials to be purchased, see the following sections. -
Page 40: Chilled Water Inlet And Outlet Pipes
(1) G 2-in, connected over screw threads (2) DN50 seamless steel pipe with an external (reserved device port) threaded connector (engineering purchase) 3.1.3.4 Pipe Support Preparations Figure 3-7 shows a pipe support. The supports used onsite prevails. Issue 02 (2020-08-30) Copyright © Huawei Technologies Co., Ltd. -
Page 41: Cables
● The cable flame spread rating must be at least VB. ● Select power cables with appropriate diameters based on the maximum working currents. When connecting cables, fit them with protective hoses. Issue 02 (2020-08-30) Copyright © Huawei Technologies Co., Ltd. - Page 42 NetCol8000-C(070, 130, 190) In-room Chilled Water Smart Cooling Product User Manual 3 Installation Guide Table 3-5 Description about the cables of the NetCol8000-C070 Application Name Technical Remarks Scenario Requirements Indoor unit Power cable Electrical power The length is (without cable, 600 V/1000 V,...
- Page 43 Cut it off and wrap it securely using insulation tape onsite. OT terminal of Naked crimping terminal: Delivered with the power cables fittings OT, 6 mm , M6, 50 A, tin plating, 12–10 AWG Issue 02 (2020-08-30) Copyright © Huawei Technologies Co., Ltd.
-
Page 44: System Layout Diagram
MP8-II, CC4P0.5GY(S), configuration) MP8-II, FTP 3.2 System Layout Diagram 3.2.1 Upflow Figure 3-8 System layout diagram (A) Chilled water supply port (B) Chilled water return (1) Balance valve or isolation port valve Issue 02 (2020-08-30) Copyright © Huawei Technologies Co., Ltd. -
Page 45: Downflow
● A water filter with 20 meshes and pressure resistance of 1.6 MPa or higher is recommended onsite. Pressure resistance of the water filter is determined by site requirements. Install the water filter on the external water inlet pipe near the smart cooling product. Issue 02 (2020-08-30) Copyright © Huawei Technologies Co., Ltd. -
Page 46: Transportation And Unpacking
● Check fitting kinds and quantities according to the fitting list. If any problem is founded, connect Huawei technical support. 3.4 Installing the Equipment 3.4.1 Checking the Nitrogen Pressure Context The device has been injected with 0.2–0.6 MPa Nitrogen before delivery. - Page 47 – You can open or close the exhaust valve using a flat-head screwdriver. ● If no, rotate the exhaust valve counterclockwise. If air flows out, the system is normal. If no air flows out, contact Huawei technical support. Figure 3-10 Upflow needle valve (1) Exhaust valve...
-
Page 48: Exhausting Nitrogen
(Remove the bonnet from the needle valve and press the valve plug to check whether there is a sound of air flow.) ● Open the exhaust valve of each heat exchanger to exhaust nitrogen onsite. Issue 02 (2020-08-30) Copyright © Huawei Technologies Co., Ltd. - Page 49 3 Installation Guide Context D ANGER Before connecting chilled water pipes, exhaust nitrogen used for avoiding injury. Figure 3-12 Upflow exhaust valve (1) Exhaust valve Figure 3-13 Downflow exhaust valve (1) Exhaust valve Issue 02 (2020-08-30) Copyright © Huawei Technologies Co., Ltd.
-
Page 50: Removing The Pallet
Secure the base to the ground using six M12 expansion bolts. Move the cabinet onto the base. Secure the cabinet to the base using six bolts. Install a shock pad between the base and the cabinet. Issue 02 (2020-08-30) Copyright © Huawei Technologies Co., Ltd. -
Page 51: Lowering A Fan (Applicable To Downflow Units)
Procedure Step 1 Open the front door. Step 2 Remove the screws of the fan maintenance baffle plate by using a Phillips screwdriver, and remove the fan maintenance baffle plate. Issue 02 (2020-08-30) Copyright © Huawei Technologies Co., Ltd. - Page 52 D ANGER At least two people are required to rotate the fan. Issue 02 (2020-08-30) Copyright © Huawei Technologies Co., Ltd.
-
Page 53: Connecting Pipelines
Connect the fan signal cable and power cable to the interconnection port reserved on the fan panel, and bind the cables. Figure 3-19 Securing the fan ----End 3.5 Connecting Pipelines Issue 02 (2020-08-30) Copyright © Huawei Technologies Co., Ltd. -
Page 54: Cabinet Hole Positions
(4) Humidifier water (5) Chilled water (6) Mains power cable inlet pipe hole return pipe hole hole (7) Standby power cable hole 3.5.1.2 Holes at the Bottom of a Downflow Unit Issue 02 (2020-08-30) Copyright © Huawei Technologies Co., Ltd. -
Page 55: Connecting The Chilled Water Pipe
(7) Standby power cable hole (8) Mains power cable hole 3.5.2 Connecting the Chilled Water Pipe Context CA UTION Before installing the pipe, release all nitrogen from the pipe to avoid personal injury. Issue 02 (2020-08-30) Copyright © Huawei Technologies Co., Ltd. -
Page 56: Upflow
Unit Model Chilled Water Supply Chilled Water Return Pipe Outer Port Pipe Outer Port Diameter Diameter NetCol8000-C G 2in, connected over G 2in, connected over screw threads screw threads 3.5.2.1 Upflow Issue 02 (2020-08-30) Copyright © Huawei Technologies Co., Ltd. - Page 57 (2) in Figure 3-24. Step 4 Connect the water pipe by using a 75# open-end wrench and an 18# pipe wrench, as shown by (3) in Figure 3-24. Figure 3-24 Connecting pipes Issue 02 (2020-08-30) Copyright © Huawei Technologies Co., Ltd.
-
Page 58: Downflow
Step 4 Use a 75# open-end wrench and 18# pipe wrench to fix the pipe, as shown by (4) Figure 3-25. Step 5 Install the pipe baffle plate at the bottom of the cabinet, and wrap the pipe with thermal insulation foam, as shown by (5) in Figure 3-25. Issue 02 (2020-08-30) Copyright © Huawei Technologies Co., Ltd. -
Page 59: Connecting Water Pipes
● The drainpipe must have gradients (1:100 is recommended), but no trap is allowed. ● The entire drainpipe should be closely wrapped with thermal insulation foam. Figure 3-26 Connecting the upflow drainpipe (1) Drainpipe Issue 02 (2020-08-30) Copyright © Huawei Technologies Co., Ltd. -
Page 60: Optional) Connecting The Water Inlet Pipe For The Wet Film Humidifier
Onsite connection: Connect a pipe with a G 1/2 in. port and inner threads to the port reserved in the device. A stop valve needs to be installed at the water Issue 02 (2020-08-30) Copyright © Huawei Technologies Co., Ltd. -
Page 61: Optional) Leakage Test With Nitrogen
Step 3 Connect the reducing valve and nitrogen cylinder to the following needle valve, inject 0.8 MPa (when the pressure is stable) nitrogen, and leave them for 24 hours. Figure 3-29 Upflow Issue 02 (2020-08-30) Copyright © Huawei Technologies Co., Ltd. -
Page 62: Leakage Test With Water
Step 2 Verify that the chilled water valve is open (100%). If not, press the button on the side of the actuator, and manually rotate the valve handle to the maximum. Issue 02 (2020-08-30) Copyright © Huawei Technologies Co., Ltd. -
Page 63: Cable Connections
3.6.1 Precautions ● Connections of all power cables, control cables, and ground cables must comply with the local electrical code, and the cable specifications should comply with the local cabling specifications. Issue 02 (2020-08-30) Copyright © Huawei Technologies Co., Ltd. -
Page 64: Positions Of Electric Ports
(9) Electric heater switch (10) Fan switch QF4 (11) SPD and voltage detection board FV1 NO TE a: The NetCol8000-C070U unit does not have the terminal of the electric heater contactor (KM5). Issue 02 (2020-08-30) Copyright © Huawei Technologies Co., Ltd. - Page 65 (8) Intermediate relay KM3 (9) Electric heater contactor KM1/KM2 switch QF3 (10) Electric heater contactor KM4/ NO TE a: The NetCol8000-C070D unit does not have the terminal of the electric heater contactor (KM5). Issue 02 (2020-08-30) Copyright © Huawei Technologies Co., Ltd.
-
Page 66: Connecting Power Cables
Procedure Step 1 A ground cable must be routed from the equipotential bonding point of the cabinet to the ground. The following figure shows the equipotential bonding point of the cabinet. Issue 02 (2020-08-30) Copyright © Huawei Technologies Co., Ltd. - Page 67 Step 2 Connect wiring terminals of the L1, L2, and L3 wire of the input power cable respectively to the corresponding terminals of the external power cable. Step 3 Connect the PE cable to the cabinet ground screw, as shown in the following figure. ● Upflow Issue 02 (2020-08-30) Copyright © Huawei Technologies Co., Ltd.
-
Page 68: Connecting Signal Cables
Figure 3-37 Cabling for upflow units with dual power supplies ● Downflow Figure 3-38 Cabling for downflow units with dual power supplies ----End 3.6.4 Connecting Signal Cables Prerequisites CA UTION Before connecting signal cables, take effective ESD protection measures. Issue 02 (2020-08-30) Copyright © Huawei Technologies Co., Ltd. - Page 69 GND of the fresh Motorized air damper air filter (GND) Common alarm Differential pressure Return air damper/ switch NTC2Z+ of the Motorized air damper (24 fresh air filter V DC) Issue 02 (2020-08-30) Copyright © Huawei Technologies Co., Ltd.
-
Page 70: Teamwork Networking And Monitoring
The device is in the state of shutdown. Alarm Steady on A major or critical indicator alarm is generated. No alarm, warning alarm, or minor alarm is generated. Issue 02 (2020-08-30) Copyright © Huawei Technologies Co., Ltd. -
Page 71: Connecting The Teamwork Network Cable
When monitoring smart cooling products over northbound RS485, the EMS needs 3 seconds to collect data from one smart cooling product. Therefore, the time required for collecting data from N smart cooling products in a group is 3 x N. If Issue 02 (2020-08-30) Copyright © Huawei Technologies Co., Ltd. - Page 72 In CAN networking and grouping, connect the COM/FE port on the last smart cooling product in each monitoring group to the monitoring device, as shown Figure 3-45. After powering on the device, set the RS485 monitoring Issue 02 (2020-08-30) Copyright © Huawei Technologies Co., Ltd.
- Page 73 Figure 3-46 Connecting the FE monitoring network cable NO TE This wiring method applies to the smart module scenarios or other scenarios with LAN switches regardless of teamwork networking. ----End Issue 02 (2020-08-30) Copyright © Huawei Technologies Co., Ltd.
-
Page 74: Optional) Connecting The Gravity Damper (Applicable To Upflow Units)
Procedure Step 1 Connect the T/H sensors outside the cabinet and the T/H sensors at the return air side in series. Issue 02 (2020-08-30) Copyright © Huawei Technologies Co., Ltd. - Page 75 ● The T/H sensors should be 1.5 m above the ground (33 U). ● Each smart cooling product supports a maximum of three T/H sensors in the cold and hot aisles respectively. Issue 02 (2020-08-30) Copyright © Huawei Technologies Co., Ltd.
-
Page 76: Optional) Connecting The Direct Free-Cooling Plenum
NO TICE ● The default addresses of T/H sensors purchased from Huawei are 1. ● After the addresses are set, power on the device. On the LCD home screen, choose Settings > System Settings > T/H Sensor, and set the sensors in the aisles corresponding to the addresses to Enable. -
Page 77: Optional) Connecting A Differential Pressure Sensor
Step 2 Connect the longer PU hose to the port without the Lo (-) silk screen under the differential pressure sensor, and route the hose through the top of the cabinet to Issue 02 (2020-08-30) Copyright © Huawei Technologies Co., Ltd. -
Page 78: Optional) Connecting A Downflow Differential Pressure Sensor
If a blocked damper is configured, route the pressure tube through the hole reserved in the damper enclosure frame, and bind the pressure tube to the cable bridge inside the damper enclosure frame. Issue 02 (2020-08-30) Copyright © Huawei Technologies Co., Ltd. - Page 79 For details about securing the PU hose, refer to the binding requirements in Step 2), as shown by (2) in Figure 3-52. Issue 02 (2020-08-30) Copyright © Huawei Technologies Co., Ltd.
-
Page 80: Optional) Installing A Cap (Applicable To Upflow Units)
● Before installing the cap, reserve space on the top of the upflow unit. The height of the reserved space must be greater than that of the cap. Issue 02 (2020-08-30) Copyright © Huawei Technologies Co., Ltd. - Page 81 Step 1 Remove the cap front panel using a Phillips screwdriver. Place the cap on the top of the cabinet. NO TICE It takes two persons to install the cap using a 2 m step ladder. Issue 02 (2020-08-30) Copyright © Huawei Technologies Co., Ltd.
- Page 82 ● During the installation, grasp the panel frame instead of the blade to move the panel to avoid blade deformation. ● The cap should be well sealed to the smart cooling product to ensure good sealing performance in-between. Issue 02 (2020-08-30) Copyright © Huawei Technologies Co., Ltd.
-
Page 83: Installation Verification
The foreign matter inside the water pan is □Passed □Failed cleaned up. (Optional) The water inlet solenoid valve is secured. □Passed □Failed Wet film The wet film humidifier is secured reliably □Passed □Failed humidifier and steadily. Issue 02 (2020-08-30) Copyright © Huawei Technologies Co., Ltd. - Page 84 The prainpipe has appropriate gradients □Passed □Failed (1:100 is recommended). Cable The power voltage is the same as the rated □Passed □Failed connections voltage on the nameplate of the unit. Issue 02 (2020-08-30) Copyright © Huawei Technologies Co., Ltd.
- Page 85 The actuator is reliably and securely □Passed □Failed connected. The T/H sensor is secured reliably and □Passed □Failed steadily as required. The differential pressure tube is reliably □Passed □Failed secured without blockage or bend. Issue 02 (2020-08-30) Copyright © Huawei Technologies Co., Ltd.
-
Page 86: Commissioning
Step 9 Turn on the general switch. For a device that has two power inputs, turn on the active power switch QF1 and standby power switch QF2. ----End 4.2 Power-On Issue 02 (2020-08-30) Copyright © Huawei Technologies Co., Ltd. - Page 87 Preset Password Permission Description admin 000001 People can operate all menus. (administrator user) operator (common 000001 People can only view parameter user) settings and set a part of parameters in the menus. Issue 02 (2020-08-30) Copyright © Huawei Technologies Co., Ltd.
- Page 88 Confirm with Huawei before modifying parameters that cannot be modified by operator users; otherwise, Huawei will not be liable for any consequences of the unauthorized modification. ● Only certified pros are allowed to modify the advanced parameters.
- Page 89 CAN bus, MAC_CAN consistent with the actual network teamwork control networking mode. over an FE port. Otherwise, the teamwork control function will be unavailable. Issue 02 (2020-08-30) Copyright © Huawei Technologies Co., Ltd.
- Page 90 If Dehumid & low-temp heat is selected, the electric heater starts heating when the dehumidification and heating condition or the low temperature heating condition is met. Issue 02 (2020-08-30) Copyright © Huawei Technologies Co., Ltd.
- Page 91 Floor Based on site, set the Retain the default value. water device action to overflow Shutdow, Inactivity, alarm Only indoor fan action running, or Humidification stopped after the floor overflows. Issue 02 (2020-08-30) Copyright © Huawei Technologies Co., Ltd.
- Page 92 Set this parameter as setpoint and humidity control type required. and the humidity value 40%–60% RH under this type are set, recommended the device conducts humidifying or dehumidifying based on the settings. Issue 02 (2020-08-30) Copyright © Huawei Technologies Co., Ltd.
-
Page 93: Home Screen
Running, Alarms and Settings. The controller main screen is shown in Figure 4-3. NO TICE User interfaces displayed in this document are for reference only. Issue 02 (2020-08-30) Copyright © Huawei Technologies Co., Ltd. - Page 94 (silenced). After the buzzer is silenced, it does not buzz when an alarm is generated. The current critical refers to the current critical alarm and alarm and their their quantity. quantity Issue 02 (2020-08-30) Copyright © Huawei Technologies Co., Ltd.
-
Page 95: Menu Structure
● T/H Curve Indicates curves for recent (time optional) temperature and humidity changes. ● Teamwork Sets and checks teamwork control information based on the requirements of the smart cooling product. Issue 02 (2020-08-30) Copyright © Huawei Technologies Co., Ltd. -
Page 96: Initial Configuration
This section describes how to enable Cold aisle sensor 1. Procedure Step 1 On the home screen, choose Settings > System Settings > T/H sensor. Step 2 Set Return air sensor 2 to Enable. Issue 02 (2020-08-30) Copyright © Huawei Technologies Co., Ltd. - Page 97 ● Min value: Select Min value if the temperature is to be controlled based on the minimum data value collected by the collector. Issue 02 (2020-08-30) Copyright © Huawei Technologies Co., Ltd.
-
Page 98: Optional) Setting The Pressure Difference Control
Indoor fan control type Sets the control type for Normally, retain R/S air the indoor fan. temp diff rate ctrl. If the differential pressure sensors are configured, change to Pressure diff ctrl. Issue 02 (2020-08-30) Copyright © Huawei Technologies Co., Ltd. -
Page 99: Setting Teamwork Control Parameters
The parameters in this section are for reference only. Set actually parameter values as required. Procedure Step 1 On the home screen, tap > Teamwork Settings, to enter Teamwork Settings page, as shown in Figure 4-4. Issue 02 (2020-08-30) Copyright © Huawei Technologies Co., Ltd. - Page 100 CAN network is used. parameter to Yes for the first and last smart cooling products in a teamwork group, and set it to No for other smart cooling products. Issue 02 (2020-08-30) Copyright © Huawei Technologies Co., Ltd.
- Page 101 Number of the smart Total number of the smart cooling products in smart cooling products cooling this group (1 to 32 in this group. products in can be set). this group Issue 02 (2020-08-30) Copyright © Huawei Technologies Co., Ltd.
- Page 102 If forced enable a forcible rotation is required, the rotation on the group function is set to Yes. before the specified rotation time. After a forced rotation, the accumulated time is recalculated. Issue 02 (2020-08-30) Copyright © Huawei Technologies Co., Ltd.
- Page 103 ● When the requirement control is Indoor fan unified control, all smart cooling product fans in the group rotate at the same speed. Issue 02 (2020-08-30) Copyright © Huawei Technologies Co., Ltd.
- Page 104 T/H sensor. Step 3 Complete the teamwork settings for all the smart cooling products by performing Step 1 Step Issue 02 (2020-08-30) Copyright © Huawei Technologies Co., Ltd.
- Page 105 Frame: A device with green frame indicates the device itself, green/non- green as shown in A non-green frame indicates the other device in the group, as shown in Issue 02 (2020-08-30) Copyright © Huawei Technologies Co., Ltd.
- Page 106 Check whether the number of online devices on the topology is the same as the actual device number. – If yes, the check is complete. – If no, check the cable connection and the settings of teamwork control parameters. Issue 02 (2020-08-30) Copyright © Huawei Technologies Co., Ltd.
-
Page 107: Setting Communications Parameters
"Enable". ● For CAN networking and grouping scenario, set the "RS485 monitoring grouping" of the last smart cooling product in each teamwork control group to "Enable". ----End Issue 02 (2020-08-30) Copyright © Huawei Technologies Co., Ltd. -
Page 108: Setting Communications Parameters (Modbus Tcp Protocol)
Client encryption is set to Disable, set NMS port number to 32906.The encryption mode must be the same as it on the NMS. NO TE The encryption mode must be the same as it on the NMS. Issue 02 (2020-08-30) Copyright © Huawei Technologies Co., Ltd. -
Page 109: Setting Communications Parameters (Snmp Protocol)
One smart cooling product supports concurrent access of up to 6 EMSs through SNMP. Procedure Step 1 On the home screen, choose Settings > Comm Settings > SNMP Settings. Figure is displayed. Issue 02 (2020-08-30) Copyright © Huawei Technologies Co., Ltd. - Page 110 Tap the text box after Write Community, as shown in Figure 4-11. Set Write Community as planned, tap and then tap Submit. Figure 4-11 Setting write community Step 4 Add an SNMPv3 user. Issue 02 (2020-08-30) Copyright © Huawei Technologies Co., Ltd.
- Page 111 – A password must not be a string containing duplicate sections, such as 12a12a12a. Set SHA Password and Confirm Password as planned, and tap , as shown in Figure 4-13. Figure 4-13 Setting an SHA password Issue 02 (2020-08-30) Copyright © Huawei Technologies Co., Ltd.
- Page 112 Select the SNMP Version. If an SNMPv3 user is configured, it is recommended that SNMP Version be set to SNMPv3. If SNMP Version is set to SNMPv3, select an SNMPv3 user name, and then as shown in Figure 4-16. Issue 02 (2020-08-30) Copyright © Huawei Technologies Co., Ltd.
-
Page 113: Optional) Setting Wifi Parameters
4.5.5 (Optional) Setting WIFI Parameters Prerequisites After connecting the WIFI module of the USB interface to the USB port of the smart cooling product main control module, WIFI Settings is enabled to be set. Issue 02 (2020-08-30) Copyright © Huawei Technologies Co., Ltd. -
Page 114: Correlation Relationship Of Parameters
Cold aisle low temperature alarm threshold + 5°C ≤ Hot aisle low temperature alarm threshold ● Cold aisle low temperature alarm threshold + 5°C ≤ Return air low temperature alarm threshold Issue 02 (2020-08-30) Copyright © Huawei Technologies Co., Ltd. - Page 115 Upper limit for dehumid start temperature demand > Upper limit for dehumid close temperature demand ● Temperature demand for dehumidifying heating close > Dehumid heating start temp demand ● Low-temp heating close temp demand > Low-temp heating start temp demand Issue 02 (2020-08-30) Copyright © Huawei Technologies Co., Ltd.
-
Page 116: Startup
User Manual 4 Commissioning 4.6 Startup Download the Service Expert app from Huawei app store and runs on Android. Apply for permission after downloading the app. Step 1 Tap Start on the home screen of the ACC. Figure 4-18 Start ●... - Page 117 4 Commissioning NO TICE The Service Expert app can be downloaded from Huawei app store and runs on Android. User interfaces displayed in this document are for reference only. ● For offline boot, enter the barcode and the verification code on the mobile phone app.
- Page 118 Step 4 Open the Service Expert app. Step 5 Tap StartUp on the home screen of the app and the screen shown in Figure 4-23 is displayed. Issue 02 (2020-08-30) Copyright © Huawei Technologies Co., Ltd.
- Page 119 Step 6 Tap Login after the parameters are set. Step 7 After login, tap Power-on password activation on the screen. The screen shown Figure 4-24 is displayed, indicating whether to start the smart cooling product. Issue 02 (2020-08-30) Copyright © Huawei Technologies Co., Ltd.
-
Page 120: Startup Wizard
NO TICE Tapping No or Exit, submission timeout, and system exception all result in commissioning failures. Choose Maint > Wizard Startup to enter the Wizard Startup screen for new commissioning. Issue 02 (2020-08-30) Copyright © Huawei Technologies Co., Ltd. - Page 121 Step 3 Tap Yes for check items one by one according to the prompt messages on the screen. Step 4 Tap Yes and enter the screen where you select commissioning items, as shown in Figure 4-27. Figure 4-27 Selecting commissioning items Issue 02 (2020-08-30) Copyright © Huawei Technologies Co., Ltd.
- Page 122 Step 6 View the commissioning result. ● Figure 4-29 is displayed if component commissioning succeeds. Figure 4-29 Commissioning successfully ● Figure 4-30 is displayed if component commissioning fails, which ends startup wizard commissioning. Issue 02 (2020-08-30) Copyright © Huawei Technologies Co., Ltd.
-
Page 123: Optional) Power-Off
(available). Procedure Step 1 Tap Shutdown on the home screen. A warning is displayed, indicating whether to shut down the smart cooling product, as shown in Figure 4-32. Issue 02 (2020-08-30) Copyright © Huawei Technologies Co., Ltd. -
Page 124: Antifreeze Handling
Step 1 Remove the plugs from the drainage needle valves of the heat exchanger. ● (For the upflow units) Remove the plugs from the drainage needle valve 1 and 2 of the heat exchanger, to drain water naturally until no water flows out. Issue 02 (2020-08-30) Copyright © Huawei Technologies Co., Ltd. - Page 125 2 of the heat exchanger, set the intake pressure to 0.5 MPa, and blow nitrogen into the valve for 10 minutes, so that the water flows out of the drainage needle valve 1. Issue 02 (2020-08-30) Copyright © Huawei Technologies Co., Ltd.
-
Page 126: Checking After Commissioning
The air filter is correctly installed according to the air flow □ Passed □ Failed direction on the frame. Check that the chilled water valve is closed. □ Passed □ Failed Issue 02 (2020-08-30) Copyright © Huawei Technologies Co., Ltd. -
Page 127: Webui
Step 4.4. Otherwise, you will fail to access the ECC800. Open the Internet Explorer and choose Tools > Internet Options. Click the Advanced tab and select Use TLS1.1 and Use TLS1.2. Issue 02 (2020-08-30) Copyright © Huawei Technologies Co., Ltd. - Page 128 Figure 5-1 Setting internet options (Optional) Click the Connections tab and select LAN settings. (Optional) Under Proxy server, clear Use a proxy server for your LAN. Figure 5-2 Setting proxy server Issue 02 (2020-08-30) Copyright © Huawei Technologies Co., Ltd.
-
Page 129: Webui Introduction
– An account is logged out due to timeout if no operation is performed within 10 minutes after system login. ----End 5.2 WebUI Introduction For data transmission security, the smart cooling product supports WebUI access through SSL. Issue 02 (2020-08-30) Copyright © Huawei Technologies Co., Ltd. - Page 130 ● Upload the network security certificate. Settings ● Set the time zone, time, and date. ● Set the IP address. ● Set the Modbus network parameters. ● Set the SNMP network parameters. Issue 02 (2020-08-30) Copyright © Huawei Technologies Co., Ltd.
- Page 131 ● Query the version and e-labels. ● Query and export fault information. ● Manage users, for example, adding and deleting a user. ● Import and export configuration files to configure devices quickly. Issue 02 (2020-08-30) Copyright © Huawei Technologies Co., Ltd.
-
Page 132: System Operation And Maintenance
Pay attention to the safety symbols on the equipment and all safety instructions in this document. The safety precautions given in this document do not cover all safety precautions. Huawei will not be liable for any consequence caused by violation of the safety operation regulations and design, production, and usage standards. -
Page 133: Monthly Maintenance
12 humidifier. months). Chilled water Check that the chilled Secure the chilled water valve and valve water valve is secure and the actuator cable. that the actuator cable is connected securely. Issue 02 (2020-08-30) Copyright © Huawei Technologies Co., Ltd. -
Page 134: Semiannual Maintenance Items
Item Method (Monthly Maintenance) Troubleshooting Monitoring Export smart cooling Rectify the fault or contact Huawei product logs and alarms technical support. as well as the operating status and time of the fan, electric heater, and wet film humidifier from the monitoring system. - Page 135 Check that the pressure Reinstall the pressure inlet tube. inlet tube is not blocked or over-bent. Check that cables to the Reconnect the cables. differential pressure switch are securely connected. Issue 02 (2020-08-30) Copyright © Huawei Technologies Co., Ltd.
-
Page 136: Annual Maintenance
1. Check the cables to air 1 temperature sensor are the temperature temperat loose or damaged. sensor. 2. The temperature 2. Maintain or replace sensor sensor is faulty. the temperature fault sensor. Issue 02 (2020-08-30) Copyright © Huawei Technologies Co., Ltd. - Page 137 7. Maintain or replace is high. the chilled water valve. 7. The chilled water valve is stuck or faulty. Issue 02 (2020-08-30) Copyright © Huawei Technologies Co., Ltd.
- Page 138 3. The temperature and the temperature and humidity sensor is faulty. humidity sensor. 4. The communications 4. Maintain or replace port of the main control the main control board is faulty. board. Issue 02 (2020-08-30) Copyright © Huawei Technologies Co., Ltd.
- Page 139 3. The temperature and the temperature and humidity sensor is faulty. humidity sensor. 4. The communications 4. Maintain or replace port of the main control the main control board is faulty. board. Issue 02 (2020-08-30) Copyright © Huawei Technologies Co., Ltd.
- Page 140 3. The temperature and the temperature and humidity sensor is faulty. humidity sensor. 4. The communications 4. Maintain or replace port of the main control the main control board is faulty. board. Issue 02 (2020-08-30) Copyright © Huawei Technologies Co., Ltd.
- Page 141 7. The temperature and the temperature and humidity sensor is faulty. humidity sensor. 8. The communications 8. Maintain or replace port of the main control the main control board is faulty. board. Issue 02 (2020-08-30) Copyright © Huawei Technologies Co., Ltd.
- Page 142 3. The temperature and the temperature and humidity sensor is faulty. humidity sensor. 4. The communications 4. Maintain or replace port of the main control the main control board is faulty. board. Issue 02 (2020-08-30) Copyright © Huawei Technologies Co., Ltd.
- Page 143 6. The air damper for the 7. Enable the air air filter is faulty. damper for the air 7. The air damper for the filter. air filter is not enabled. Issue 02 (2020-08-30) Copyright © Huawei Technologies Co., Ltd.
- Page 144 2. The cables to the sensor. smoke sensor are loose or damaged. 2. Check the cables to the smoke sensor. 3. The smoke sensor is faulty. 3. Maintain or replace the smoke sensor. Issue 02 (2020-08-30) Copyright © Huawei Technologies Co., Ltd.
- Page 145 7. Maintain or replace is high. the chilled water valve. 7. The chilled water valve is stuck or faulty. Issue 02 (2020-08-30) Copyright © Huawei Technologies Co., Ltd.
- Page 146 6. The air filters are 6. Maintain or replace blocked. the air filters. 7. The chilled water valve 7. Maintain or replace is stuck or faulty. the chilled water valve. Issue 02 (2020-08-30) Copyright © Huawei Technologies Co., Ltd.
- Page 147 7. Maintain or replace is high. the chilled water valve. 7. The chilled water valve is stuck or faulty. Issue 02 (2020-08-30) Copyright © Huawei Technologies Co., Ltd.
- Page 148 Indoor Major The fan is faulty. Maintain or replace fan 2 the fan. fault Indoor Major The fan is faulty. Maintain or replace fan 3 the fan. fault Issue 02 (2020-08-30) Copyright © Huawei Technologies Co., Ltd.
- Page 149 6. The air filters are 6. Maintain or replace blocked. the air filters. 7. The chilled water valve 7. Maintain or replace is stuck or faulty. the chilled water valve. Issue 02 (2020-08-30) Copyright © Huawei Technologies Co., Ltd.
- Page 150 4. The high humidity threshold. alarm threshold is 5. Calibrate or replace inappropriate. the temperature and 5. The value detected by humidity sensors. the temperature and humidity sensor is different from the actual value. Issue 02 (2020-08-30) Copyright © Huawei Technologies Co., Ltd.
- Page 151 4. The supply and return and return water water sensors are sensors. reversely installed. 5. Calibrate or replace 5. The supply water the supply water temperature displayed is temperature sensor. different from the actual temperature. Issue 02 (2020-08-30) Copyright © Huawei Technologies Co., Ltd.
- Page 152 A174 Major The SPD and voltage Replace the SPD and function detection board is faulty. voltage detection failure board. Issue 02 (2020-08-30) Copyright © Huawei Technologies Co., Ltd.
- Page 153 Indoor Major 1. The fan blade is stuck. 1. Clear the blockage. fan 3 2. The fan is faulty. 2. Maintain or replace blocked the fan. alarm Issue 02 (2020-08-30) Copyright © Huawei Technologies Co., Ltd.
- Page 154 3. Enable the sensor enabled on this air that corresponds to the conditioner. temperature and humidity control type for the master unit on this air conditioner. Issue 02 (2020-08-30) Copyright © Huawei Technologies Co., Ltd.
- Page 155 1. Check the control damper the air damper is loose or cable connection to fault damaged. the air damper. 2. The air damper is 2. Maintain or replace faulty. the air damper. Issue 02 (2020-08-30) Copyright © Huawei Technologies Co., Ltd.
- Page 156 2. Maintain or replace fault 2. The temperature and the temperature and humidity sensor is faulty. humidity sensor. Issue 02 (2020-08-30) Copyright © Huawei Technologies Co., Ltd.
- Page 157 The water overflow While configuring the overflow sensor detects water or water overflow sensor, alarm the sensor is faulty. check and clear the water source, and maintain or replace the sensor. Issue 02 (2020-08-30) Copyright © Huawei Technologies Co., Ltd.
- Page 158 2. The SPD and voltage detection board is faulty. 2. Replace the SPD and voltage detection board. Issue 02 (2020-08-30) Copyright © Huawei Technologies Co., Ltd.
- Page 159 3. The cables to the 3. Check the cable primary power supply is connection to the loose or damaged. primary power supply. Issue 02 (2020-08-30) Copyright © Huawei Technologies Co., Ltd.
-
Page 160: Troubleshooting
Exercise caution during live-line troubleshooting. NO TICE If jumpers are used for troubleshooting, remove them after troubleshooting. Connected jumpers may affect control functions and damage equipment. Issue 02 (2020-08-30) Copyright © Huawei Technologies Co., Ltd. - Page 161 NetCol8000-C is front or rear extremely humid. panel. The temperature Adjust the temperature and threshold is set to a humidity thresholds. much smaller value. Issue 02 (2020-08-30) Copyright © Huawei Technologies Co., Ltd.
- Page 162 An electric heater is Disconnect the power supply burnt out. and check whether the electric heater is damaged by checking the electric heater resistance properties with an ohmmeter. Issue 02 (2020-08-30) Copyright © Huawei Technologies Co., Ltd.
- Page 163 The air filter of The air filter has been Clean or replace the air filter. the fresh air unit used for too long and is blocked. become dusty. Issue 02 (2020-08-30) Copyright © Huawei Technologies Co., Ltd.
-
Page 164: Parts Replacement
Step 2 Remove the sheet metal fastener from the air filter using a Phillips screwdriver, hold the handle and pull out the air filter. Figure 6-1 Removing an upflow air filter Issue 02 (2020-08-30) Copyright © Huawei Technologies Co., Ltd. -
Page 165: Replacing The Air Filter (Downflow)
6.7.2 Replacing the Wet Film Humidifier Context Tool: Phillips screwdriver Procedure Step 1 Choose Settings > System Settings > System Control and choose Humidifying function > Disable. Step 2 Open the cabinet front door. Issue 02 (2020-08-30) Copyright © Huawei Technologies Co., Ltd. - Page 166 Figure 6-3 Removing an upflow wet film humidifier Figure 6-4 Removing a downflow wet film humidifier (NetCol8000-C070D) Issue 02 (2020-08-30) Copyright © Huawei Technologies Co., Ltd.
- Page 167 Then exit from the wizard startup mode. Step 10 On the home screen, choose Maint > Performance Maint to enter the Performance Maint screen, and clear the runtime of the wet film humidifier. Issue 02 (2020-08-30) Copyright © Huawei Technologies Co., Ltd.
-
Page 168: Replacing The Differential Pressure Switch
Step 2 Open the front door and turn off the general switch. Step 3 Remove the pressure tube. Step 4 Unscrew the differential pressure switch using a Phillips screwdriver and take out the switch. Figure 6-7 Removing an upflow differential pressure switch Issue 02 (2020-08-30) Copyright © Huawei Technologies Co., Ltd. -
Page 169: Replacing A T/H Sensor
Air filter blocked alarm is generated. If the alarm is generated, the differential pressure switch works properly. Then exit the diagnostics mode. ----End 6.7.4 Replacing a T/H sensor Procedure Step 1 Tap Shutdown on the LCD home screen. Issue 02 (2020-08-30) Copyright © Huawei Technologies Co., Ltd. - Page 170 Step 3 Remove the cable terminals from the ports on the T/H sensor. Step 4 Pull out the T/H sensor in the direction. Figure 6-9 Replacing an upflow T/H sensor Figure 6-10 Replacing a downflow T/H sensor Issue 02 (2020-08-30) Copyright © Huawei Technologies Co., Ltd.
-
Page 171: Replacing The Water Valve Actuator
Step 5 Remove the chilled water valve actuator. Pull the actuator handle up to remove it, as shown by (1) in Figure 6-11. Figure 6-11 Removing the actuator of a chilled water valve Issue 02 (2020-08-30) Copyright © Huawei Technologies Co., Ltd. - Page 172 Figure 6-13. Fit in the connecting plate with the screws on the left, as shown by (3) in Figure 6-13. Keep the handle upwards, as shown by (4) in Figure 6-13. Issue 02 (2020-08-30) Copyright © Huawei Technologies Co., Ltd.
-
Page 173: Replacing The Fan
----End 6.7.6 Replacing the Fan Context Recommended tools and materials: 13# socket wrench, small-sized flat-head screwdriver, security torx wrench CA UTION Exercise caution during replacement as the fan is comparably heavy. Issue 02 (2020-08-30) Copyright © Huawei Technologies Co., Ltd. -
Page 174: Replacing The Fan (Upflow)
Figure 6-14 Removing the fan maintenance baffle plate Step 3 Remove the fan power cable terminals and signal cable terminals. Remove the four screws that secure the fan using a 13# socket wrench, and pull out the fan. Issue 02 (2020-08-30) Copyright © Huawei Technologies Co., Ltd. - Page 175 D ANGER When the buckle is pressed, it takes two persons to hold the fan up to avoid fan dropping. Figure 6-17 shows where to hold when moving the fan. Issue 02 (2020-08-30) Copyright © Huawei Technologies Co., Ltd.
- Page 176 Step 5 Remove the eight screws that secure the bottom of the fan frame to the bottom plate of the fan. Move the fan and fan frame to the side, and then remove the eight screws that secure the top of the fan frame to the fan. Issue 02 (2020-08-30) Copyright © Huawei Technologies Co., Ltd.
- Page 177 (namely, the PE cable) using a flat-head screwdriver. Issue 02 (2020-08-30) Copyright © Huawei Technologies Co., Ltd.
-
Page 178: Replacing The Fan (Downflow)
Step 13 On the home screen, choose Maint > Performance Maint to enter the Performance Maint screen and clear the runtime of the indoor fan. ----End 6.7.6.2 Replacing the Fan (Downflow) Issue 02 (2020-08-30) Copyright © Huawei Technologies Co., Ltd. - Page 179 Remove the screws on the beams above the fan by using a 13# socket wrench, and remove the two screws on the connecting piece between the fan and the bottom of the cabinet. Remove the beams and connecting piece. Issue 02 (2020-08-30) Copyright © Huawei Technologies Co., Ltd.
- Page 180 Move the fan and fan frame to the side, and then remove the eight screws that secure the top of the fan frame to the fan. Figure 6-23 Removing a fan Remove the connection box cover using a security torx wrench. Issue 02 (2020-08-30) Copyright © Huawei Technologies Co., Ltd.
- Page 181 11. Tap Repair in the lower left corner. The Connect the cable to the communications port on the fan to be repaired and disconnect the cables Issue 02 (2020-08-30) Copyright © Huawei Technologies Co., Ltd.
-
Page 182: Replacing The Psu
● When replacing a main control module, remove the cable from the module. ● To replace the main control module, download the software and ACC software upgrade guide from Huawei websites, and upgrade it on the LCD. Procedure Step 1 Tap Shutdown on the LCD home screen. - Page 183 When installing a new PSU, ensure that the handle is in the lower part of the PSU. Step 4 Insert the spare PSU into the corresponding slot of the power distribution subrack, and push the latch downwards to lock the PSU. ----End Issue 02 (2020-08-30) Copyright © Huawei Technologies Co., Ltd.
-
Page 184: Replacing The Electric Heater
Step 3 Remove the fan maintenance baffle plate. After the electric heater cools to the room temperature, cut off the cable tie on the electric heater cable and disconnect the interconnection terminal. Issue 02 (2020-08-30) Copyright © Huawei Technologies Co., Ltd. - Page 185 Step 4 Remove the two bolts that secure the electric heater support and take out the electric heater. Figure 6-29 Removing an electric heater Step 5 Remove the four bolts from both ends of the electric heater and take out the electric heater and its cable. Issue 02 (2020-08-30) Copyright © Huawei Technologies Co., Ltd.
-
Page 186: Replacing The Electric Heater (Downflow)
Step 2 Open the front door and turn off the general switch. For a device that has two power inputs, turn off the active power switch QF1 and standby power switch QF2. Step 3 Remove the fan maintenance baffle plate. Issue 02 (2020-08-30) Copyright © Huawei Technologies Co., Ltd. - Page 187 Then exit from the wizard startup mode. Step 8 On the home screen, choose Maint > Performance Maint to enter the performance maintenance screen and clear the runtime of the electric heater. ----End Issue 02 (2020-08-30) Copyright © Huawei Technologies Co., Ltd.
-
Page 188: Replacing Inlet Solenoid Valve
Figure 6-33 Remove screws of the sheet metal Step 6 Remove the intake tube of the inlet solenoid valve. Step 7 Install a new inlet solenoid valve by performing Step 6 Step ----End 6.7.10 Replacing the LCD Issue 02 (2020-08-30) Copyright © Huawei Technologies Co., Ltd. - Page 189 Step 5 Install the new LCD in reverse order. Step 6 Install the LCD cables. Step 7 After the cables are reconnected, the home screen is displayed on the LCD. Check whether the display is normal. ----End Issue 02 (2020-08-30) Copyright © Huawei Technologies Co., Ltd.
-
Page 190: Faq
30 days. Procedure Step 1 On the home screen, tap T/H Curve. Figure 7-1 is displayed. Figure 7-1 T/H curve screen Issue 02 (2020-08-30) Copyright © Huawei Technologies Co., Ltd. -
Page 191: Querying Logs
When querying component status through Device Details (using the T/H sensor as an example), choose Running > Device Details > T/H Sensor on the home screen to query the status of the T/H Sensor. ----End Issue 02 (2020-08-30) Copyright © Huawei Technologies Co., Ltd. -
Page 192: Querying System Parameters
Figure 7-3 System overview ----End 7.1.5 Querying Version Details Procedure Step 1 On the home screen, select About. Step 2 On the About screen, tap Version Info or E-label. Issue 02 (2020-08-30) Copyright © Huawei Technologies Co., Ltd. -
Page 193: How To View Teamwork Control Information
----End 7.1.8 How Can I Handle Active Alarms? Procedure Step 1 Tap (or choose Alarms > Query Act Alarms) on the home screen to enter the active alarms screen. Issue 02 (2020-08-30) Copyright © Huawei Technologies Co., Ltd. - Page 194 Perform operations as required. Step 3 Tap Diagnostic Mode to view the diagnosis report. Rectify the faults following instructions in the diagnosis report. Figure 7-5 Diagnosis report ----End Issue 02 (2020-08-30) Copyright © Huawei Technologies Co., Ltd.
-
Page 195: Clearing The Runtime
20°C while the value measured by the sensor is 22°C, the sensor has an error of 2°C, and the calibration value should be set to –2°C. Issue 02 (2020-08-30) Copyright © Huawei Technologies Co., Ltd. -
Page 196: How To Modify A Password
Step 2 Tap Password to enter the password changing screen, as shown in Figure 7-8. NO TE It is recommended that the password should contain at least two types of characters. Issue 02 (2020-08-30) Copyright © Huawei Technologies Co., Ltd. -
Page 197: How To Set Alarm Parameters
Be careful when configuring alarms. Only professional maintenance personnel can change alarm settings. Procedure Step 1 Choose Settings > Alarm Settings > T/H Sensor on the home screen. Figure 7-9 is displayed. Issue 02 (2020-08-30) Copyright © Huawei Technologies Co., Ltd. -
Page 198: How To Commission Single Component
If you need to manually turn on or off system components in diagnostic mode, ensure that the smart cooling product is started before operation. ● Take commissioning the indoor fan as an example. Procedure Step 1 Choose Maint > Diagnostic Mode > Enter. Issue 02 (2020-08-30) Copyright © Huawei Technologies Co., Ltd. -
Page 199: Restoring Factory Settings
● To ensure information security and prevent malicious password reset, you must keep the cabinet keys securely. If any abnormal operation is found, check the information in the equipment room access control system and monitoring system. Issue 02 (2020-08-30) Copyright © Huawei Technologies Co., Ltd. -
Page 200: Which Parameters Are Restored To Default Values After Default Settings Are Operated
After default settings are restored, all communication addresses are changed to 1 and the communication between all devices and the EMS is disconnected. The communication addresses must be reset to recover the communication. Issue 02 (2020-08-30) Copyright © Huawei Technologies Co., Ltd. -
Page 201: Rectifying Faults Of The E-Label Identification Board
During actual operations, the version in use prevails. Procedure Step 1 Check whether strong electromagnetic interference exists around the E-label identification board. ● If yes, contact Huawei technical support. Issue 02 (2020-08-30) Copyright © Huawei Technologies Co., Ltd. -
Page 202: Exporting Data
7 FAQ ● If no, continue with Step Step 2 Disconnectthe main power supply from the smart cooling product. Step 3 Contact Huawei technical support to replace the backplane of the smart cooling product. ----End 7.1.17 Exporting Data Context With the one-click mode, you can export active alarms, historical alarms, run logs, and so on. -
Page 203: How To Export And Import A Configuration File
Step 2 Tap the file where the user saves current data in the Select Path dialog box and tap Next. Then tap Confirm in the displayed dialog box. Step 3 After the data is successfully exported, Figure 7-16 is displayed. Click Finish. Issue 02 (2020-08-30) Copyright © Huawei Technologies Co., Ltd. - Page 204 Step 6 Select the file that needs to be imported and tap Next, as shown in Figure 7-18. Figure 7-18 Confirming the file Step 7 After you tap Confirm and Next, Figure 7-19 Figure 7-20 are displayed. Issue 02 (2020-08-30) Copyright © Huawei Technologies Co., Ltd.
-
Page 205: How To Import A Certificate And A Key
If the file fails to be imported, a failure message will be displayed. Step 9 Tap Maint > USB Operations > Remove USB to remove the USB flash drive. ----End 7.1.19 How to Import a Certificate and a Key Issue 02 (2020-08-30) Copyright © Huawei Technologies Co., Ltd. -
Page 206: Webui Operations
If files fail to be imported, the message indicating the cause for failure will be displayed. Rectify the fault according to the message and import files again. ----End 7.2 WebUI Operations Issue 02 (2020-08-30) Copyright © Huawei Technologies Co., Ltd. -
Page 207: How To Manage Webui Users
Choose the admin user and click Modify. Reset the login password on the displayed page and tap Confirm. Figure 7-23 Changing the login password Input the Login password, and click Submit. Figure 7-24 Recertification Issue 02 (2020-08-30) Copyright © Huawei Technologies Co., Ltd. -
Page 208: How To Install A Network Security Certificate
Select the network security certificate key to be imported from the PC and click Upload. If the network security certificate is encrypted, select If an encrypted private key is imported, enter the password for decryption, and specify Key cryptography and Confirm key cryptography. Issue 02 (2020-08-30) Copyright © Huawei Technologies Co., Ltd. -
Page 209: How Can I View Active Alarms And Historical Alarms
Log in to the smart cooling product 2 WebUI as an administrator. Choose Maintenance > Configuration File. Specify Configuration File Decryption Password. Click Browse on the right of Import a new configuration file. Issue 02 (2020-08-30) Copyright © Huawei Technologies Co., Ltd. -
Page 210: How Can I Export Fault Information
Step 4 In the displayed The WebUI will exit or not respond after the new IP address is set. You need to log in again with the new IP address. Do you want to change the IP address? dialog box, click OK. ----End Issue 02 (2020-08-30) Copyright © Huawei Technologies Co., Ltd. -
Page 211: How Can I View Version Information
Step 3 Choose Maintenance > Version Information and view the version information, software version, and BSP version. ----End Issue 02 (2020-08-30) Copyright © Huawei Technologies Co., Ltd. -
Page 212: A Glycol Adding Requirements
–5°C to 0°C –10°C –10°C to –5°C –15°C –15°C to –10°C –20°C –20°C to –15°C –25°C –25°C to –20°C –30°C –30°C to –25°C –35°C –35°C to –30°C –40°C –40°C to –35°C –45°C Issue 02 (2020-08-30) Copyright © Huawei Technologies Co., Ltd. -
Page 213: B Base Dimensions
L-shaped components or components with other shapes, and then secure the components to the base. Control the welding errors during the welding; otherwise, the base may be unusable. ● Upflow Issue 02 (2020-08-30) Copyright © Huawei Technologies Co., Ltd. - Page 214 NetCol8000-C(070, 130, 190) In-room Chilled Water Smart Cooling Product User Manual B Base Dimensions Figure B-1 Single-door cabinet base (unit: mm) Figure B-2 Double-door cabinet base (unit: mm) Issue 02 (2020-08-30) Copyright © Huawei Technologies Co., Ltd.
- Page 215 NetCol8000-C(070, 130, 190) In-room Chilled Water Smart Cooling Product User Manual B Base Dimensions Figure B-3 Triple-door cabinet base (unit: mm) ● Downflow Figure B-4 Single-door cabinet base (unit: mm) Issue 02 (2020-08-30) Copyright © Huawei Technologies Co., Ltd.
- Page 216 NetCol8000-C(070, 130, 190) In-room Chilled Water Smart Cooling Product User Manual B Base Dimensions Figure B-5 Double-door cabinet base (unit: mm) Figure B-6 Triple-door cabinet base (unit: mm) Issue 02 (2020-08-30) Copyright © Huawei Technologies Co., Ltd.
-
Page 219: D Parameter Description
LCD backlight turns off. Key lifecycle Set key lifecycle. 180 Day Settings > Supply air high Specifies the alarm 40.0 °C Alarm temperature threshold for a certain alarm alarm. Issue 02 (2020-08-30) Copyright © Huawei Technologies Co., Ltd. - Page 220 EMS. Settings > The LCD displays active Mainboard alarms and the system implements related protection actions. ● Disable: Alarms are not reported and no protection actions are implemented. Issue 02 (2020-08-30) Copyright © Huawei Technologies Co., Ltd.
- Page 221 EMS. sensor alarm The LCD displays active alarms and the system implements related protection actions. ● Disable: Alarms are not reported and no protection actions are implemented. Issue 02 (2020-08-30) Copyright © Huawei Technologies Co., Ltd.
- Page 222 Enable shutdown alarm reported to the EMS. The LCD displays active alarms and the system implements related protection actions. ● Disable: Alarms are not reported and no protection actions are implemented. Issue 02 (2020-08-30) Copyright © Huawei Technologies Co., Ltd.
- Page 223 Motorized This parameter can be set The default damper to Enable or Disable. setting is Disable. Issue 02 (2020-08-30) Copyright © Huawei Technologies Co., Ltd.
- Page 224 Temperature After the Temperature and 22.0 °C setpoint humidity control type and the temperature value under this type are set, the device conducts cooling or heating based on the settings. Issue 02 (2020-08-30) Copyright © Huawei Technologies Co., Ltd.
- Page 225 Issue 02 (2020-08-30) Copyright © Huawei Technologies Co., Ltd.
- Page 226 Issue 02 (2020-08-30) Copyright © Huawei Technologies Co., Ltd.
- Page 227 ● When DO associated alarm is set to No, ports 1 and 2 for reporting common alarms are open and generate no alarms. Issue 02 (2020-08-30) Copyright © Huawei Technologies Co., Ltd.
- Page 228 If Dehumid & low-temp heat is selected, the electric heater starts heating when the dehumidification and heating condition or the low temperature heating condition is met. Issue 02 (2020-08-30) Copyright © Huawei Technologies Co., Ltd.
- Page 229 Supply air temp Specifies the temperature 25.0 °C to forcibly start threshold for forcibly cooling starting the compressor when the supply air temperature is higher than the threshold. Issue 02 (2020-08-30) Copyright © Huawei Technologies Co., Ltd.
- Page 230 No, ports 1 and 2 for reporting common alarms are open and generate no alarms. Cooling capacity The cooling capacity Disable management management function can function be set to Enable or Disable. Issue 02 (2020-08-30) Copyright © Huawei Technologies Co., Ltd.
- Page 231 Return air sensor The return air sensors can Disable be set to Enable or Disable. Cold aisle sensor The sensors in cold aisles Disable can be set to Enable or Disable. Issue 02 (2020-08-30) Copyright © Huawei Technologies Co., Ltd.
- Page 232 Max indoor fan Specifies the maximum 100% speed speed for the indoor fan. Motorized This parameter can be set The default damper to Enable or Disable. setting is Disable. Issue 02 (2020-08-30) Copyright © Huawei Technologies Co., Ltd.
- Page 233 Enable or Cooling cap. Disable. mgmt Maint > Chilled water Total runtime for chilled Performance valve total water valve. Maint runtime Indoor fan total Total runtime for indoor runtime fan. Issue 02 (2020-08-30) Copyright © Huawei Technologies Co., Ltd.
- Page 234 Return air 0.0 %RH detected by other devices, humidity set the calibration value to calibration value 1°C. Supply water 0.0 °C temperature calibration value Return water 0.0 °C temperature calibration value Issue 02 (2020-08-30) Copyright © Huawei Technologies Co., Ltd.
-
Page 235: E Acronyms And Abbreviations
NetCol8000-C(070, 130, 190) In-room Chilled Water Smart Cooling Product User Manual E Acronyms and Abbreviations Acronyms and Abbreviations Alternating Current Computational Fluid Dynamics Controller Area Network Direct Current Electronic Commutation fast Ethernet Internet Protocol Issue 02 (2020-08-30) Copyright © Huawei Technologies Co., Ltd. - Page 236 NetCol8000-C(070, 130, 190) In-room Chilled Water Smart Cooling Product User Manual E Acronyms and Abbreviations Liquid Crystal Display negative temperature coefficient personal computer positive temperature coefficient RCCB Residual Current Circuit Breaker Universal Series Bus Issue 02 (2020-08-30) Copyright © Huawei Technologies Co., Ltd.