Table of Contents
Advertisement
Quick Links
Advertisement
Table of Contents

Related Manuals for Honeywell MultiRAE Series


Summary of Contents for Honeywell MultiRAE Series
- Page 1 Honeywell MultiRAE Series™ Portable Multi-gas Monitor...
-
Page 2: Table Of Contents
Table of Contents Honeywell MultiRAE Series™ Safety Features Comparison Standard Contents General Information Key Features User Interface Display Overview Screen Display for Various Numbers of Active Sensors Menus Wireless Control and Submenus Point-To-Point Wired Connection Using Safety Suite Device Configurator (SSDC) to Set P2P Operation... - Page 3 Zero/Fresh Air Calibration Span Calibration Three-Point Calibration for Enhanced Linearity with Extended- Range And ppb PID Sensors MultiRAE Pro Normal & Gamma Operation Normal Mode for Simultaneous Radiation & Gaseous Threat Measurements Gamma Radiation-Only Measurement Mode Honeywell MultiRAE Series™ User Manual...
- Page 4 Setting Pump Stall Threshold Values – Dynamic Method Setting Pump Stall Threshold Values – Static Method Configuring Wi-Fi Communication Setting Wi-Fi Communication Parameters in Safety Suite Device Configurator (SSDC) Configuring Messaging Configuring BLE BLE Modes Specifications Honeywell MultiRAE Series™ User Manual...
- Page 5 Appendix Alarm Limits Sensors’ information Contact Us Honeywell MultiRAE Series™ User Manual...
-
Page 6: Honeywell Multirae Series
MultiRAE series device uses instrument FW 1.31/ sensor FW 1.08A MultiRAE lite with Wi-Fi option uses instrument FW 1.36/ sensor FW 1.36 Note: Fws 1.36 are not compatible with MultiRAE series device not using Wi-Fi module (and vice and versa). - Page 7 CAUTION! Fws 1.36 are not compatible with MultiRAE series device not using Wi-Fi module (and vice and versa). WARNINGS Read Before Operating This manual must be carefully read by all individuals who have or will have the responsibility of using, maintaining, or servicing this product. The product will perform as designed only if it is used, maintained, and serviced in accordance with the manufacturer’s instructions.
- Page 8 180 days, depending on use and sensor exposure to poisons and contaminants. SPECIAL CONDITIONS FOR SAFE USE The PGM-62xx shall only be fitted with Honeywell Battery Pack type M01-3053-000, M01-3055-000, or Battery Adapter M01-3054-000 fitted with Duracell MN1500 batteries.
- Page 9 Warning: Do not change batteries in hazardous location. Do not mix old/new or different type of batteries PGM62x0: Use only Honeywell battery pack. PGM62x6/62x8: Use only Honeywell battery pack, PN: M01-3053-000, M01-3055-000, or M01-3054-000. Um: 20V -20º C ≤ Tamb ≤ +50º C Honeywell MultiRAE Series™...
- Page 10 Storage Humidity: 15% to 90% RH (relative humidity), non-condensing; preferred 30% to 70% RH 0% RH preferred sealed storage for PID and NDIR sensors Storage Pressure: 90 to 110kPa Storage Life: 6 months in sealed container (no air) Honeywell MultiRAE Series™ User Manual...
- Page 11 For information on sensor specifications, cross-sensitivities, and calibration information, refer to RAE Systems Technical Note TN-114: Sensor Specifications and Cross-Sensitivities (available for free download from https://sps.honeywell.com/us/en/products/safety/gas-and- flame-detection). All specifications presented in this Technical Note reflect the performance of stand-alone sensors. Actual sensor characteristics may vary when the sensor is installed in different instruments.
- Page 12 Honeywell MultiRAE Series™ User Manual...
-
Page 13: Features Comparison
Combustible NDIR Sensors (%LEL or Pumped Only %Vol. CH NDIR Sensor Integrated Wireless Modem (Optional) Integrated BLE Modem (Optional) Integrated Wi-Fi Modem (Optional) Sampling Pumped Pumped Pumped or Diffusion IP Rating IP-65 IP-65 IP-65 (Pumped) Honeywell MultiRAE Series™ User Manual... - Page 14 IP-67 (Diffusion) Default Rubber Boot Color Black Yellow Yellow AutoRAE AutoRAE AutoRAE 2, pumped Automatic Test and Calibration System version only Honeywell MultiRAE Series™ User Manual...
- Page 15 Honeywell MultiRAE Series™ User Manual...
-
Page 16: Standard Contents
RAE-Sep Tube Cartridges PID sensor cap removal tool PID zeroing charcoal filter Toolkit QuickStart Guide Technical Note TN-106 with ionization energies and correction factors for 300+ VOCs Calibration and test certificate Cardboard box with a colorful Honeywell MultiRAE Series™ User Manual... - Page 17 Hard transport case Pelican case Optional Optional Optional * If ordered with 9.8dV PID Lamp sensor. Honeywell MultiRAE Series™ User Manual...
- Page 18 Honeywell MultiRAE Series™ User Manual...
-
Page 19: General Information
If a %Vol. NDIR sensor is installed in an instrument, a catalytic bead %LEL sensor must also be installed in the instrument for CSA certification. IMPORTANT! The benzene-specific cartridge can only be used on MultiRAE and MultiRAE Pro models equipped with a 9.8eV lamp. Honeywell MultiRAE Series™ User Manual... -
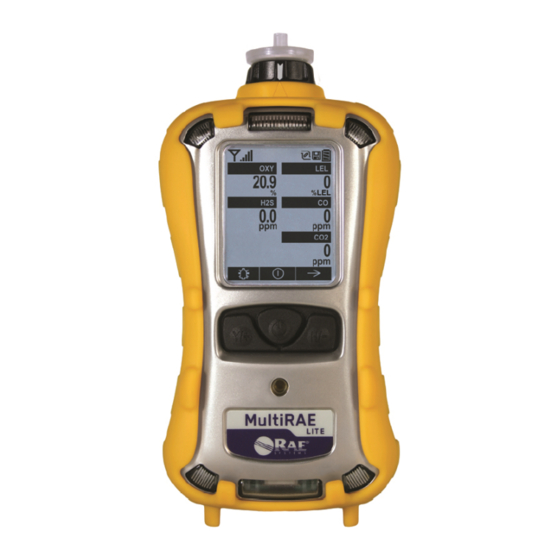
Page 20: Key Features
1 External filter 5 MODE key Alarm LED 2 Gas inlet 6 Y/+ key 10 Alarm buzzer 3 Belt clip (back) 7 LED 11 N/- key 4 Display 8 Charging and comm unication contact 12 Alarm LEDs Honeywell MultiRAE Series™ User Manual... - Page 21 MultiRAE Lite Diffusion Model, rear view Gas inlets Alarm LEDs Alarm Buzzer Honeywell MultiRAE Series™ User Manual...
- Page 22 LEDs. MultiRAE or MultiRAE Pro Equipped With 9.8eV Lamp And RAE-Sep Tube Cartridge The belt clip on the back of the pump-equipped MultiRAE can be swiveled for carrying it at different angles: Honeywell MultiRAE Series™ User Manual...
- Page 23 Honeywell MultiRAE Series™ User Manual...
-
Page 24: User Interface
Soft keys (functions 10 Unit of measure according to policy” tick mark change by activity) Status 3 Man Down alarm enabled 7 Reading indicators Wireless radio on/off status and signal Alarm type (High, Low, strength etc.) Honeywell MultiRAE Series™ User Manual... - Page 25 Roaming status: Network joined, received signal strength medium (41% to 60%) Roaming status: Network joined, received signal strength good (61% to 80%) Roaming status: Network joined, received signal strength very good (81% to 100%) P2P (Point-to-Point) protocal enabled, wireless disabled Honeywell MultiRAE Series™ User Manual...
- Page 26 Network joined, signal very low, 0% to 24% Network joined, signal low, 25% to 49% Network joined, signal medium, 50% to 74% Network joined, signal good, 75% to 100% P2P (Point-to-Point) protocol enabled, wireless disabled Honeywell MultiRAE Series™ User Manual...
- Page 27 If the instrument’s Wi-Fi and access point are not associated and there are unread There are unread messages, messages blinks at 1-second intervals Message has been read Message is unread Message received Send/Sent message Panic alarm Honeywell MultiRAE Series™ User Manual...
- Page 28 In addition to the functions described above, any of the keys can be used to manually activate display backlighting. Press any key when the backlighting is off to turn it on. A subsequent key press is required to carry out an actual function corresponding to that key. Honeywell MultiRAE Series™ User Manual...
- Page 29 Key Remapping When LCD Is Flipped When the instrument is inverted and the LCD flips, the keys are remapped to the functions shown on the screen. Display with MultiRAE in non-inverted position: Display with MultiRAE inverted: Honeywell MultiRAE Series™ User Manual...
- Page 30 Now when you press [N/-], you step back through the screens. To change direction again: Press and hold [N/-] for 3 seconds and then release. Note: Changing direction does not work with all screens. Honeywell MultiRAE Series™ User Manual...
-
Page 31: Screen Display For Various Numbers Of Active Sensors
(CF) and measurement gas. One sensor. Two sensors. Three sensors. Four sensors. Six-sensor Five sensors, Five sensors, configuration with including Gamma including PID. radiation sensor. CO+H S combo Honeywell MultiRAE Series™ User Manual... -
Page 32: Menus
LEL sensor, then screens for those sensors (VOC Gas Status and LEL Gas Status, respectively) are not shown. Operation of Wi-Fi-equipped MultiRAE Lite is shown on page 14. Search Mode is not available when MultiRAE is in benzene-specific mode. Benzene-specific operation is shown on section Benzene Mode. Honeywell MultiRAE Series™ User Manual... - Page 33 Also, if you start sampling again and stop sampling, clear the Peak, or clear the Min, it advances to Date and Time, as well. The Site ID increases by 1 numeric value each time. Honeywell MultiRAE Series™ User Manual...
- Page 34 MultiRAE for benzene sampling. If the option is not shown, follow the procedure on section 7.10. Benzene sampling is done in a “snapshot,” meaning that the instrument does not continuously monitor for benzene. Honeywell MultiRAE Series™ User Manual...
- Page 35 Note: Dashed line indicates automatic progression. Honeywell MultiRAE Series™ User Manual...
- Page 36 Honeywell MultiRAE Series™ User Manual...
-
Page 37: Wireless Control And Submenus
The Wireless menu is divided into a sequence of four “pages,” each presenting different information. As you press [Y/+] on each of the “pages,” you advance to the next one. Honeywell MultiRAE Series™ User Manual... - Page 38 (transmission power). These are primarily for diagnostics and troubleshooting. When you reach the fourth “page,” you can wrap around to the first one by pressing [Y/+]. Otherwise, you can press [N/-] to quit, which advances to the next screen. Honeywell MultiRAE Series™ User Manual...
- Page 39 Honeywell MultiRAE Series™ User Manual...
-
Page 40: Point-To-Point Wired Connection
License Key Installation After receiving the License Key for MultiRAE P2P via email from Honeywell Customer Support, do the following: Use the supplied PC Communications Cable (USB to mini-USB cable) to connect the MultiRAE’s Desktop Cradle, AutoRAE 2 Cradle, or Travel Charger to a PC where the License Key will be stored. - Page 41 The main Safety Suite Device Configurator (SSDC) screen is shown: Click on the profile logo and click on “Settings”. Next, click on “License”. Please ensure you are connected to the internet while activating and using licensing. Honeywell MultiRAE Series™ User Manual...
- Page 42 Enter the Security Code in the field provided and click the 'Enable' button. Once licensing is enabled, you will see an 'Add Key' button under the 'License" tab. Click the button and enter the license key. Honeywell MultiRAE Series™ User Manual...
- Page 43 You may add more license keys by repeating steps 13 and 14. If the license key is already added using another instance of SSDC, you will see all the available licenses once the licensing is enabled. Honeywell MultiRAE Series™ User Manual...
-
Page 44: Connecting A Multirae To A Pc To Enable Point-To-Point Operation
Travel Charger will not operate without a power source. Note: Do not plug in both the USB and the AC adapter at the same time, as this may cause errors. Follow one of the three diagrams below for power and data connection options. Honeywell MultiRAE Series™ User Manual... - Page 45 Note: Refer to Honeywell Technical Note TN-190 for more information on how point-to-point operation works. Honeywell MultiRAE Series™ User Manual...
-
Page 46: Charging With The Multirae Desktop Cradle
To remove the MultiRAE from the Desktop Cradle, tilt it toward you until it releases, and then lift it up. Press down until MultiRAE is seated firmly in the cradle Release the MultiRAE by tilting it forward and lifting Honeywell MultiRAE Series™ User Manual... -
Page 47: Automatic Pid Cleaning
Then the pump runs for 20 minutes to exhaust gas contained inside the gas plate. After the pump stops, the battery continues to be charged, if necessary. Note: This function also works when the instrument is turned off Honeywell MultiRAE Series™ User Manual... -
Page 48: Charging With The Travel Charger
The MultiRAE Truck Mount (PN M01-0307-000), used in conjunction with the front part of the Desktop Cradle (PN M01-0306-000), provides an NFPA requirement-compliant way to mount and carry the MultiRAE in a vehicle. CAUTION! Do not use the Truck Mount in hazardous locations. Honeywell MultiRAE Series™ User Manual... - Page 49 12-volt outlet in the vehicle. Note: If the 12-volt charging adapter has an angle (“L”-shaped) plug, follow the Angle-Plug Configuration. This requires inserting the angle plug before placing the cradle into the Truck Mount. Straight-Plug Configuration Honeywell MultiRAE Series™ User Manual...
- Page 50 Then wrap the Velcro strap around the MultiRAE and fasten its end to the mating Velcro on the side of the Truck Mount. To secure: Press the MultiRAE into the cradle and fasten the Velcro strip. Honeywell MultiRAE Series™ User Manual...
-
Page 51: Charging With The Autorae 2
Tilt a fully charged battery (or alkaline battery adapter) into the battery compartment and place it in the instrument. Slide the tab back into place to secure the battery. Honeywell MultiRAE Series™ User Manual... -
Page 52: Charging Batteries With A Multirae Battery Charger
Holder for External Battery Charger (P/N: M01-2110-000) External Battery Charger (P/N: M01-3025-000) 2. Connect the power cables and the power supply: 1 One-To-Five Power Cable P/N: 020-2480-000) 2 Power Supply (P/N: 500-0087-000) 3 Power Cord with U.S. Plug P/N: 410-0036-000), or Honeywell MultiRAE Series™ User Manual... - Page 53 1. Tilt the battery into the MultiRAE Battery Charger, making sure to align it properly. Charging begins immediately. While a battery is charging, the LED on the charger glows red. When the battery is fully charged, the LED glows green. Honeywell MultiRAE Series™ User Manual...
-
Page 54: Battery States
Alkaline Battery Pack An alkaline battery adapter is supplied with each instrument. The adapter (part number M01- 3052-000 or M01-3054-000) is installed and removed just like the rechargeable battery. It Honeywell MultiRAE Series™ User Manual... - Page 55 The alkaline battery adapter accepts four AA alkaline batteries (use only Duracell MN1500). Do not mix old and new batteries or batteries from different manufacturers. Note: When replacing alkaline batteries, properly dispose of old ones. Honeywell MultiRAE Series™ User Manual...
- Page 56 Honeywell MultiRAE Series™ User Manual...
-
Page 57: Turning The Multirae On And Off
Sensor firmware, build date, build time Installed sensors (including serial number/production/expiration/calibration date and alarm limit settings) Current date, time, temperature, and relative humidity User mode and operation mode Battery type, voltage, shutoff voltage Alarm mode and alarm settings Honeywell MultiRAE Series™ User Manual... -
Page 58: Turning The Multirae Off
Mode. It is possible that any or all of the alarms have been turned off. If all of the alarms are turned on, but one or more of them (buzzer, LED lights, or vibration alarm) does not respond to this test, do not use the instrument. Contact your Honeywell distributor for technical support. Glance Mode Glance Mode allows you to get vital information without turning the MultiRAE on. -
Page 59: Pump Status
Once the obstruction is removed, you can try to restart the pump by pressing the [Y/+]. If the pump does not restart, and the pump stall alarm continues, consult the Troubleshooting section of this guide or contact Honeywell Technical Support. It is advisable to perform a pump stall test periodically, to make sure the pump is working properly and there are no leaks in the system. -
Page 60: Calibration Status
Step through the screens on the MultiRAE using the [N/-] button until you see the screen that says, “Enter Communications Mode.” Press [Y/+]. With “PC” selected, press [Y/+]. Start Safety Suite Device Configurator (SSDC). Log in (default username is “administrator”. Default password is “Default123”) Click “Settings.” Honeywell MultiRAE Series™ User Manual... -
Page 61: Enabling Benzene Operation & Sep-Tube Cartridge Tutorial
Under “Instrument User Preferences” click to enable “Tube Mode”. In “Settings”, a tutorial feature can optionally be enabled. It shows, on the instrument screen, how to operate the device with the RAE-Sep Tube for benzene sensing. Click the checkbox to enable “Tutorial Status.” Honeywell MultiRAE Series™ User Manual... - Page 62 Exit Safety Suite Device Configurator (SSDC) and disconnect the USB cable. Press [Y/+] on the MultiRAE or MultiRAE Pro. Note: To disable either benzene-related feature, follow the same procedure, but instead of clicking the checkbox to select, deselect the option. Honeywell MultiRAE Series™ User Manual...
- Page 63 Honeywell MultiRAE Series™ User Manual...
-
Page 64: Modes Of Operation
IMPORTANT! The RAE-Sep Tube Cartridge is warranted by RAE Systems by Honeywell only for use with the MultiRAE or MultiRAE Pro monitor. Any other use will void the product warranty. In addition, Honeywell MultiRAE Series™... - Page 65 RAE Systems by Honeywell specifically disclaims liability for all loss or damage arising out of any use of the RAE-Sep Tube Cartridge that violates the warnings and instructions in this manual. Separation Tube Cartridge Installation Before using the MultiRAE or MultiRAE Pro monitor equipped with a 9.8eV lamp for benzene- specific measurement, you must attach a RAE-Sep Tube Cartridge to the instrument.
- Page 66 Press the tab at the other end to break open the other end of the tube. IMPORTANT! Once a tube’s ends are broken off, the material inside is exposed. Therefore, use the tube for sampling as soon as possible. Honeywell MultiRAE Series™ User Manual...
- Page 67 9.8eV lamp. Make sure it is set for TVOC measurement (the “T” is showing). Turn on the instrument. Allow it to go through its startup until the main reading screen is shown. Press [N/-] to advance to this screen: Honeywell MultiRAE Series™ User Manual...
- Page 68 Note: If the instrument is in this mode for more than five minutes, it automatically returns to TVOC Mode. Make sure the cartridge is installed tightly, and the selector shows “B”: Honeywell MultiRAE Series™ User Manual...
- Page 69 Countdown time is automatically adjusted, depending on temperature. Once the countdown is completed, the display shows a benzene-specific snapshot result (and triggers an alarm if appropriate). Press [N/-] to exit. You see this screen again: Honeywell MultiRAE Series™ User Manual...
- Page 70 Note: When the instrument is used only for TVOC (total VOC) monitoring, there is no need to use a RAE-Sep Tube Cartridge. If the cartridge is left on during VOC monitoring, make sure it is set for TVOC measurement (the “T” is showing). Honeywell MultiRAE Series™ User Manual...
-
Page 71: Basic User Mode
Programming Mode by unauthorized personnel. Advanced User Mode In Advanced User Mode, there are no access restrictions (you do not need a password), and MultiRAE provides the indications and data you need most for typical monitoring applications. Honeywell MultiRAE Series™ User Manual... - Page 72 Honeywell MultiRAE Series™ User Manual...
-
Page 73: Programming
To enter Programming Mode, press and hold [MODE] and [N/-] until you see the Calibration screen. No password is necessary in Advanced Mode. Press [N/-] to step through the programming screens. To enter a menu and view or edit parameters in its submenus, press [Y/+]. Honeywell MultiRAE Series™ User Manual... -
Page 74: Enter Programming In Basic Mode
Programming Mode until you turn the instrument off and on again. Once you enter Programming Mode, the Calibration menu is highlighted. Press [N/-] to step through the programming screens. Honeywell MultiRAE Series™ User Manual... -
Page 75: Menus And Submenus
Memory Full Temperature Interval Bump Action Units Cal. Reference Network Language Alarm Change Cal. Factory Site ID Reset Multi Cal. Select User ID Change Span Date Format Value Change Span2 Date Value*** Time Format Time Honeywell MultiRAE Series™ User Manual... - Page 76 SensorRAE 4R+), readings will be seen to decrease until the sensor’s bias is stable. Also, this may trigger a low alarm, even if calibration passes. Refer to RAE Systems Technical Note TN-114 for a list of biased sensors. Honeywell MultiRAE Series™ User Manual...
- Page 77 Start the flow of dry air, if used. Press [Y/+] to start fresh air calibration. A countdown screen appears. You can abort the calibration at any time during the countdown by pressing [N/-]. Honeywell MultiRAE Series™ User Manual...
- Page 78 [N/-]. Note: Dotted line indicates automatic progression. If the calibration is not aborted, the display shows the sensor names and tells you whether the calibration passed or failed, followed by the sensor readings. Honeywell MultiRAE Series™ User Manual...
- Page 79 Note: Dotted line indicates automatic progression. If the calibration is not aborted, the display shows the sensor names and tells you whether the zero calibration passed or failed, followed by the sensors’ zero calibration readings. Honeywell MultiRAE Series™ User Manual...
- Page 80 You can abort the calibration at any time during the countdown by pressing [N/-]. Note: Dotted line indicates automatic progression. If the calibration is not aborted, the display shows the sensor names and tells you whether the calibration passed or failed, followed by the sensor readings. Honeywell MultiRAE Series™ User Manual...
- Page 81 Press [Y/+] to start bump or wait for bump test to start automatically. Start the flow of calibration gas. A countdown screen is shown. You can abort the Bump test at any time during the countdown by pressing [N/-]. Honeywell MultiRAE Series™ User Manual...
- Page 82 [Y/+]. Note: You can quit the Bump Test procedure and exit to the menu whenever you see “Quit.” Press [MODE] to quit. Honeywell MultiRAE Series™ User Manual...
- Page 83 After each sensor is bump tested, and you press “OK,” the next sensor in the menu list is highlighted. Note: Dotted line indicates automatic progression. Press [Y/+] to start bump or wait for bump test to start automatically. Start the flow of calibration gas. Honeywell MultiRAE Series™ User Manual...
- Page 84 Add or remove that gas from the list by pressing [Y/+]. An “X” in a box to the left of a sensor’s name indicates it is selected. Once you have made all your selections, press [MODE] for “Done.” Honeywell MultiRAE Series™ User Manual...
- Page 85 Honeywell MultiRAE Series™ User Manual...
- Page 86 Note: Three-point calibration is disabled by default but can only be enabled on MultiRAE and MultiRAE Pro instruments with 10.6eV PID sensors, including high-range ppm and ppb PID sensors. The MultiRAE Lite PID sensor only supports 2-point calibration. Honeywell MultiRAE Series™ User Manual...
- Page 87 PH H sensor, the Span Calibration screen shows the target value of the calibration gas and reminds you to apply gas using 10 ppm H S. Follow the standard process outlined on section 9.3.2 Honeywell MultiRAE Series™ User Manual...
- Page 88 Add or remove that gas from the list by pressing [Y/+]. An “X” in a box to the left of a sensor’s name indicates it is selected. Once you have made all your selections, press [MODE] for “Done.” Honeywell MultiRAE Series™ User Manual...
- Page 89 Configurator (SSDC), all parameters defining a gas can be modified, including the name, span value(s), correction factor, and default alarm limits. * See RAE Systems by Honeywell Technical Note TN 156 (for LEL) and TN 106-B (for PID) for more details.
- Page 90 Gamma * The CO switch point from ppm to %VOL can be changed via Safety Suite Device Configurator (SSDC). Here are two examples of menu hierarchies (select the sensor type and then the measurement unit): Honeywell MultiRAE Series™ User Manual...
- Page 91 High Alarm, Low Alarm, STEL Alarm, and TWA Alarm. Alarm Settings You can enable/disable any combination of light (visible), buzzer (audible), and vibration alarms. Settings: All Enabled Light Vibration Buzzer Buzzer & Light Buzzer & Vibration Vibration & Light All Disabled Comfort Beep Honeywell MultiRAE Series™ User Manual...
- Page 92 Man Down message is sent in real time to remote observers). If neither key is pressed, then after the countdown, it goes into Man Down Alarm (again sending a message to remote observers if wirelessly enabled). Settings are available for: Honeywell MultiRAE Series™ User Manual...
- Page 93 Super Alarm (gas or radiation and Man Down) with four beeps/flashes per second. IMPORTANT! MultiRAE & MultiRAE Pro set up for benzene sampling: Man Down alarm capability is off during Benzene Mode measurements. IMPORTANT! Honeywell MultiRAE Series™ User Manual...
- Page 94 In addition, the instrument alarms (audible and visible) four times per second. The instrument also sends an emergency message to Safety Suite Device Configurator (SSDC). Press [Y/+] to clear the alarm. The alarm stops and the display returns to the main reading screen. Honeywell MultiRAE Series™ User Manual...
- Page 95 When a fall is sensed, as determined by the Motion Sensitivity and Falldown Sensitivity settings, the Falldown Window starts. If motion resumes, then the instrument resets itself and is ready for the next fall or motionless period. Honeywell MultiRAE Series™ User Manual...
- Page 96 If the person does not press [Y/+] for “Yes” in response to the “Are You OK?” question on the screen before the countdown reaches zero, the Man Down alarm is sounded and LEDs flash continuously. If the person presses [MODE] for “No” during the countdown, the Man Down alarm starts. Honeywell MultiRAE Series™ User Manual...
- Page 97 Individual sensitivity settings for Man-down and Falldown allow for customization to individuals or activities. Default values are set at the factory, but it can be helpful to try other settings in order to customize an instrument’s response. Honeywell MultiRAE Series™ User Manual...
- Page 98 (audible and visible) four times per second. Press and hold [Y/+] to activate Panic Alarm Instruments equipped with Wi-Fi also send an emergency message to Safety Suite Device Configurator (SSDC). Honeywell MultiRAE Series™ User Manual...
- Page 99 The remote alarms have same priority as local LCD UI mode) alarm. below e.g.: Device 1 gas alarmed, it reports to Central Hub, then Central Hub can trig Device 2, Device 3 Remote alarm. Honeywell MultiRAE Series™ User Manual...
- Page 100 The Quick Access Menu provides three choices. Scroll through them by pressing [N/-] and select one by pressing [Y/+]. Clear Alarm. If an alarm is sounding, press [Y/+]. The alarms are cleared, and the display shows the main reading screen. Honeywell MultiRAE Series™ User Manual...
- Page 101 The “Send Message” screen shows the first message and the total number of available stored messages (in this example, 10 messages): Scroll through the messages by pressing [N/-]. When you reach the message you want to send, press [Y/+]. If the message is sent successfully, this message is show: Honeywell MultiRAE Series™ User Manual...
- Page 102 If it is off, turn it on and try sending the message again. Received Message. Check for received messages by selecting this option (press [Y/+]). Press [Y/+] to check for received messages. If there are no received messages, the display alerts you: Honeywell MultiRAE Series™ User Manual...
- Page 103 24/7. All data are retained (even after the unit is turned off) in non-volatile memory so that they can be downloaded at a later time to a PC. Honeywell MultiRAE Series™ User Manual...
- Page 104 Safety Suite Device Configurator (SSDC) (version 3.2.0 or higher) software. You can choose any or all of four types of data (you must choose at least one): Minimum Average Maximum Real Time Honeywell MultiRAE Series™ User Manual...
- Page 105 All you have to do is press [MODE] each time you want to capture a snapshot of the data at that instant. Press [MODE] for a Datalog icon is shown momentarily during a No snapshot. snapshot. snapshot Honeywell MultiRAE Series™ User Manual...
- Page 106 Turn the radio on or off via this menu. Choose between “On” and “Off” by pressing [N/-]. Select the highlighted state by pressing [Y/+]. Save or register the change: Press [Y/+] to save the change. Press [N/-] to undo the change. Honeywell MultiRAE Series™ User Manual...
- Page 107 PAN ID cannot be changed. To make the menu item available and to change the PAN ID in the instrument, turn Roaming off. Press [Y/+] to increase the number and [N/-] to advance to the next digit. After moving to the last digit and making changes, press [MODE]. Honeywell MultiRAE Series™ User Manual...
- Page 108 Press [Y/+] to save the change. Press [N/-] to undo the change. Note: You cannot change the channel setting on an instrument equipped with a radio modem that operates at a frequency of 868 MHz. Honeywell MultiRAE Series™ User Manual...
- Page 109 Scroll down the list of intervals by pressing [N/-] until the interval you want is highlighted. Select the highlighted interval by pressing [Y/+]. Save or register the change: Press [Y/+] to save the change. Press [N/-] to undo the change. Honeywell MultiRAE Series™ User Manual...
- Page 110 Press [N/-] to undo the change. Factory Reset Restore all the wireless settings to their original factory defaults. Caution! Once you reset the wireless settings, you cannot retrieve any of the settings deleted by performing this reset. Honeywell MultiRAE Series™ User Manual...
- Page 111 To change wireless settings on instruments equipped with Wi-Fi, go to “Wireless” in Programming Mode: Press [Y/+] to enter the Wireless menu. Radio ON/OFF. Press [Y/+] to select “Radio On/Off.” Press [N/-] to select “Off” or “On.” Honeywell MultiRAE Series™ User Manual...
- Page 112 If messages have been sent, the display shows the first one and tells you the total number of messages sent (such as 1/5, first message of five messages, etc.). It also shows the time and date when the message was sent: Honeywell MultiRAE Series™ User Manual...
- Page 113 The submenus under “Monitor” control the LCD’s contrast, operation mode, pump speed, and other parameters. Press [N/-] to advance through the submenus, and when you reach the last one, it returns to the first selection. Honeywell MultiRAE Series™ User Manual...
- Page 114 Hygiene Mode. Search Mode When the instrument is in Search Mode, it only samples when you activate sampling. When you see the display that says, “Ready…Start sampling?” press [Y/+] to start. The instrument Honeywell MultiRAE Series™ User Manual...
- Page 115 Choose and enter an 8-digit Site ID to uniquely identify the particular site where the instrument is to be used. The first four digits can be an alphabet letter or number, while the last four digits Honeywell MultiRAE Series™ User Manual...
- Page 116 Basic User Mode. It can be used with either of the Operation Modes, Hygiene or Search. No password is required to enter the Programming Menu when in Advanced User Mode. Honeywell MultiRAE Series™ User Manual...
- Page 117 The LCD Flip feature can be set to On or Off. Note: When LCD Flip is enabled and the instrument is inverted, the screen flips, and the button functions also “flip” so that their orientation changes, as well. Honeywell MultiRAE Series™ User Manual...
- Page 118 Honeywell MultiRAE Series™ User Manual...
-
Page 119: Policy Enforcement
Turn off the MultiRAE (or put the MultiRAE into AutoRAE 2 Mode) and set it in the cradle. Start Safety Suite Device Configurator (SSDC) software on the PC. Enter a username and password (the default administrator username is “administrator” and the password is “Default123”). The software will scan automatically for instruments. Honeywell MultiRAE Series™ User Manual... - Page 120 Click on “Settings” and scroll down to “Policy Settings” “Policy Enable Bump” and “Policy Enable Calibration” can be enabled or disabled from this screen. “Policy Bypass Bump” and “Policy Bypass Calibration” can also be activated Honeywell MultiRAE Series™ User Manual...
- Page 121 These are the screens that are shown on a MultiRAE after startup if “Can Bypass” is selected: If “Can’t Bypass” is selected, the display looks like this, and only allows the options of performing the test or shutting down: Honeywell MultiRAE Series™ User Manual...
- Page 122 The screen now displays: “Ready To Communicate With Computer.” Start Safety Suite Device Configurator (SSDC) software on the PC. Enter a username and password (the default administrator username is “administrator” and the password is “Default123”). Click “LOGIN.” Honeywell MultiRAE Series™ User Manual...
-
Page 123: Deactivating Policy Enforcement
After startup, enter the password when prompted (default is “0000”) and press [MODE]. Press [N/-] repeatedly until you see the “Enter Communications Mode?” screen. Press [Y/+] to enter Communications Mode. Start Safety Suite Device Configurator (SSDC). Honeywell MultiRAE Series™ User Manual... - Page 124 Click “Settings.” Scroll down to “Policy Settings.” Deselect Policy Settings features you do not wish to use. Click When the upload is done, exit SSDC. Press [Y/+] on the MultiRAE to exit Communication Mode. Honeywell MultiRAE Series™ User Manual...
- Page 125 Honeywell MultiRAE Series™ User Manual...
-
Page 126: Calibration And Testing
Bump Testing and Calibration Honeywell recommends that a bump test be conducted prior to each day’s use. The purpose of a bump test is to ensure that the instrument’s sensors respond to gas and all the alarms are enabled and functional. - Page 127 (The connectors with the on the Calibration Adapter has small grooves on its screws on both sides of Calibration underside to allow gas to escape after passing the MultiRAE’s gas Adapter. over the sensors. inlets. Honeywell MultiRAE Series™ User Manual...
- Page 128 With the instrument running in Normal Mode and the main measurement screen shown, press both [Y/+] and [N/-] at the same time and hold them for 5 seconds. If all the sensors have warmed up, the Multi-Bump Test menu then appears: Honeywell MultiRAE Series™ User Manual...
- Page 129 PID sensor. Note: If other installed sensors require a dedicated cylinder of gas to calibrate, the instrument prompts for calibrating these sensors at this point. Honeywell MultiRAE Series™ User Manual...
- Page 130 MultiRAE equipped with a gamma sensor to check the readings (Lantern Mantle PN: 029-5900-000). A raised dot on the rubber boot marks where the sensor is located inside the instrument. Gamma Sensor Location Honeywell MultiRAE Series™ User Manual...
-
Page 131: Zero/Fresh Air Calibration
This procedure determines zero points of most sensors. The MultiRAE should be zero- calibrated in clean air with 20.9% oxygen or with a cylinder of clean zero air. At the Calibration menu, select “Fresh Air” by pressing [Y/+] once to enter fresh air calibration. Honeywell MultiRAE Series™ User Manual... -
Page 132: Span Calibration
This procedure determines the second point of the sensor calibration curve for the sensor. Note: When a manual calibration is performed, the readings shown are in the equivalent units of the calibration gas, and not the measurement gas. Honeywell MultiRAE Series™ User Manual... -
Page 133: Three-Point Calibration For Enhanced Linearity With Extended-Range And Ppb Pid Sensors
1 ppm Isobutylene supported dry air resolution MultiRAE or 0 to 2,000 ppm 100 ppm MultiRAE Pro Fresh air or dry range, 1 ppm Isobutylene 5 equipped with 9.8eV supported resolution ppm Benzene lamp Honeywell MultiRAE Series™ User Manual... - Page 134 Click 3-Point Calibration (the check mark should now be showing). Click the icon. When you are done, quit Safety Suite Device Configurator (SSDC) and then press [Y/+] on the MultiRAE to exit the PC communications mode. The instrument returns to operating in Normal mode. Honeywell MultiRAE Series™ User Manual...
- Page 135 If the calibration reaches its conclusion, it shows the sensor names and tells you whether the calibration passed or failed, followed by the sensor readings. Note: If there are other sensors to be calibrated at this stage, the screens will guide you through the process. Honeywell MultiRAE Series™ User Manual...
- Page 136 Verify that the displayed calibration value meets the concentration label on the gas cylinder. Start the flow of calibration gas. Press [Y/+] to start calibrating. You can abort the calibration at any time during the countdown by pressing [N/-]. Honeywell MultiRAE Series™ User Manual...
- Page 137 Note: If the sensor calibration fails, try again. If calibration fails repeatedly, turn off the instrument and then replace the sensor. WARNING: Do not replace sensors in hazardous locations. Honeywell MultiRAE Series™ User Manual...
- Page 138 Honeywell MultiRAE Series™ User Manual...
-
Page 139: Multirae Pro Normal & Gamma Operation
The pump remains off and gamma radiation is measured all the time. WARNING Toxic and combustible gases cannot be detected by the MultiRAE when it is operated in gamma- only mode. Honeywell MultiRAE Series™ User Manual... - Page 140 Activating Gamma-Only Measurement Mode To activate gamma-only measurement mode: Press [N/-] when the instrument is running in normal (multi-threat) mode: Press [Y/+] when the following screen appears: Honeywell MultiRAE Series™ User Manual...
- Page 141 Press [MODE] to enter gas-only mode. Notes: If the monitor runs in gamma-only mode for over 20 minutes, TWA is not calculated for gas sensors. STEL is reset for gas sensors when the instrument exits gamma-only mode. Honeywell MultiRAE Series™ User Manual...
- Page 142 Honeywell MultiRAE Series™ User Manual...
-
Page 143: Via Computer
(PN: 410-0203-000) to connect the Travel Charger or Desktop Cradle to a computer running Safety Suite Device Configurator (SSDC) or a USB A to USB B cable to connect the AutoRAE 2. Travel Charger Desktop Charging Cradle Honeywell MultiRAE Series™ User Manual... -
Page 144: Downloading Datalogs And Performing Pc-Based Instrument Configuration And Firmware Upgrades
Note: The most recent version of Safety Suite Device Configurator (SSDC) software is available for a free-of-charge download at: https://explore.honeywell.com/safety_suite_device_ configurator.html The MultiRAE must be connected to a PC through the supplied Desktop Cradle, Travel Charger, or AutoRAE 2 and must be in the PC or AutoRAE 2 communications mode. - Page 145 • Click on “Choose file” in the “Update Firmware Version” selection dialog box. The firmware can be downloaded from: https://www.honeywellanalytics.com/en-gb/downloads • Browse to select the firmware file to apply (.rfp file). The firmware update will start. Honeywell MultiRAE Series™ User Manual...
- Page 146 Honeywell MultiRAE Series™ User Manual...
-
Page 147: Maintenance
2. Remove the two hex screws located below the battery area. 3. Pull the bottom of the boot back over the rear side of the instrument. 4. Carefully slide the boot upward and slide it over the D-ring and clamp. Honeywell MultiRAE Series™ User Manual... -
Page 148: Replacing The Filters
O-rings in their and tighten the four cover in place. proper locations. O-rings may need to be screws. replaced as well if they appear worn down, cracked, or dirty Honeywell MultiRAE Series™ User Manual... -
Page 149: Replacing The Gas Inlet Adapter
Install the replacement sensor. It can only go into its slot one way. The connector inside the MultiRAE and the indexing guides are good visual indicators of how to set the sensor into position. Make sure the indexing keys are aligned and that the sensor is seated firmly. Honeywell MultiRAE Series™ User Manual... -
Page 150: Removing/Cleaning/Replacing A Pid (Pumped Versions Only)
(part number G02-0306-003, package of three). Its “C”-shaped end has small “teeth” inside. Slide the tool so that the teeth slip into the notch between the module’s cap and body: Honeywell MultiRAE Series™ User Manual... - Page 151 Clean the lamp’s window with a cleaning swab dipped in isopropanol or methanol lamp cleaner and allow it to dry. Do not touch the lamp window with your fingers, as the residual oils will affect its performance and shorten its life. Honeywell MultiRAE Series™ User Manual...
-
Page 152: Replacing The Pump
Note: Always calibrate the MultiRAE after replacing the sensor module. Replacing the Pump If your MultiRAE has a pump and it requires replacement, please contact Honeywell or your Honeywell Distribution Center. Only authorized personnel should replace the pumps. Any attempt to change the pump will void the warranty. - Page 153 Honeywell MultiRAE Series™ User Manual...
-
Page 154: Alarms Overview
1. Enter the Alarm Mode sub-menu of the Alarms section under the Programming Menu. 2. Select Auto Reset or Latched by pressing [N/-] to select, and [Y/+] to confirm the choice. 3. Press [Y/+] to save your selection. Honeywell MultiRAE Series™ User Manual... -
Page 155: Alarm Signal Summary
“STEL” at STEL sensor 400ms Reading beep/sec location “TWA” at sensor 400ms Reading beep/sec location “Cal” at Calibration sensor 400ms Reading Fail beep/sec location “Bump” at Bump Fail sensor 400ms Reading beep/sec location Honeywell MultiRAE Series™ User Manual... - Page 156 “Negative” means that the true sensor reading is below zero, even though a zero reading is shown for the sensor. “Nwk Lost” means “Network Lost.” This indicates that the MuliRAE has lost wireless connectivity with its network. “Nwk Joined” means that the MultiRAE has joined a wireless network. Honeywell MultiRAE Series™ User Manual...
- Page 157 400ms beeps/sec g 9999 location 7 beeps (>Hig (30ms)/se 6 beeps (40ms)/se 5 beeps (50ms)/se Geiger Counte 4 beeps Readin 400ms r-style (60ms)/se change Alarm 3 beeps (70ms)/se 2 beeps (80ms)/se 1 beep (>Low) Honeywell MultiRAE Series™ User Manual...
- Page 158 Connectio 400ms Broken Alarm beep/min n Broken” message Blinking Readin Nwk Lost RF offline 400ms beep/min symbol RF symbol Readin Nwk Joined 1 beep 400ms with RSSI beep/min Readin Comfort Beep Lowest No LED flashing Honeywell MultiRAE Series™ User Manual...
- Page 159 True sensor reading is below zero, even though a zero 1 beep/flash reading is shown for the sensor. per second * For oxygen, “low alarm limit” means a concentration is lower than the low alarm limit. Honeywell MultiRAE Series™ User Manual...
-
Page 160: Troubleshooting
Incorrect sensor in location slot. Check Error 1005 Sensor Not Supported correct sensor’s location. Programming Basic Programming is by default. Password Options not Password not entered must be entered (default is "0,0,0,0") to available access Programming Menu Honeywell MultiRAE Series™ User Manual... - Page 161 Contact RMA Group or Authorized Service connection to PCB. Error 3003 Center to replace Back Gas Plate. TH Sensor is bad. There is a problem with the Contact RMA Group or Authorized Service Error 4003 Honeywell MultiRAE Series™ User Manual...
- Page 162 Center to replace PCB. Instrument is in alarm even Unit has a "Latched" alarm Press the Y/+ key to clear alarm. though there is feature. no gas If you need replacement parts, a list is available online: www.sps.honeywell.com Honeywell MultiRAE Series™ User Manual...
- Page 163 Honeywell MultiRAE Series™ User Manual...
-
Page 164: Pump Stall Threshold Adjustment
When you see the password screen, input your 4-digit password, and then press [MODE]. Once you have entered Diagnostic Mode, press [N/-] until the “Pump” screen is displayed. Set the high and low threshold settings for pump stall using the instructions in this section. Honeywell MultiRAE Series™ User Manual... -
Page 165: Selecting The Pump Stall Threshold Method
Setting Pump Stall Threshold Values – Dynamic Method When the Dynamic pump stall threshold values are shown, you can perform calibration to set the pump stall values dynamically. Press [MODE] to begin calibration. This screen is shown, indicating that it is ready: Honeywell MultiRAE Series™ User Manual... - Page 166 Once the countdown is finished, this message is displayed: Hold your finger over the inlet and allow the countdown to proceed. Press [N/-] anytime to abort. When the countdown is finished, the main Dynamic pump stall screen is shown. Honeywell MultiRAE Series™ User Manual...
-
Page 167: Setting Pump Stall Threshold Values - Static Method
≤ -10in Hg Flow >200 cc/min >300 cc/min rate Idle (I) 100 to 200 counts 150 to 250 counts (Block-Idle) > 100 (Block-idle) > 100 Block counts counts Stall (Idle + Block)/2 (Idle + Block)/2 Setting Honeywell MultiRAE Series™ User Manual... - Page 168 If the pump does not stall or send the instrument into alarm, then there may be a leak in the gas inlet or the pump is weak or defective and should be replaced. Honeywell MultiRAE Series™ User Manual...
- Page 169 If the pump does not stall and send the instrument into alarm, then there may be a leak in the gas inlet or the pump is weak or defective and should be replaced. Important! When you are done setting thresholds, exit Diagnostic Mode and test the instrument before actual use. Honeywell MultiRAE Series™ User Manual...
- Page 170 Honeywell MultiRAE Series™ User Manual...
-
Page 171: Configuring Wi-Fi Communication
Connect Wi-Fi-equipped instrument via USB to a PC running SSDC. Place the instrument in Communications Mode. From the main screen, press [N/-] until you see “Enter Communications Mode?” Press [Y/+]. Select PC. The message on the display should say “Ready To Communicate With Computer”. Honeywell MultiRAE Series™ User Manual... - Page 172 Changes in the setting can now be performed for the Wi-Fi equipped instrument. Click save the new settings to the instrument. Wi-Fi Power Select either “On” or “Off” to set the default power setting for your Wi-Fi-equipped instrument. Honeywell MultiRAE Series™ User Manual...
- Page 173 Choosing the best Wi-Fi channel on your router helps to reduce interference and improve your Wi-Fi connectivity. If you know that some channels are not used, then remove them. This eliminates searching for channels that either are not used and saves time when connecting to a network. Honeywell MultiRAE Series™ User Manual...
- Page 174 Protect all data that is transmitted through the wireless network Check with your system administrator for the wireless security mode you should use. Use the drop-down menu to select the type of security: Then set your Security Key. Honeywell MultiRAE Series™ User Manual...
- Page 175 Check with your IT department for guidance on setting IP addresses for your system within a network. Server Port Set the appropriate port to match your system (for example, 9723). Check with your IT department for guidance on server port settings. Honeywell MultiRAE Series™ User Manual...
-
Page 176: Configuring Messaging
Note: When you type a message, it will not accept more characters after you reach the 20- character maximum. When you are done making changes to the configuration for Wi-Fi and Messages, upload your changes to your Wi-Fi-equipped instrument. Click the “Save” icon to send the new settings to the instrument. Honeywell MultiRAE Series™ User Manual... -
Page 177: Configuring Ble
Please engage with Honeywell support to understand approved third-party systems supported by Profile Mode. When in Profile Mode, an instrument is absolutely not compatible with Honeywell mobile apps. In App Mode, you can turn BLE on or off, plus set a BLE PIN Number in Safety Suite Device Configurator (SSDC). - Page 178 Check for interference (too many BLE communications nearby, too much distance between the MultiRAE and the smartphone or third-party devices). You may need to turn off the MultiRAE and exit the app, and then restart both and re-pair. Honeywell MultiRAE Series™ User Manual...
- Page 179 License Key Installation After receiving the License Key for MultiRAE BLE via email from Honeywell Customer Support, do the following: Use the supplied PC Communications Cable (USB to mini-USB cable) to connect the MultiRAE’s Desktop Cradle, AutoRAE 2 Cradle, or Travel Charger to a PC where the License Key will be stored.
- Page 180 Enter the Security Code in the field provided and click the 'Enable' button. Once licensing is enabled, you will see an 'Add Key' button under the 'License" tab. Click the button and enter the license key. Honeywell MultiRAE Series™ User Manual...
- Page 181 Note: Licenses must stay on this particular computer. They cannot be deactivated from this PC and moved to another. If this computer is lost, stolen, corrupted, or replaced, contact Customer Support. Honeywell MultiRAE Series™ User Manual...
- Page 182 NOTE: More than one key can be enabled and added. The license key can be added using another instance of SSDC or same instance. When you are done, press [Y/+] to exit the PC communications mode on the MultiRAE. The instrument returns to operating in Normal mode. Honeywell MultiRAE Series™ User Manual...
- Page 183 Honeywell MultiRAE Series™ User Manual...
-
Page 184: Specifications
(flashing bright red LEDs), and on-screen indication of Alarms alarm conditions • Man Down Alarm with pre-alarm and real-time remote wireless notification • Continuous datalogging (six months for 5 sensors at 1-minute intervals, Datalogging 24/7) Honeywell MultiRAE Series™ User Manual... - Page 185 IECEx SIR 11.0069X, Ex ia d IIC T4 Gb, Ex ia I Ma (for PGM62x8) IECEx TSA 13.0021X / ANZEx 13.3023X Ex ia IIC T4 Ga Ex ia I Ma (PGM62x0/PGM62x6) Ex ia d IIC T4 Gb Ex ia I Ma (PGM62x8) EMC directive: 2014/30/EU Honeywell MultiRAE Series™ User Manual...
- Page 186 Brazilian Safety Certification INMETRO DNV 18.0198X Normas Técnicas: Standards/Normas ABNT NBR IEC 60079-0-2013, ABNT NBR IEC 60079-1:2016 e ABNT NBR IEC 60079-11:2013 Sensor Specifications Radiation Sensor Range Resolution 0 to 20,000 Gamma 1 µRem/h µRem/h Honeywell MultiRAE Series™ User Manual...
- Page 187 ), allows H S cross- 0 to 20 ppm 0.1 ppm calibration Sulfur Dioxide (SO 0 to 20 ppm 0.1 ppm * Supported in MultiRAE Lite Pumped version only. ** Supported in Diffusion version only. Honeywell MultiRAE Series™ User Manual...
- Page 188 Ammonia 0.80 * Response of the Honeywell LEL sensor to a range of gases at the same LEL, expressed as percent of methane response (=100). These figures are for guidance only and are rounded to the nearest 5%. For the most accurate measurements, the instrument should be calibrated with the gas under investigation.
- Page 189 First Second digit digit Year Month Year Month code code 2014 January 2015 February 2016 March 2017 April 2018 2019 June 2020 July 2021 August 2022 September 2023 October 2024 November 2025 December Honeywell MultiRAE Series™ User Manual...
- Page 190 Honeywell MultiRAE Series™ User Manual...
- Page 191 Alarm Alarm C03-0980- C03-0978- C03-0956- C03-0906- C03-0979- CO comp H C03-0950- CO High Range C03-0913- COSH_CO C03-0913- COSH_H C03-0954- EtO-A C03-0922- EtO-B C03-0923- EtO-C, HR C03-0981- C03-0907- C03-0904- S High-Range C03-0982- HCHO 0.75 C03-0949- C03-0950- Honeywell MultiRAE Series™ User Manual...
- Page 192 NDIR, %LEL C03-0963- NDIR, %VOL C03-0961- NDIR CO 2000 5000 30000 5000 C03-0912- PID ppb 10.6eV C03-0912- PID High Range 10.6Ev C03-0912- PID Low Range 10.6eV C03-0912- PID 9.8eV C03-0912- PID 9.8eV C03-0910- Gamma C03-0986- Gamma Honeywell MultiRAE Series™ User Manual...
- Page 193 C03- 0978- Chlorine sensor C03- 0956- Chlorine Dioxide sensor C03- 0954- EtO-A Ethylene Oxide sensor (0 - 100 ppm, 1 ppm res) C03- 0922- EtO-B Ethylene Oxide sensor (0 - 10 ppm, 0.1 ppm res) Honeywell MultiRAE Series™ User Manual...
- Page 194 C03- 0908- Liq Oxygen sensor C03- 0976- Phosphine sensor (up to 20 ppm reading) C03- 0973- Sulfur Dioxide sensor C03- 0961- Carbon Dioxide C03- 0942- Oxygen Combustible Sensors C03- 0911- Combustible catalytice bead %LEL sensor Honeywell MultiRAE Series™ User Manual...
- Page 195 Corporate Headquarters Honeywell 700 Mint St. Charlotte, NC 28202, USA Phone : +1 888 749 8878 rae-callcenter@honeywell.com Worldwide Sales Offices USA/Canada 1.877.723.2878 Europe +800.333.222.44/+41.44.943.4380 Middle East +971.4.450.5852 China +86.10.5885.8788-3000 Asia Pacific +852.2669.0828 Tuesday, February 14, 2023 M01-4003-000_EN_RevL_MultiRAE_UM Honeywell MultiRAE Series™ User Manual...