Honeywell BW Ultra User Manual
Portable five-gas detector
with internal pump
Hide thumbs
Also See for BW Ultra:
- User manual ,
- Quick reference manual (140 pages) ,
- User manual (29 pages)

Related Manuals for Honeywell BW Ultra


Summary of Contents for Honeywell BW Ultra
- Page 1 | Gas Detection User Manual Honeywell BW ™ Ultra Portable Five-gas Detector with Internal Pump 50122982-265 EN-A...
- Page 2 Honeywell until receipt by the buyer of shipping instructions from Honeywell. • The right of Honeywell to require that the buyer provides proof of purchase such as the original invoice, bill of sale, or packing slip to establish that the product is within the warranty period.
-
Page 3: Table Of Contents
Troubleshooting ........................24 Deactivate the detector ......................6 Glossary ............................25 Navigate the menu ........................6 Contact Honeywell ........................26 View detector’s general information ................... 6 Reset TWA or STEL readings ....................6 Reset Peak readings ........................6 Reset TWA/STEL and Peak readings .................. 7 Zero sensors ........................... -
Page 5: Before You Begin
% volume customers. Combustible gases (LEL) a) percent of lower explosive limit (%LEL) In no event is Honeywell liable to anyone for any indirect, Lower explosive limit b) percent by volume methane 0-5.0% v/v special, or consequential damages. The information and... -
Page 6: Safety Information: Read This First
LEL sensor after any gas exposure that causes alarm in the toxic gas sensors. • The Honeywell BW ™ Ultra is provided with an antistatic coating over the LCD window to minimize the risk of ignition due to electrostatic discharge. Periodic inspection of this coating is required to ensure no degradation, delamination, abrasions or other deformities to this surface. -
Page 7: Sensor Poisons And Contaminants
Sensor Poisons and MISES EN GARDE Contaminants • POUR DES RAISONS DESECURITE, CET EQUIPEMENT DOlT ETRE UTILISE, ENTRETENU ET REPARE UNIQUEMENT PAR UN PERSONNEL QUALIFIE. Many chemicals can contaminate and permanently ETUDIER LE MANUEL D’INSTRUCTIONS EN ENTIER AVANT D’UTILISER, damage sensors. Follow these guidelines when using ‘ENTRETENIR OU DE REPARER L’EQUIPEMENT. -
Page 8: Getting Started
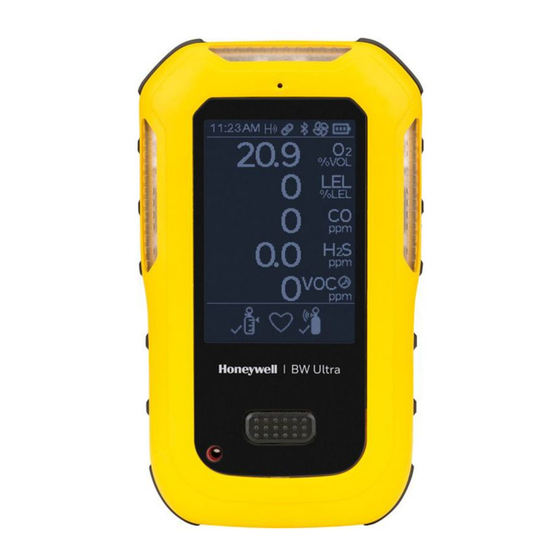
Getting Started Screen Icons The detector’s screen, shown here with typical icons, will display those shown in the following table as conditions dictate. Appearance BW ULTRA Screen Icons 1. Visual alarm indicator Pump/header 2. Exhaust port 3. Screen BLE Pairing Error Pump passed 4. -
Page 9: Alarms
Depending on the type of Fast flash alarm, these flashes, vibrations, and noises will be different. NOTE: In Stealth mode the Honeywell BW ™ Ultra only Black box around gas Over Limit vibrates. -
Page 10: Detector Operations
Navigate the menu Detector Operations There are four main menu items. • See Information • Start Bump Test Activate the detector • Zero Sensors • Start Calibration Turn-on the detector in a safe area with an atmosphere of 1. Double pressing the button displays all four options on 20.9% oxygen and free of hazardous gas. -
Page 11: Reset Twa/Stel And Peak Readings
Latching Alarms Reset TWA/STEL and Peak readings If enabled, during an alarm condition the Latching Alarms option causes the low and high gas alarms (audible, visual, Before you begin. and vibrator) to persist until the alarm is acknowledged and You need to enable TWA/STEL Reset and Peak Reset in the gas concentration is below the low alarm setpoint. -
Page 12: Start A Bump Test
7. Press the button to finish the procedure. CAUTION Honeywell recommends to bump test the sensors before each day’s use to confirm their ability to respond to gas by exposing the sensors to a gas concentration that exceeds the alarm setpoints. -
Page 13: Select An Operation Mode
Fleet Manager II. mode, Hole Watch mode, and Inert mode. Necessary to configure detector settings: : Honeywell BW ™ Ultra always monitors gas levels, regardless of Note • Honeywell BW ™ Ultra detector the operating mode. If the detector detects a sudden gas exposure, •... -
Page 14: Bluetooth Pairing
Bluetooth Pairing The user can pair the Honeywell BW ™ Ultra to a mobile device via built in Bluetooth Low Energy (BLE). The Honeywell Safety Communicator app, installed on the mobile phone, can then show gas readings and alarms from the Honeywell BW ™ Ultra unit that is connected. -
Page 15: Clean The Detector
• Verify the expiration date on the cylinder before use. II Software. • Do not use an expired gas cylinder. • Contact Honeywell if a certified calibration of the detector is required. Before you begin. • You should have the IR Connectivity Kit (sold separately) to transfer the data Charge the Battery from a computer to the detector. -
Page 16: Service
Service 3. Remove the LCD: a) Disengage the two snaps on the upper sides of the LCD carrier. Replace the Printed Circuit Board (PCB) 1. Turn the instrument off. 2. Remove the front shell: b) Swing LCD forward watching for the ZIF connector. a) Turn the instrument face down and unscrew on the battery pack. - Page 17 9. Insert the 4R+ ribbon cable into the ZIF connector and b) Place the PCB into the front shell and insert the two press down on the 4R+ ZIF latch to engage the cable. screws (torque 3-4 in-lbs) to fasten both pieces. c) Replace the back shell and install the four screws 10.
-
Page 18: Replace The Lcd
Replace the LCD 4. Remove the LCD: a) Disengage the two snaps on the upper sides of the 1. Turn the instrument off. LCD carrier. 2. Remove the battery: a) Turn the instrument face down and unscrew on the battery pack. b) Swing LCD forward watching for the ZIF connector. - Page 19 c) On the front shell, ensure the LCD gasket is aligned b) Push the battery pack into place and tighten the with the pins. The frame should be facing up. battery retention screw (torque 4-5 in-lbs). c) Turn on the instrument and allow for the sensors to stabilize.
-
Page 20: Replace The 1-Series Sensors
Replace the 1-Series Sensors d) Pull the sensor manifold out from the pump manifold. 1. Turn the instrument off. 2. Remove the battery: a) Turn the instrument face down and unscrew on the battery pack. e) Remove the desired sensor. b) Remove the battery pack and the four screws in the battery compartment. - Page 21 7. Attach the battery: a) To place the battery pack correctly, first engage hooks on the bottom of the battery pack. b) Push the battery pack into place and tighten the battery retention screw (torque 4-5 in-lbs). 8. Turn on the instrument and allow for the sensors to stabilize.
-
Page 22: Replace The 4R+ Sensors
Replace the 4R+ Sensors 4. Install the new sensor: a) Retrieve the new sensor and insert it into the 1. Turn the instrument off. manifold aligning the sensor guides to the instrument’s slots. 2. Remove the battery: a) Turn the instrument face down and unscrew on the battery pack. -
Page 23: Replace The Pump
Replace the Pump b) Fold the pump wires across the bottom of the pump motor. 1. Turn the instrument off. 2. Remove the battery: a) Turn the instrument face down and unscrew on the battery pack. c) Insert the pump into the manifold assembly. b) Remove the battery pack and the four screws in the battery compartment. -
Page 24: Replace The Battery
5. Remove both the particulate and hydrophonic filter. retention screw (torque 4-5 in-lbs). 6. First, Install both the hydrophonic and then the : Use only the HU-BAT Honeywell battery pack. Note particulate filters. 7. Place the filter cover and rotate the filter cover clockwise until stop. -
Page 25: Appendices
Appendices Specifications Detector dimensions: 8.1 x 14.6 x 5.1cm Weight: 444.2 g Operating temperatures: -4°F to +122°F (-20°C to +50°C) Auto detect gas Battery operating times: 10 hours. While the gas is applied during calibration, the detector will Rechargeable battery: 8 hours in a temperature range from wait for up to 300 seconds to allow the gas to stabilize. -
Page 26: Standards And Certifications
Standards and Certifications FCC Compliance This device complies with part 15 of the FCC Rules. The Honeywell BW ™ Ultra gas detector is in conformity Operation is subject to the following two conditions: with the following standards and certifications: (1) This device may not cause harmful interference, and (2) this device must accept any interference received, including interference that may cause undesired operation. - Page 27 In ISA 60079-29-1, Honeywell BW ™ Ultra was tested only for IP54. Other IP ratings are not the scope of ISA 60079- 29-1. Honeywell BW ™ Ultra was pressure tested for 80, 100 and 120 kPa in ISA 60079-29-1. Outside of 80 - 120 kPa is NOT the scope of ISA 60079-29-1.
-
Page 28: Troubleshooting
Sensor fails to zero during startup self-test Change the sensor. The detector does not activate. Depleted battery. Replace the battery. Damaged detector. Contact Honeywell. Detector automatically deactivates. Automatic deactivation due to critical low Replace the battery. battery. Lockout on Self-Test Error is enabled and Change the sensor. -
Page 29: Glossary
Fleet Manager concentration a worker can be safely exposed to for short periods of time (5-15 minutes maximum). A proprietary, Windows-based software developed by Honeywell to configure and manage docking modules, calibration, bump tests, and data TWA Alarm logs. Fleet Manager II is available for download from The time-weighted average (TWA) is a safety measure used to calculate www.honeywellanalytics.com... -
Page 30: Contact Honeywell
Contact Honeywell Corporate Headquarters Honeywell Analytics Suite 110, 4411-6 St SE Calgary, Alberta Canada T2G 4E8 Toll free: 1-888-749-8878 United States Honeywell Analytics 405 Barclay Boulevard Lincolnshire, Illinois 0069 USA 60069 Toll free: 1-888-749-8878 Europe Honeywell Analytics Javastrasse 2 8604 Hegnau... - Page 32 © Honeywell, 2018 All rights reserved...