
Related Manuals for Mitsubishi Electric HD-6000

Summary of Contents for Mitsubishi Electric HD-6000
- Page 1 DIGITAL TELEVISIONS MFSUBISHI i,VillWPOi Owner Information: Use this space to record the serial number of your HD=6000. This information is on the back of your receiver/controller. Serial number visit bs_te...
- Page 2 RISK OF ELECTRIC SHOCK DO NOT OPEN CAUTION: TO REDUCE THE RISK OF ELECTRIC SHOCK, DO NOT REMOVE COVER (OR BACK). NO USER SERVICEABLE PARTS INSIDE REFER SERVICING TO QUALIFIED SERVICE PERSONNEL. The exclamation point within an equilateral triangle is intended to alert the user to the presence of important operating and maintenance (servicing) instructions in the literature accompanying...
- Page 3 Consult the dealer or an experienced radioiTV technician for help. Changes or modifications not expressly approved by Mitsubishi could cause harmful interference and would void the user's authority to operate this equipment.
- Page 4 Monitor with Component Video ..............Display Monitor with an HDMm mnput ................ HDMm Source Device ....................DVi Device ........................To the Mitsubishi L%4260 LCD TV ................mR Emitter NetCommand® ..................mRSensor mnput ......................Compatible (EEE 1394 Devices ................. Helpful Hints .......................
-
Page 5: Table Of Contents
..................Direct VCR Recording from an Antenna or Cabme Source ........PC Viewing ........................MediaCommand and Media Card Pmayback with the Mitsubishi LTo4260 ..65 Chapter 5 Tv Menu Screen Operations Main Menu Choices ....................Setup Menu ......................... NetCommand® Menu .................... - Page 6 IM PORTANT SAFEG UAR DS PUease read the following safeguards for your HDTV receiver/controller and retain for future reference. AUways follow aH warnings and instructions marked on the tebvision. Read, Retain and Follow All instructions Read aHsafety and operating instructions before operating the HDTV receiver/controller.
- Page 7 IMPORTANT SAFEGUARDS, continued Power Lines An outside antenna system shouid not be ]oeated in the vbirfity of overhead power Hinesor other ebctrb Hight or power circuits, or where it can fan into such power Hines or circuits. When installing an outside antenna system, extreme care should be taken to keep from touching such power lines or circuits as contact with them might be fatal.
- Page 8 Thanks... We are honored that you chose Mitsubishi as your path to upgrading your high definition monitor dLsplay to a furl HDTV. The HD-6000 Lsdesigned to become the cornerstone of your home entertainment system, offering the flexibility of using both digital sources and analog sources in an advanced, but simple to use single control system.
- Page 9 HDo6000 Receiver/Controm_er Overview Accessories ................SpeciaU Features ................ Front Control Panel ..............Back Panel ..................
-
Page 10: Accessories
HD=6000 Accessories PUease take a moment to review the following Uistof items to ensure that you have received everything incUuding: 5, One Quadruple IR Emitter Cable (allows NetCommand control other devices) 1. Remote Control 6. One HDMf to HDMI cable 2. -
Page 11: Speciau Features
LT-4260 CompatibiJity The HD-6000 is designed to work with all of the features of the Mitsubishi LT-4260 LCD HDTV display. The HD-6000 has the correction connection to work with the authorized card reader... -
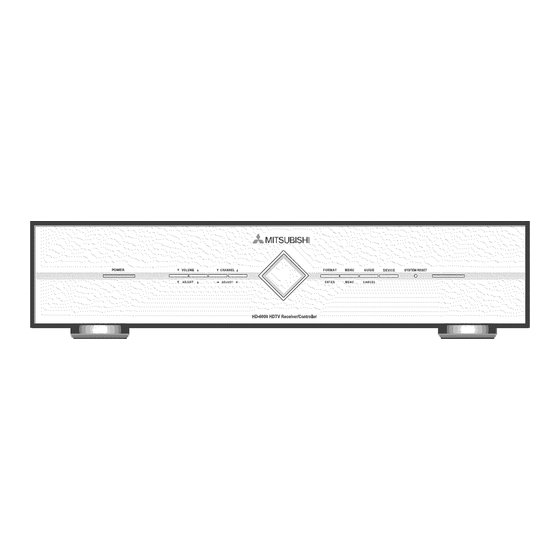
Page 12: Front Control Panel
Front ControJ PaneJ MITSUBJSHJ HD-6000 HDTV Receive_lControimer Except for SYSTEM RESET, the buttons on the Front Control Panel duplicated on the remote control. The top row of labels show the control functions when there are no TV menus displayed on the screen. The bottom row of labels show the control... -
Page 13: Back Panel
Back Panel 1. IR Emitter°NetCommand ® HDMI=to-DVI adaptor or cabJe wilI be necessary to make Two jacks are provided for connecting IR emitters. this connection and may be available from your IocaJ Emitters connected to these jacks are used by the eJectronics retailer. - Page 14 B for signal compatibility. audio and send it to the A/V receiver as analog left and right audio from Monitor Output. 11. MonitorLinkTM/RSo2320 ControJ When used with a Mitsubishi HD upgradeabIe TV or fiat 15. Monitor Output panel display this digital control...
- Page 15 DispJay Monitor with Component Video ........DispJay Monitor with an NDMJ input ..........HDMJ Source Device ..............DVJ Device ..................To the Mitsubishi LTo4260 LCD TV ..........JR Emitter NetCommand® ............JR Sensor input ................CompatibJe JEEE 1394 Devices .............
-
Page 16: E×Ternau Devices & Netcommand® Setup
Connecting E×temai Devices & NetCommand ® Setup NetCommand is able to control many current audio and video devices by sending remote control signals from the HDTV receiver/controller to each device through IR emitters, Additionally, it is also able to barn the remote control signals used by most audio video devices not already in the HDTV receiver's memory, NetCommand automatically... -
Page 17: Connecting
Connecting a Wall Out et Cable or Cable Wall OutJet CabJe (can be used with a CabmeCARD Figure It is very important to connect the incoming cable for your primary viewing source to ANT=l, especially CaBIeCARD use. 1. Connect the primary incoming coaxiaH HeadcabHe to ANT-1 MAiN on the HDTV receiver/controller back panel 2. -
Page 18: Cablecard Tmtechnouogy
Cab eCARD Technology CabJeCARD TechnoJogy Using a CabJeCARD CabbCARD is a nationwide system standard that After inserting a CableCARD into the HDTV receiver/ controller back panel CableCARD slot and powering allows your local cabb TV provider to supply you with On the HDTV receiver/controller, the initialization an access card customized... -
Page 19: Separate Uhf And Vhf Antennas
For cable or antenna with coaxial lead 3. Connect the coaxial lead directly to ANT-1 MAiN on the HDTV receiver/controller back panel. Mitsubishi strongly recommends against using antennas with twin flat leads, Twin flat lead antenna wires are subject... -
Page 20: Antenna Or Waul Outuet Cabue To A Vcr
Wai Out et Cable to a VCF{ (Audio & Connecting Antenna Video) Antenna or Wal OutJet CabJe to a VCR (Audio & Video) Figure 5 A two-way RF splitter, 3 coaxial cables, right and left audio cables and a S-Video or Video cables are required, These are not included with the HDTV receiver/controller, 1. -
Page 21: Cabue Box To A Vcr
Connecting a Cable Box to a VCR (Audio & Video) Cable Box to a VCR (Audio & Video) Figure 6 A two-way RF splitter, 4 coaxial cables, right and Ieft audio cables and an S-Video or Video cable are required. These are not included with the HDTV rece/ver/controller. -
Page 22: A/V Receiver Or Stereo System
Connecting an A/V Receiver or Stereo System a Satellite Receiver or Other Device with S-Video A/V Receiver or Stereo System Figure 7 A digital audio cable and stereo audio cables are required. The digital audio cable is provided. The stereo audio cables are not included with the HDTV receiver/controller. -
Page 23: Monitorlink Tmcontrol
M-Link control on the TV back panel (MonitorLink is also called MonLink or M-Link, depending on the Mitsubishi display monitor), You will also want to connect the MonitorLink HDMI Output to the Mitsubishi monitor, as shown on page 27 or 28_ Section detail of Mitsubishi... -
Page 24: Dtv Receiver
DTV Connectors and Adaptors Connecting a DTV Receiver with Component Video DTV Connectors and Adaptors Figure 1! The HDTV receiver/controlbr back panel has 5 RCA-type connectors for the Input-DTV. The back panel of your external DTV receiver may use RCA-type connectors or BNC-type connectors. If your DTV receiver comes with BNC type connections, you will need to purchase BNC to RCA adaptors to connect the HDTV receivericontrolbr... -
Page 25: With Rgb, Hv Video
Connecting a DTV Receiver with RGB, HV Video DTV Receiver with RGB, HV Video Figure A coaxial splitte_ RGB, HV and audio cables are required. These are not included with the HDTV receiver/controller. 1. Connect the outside antenna, came or sateHke to ANT or SATELLITE IN on the DTV receiver (see your DTV receiver owner's guide for instructions and cabHe compafibiHRy). -
Page 26: Dvd Puayer With Component Video
Connecting a DVD Player with Component Video or a Display Monitor with Component Video DV[::) PJayer with Component Video Figure 14 Component video cabtes and audio cables are required. These are not included with the HDTV receiveffcontrotler. 1_ Connect the Component Video cabHes from _1Pr/Pb VIDEO OUT on the back of the DVD pHayerto COMPONENT- 1 on the HDTV receiver/controller back paneH, matching the correct connection:... -
Page 27: Dispjay Monitor With An Ndmj Input
Connecting HDMI Devices DispJay Monitor with an HDMI or DVi Input Figure !6 An HDMI to HDMI or HDMf to DV/ cable is required. An HDMI to HDMI cable isprovided, 1. To connect to an HDMI monitor, connect an HDMI cabHe from the HDMI output on the HDTV receiver/controller back paneHto the HDMI input on the monitor. -
Page 28: Dvj Device
Connecting a DV[ Device DV[ Device Figure 18 A DV/-to-HDM/cable or DVt/HDMI adaptor and HDMI cable and audio cables are required, These are not included with the HDTV receiver/controlle,c They may be available at your local electronics retailer. 1. Connect the DVPto-HDM[ cable (recommended) (or DV[/HDM[ adaptor with an HDM[ cable) from the DV[ device's back panel to the HDTV receiver/controller's back panel. -
Page 29: To The Mitsubishi Lto4260 Lcd Tv
Connecting to the Mitsubish LT=4260 LCD TV Power Connection Figure 19 TheAC Power cord is provided with the LT-4260, Connect the AC power cord from the back of the HD-6000 to the back of the LT-4260. Make this connection before connecting any devices. -
Page 30: Jr Emitter Netcommand
Connecting Emitter NetCommand ® IR Emitter NetCommand® Figure 22 A quadruple/R Emitter cable is included with the HDTV receiver/controller, The emitters connected to these jacks are used by the NetCommand system to controi other devices such as VCRs, DVD phyers, Cabb boxes and Satellite receivers. 1_ Connect the phg end of the suppibd quadrupb BREmitter Cabb to one of the IR Output NetCommand... -
Page 31: Jr Sensor Input
When the IR sensor Input is connected the IR sensor on the front panel wiii not function. This connection is not required when the HD-6000 is connected to the Mitsubishi LT-4260 LCD TV, Figure 25, IR Sensor Placement Recommendation Figure 23, /R Emitter Placement Recommendations... -
Page 32: Compatibje Jeee 1394 Devices
Connecting Compatible IEEE 1394 Devices CompatibJe IEEE 1394 Devices When Connecting IEEE 1394 Devices It is possible to connect devices to the HDTV receiver that have EEE 1394 connectors but are not compatible with the HDTV receiver or with the NetCommand ® control system. Do not place an IEEE 1394 device between the Areas of compatibility to consider are: HDTV receiver/controller... - Page 33 Connecting Compatible IEEE 1394 Devices, continued Connection StyJes 4oPin Styme vs. 6-Pin Styme Connectors There are two different connection sues that can be There are two different types of connectors used for used when connecting IEEE 1394 devices. Use the IEEE 1394 terminals and cables, a 4-pin and a 6-pin that fits your network of audio/video products.
-
Page 34: Hejpfuj Hints
Connecting: Helpful Hints Q My VCR (or other device} does not have two sets of stereo audio outputs. How can I connect this device's audio to both the HDTV receiver and the A/V Receiver? A. There are two solutions: Connect the single set of stereo audio outputs to the HDTV receiver only. -
Page 35: Important Notes
Close Caption wiii be used display monitors age with use, As they age, their frequently, Mitsubishi suggests the use of the gray light output is gradually reduced. Normal pictures fill or translucent background. -
Page 37: Change
NetCommand ® Setup and Editing Using the Remote ControU with NetCommand® ......Remote Control Functions: Overview .......... Remote ControU Functions: Battery installation ..............Care .................... NetCommand® OnScreen Buttons ..........3D GraphicaU Viewpoint® Menu System ........NetCommand® lnitiaU Setup ............Edit NetCommand® Add an A/V Receiver .............. -
Page 38: Using The Remote Controu With Netcommand
HDTV receiver remote to operate these devices in the traditiona! manner. NetOommand PreBMemorized Devices DEVICE A/V receiver Cable Box DBSSatellite DVDPlayer Receiver Mitsubishi MA/R800, SR-HD5 DD_6000, HS_U795, M-VR900 DD-8020 HS_U778 Bose Lifestyle@28 Lifestyle@28 Denon AVR_2700 Echostar 6000... -
Page 39: Remote Control Functions: Overview
Displays menus for devices by the remote control. When in the TV position, will connected to the HDTV receiver, including CableCARD operate Mitsubishi TVs and plasma display monitors. Select Cable/DBS/DTV for NetCommand® device 17, HOME: Exits the HDTV receiver's on-screen menus control. -
Page 40: Battery Installation
Remote ControJ Functions:Operation and Care, SJeep Timer Care CAB__/DBS/D_ VCR _VO For Best Results from the Remote Control: _ _ i _AUDIO • Be within 20 feet of the equipment. RM-6000 • Do not press two or more buttons at the same time unless instructe&... -
Page 41: Netcommand® Onscreen Buttons
NetCommand® On Screen Buttons To use the HDTV receiver's NetCommand feature, you need to provide some detaibd information during the setup. You must define the manufacturer of the devices that are connected to the HDTV receiver, or barn the IR code remote controi signais for the device connected. -
Page 42: Graphicau Viewpoint® Menu System
)ViewPoiil[ 3D Graphical Menu System Vi6WPOifll Your HDTV receiver also has MitsubisM's exclusive 3D GrapMca[ on-screen operating system, which provides on-screen information for menu choices and changes, using the HDTV receiver's remote control V[SWPS[I][ Menu Screens Remote Contro[ Buttons The following buttons on your remote control help you A picture (icon) wiN[be highlighted on the menu screen when selected with the ADJUST... -
Page 43: Netcommand® Lnitiau Setup
NetCommand ® lnitia Setup If the NetCommand Setup is cancelled before it's When you first power On your new MitsubisM HDTV completed, you can restart the NetCommand setup receiver, the initiaHsetup screens appear. Most IR remote controH signaH formats can be Hearned by NetCommand. -
Page 44: Finish Screen
NetCommand ® Initial Setup, continued Finish Screen Note: if you selected "Other" for any of the device names, the HDTV receiver/controller Figure 5 can "Learn" the connected device by following To compiete the NetCommand setup, seiect Finish from the Finish screen. the Edit NetCommand instructions. -
Page 45: Edit Netcommand
NetCommand and add it again, as described above. the bottom of the screen. If a number follows the manufacturer's name, (example: Mitsubishi 1), this indicates additional models are optimized for that manufacturer. For many device types, non-listed models will operate in the same way as the listed models and you can still use the preqoaded setting. - Page 46 Edit NetCommand ®, Add an AiV Receiver, continued A/V Receiver Learn Screen A/V Receiver input Learn Screen Figure 8 Figure 9 NetCommand can now barn the remote controi 1. Press ADJUST _ or _ on the HDTV receiver/ controller remote to select the check box for each signais used to sebct each input on the AiV receiver.
- Page 47 Edit NetCommand ®, Add an AiM Receiver, continued Finish Screen Name Screen Figure 10 Figure 12 The Name screen allows you to change the default To finaHize your seHections and compHete the A/V name for the AiV receiver to a custom name of up to receiver setup, seHect Finish from the Finish screen.
-
Page 48: Add Devices
Edit NetCommand ®, Add Devices MitsubishVs NetCommand allows you to edit your home theater configuration. You can add new devices, change device settings and connections, debte devices and barn remote controi IR signais not akeady in NetCommand memory. Edit NetCommand Screen time by pressing TV MENU, then sebcting NetCommand. - Page 49 If a number follows the Figure 16. [Device] Learn screen manufacturer's name, (example: Mitsubishi 1), this indicates additional models are optimized for that Press ADJUST A, V, _ or _ to select the check manufacturer.
- Page 50 Edit NetCommand®, Add Devices, continued Name Screen 6. To erase a barned function, highiight the check box for that function and press CANCEL. Figure 18 The Name screen allows you to change the defauit 7. When the function signais have been barned, name for each device to a custom name of up to eight press ADJUST _ to sebct Next>...
- Page 51 VCR you can specify the IR Code setting to VCR-B, if the connected to a VCR for recording, select that VCR. primary Mitsubishi VCR is using the VCR-A IR code. If your Cable box is connected using Audio/Video cables, make sure the RF checkbox is unchecked.
-
Page 52: Change
Edit NetCommand ®, Change or Delete Devices, Finish Screen Finish Screen Change Device Screen Figure 24 Figure 26 To finaHize your seHecfions and compHete the SeHecflng Change from the Setup menu screen, NetCommand setup, seHect Finish from the Finish dispHays the Change screen. To change a device, screen. -
Page 53: Using The Guide Button To Display Channelview
................Record List ................Peer-to- Peer Connectio ns ............ Using TV Disc & A/V Disc ............. Direct VCR Recording from an Antenna or CabUe Source ..63 PC Viewing ..................MediaCommand and Media Card PJayback with the Mitsubishi LT-4260 ................. -
Page 54: Jeee 1394 Devices And Netcommand® Control
IEEE 1394 Devices and NetCommand® Contro See pages 31-32 for information regarding compatible IEEE 1394 devices and connection styles. The HDTV receiver/ controller is not able to control IEEE 1394 devices that use other types of control protocols. Incompatible digital audio, video and/or control information wilI stiII be able to pass from one device through... -
Page 55: Adding Jeee 1394 Devices Automatically
Adding IEEE 1394 Devices Automatically Name for 1394 Device Screen Adding IEEE 1394 Devices Figure If you choose to add the discovered IEEE 1394 device, When an JEEE 1394 device is connected into the HDTV the Name for 1394 Device screen will appear. Name receiver/controller network and is powered On, the new... - Page 56 Histed, then you may be aMe to controH this device whiHe it is operating as an anaHog VCR. For exampHe, if the IEEE 1394 device you have added is a Mitsubishi DVCR, and you have seHected an anaHog connection as a second connection, then you will select Mitsubishi for the manufacturer.
-
Page 57: Device Selection Menu
Device Selection Menu When you press DEVICE on the HDTV receiver/controller's remote control, the Device Selection menu (Figure displays. If NetCommand@ has not been set up, the Device Selection menu allows you to select an input for viewing. If NetCommand is set up, the Device Selection menu allows... -
Page 58: Using The Device Menu Button To E)Ispuay Menus
DEVICE MENU button wiii display menu for the current general rubs apply in using these screens with your device source, if available. Mitsubishi HDTV receiver/controller. Blue text denotes a link to another screen. Press ENTER to move to the next application. - Page 59 Using the GUIDE Button to Display Channe View and Menus Recording a Current Program GUIDE and Devices (1394 or mR Controlled) To record a current program, press REC (record) when For NetCommand compafibie satellite receivers and your program choice is highlighted on the program some cable boxes, GUIDE wiii display the on-screen list in ChannelView.
-
Page 60: Netcommand® Controlled Recordings
NetCommand ® Controlled Recordings Setting up Recordings Recording Figure Can be used when viewing Antenna 1 or 2, an IEEE Through NetCommand, you can automatbaHy start 1394 device including TV Disc, or a non-recording and stop recordings and send signais from one traditional device. -
Page 61: Record List
Record List, Peer=to=Peer Connections Record List Setting up a Peer-to-Peer Connection Figure 14 To establish a peer-to-peer connection: Press GUIDE while viewing the Record To screen to see a 1_ Press CONNECT on the HDTV receiver/controller list of all currently programmed recordings. A maximum of remote_ 32 recordings can be scheduled. -
Page 62: Using Tv Disc & A/V
TV Disc requires replacement or repair. Mitsubishi not liable for lost recordings. Figure 15, Track List screen for TV Disc Using the Remote Control with TV Disc or A/V Disc TV Disc or A/V Disc Search... -
Page 63: Direct Vcr Recording From An Antenna Or Cabme Source
Direct VCR Recording from an Antenna or Cable Source, Copy=Protected Material and Restricitons for Traditional VCRs Direct VCR Recording from an Copy-Protected Material Antenna or Cable Source: When attempting to record copy-protected material, the Record functions of the NetCommand and IEEE Pressing REC (record) on the HDTV receiver/ 1394 systems may be prevented or stopped. -
Page 64: Pc Viewing
PC Viewing 5. Depending on your PC, either: PC Input Figure 16 Use the screen area sHider or use the Screen Display ResoHution sHiderto adjust the resoHution. 1. Connect the PC to the HDTV receivericontroHHer's back paneHas shown in the connection chapter of You may need to restart the PC for this change to take this guide. -
Page 65: Mitsubishi Lt-4260
Media Card Playback with the MediaComrnand Mitsubishi LT-4260 LCD TV Display Only Warning: Some media cards avaimabie on the market are not properly certified to fommow the card type specifications noted below and cannot be used by the Card Reader. -
Page 66: Mediacommand
Media Card Playback with the MediaCommand Mitsubishi LT-4260 LCD TV Display Only, continued NOTE: During MP3 or WMA7 audio playback, For MP3 or WMA7 Playlist Menu: audio from the cards wiii be sent to the AiV Figure 19 receiver as analog audio. -
Page 67: Tv Menu Screen Operations
TV Menu Screen Operations Main Menu Choices ............... Setup Menu ..................NetOommand® Menu ..............Antenna Menu ................Time Menu ..................Captions Menu ................V-Chip Rating Guidelines .............. V-Chip Lock Menu ................. AudioVideo Menu ................A/V Settings Descriptions ............. -
Page 68: Main Menu Choices
Main Menu Choices Time Menu Setup Menu Figure 1 Figure 4 Use the Setup menu to seHect EngHish or Spanish as Manually set the time for the HD-6000, or seHect Auto the Hanguage for the menus and on-screen dispHays. and the HD-6000 will automatically set the time based upon Extended Data Service (XDS) time data. -
Page 69: Setup Menu
Setup Menu Setup Menu Press ADJUST A or T to navigate between cobrs and ADJUST _ or _ to change the cobr siider Figure 8 settings. Figure 8. Setup Menu, NetCommand Option Figure 9. PerfectColor Menu, Manual Color Correction Language Dispiay the on-screen menus in either Engiish or Reset Spanish (Espa_oi). - Page 70 Setup Menu, continued Side Bar CoJor forward to catch up to the Hivebroadcast. In the AHways setting, the PIP/POP features are not For some TV formats sidebars are visibHe (see TV avaiHaMe and channeH changing will be shower. To DispHay Formats, pages 85-86). You can choose to use the PPiPOP features, seHect the Off or On dispHay these sidebars in gray or bHack.
-
Page 71: Netcommand® Menu
NetCommand® Menu NetCommand Menu Note: Transport buttons (rewind, play forward, stop, Figure 11 pause and record) on the remote control are located in the bottom section of the remote control DefauJt DigitaJ Record Device If multiple digital recording devices are available in NetCommand, this setting allows you to choose the device to use when recording digital programs. -
Page 72: Antenna Menu
Antenna Menu Antenna Menu Figure 14 Channels can be changed in 3 ways: 1. By pressing ADJUST • or • to select the channel. 2. By pressing CH • or • for channels already in memory. Directly entering the number. With so many current and potential channels,... - Page 73 Antenna Menu, continued: SuperQuickView (SQV) SQV (SuperQuickView SQV (SuperQuickView Using The Menu Screen Using The Remote Control Figure 15 Viewing and changing SQV banks using the remote SQV (SuperQuickView TM)allows you to put together control: banks of your favorite channeb from Antenna 1 and 1.
-
Page 74: Time Menu
Time Menu if a channel displays incorrect time information, it is Setting the CJock because of information sent from the broadcaster You may choose to manually or automatically set the is not a defect of the HDTV receiver/controller. chock that your HDTV receiver/controller will use for recording or timer functions. -
Page 75: Captions Menu
Captions Menu: AnaJog and DigitaJ Captions Captions Menu Figure 18 To make the anaiog dosed captions easier to read, you For anaiog channeis broadcasters can send either can choose to dispiay the background cobr as either Standard or Text ciosed captioning. Standard Ciosed biack or gray behind the captions. - Page 76 Captions Menu, continued: Customizing Digita Settings Fonts Opaque - Solid color text; blocks the TV program Flashing - Text flashes in intervals You can customize the text of digitaH captions by selecting the font of your choice, The avaiHabHe Font options are as follows: Default - Selected by the Closed Captions...
-
Page 77: V-Chip Rating Guidelines
V-Chip Rating Guidelines V-Chip Signal Information When provided by the broadcaster, V-Chip ratings can be used to control which programs can be viewed or will be blocked. When V-Chip ratings are sent, you will see the ratings when you change the channel or when you press the INFO button on the remote control. -
Page 78: V-Chip Lock Menu
Lock Menu V=Chip V-Chip Lock Menu Overview VoChip Lock Menu Figure 21 The V-Chip Lock menu allows you to Mock or allow The V-Chip Lock menu can be used in several ways. If programs based upon rating signaHs sent by the you want to lock the HD-6000 during specific hours, broadcaster, or bHock TV viewing during specific select Lock by Time from the V-Chip Lock menu. - Page 79 V Chip Lock Menu, continued Using VoChip with Program Ratings Using the Passcode from the VoOhip Figure 22 Lock Menu You can choose the program ratings that you want When a channel or the HD-6000 is locked, figure 23 to allow during specific times of the day by using the will display.
-
Page 80: Audiovideo Menu
AudioVideo Menu Figure 25 Figure 26. Scan Rate Output Figure 25. Audio/Video Menu, Settings A/V Memory Reset AiV Memory Reset allows you to seHect the device which will have the AiV Settings returned to the odginaH factory settings. To return a device's memory to the odginaH factory settings, seHect the device and then press ENTER. -
Page 81: A/V Settings Descriptions
Setting Descriptions: Audio NOTE: The effects of the Audio Settings of Bass, Trebb, Baiance and Surround affect the sound heard through the TV speakers oniy. Using the AUDIO Button on the Remote Control SAP (Second Audio Program): Additional To adjust individuai Audio settings directly with the monaural soundtrack that you cannot hear remote controk during normal TV viewing. - Page 82 AiV Setting Descriptions: Video Using the VIDEO Sutton on the Remote Control To adjust individuaH Video settings directly with the Film Mode is not effective for progressive scan (480p) remote controH: devices, and high definition signals. 1. Press VIDEO to cycHe through the avaihbHe settings. NOTE: A slider will display on-screen for most 2.
- Page 83 Special Features Operation of PiP and POP ............. Display Formats ................Device Control with NetCommand® ........... Appendix A: Bypassing the V-Chip Lock ........Appendix B: input Connection CompatibiUity ......Appendix C: Remote Control Programming Codes ....94 Appendix D: On-Screen information Displays ......
- Page 84 Operation of PIP and POP You can display programs from analog channels, analog inputs or devices as Pictureqn-Picture (PIP) and Picture- Outside-Picture (POP). The HDTV receiver/controller has a second analog tuner for non-scrambled analog channels received on Ant-1 and will display them as the PIP/POP sub-pictures. Digital channels and devices can be shown as the main picture but cannot be the sub-picture.
-
Page 85: Display Formats
4:3 aspect ratio) you wiii encounter. While there wiii never be a perfect solution for displaying a narrow image on a wide screen, Mitsubishi offers several display formats to choose from. Press FORMAT on the HDTV receiver/controller remote Zoom: This wiii enlarge the picture, cropping off some control to cycle through the available display formats. - Page 86 Display Formats ORIGINAL SIGNAL ORIGINAL SIGNAL Anamorphic Non-anamorphic or SD 4:3 TV Display TV Display Standard Standard (not recommended, distorted) (recommended) Expand HD, SD 16:9 analog 720p, 1080i Expand HD, SD 16:9 or not available for analog 72gp, 1080i __O__O__ not available (recommended for letterboxed)
- Page 87 Device Contro with Net Command ° NetCommand Compatibme Traditionam Devices (Anamog) When Device Semection Menu is Dispmayed and the Device is Highlighted (Yellow Outline) A/V RECEmVER CABLE BOX/DRS POWER Power On/Off Power On/Off Power On/Off Power On/Off (toggle) (toggle) (toggle) (toggle) GUIDE Changes...
- Page 88 Device Contro with Net Command O, continued (EEE 1394 Devices When Device Semection Menu is Dispmayed and the Device is Highlighted (Yellow Outline) CABLE BOX/ TUNER/ A/V DmSC DVCR AMPLIFIER Remote Controm Butto_-_ POWER Power On/Off Power On/Off Power On/Off Power On/Off (toggle) (toggle)
-
Page 89: Appendix A: Bypassing The V-Chip Lock
Appendix Bypassing V=Chip Lock: Bypassing the V-Chip Lock After you set the Hock, you need your passcode to view a V-Chip Hocked program, view the Hocked TV, canceH the Hock,or enter the V-Chip Lock menus. ® gg If you forget your passcode, you can view the Hocked HD-6000 without entering your passcode. - Page 90 This page intentionally bJank...
- Page 91 IEEE 1394 AV/C, they will be responsible for the development of their products to meet the standards of the technology, as well as compatibility testing with other products. Mitsubishi cannot be responsible for their efforts, and therefore cannot promise compatibility with these other products.
- Page 92 Appendix B: Specifications From time to time, Mitsubishi may offer software updates to expand the features or operation of this HDTV receiver, / controller. When these updates are avaHabHethey win be announced on our web site, Mitsubishi-tv.com. If you return your Owner's registration card, with your modeH and sedan number, you may receive written notification of avaHabHesoftware updates.
- Page 93 3roduct controm, making the product easier to use. Mitsubishi D-VHS VCRs are fully compatible with this HDTV receiver/controller in audio, video and control. Many DV camcorders that have IEEE 1394 connections...
- Page 94 Appendix C:Remote Contro Programming Codes Receivers A/V Receiver Brand Code MITSUBISHI 010, 011,012, 013, 014 AIWA 225,226,241 BOSE B&K DENON 234,235,236,245,246,359,361 FISHER GARRARD HARMAN KARDON 215,223,242,362 JENSEN 223_229 232,233 Programming the Remote to ControJ KENWOOD 200,208 NetCommand A/V Products KOSS...
-
Page 95: Appendix C: Remote Control Programming Codes
Appendix C: Remote Control Programming Codes, continued VCRs Cable Boxes, continued SCiENTiFiC ATLANTA 112, 113, 194 VCR Brand Code SIGNATURE 119,124,125,126,127,120,121,122 MITSUBISHI [001,060, 067,068,061,062,002 SLMARK 105,101 AKAI 049_ 034, 035,036 SPRUCER AUDIO DYNAMIC STARCQM 119,124,125,126,127,120,121,122 BELL&HOWELL 025, STARGATE BROKSONIC 040, 046... - Page 96 (net all functions for all models) Cable box POWER MENU 0-9 number buttons (on some models) If you have a Mitsubishi AiV receiver, the audio PLAY position may be used in conjunction with select STOP Mitsubishi CD players. Your audio position must be...
-
Page 97: Appendix D: On-Screen Information Displays
Appendix D: On Screen Information Displays When you turn on the HD-6000, change Devices, change Channels or when you press the INFO button on the remote control the HD-6000 will display the current status. Below are the most common displays; please note that seldom or never do all of the different status... -
Page 98: Appendix E: Netcommand® Specialized Device Keys
Appendix E: NetCommand® Specialized Device Keys CABLE FUNCTION LEARNING SCREEN NAME ON TV or DBS RECEBVER CHECKBOX NAME REMOTE Power* Power On or Power On/Off POWER** Power Off POWER** Power (Off)* VOL A Volume Up Volume Up Volume Down Volume Down VOL •... - Page 99 If you are unable to correct a problem with your HDTV duster wiii keep your HDTV Receiver clean. If cleaning Receiver, consult your Mitsubishi dealer or a Mitsubishi beyond this is needed, please use the following Authorized Warranty Service Center.
- Page 100 Appendix G: Input Sources and Scan Rates HDMI/DVJ Monitor Output Scan Rate HDCP HDCP Non- HDCP Copy HDCP HDCP HDCP Protection 1080i 720p 480p 1080i Monitor Monitor 720p Monitor 480p Monitor Monitor Monitor ANALOG none 1080i 1080i 480i signals from 720p 720p 480p...
- Page 101 Appendix G: Input Sources and Scan Rates YPbPR or HD Monitor Output Scan Rate 1080i 720p 480p mnput Signam Source copy Protection Monitor Monitor Monitor Scan Rate ANALOG 480i signais from Ant-l, Ant-2, Input- 1, 2 none 1080i 720p 480p 480i signals from Ant-l, Ant-2, Input- 1, 2 none none...
-
Page 102: Troubleshooting
®Room lighting may affect the signal. Have the remotes very close (6 inches or less) to the HD-6000 during Learning. ® if using a Mitsubishi remote control, make sure the slide switch is not set to the CABLE/DBS/DTV position. - Page 103 TroubJeshooting, continued PossibJe SoJution HD-6000 functions do not respond to the ®Use the System Reset button as explained at the end of this remote control or to front panel control and will section. not Power Off. Name options not available for some channels _ Only memorized analog channels can be named.
- Page 104 TroubJeshooting, continued PossibJe SoJution The REC button is not working, or, on the The device does not support recording, such as a DVD player. Transport menu the record key is grayed out and ® Recordings can not be initiated from the Transport menu when not availabJe.
- Page 105 Troubleshooting, continued PossibJe SoJution ® The IEEE 1394 connection to the HD-6000 or another device is not An IEEE 1394 device has been plugged in but secure or is loose. does not appear in the Device Selection menu (not discovered). The IEEE 1394 device is not powered on.
- Page 106 Troubleshooting, continued PossibJe SoJution TV PAUSE does not start when the PAUSE key If there is a fulI screen pause without a slider appearing, then TV is pressed. Pause is off. Go to the Setup menu and change the TV Pause setting from Off to Always or On Request.
-
Page 107: Additional Mnformation
Firewire@ is a trademark of Apple Computer, Inc. registered in the U.S. and other countries. MonitorLink TM,NetOommand@, ViewPoint@, QuickView TM,SuperQuickView TM,PerfectColor TM, MediaCommand TM and ChanneIView TM are trademarks of Mitsubishi Digital Electronics America, Inc. WARNING: This product contains chemicals known to the State of California to cause cancer and/or birth defects or other reproductive harm. - Page 108 Lead Antenna LT-4260 LCD TV 29 M(onitor)-Link ControH 23 S-Video 22 SateHHite Receiver 22 Separate UHF and VHF Antenna Stereo System 22 VCR 20, 21 Disc Search 62 VVaHH Outlet CaMe 17, 20 Memory Reset 80 Copy-Protected Materia[ Receiver, add 45-47 Current Recordings, canceHHing 61 Reset 12...
- Page 109 iconOrder, V iewing, C hanging71 Recording Now 60 IEEE1394 Record To AddingAutomatically 5 5-56 List 61 andNetCommand® C ontrol54 Setup 60 Compatible D evices 32 Remote Control Device Type Screen56 Battery Installation Name53 Buttons 39, 40 important S afeguards6-7 Care 40 indicators, f rontpanel 12 Functions 39-40...
-
Page 110: Warranty
GRANT. MDEA grants you a non-exclusive, non-transferable, limited right and license to use one copy of the Software only with the Mitsubishi HDTV Receiver/Controller model that included this owner's guide and owned by you. RIGHTS AND LIMITATIONS. Software Not for Resale. You may not resell or otherwise... - Page 111 MDEA at the 800-332-2119, or by using the support feature of our website at www.mitsubishi-tv.com. b. Proof of purchase date from an authorized MITSUBISHI dealer is required when requesting warranty service. Present your sales receipt or other document which establishes proof and date of purchase.
- Page 112 ELECTRIC DiGiTAL TELEVJSJDNB Website: www. rnitsubishi-tv.com M DEAservice@mdea.corn To order repMacement additionaU remote controUs or Owner's Guides, call 800 -553-7278 For questions, call Consumer ReMations at © 2004 Mitsubishi Digital Electronics America, hc. Written and Printed in the U.S.A 871D410A10...
Need help?
Do you have a question about the HD-6000 and is the answer not in the manual?
Questions and answers