
Related Manuals for Huawei LampSite


Summary of Contents for Huawei LampSite
-
Page 1: Installation Guide
LampSite Installation Guide Issue Date 2014-05-27 HUAWEI TECHNOLOGIES CO., LTD. - Page 2 All other trademarks and trade names mentioned in this document are the property of their respective holders. Notice The purchased products, services and features are stipulated by the contract made between Huawei and the customer. All or part of the products, services and features described in this document may not be within the purchase scope or the usage scope.
-
Page 3: Intended Audience
Single-mode versions mapping V100R009C00: pRRU3901 (referred to as pRRU in this l NodeB: V200R016C00 document) l eNodeB: V100R007C00 Intended Audience This document is intended for: BTS installation personnel Issue 02 (2014-05-27) Huawei Proprietary and Confidential Copyright © Huawei Technologies Co., Ltd. -
Page 4: Table Of Contents
LampSite Installation Guide Contents Contents About This Document........................ii 1 Changes in LampSite Installation Guide.................1 2 Installation Preparations......................4 2.1 Reference Documents..............................5 2.2 Preparing Tools and Instruments............................5 2.3 Requirements for Installation Personnel.........................6 3 Unpacking and Checking......................7 4 Installing an RHUB........................9 4.1 Information About the Installation..........................10 4.1.1 RHUB Installation Scenarios.............................10... - Page 5 5.8 Checking the pRRU Hardware Installation........................87 5.9 Powering on the pRRU..............................88 6 Appendix............................90 6.1 MAC Collection Template............................91 6.2 Installing RF Daughter Boards on a pRRU (in Capacity Expansion Scenarios)............91 Issue 02 (2014-05-27) Huawei Proprietary and Confidential Copyright © Huawei Technologies Co., Ltd.
-
Page 6: Changes In Lampsite Installation Guide
LampSite Installation Guide 1 Changes in LampSite Installation Guide Changes in LampSite Installation Guide This chapter describes the changes in the LampSite Installation Guide. 02 (2014-05-27) This is the second commercial release. Compared with 01 (2014-04-26), no information is added. -
Page 7: About This Document
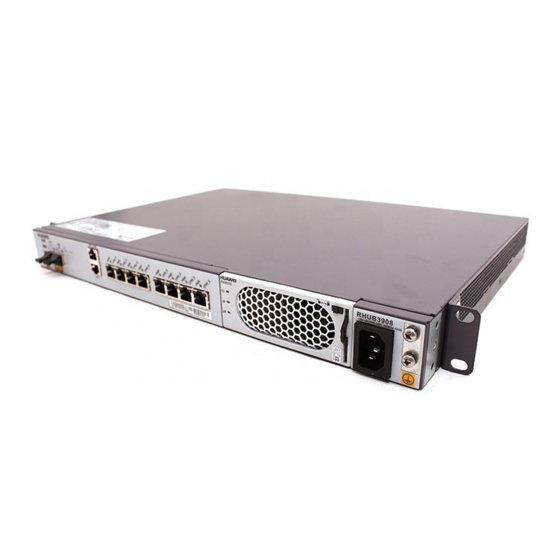
LampSite Installation Guide 1 Changes in LampSite Installation Guide Draft C (2014-03-26) This is a draft release. Compared with Draft B (2014-02-28), no information is added. Compared with Draft B (2014-02-28), this issue incorporates the following changes: Content Change Description 4.4.7 Installing CRPI Optical Cables... - Page 8 LampSite Installation Guide 1 Changes in LampSite Installation Guide RHUB Ports and Indicators pRRU Exterior pRRU Ports and Indicators Draft A (2013-11-30) This is a draft release. Issue 02 (2014-05-27) Huawei Proprietary and Confidential Copyright © Huawei Technologies Co., Ltd.
-
Page 9: Installation Preparations
2.3 Requirements for Installation Personnel This section describes requirements for installation engineers. They must be qualified and trained, and familiar with correct operation methods and safety precautions before performing any operations. Issue 02 (2014-05-27) Huawei Proprietary and Confidential Copyright © Huawei Technologies Co., Ltd. -
Page 10: Reference Documents
Rubber mallet T20 torque torx screwdriver Wire stripper Hammer drill (Ø6,Ø8 and Torque wrench (Ø10 mm) Protective gloves Ø12) Guarded blade utility knife ESD gloves Long measuring tape Issue 02 (2014-05-27) Huawei Proprietary and Confidential Copyright © Huawei Technologies Co., Ltd. -
Page 11: Requirements For Installation Personnel
Before the installation, pay attention to the following items: Technical engineers must take Huawei training and be familiar with proper installation and operation methods. The number of installation personnel depends on the engineering schedule and installation environment. -
Page 12: Unpacking And Checking
Report the problems and causes to the local inconsistent with that recorded in the Huawei office. packing lists on all packing boxes Step 2 Check the exterior of each packing box. Issue 02 (2014-05-27) Huawei Proprietary and Confidential Copyright © Huawei Technologies Co., Ltd. - Page 13 1. Store the unpacked equipment and packing materials indoors. 2. Take photos of the storeroom, rusted or eroded equipment, packing box, and packing materials. 3. File the photos. ----End Issue 02 (2014-05-27) Huawei Proprietary and Confidential Copyright © Huawei Technologies Co., Ltd.
-
Page 14: Installing An Rhub
After an RHUB is installed, check the installation of hardware including the devices and related cables. 4.6 Power-on Check on an RHUB This section describes the power-on check on the RHUB after the RHUB hardware is installed and checked. Issue 02 (2014-05-27) Huawei Proprietary and Confidential Copyright © Huawei Technologies Co., Ltd. -
Page 15: Information About The Installation
In reverse mode, the front of the mounting ear is 31 mm away from the RHUB panel, as shown in Figure 4-2. Figure 4-2 Installing mounting ears in reverse mode Issue 02 (2014-05-27) Huawei Proprietary and Confidential Copyright © Huawei Technologies Co., Ltd. - Page 16 When an RHUB is installed in a 19-inch shelf, the shelf must be installed on a wall. One shelf can house multiple RHUBs with 1 U space between two RHUBs. Issue 02 (2014-05-27) Huawei Proprietary and Confidential Copyright © Huawei Technologies Co., Ltd.
- Page 17 Installation Guide 4 Installing an RHUB Figure 4-5 Figure 4-6 show RHUBs installed in a 19-inch shelf. Figure 4-5 RHUB installed in a 19-inch shelf in standard mode Issue 02 (2014-05-27) Huawei Proprietary and Confidential Copyright © Huawei Technologies Co., Ltd.
- Page 18 4 Installing an RHUB Figure 4-6 RHUB installed in a 19-inch shelf in reverse mode Installing an RHUB on a Wall Figure 4-7 shows an RHUB installed on a wall. Issue 02 (2014-05-27) Huawei Proprietary and Confidential Copyright © Huawei Technologies Co., Ltd.
-
Page 19: Installation Clearance Requirements Of An Rhub
Figure 4-8 Installation clearance for an RHUB installed in a 19-inch cabinet, rack, or shelf Figure 4-9 Figure 4-10 shows the recommended and minimum installation clearance respectively when the RHUB is installed on a wall. Issue 02 (2014-05-27) Huawei Proprietary and Confidential Copyright © Huawei Technologies Co., Ltd. - Page 20 LampSite Installation Guide 4 Installing an RHUB Figure 4-9 Recommended installation clearance for a wall-mounted RHUB (unit: mm) Issue 02 (2014-05-27) Huawei Proprietary and Confidential Copyright © Huawei Technologies Co., Ltd.
-
Page 21: Installation Environment Of An Rhub
The temperature and humidity of the installation position must ensure normal operation. A cool and ventilated place is recommended. The heat dissipation holes on the RHUB cannot be blocked. Issue 02 (2014-05-27) Huawei Proprietary and Confidential Copyright © Huawei Technologies Co., Ltd. - Page 22 The RHUB must be installed in a dry, ventilating, and dust-proof place. If the RHUB is installed in parking areas or basements, the installation position must be well-ventilated. Issue 02 (2014-05-27) Huawei Proprietary and Confidential Copyright © Huawei Technologies Co., Ltd.
-
Page 23: Installation Process
With one hand holding it, align the mounting holes with the installation holes, slowly push the RHUB into the required position in the cabinet, as shown in Figure 4-12. Issue 02 (2014-05-27) Huawei Proprietary and Confidential Copyright © Huawei Technologies Co., Ltd. - Page 24 If necessary, request one more person for assistance. Remove the mounting ears on both sides of the RHUB by removing the four M4×8 screws, as shown in Figure 4-14. Issue 02 (2014-05-27) Huawei Proprietary and Confidential Copyright © Huawei Technologies Co., Ltd.
- Page 25 With one hand holding it, align the mounting holes with the installation holes, slowly push the RHUB into the required position in the cabinet, as shown in Figure 4-16. Issue 02 (2014-05-27) Huawei Proprietary and Confidential Copyright © Huawei Technologies Co., Ltd.
-
Page 26: Installing An Rhub In A 19-Inch Shelf
Procedure The following describes how to install an RHUB with mounting ears installed in reverse mode: NOTE If necessary, request one more person for assistance. Issue 02 (2014-05-27) Huawei Proprietary and Confidential Copyright © Huawei Technologies Co., Ltd. - Page 27 If necessary, request one more person for assistance. Remove the mounting ears on both sides of the RHUB by removing the four M4×8 screws, as shown in Figure 4-19. Issue 02 (2014-05-27) Huawei Proprietary and Confidential Copyright © Huawei Technologies Co., Ltd.
- Page 28 RHUB into the required position in the cabinet, as shown in . Use a torque screwdriver or Phillips screwdriver to tighten the four M6×16 screws with a torque of 2 N•m, as shown in Figure 4-21. Issue 02 (2014-05-27) Huawei Proprietary and Confidential Copyright © Huawei Technologies Co., Ltd.
-
Page 29: Installing An Rhub On A Wall
Use a torque screwdriver or Phillips screwdriver to remove the mounting ears on both sides of the RHUB by removing the four M4×8 screws, as shown in Figure 4-22. Issue 02 (2014-05-27) Huawei Proprietary and Confidential Copyright © Huawei Technologies Co., Ltd. - Page 30 RHUB to the position to be installed against the wall, and then mark the four anchor points where the mounting ear screws are fastened using a marker, as shown in Figure 4-24. Issue 02 (2014-05-27) Huawei Proprietary and Confidential Copyright © Huawei Technologies Co., Ltd.
- Page 31 To prevent inhalation or eye contact with dust, take adequate preventive measures when drilling holes. Step 3 Drill holes at the anchor point and install expansion bolts, as shown in Figure 4-25. Issue 02 (2014-05-27) Huawei Proprietary and Confidential Copyright © Huawei Technologies Co., Ltd.
- Page 32 M6×60 bolts with a torque of 5 N•m to secure the RHUB to the wall, as shown in Figure 4-26. Issue 02 (2014-05-27) Huawei Proprietary and Confidential Copyright © Huawei Technologies Co., Ltd.
-
Page 33: Installing Rhub Cables
Cables must be routed according to the specified cabling requirements to prevent signal interference. NOTE If a cable listed below is not required, skip the requirements for routing the cable. General Requirements for Cable Layout Bending radius Issue 02 (2014-05-27) Huawei Proprietary and Confidential Copyright © Huawei Technologies Co., Ltd. - Page 34 If DC power cables need to be routed close to a device on the tower, the cables are secured to the guard rail or pole with cable clips and the device cannot be far away from the position for securing the cables. PGND cable Issue 02 (2014-05-27) Huawei Proprietary and Confidential Copyright © Huawei Technologies Co., Ltd.
-
Page 35: Rhub Cable List
If the optical cable close to a device on the tower is too long, the optical cables are wrapped and secured to the tower. 4.4.2 RHUB Cable List This section describes the connector types and connections of the RHUB cables. Table 4-2 lists RHUB cables. Issue 02 (2014-05-27) Huawei Proprietary and Confidential Copyright © Huawei Technologies Co., Ltd. - Page 36 Ethernet cable. If the Extender is used, the Ethernet cable is divided into two parts, one between the RHUB and the Extender and the other between the Extender and the pRRU. Issue 02 (2014-05-27) Huawei Proprietary and Confidential Copyright © Huawei Technologies Co., Ltd.
-
Page 37: Cable Connections
Extender and the other between the Extender and the pRRU. 4.4.4 RHUB Cable Installation Process This section describes the process of installing RHUB cables. Figure 4-28 shows the RHUB cable installation process. Issue 02 (2014-05-27) Huawei Proprietary and Confidential Copyright © Huawei Technologies Co., Ltd. -
Page 38: Installing An Rhub Pgnd Cable
). Both ends of the cable are OT terminals, as shown in Figure Figure 4-29 Exterior of a PGND cable (1) OT terminal (6 mm [0.009 in. ], M4) (2) OT terminal (6 mm [0.009 in. ], M6) Issue 02 (2014-05-27) Huawei Proprietary and Confidential Copyright © Huawei Technologies Co., Ltd. - Page 39 PGND cable to the ground screw on the RHUB panel with a torque of 1.4 N•m. If the OT terminal is a one-hole OT terminal, connect it to the ground screw on the lower part of the RHUB panel, as shown in Figure 4-31. Issue 02 (2014-05-27) Huawei Proprietary and Confidential Copyright © Huawei Technologies Co., Ltd.
-
Page 40: Installing An Ethernet Cable
CPRI_E0 port. The following section describes the connection using the CPRI_E0 port. Procedure Step 1 Remove the dustproof cap of the CPRI_E0 port on the pRRU. Issue 02 (2014-05-27) Huawei Proprietary and Confidential Copyright © Huawei Technologies Co., Ltd. -
Page 41: Installing Crpi Optical Cables
Single-mode optical modules are labeled SM and each has a blue puller. For details about the connection of CPRI optical cables, see CPRI Networking in LampSite Technical Description and CPRI Optical Fiber in LampSite Hardware Description. An optical module to be installed must match the rate of its corresponding port. - Page 42 DLC connector CPRI0 or CPRI1 port on connecto LBBP&WBBP&UBBP/ the RHUB CPRI port CPRI0 or CPRI1 port on the CPRI0 or CPRI1 port on RHUB the RHUB Issue 02 (2014-05-27) Huawei Proprietary and Confidential Copyright © Huawei Technologies Co., Ltd.
-
Page 43: Installing An Rhub Alarm Cable (Optional)
Step 4 Label the installed cable. For details, see section Attaching an L-Shaped Label in the Installation Reference. ----End 4.4.8 Installing an RHUB Alarm Cable (Optional) An RHUB alarm cable transmits dry node alarm signals. Issue 02 (2014-05-27) Huawei Proprietary and Confidential Copyright © Huawei Technologies Co., Ltd. -
Page 44: Installing An Rhub Power Cable
Step 2 Connect the power connector on the X1 end to the AC power input port on the RHUB panel, as shown in Figure 4-37. Step 3 Connect the power connector on the X2 end to the external power supply port, as shown in Figure 4-37. Issue 02 (2014-05-27) Huawei Proprietary and Confidential Copyright © Huawei Technologies Co., Ltd. -
Page 45: Checking The Rhub Hardware Installation
PGND cable connections. Table 4-5 Checklist for power cable and PGND cable connections Item The power cables and PGND cables comply with the requirements of local regulations. Issue 02 (2014-05-27) Huawei Proprietary and Confidential Copyright © Huawei Technologies Co., Ltd. - Page 46 Correct and clear labels are attached to both ends of the signal cables. The distance between the bundled fiber tails and the RHUB panel is less than 70 Issue 02 (2014-05-27) Huawei Proprietary and Confidential Copyright © Huawei Technologies Co., Ltd.
-
Page 47: Power-On Check On An Rhub
The external power supply does not Find out the cause and ensure that the resistance range from 100 V AC to 240 V AC meets requirement. Then, go to Step Issue 02 (2014-05-27) Huawei Proprietary and Confidential Copyright © Huawei Technologies Co., Ltd. - Page 48 0.125s being uploaded. finished in 5 minutes, and check whether the configuration file is correct. Power on the RHUB again after the fault is rectified. ----End Issue 02 (2014-05-27) Huawei Proprietary and Confidential Copyright © Huawei Technologies Co., Ltd.
-
Page 49: Installing A Prru
5.6 Installing the Extender (Optional) This section describes the Extender installation process. 5.7 Installing pRRU Cables This section describes the procedure of installing the pRRU cables. Issue 02 (2014-05-27) Huawei Proprietary and Confidential Copyright © Huawei Technologies Co., Ltd. - Page 50 5.9 Powering on the pRRU This section describes the power-on check on the pRRU after the pRRU hardware is installed and checked. Issue 02 (2014-05-27) Huawei Proprietary and Confidential Copyright © Huawei Technologies Co., Ltd.
-
Page 51: Information About The Installation
RHUB. 5.1.2 pRRU Installation Scenario The pRRU can be installed on a wall, ceiling, pole, or keel. The following table describes the installation in different scenarios. Issue 02 (2014-05-27) Huawei Proprietary and Confidential Copyright © Huawei Technologies Co., Ltd. - Page 52 The thickness of plate the wall is less For details, see than the bolt 5.4.5 pRRU length (80 mm). Installed on a Plate. Issue 02 (2014-05-27) Huawei Proprietary and Confidential Copyright © Huawei Technologies Co., Ltd.
- Page 53 The screws must Ceiling. be tightened with a torque of 10 N·m. This ensures the screws work properly and the ceiling remains intact without cracks in it. Issue 02 (2014-05-27) Huawei Proprietary and Confidential Copyright © Huawei Technologies Co., Ltd.
- Page 54 Installing the pRRU on a pole When a pRRU is installed on a pole, installation modes vary with the diameter of the pole, as shown in Table 5-4. Issue 02 (2014-05-27) Huawei Proprietary and Confidential Copyright © Huawei Technologies Co., Ltd.
-
Page 55: Space Requirements
For details, see 3. Bolt (M6X80) shapes. 5.4.6 pRRU shows the pRRU Installed on a installed on a U- Keel. shaped keel. 5.1.3 Space Requirements Issue 02 (2014-05-27) Huawei Proprietary and Confidential Copyright © Huawei Technologies Co., Ltd. - Page 56 At least 20 mm on the back of the pRRU is reserved for ventilation. Figure 5-2 shows the minimum space requirements of the pRRU when the external antenna is not required. Issue 02 (2014-05-27) Huawei Proprietary and Confidential Copyright © Huawei Technologies Co., Ltd.
- Page 57 Only space above and under the Extender is required to be reserved when installing the Extender. Figure 5-3 shows the recommended space requirements of the Extender. Figure 5-3 Recommended space requirements of the Extender Issue 02 (2014-05-27) Huawei Proprietary and Confidential Copyright © Huawei Technologies Co., Ltd.
-
Page 58: Prru Installation Environment Requirements
The pRRU must be installed in a dry, ventilating, and dust-proof place. If the pRRU is installed in parking areas or basements, the installation position must be well-ventilated. Issue 02 (2014-05-27) Huawei Proprietary and Confidential Copyright © Huawei Technologies Co., Ltd. -
Page 59: Obtaining The Mac Address (Optional)
This section describes the pRRU installation process, which involves installing a pRRU, the AC/ DC power adapter, and cables, checking the pRRU hardware installation, and powering on the pRRU. Figure 5-5 shows the pRRU installation process. Issue 02 (2014-05-27) Huawei Proprietary and Confidential Copyright © Huawei Technologies Co., Ltd. -
Page 60: Installing A Prru
A pRRU can have two transmission ports or three transmission ports, requiring the same installation operations. Unless otherwise specified, this document uses the pRRU with three transmission ports as an example. Issue 02 (2014-05-27) Huawei Proprietary and Confidential Copyright © Huawei Technologies Co., Ltd. -
Page 61: Prru Installation Kits
(1) V clamp (2) Plate (3) Screw (M6x50) (4) Plastic expansion sleeve (5) Bolt (M6x80) (6) Flat washer The following figure shows the specifications of the installation plate. Issue 02 (2014-05-27) Huawei Proprietary and Confidential Copyright © Huawei Technologies Co., Ltd. -
Page 62: Prru Installed On A Wall
Step 2 Place the plate in the installation position against the wall. Then, level the plate and mark the two anchor points using a marker, as shown in Figure 5-8. Issue 02 (2014-05-27) Huawei Proprietary and Confidential Copyright © Huawei Technologies Co., Ltd. - Page 63 If they are inaccurately positioned, re-measure and re-drill the holes. Then, use a rubber mallet to push the two plastic expansion sleeve into the holes. Issue 02 (2014-05-27) Huawei Proprietary and Confidential Copyright © Huawei Technologies Co., Ltd.
- Page 64 Step 4 Lead the M6x50 screw through the washer, and then through the drilling holes of the plate to the plastic expansion sleeve, and tighten the screw to a torque of 5 N•m, as shown in Figure 5-10. Figure 5-10 Installing the plate Issue 02 (2014-05-27) Huawei Proprietary and Confidential Copyright © Huawei Technologies Co., Ltd.
-
Page 65: Prru Installed On A Ceiling
This section describes the procedure of installing a pRRU on the ceiling, such as the concrete ceiling, when the ceiling has sufficient load bearing capacity and installation space. Issue 02 (2014-05-27) Huawei Proprietary and Confidential Copyright © Huawei Technologies Co., Ltd. - Page 66 Figure 5-12 Anchor points of the pRRU installation kits (unit: mm) (1) Ceiling (2) Plate (3) Anchor point of the bolt CAUTION To prevent inhalation or eye contact with dust, take adequate preventive measures when drilling holes. Issue 02 (2014-05-27) Huawei Proprietary and Confidential Copyright © Huawei Technologies Co., Ltd.
- Page 67 Figure 5-14 Installing the plate NOTE If the screws cannot be tightened using a Phillips screwdriver, use a hex key or an electric screwdriver to assist the installation. Issue 02 (2014-05-27) Huawei Proprietary and Confidential Copyright © Huawei Technologies Co., Ltd.
-
Page 68: Prru Installed On A Pole
Lead the M6x80 bolt through the plate, and tighten the bolt to a torque of 5 N•m, as shown in Figure 5-16. Issue 02 (2014-05-27) Huawei Proprietary and Confidential Copyright © Huawei Technologies Co., Ltd. - Page 69 The hose clamp is prepared by customers. Tighten the bolt with a torque of 5 N•m, as shown in Figure 5-17. Figure 5-17 Securing the pRRU installation kits on the metal pole Issue 02 (2014-05-27) Huawei Proprietary and Confidential Copyright © Huawei Technologies Co., Ltd.
-
Page 70: Prru Installed On A Plate
Step 2 Place the plate in the installation position against the wall. Then, level the plate and mark the two anchor points using a marker, as shown in Figure 5-19. Issue 02 (2014-05-27) Huawei Proprietary and Confidential Copyright © Huawei Technologies Co., Ltd. - Page 71 Step 4 Lead the bolt M6x80 through the panel and daughter board, and tighten the torque screwdriver to a torque of 5 N•m, as shown in Figure 5-20. Issue 02 (2014-05-27) Huawei Proprietary and Confidential Copyright © Huawei Technologies Co., Ltd.
- Page 72 NOTE It is recommended that you observe the installation from one side of the pRRU when inserting hooks into the kits. Issue 02 (2014-05-27) Huawei Proprietary and Confidential Copyright © Huawei Technologies Co., Ltd.
-
Page 73: Prru Installed On A Keel
Requirements. Step 2 Lead the V clamp on across the keel, and mark the projective position on the cover with a marker, as shown in Figure 5-22. Issue 02 (2014-05-27) Huawei Proprietary and Confidential Copyright © Huawei Technologies Co., Ltd. - Page 74 Step 4 Lead the bolt M6x80 through the installation plate and ceiling cover, and then socket to tighten the bolt to a torque of 5 N•m, as shown in Figure 5-23. Issue 02 (2014-05-27) Huawei Proprietary and Confidential Copyright © Huawei Technologies Co., Ltd.
- Page 75 NOTE It is recommended that you observe the installation from one side of the pRRU when inserting hooks into the kits. Issue 02 (2014-05-27) Huawei Proprietary and Confidential Copyright © Huawei Technologies Co., Ltd.
-
Page 76: Installing The Ac/Dc Power Adapter (Optional)
Use a marker to mark the two anchor points of the support for the AC/DC adapter which is level to the wall. The interval of the two anchor points is 50 mm, as shown Figure 5-25. Issue 02 (2014-05-27) Huawei Proprietary and Confidential Copyright © Huawei Technologies Co., Ltd. - Page 77 50 mm. Figure 5-26 Drilling holes and installing expansion bolts Use two tapping screws to secure the power adapter support to the wall, as shown in Figure 5-27. Issue 02 (2014-05-27) Huawei Proprietary and Confidential Copyright © Huawei Technologies Co., Ltd.
- Page 78 LampSite Installation Guide 5 Installing a pRRU Figure 5-27 Tightening the power adapter support Place the AC/DC power adapter on the support by referring to Figure 5-28. Issue 02 (2014-05-27) Huawei Proprietary and Confidential Copyright © Huawei Technologies Co., Ltd.
- Page 79 Figure 5-28 Installing the AC/DC power adapter On a pole Route the cable ties through the notches on the support and secure the fixing hoops to a pole, as shown in Figure 5-29. Issue 02 (2014-05-27) Huawei Proprietary and Confidential Copyright © Huawei Technologies Co., Ltd.
-
Page 80: Installing The Extender (Optional)
When an RHUB and a pRRU need extended install, use extender. With the Extender, the distance of the pRRU and RHUB can be extended by the Extender up to a total distance of 200 m. Issue 02 (2014-05-27) Huawei Proprietary and Confidential Copyright © Huawei Technologies Co., Ltd. - Page 81 Step 3 Place the Extender in the corresponding position and use an M4 Phillips screwdriver to tighten the screws to 1.4 N•m, as shown in Figure 5-33. Issue 02 (2014-05-27) Huawei Proprietary and Confidential Copyright © Huawei Technologies Co., Ltd.
-
Page 82: Installing Prru Cables
The bending radius of a signal cable must be at least five times of the diameter of the cable. Cable binding Cables of the same type are bound together. Issue 02 (2014-05-27) Huawei Proprietary and Confidential Copyright © Huawei Technologies Co., Ltd. -
Page 83: List Of Prru Cables
Adapter C13 female C14 male Based on the AC power socket Power Cable connector connector on country and area the AC/DC where the adapter connector is used. Issue 02 (2014-05-27) Huawei Proprietary and Confidential Copyright © Huawei Technologies Co., Ltd. -
Page 84: Cable Connections
TX/RX RF port on the pRRU. The other end of the pRRU RF jumper is the type N male connector, which is connected to the antenna system. For the standard of the pRRU RF jumper, see pRRU RF Jumper of the LampSite Hardware Description. Figure 5-34 shows the cable connection when the pRRU is configured with only one RF Daughter Board. -
Page 85: Cable Connections (Lte Tdd)
For external antennas corresponding to RF daughter board 1, the TX port and RX port are ANT0 and ANT1, respectively. For external antennas corresponding to RF daughter board Issue 02 (2014-05-27) Huawei Proprietary and Confidential Copyright © Huawei Technologies Co., Ltd. - Page 86 TX/RX RF port on the pRRU. The other end of the pRRU RF jumper is the type N male connector, which is connected to the antenna system. For the standard of the pRRU RF jumper, please see pRRU RF Jumper of the LampSite Hardware Description. Figure 5-36 shows the cable connection when the pRRU is configured with only one RF Daughter Board.
-
Page 87: Prru Cable Installation Process
5.7.5 pRRU cable installation process This section describes the process of installing pRRU cables. Figure 5-38 shows the process of installing pRRU cables. Figure 5-38 pRRU cable installation process Issue 02 (2014-05-27) Huawei Proprietary and Confidential Copyright © Huawei Technologies Co., Ltd. -
Page 88: Installing An Ethernet Cable
Remove the dustproof cap of the GE port on the pRRU. Connect the RJ45 connector at one end of the Ethernet cable to the GE port on the pRRU panel. Issue 02 (2014-05-27) Huawei Proprietary and Confidential Copyright © Huawei Technologies Co., Ltd. -
Page 89: Installing Prru Jumpers (Optional)
Context If the RF jumper is provided by the customer, the jumper must not be lower than the RG316 specifications. In addition, the jumpers can be used after they are checked by Huawei engineers. pRRUs can be connected to external whip antennas or external remote antennas (through pRRU RF jumpers). - Page 90 Tighten the feeder close to the type N connector to ensure that the jumper is not tightened. In this way, the connectors on both ends of a jumper are not affected by the external force. Issue 02 (2014-05-27) Huawei Proprietary and Confidential Copyright © Huawei Technologies Co., Ltd.
-
Page 91: Installing Adapter Power Cables
AC power input port, as shown in Figure 5-42. Step 3 The X3 end is connected to the external power supply port of the AC adapter, as shown in Figure 5-42. Issue 02 (2014-05-27) Huawei Proprietary and Confidential Copyright © Huawei Technologies Co., Ltd. -
Page 92: Checking The Prru Hardware Installation
Table 5-9 Checklist for the signal cable connection Item The connectors of the signal cables must securely connected. The connectors of the signal cables are intact. The signal cables are intact. Issue 02 (2014-05-27) Huawei Proprietary and Confidential Copyright © Huawei Technologies Co., Ltd. -
Page 93: Powering On The Prru
Step DC power adapter is used) Step 2 Power on the pRRU. Wait 3 to 5 minutes, check the status of the RUN indicator on the pRRU. Issue 02 (2014-05-27) Huawei Proprietary and Confidential Copyright © Huawei Technologies Co., Ltd. - Page 94 Check whether the data configuration file is correct. After the fault is rectify, power on the pRRU again. ----End Issue 02 (2014-05-27) Huawei Proprietary and Confidential Copyright © Huawei Technologies Co., Ltd.
-
Page 95: Appendix
This section describes the procedures for installing RF daughter boards on a pRRU. A pRRU can have two transmission ports or three transmission ports, requiring the same installation operations. This section uses the pRRU with three transmission ports as an example. Issue 02 (2014-05-27) Huawei Proprietary and Confidential Copyright © Huawei Technologies Co., Ltd. -
Page 96: Mac Collection Template
The preferred slot for an RF daughter board depends on the mode of the RF daughter board. Figure 6-1 shows the slot for installing the RF daughter boards. Issue 02 (2014-05-27) Huawei Proprietary and Confidential Copyright © Huawei Technologies Co., Ltd. - Page 97 Step 4 Use an M4 Phillips screwdriver to loosen the Phillips screw on the pRRU housing. Wrench and remove the housing from the installation position of the Phillips screw hole, as shown in Figure 6-2. Issue 02 (2014-05-27) Huawei Proprietary and Confidential Copyright © Huawei Technologies Co., Ltd.
- Page 98 Phillips screws on the RF daughter board with a torque of 1.4 N•m, as shown in Figure 6-3. Figure 6-3 Installing the RF daughter board in slot S2 Issue 02 (2014-05-27) Huawei Proprietary and Confidential Copyright © Huawei Technologies Co., Ltd.
- Page 99 Use the M4 Phillips screwdriver to tighten the Phillips screw on the housing with a torque of 1.4 N•m, as shown in Figure 6-6. Issue 02 (2014-05-27) Huawei Proprietary and Confidential Copyright © Huawei Technologies Co., Ltd.
- Page 100 On the LTE side, log in to the eNodeB LMT and run the UBL BRD command to unblock the RF daughter board of the pRRU. Step 11 Take off the ESD gloves and pack up all the tools. ----End Issue 02 (2014-05-27) Huawei Proprietary and Confidential Copyright © Huawei Technologies Co., Ltd.