Cisco 8800 Series User Manual
Multiplatform phones
Hide thumbs
Also See for 8800 Series:
- Manual (544 pages) ,
- Administration manual (406 pages) ,
- Hardware installation manual (140 pages)
Table of Contents
Advertisement
Advertisement
Table of Contents
Troubleshooting

Related Manuals for Cisco 8800 Series


Summary of Contents for Cisco 8800 Series
- Page 1 Cisco IP Phone 8800 Series Multiplatform Phones User Guide First Published: 2016-01-29 Last Modified: 2022-06-27 Americas Headquarters Cisco Systems, Inc. 170 West Tasman Drive San Jose, CA 95134-1706 http://www.cisco.com Tel: 408 526-4000 800 553-NETS (6387) Fax: 408 527-0883...
- Page 2 Cisco has more than 200 offices worldwide. Addresses and phone numbers are listed on the Cisco website at www.cisco.com/go/offices. Cisco and the Cisco logo are trademarks or registered trademarks of Cisco and/or its affiliates in the U.S. and other countries. To view a list of Cisco trademarks, go to this URL: https://www.cisco.com/c/en/us/about/legal/trademarks.html.
-
Page 3: Table Of Contents
Onboard Your Phone with Activation Code Auto Provision Your Phone with Short Activation Code Set a Password on Initial Phone Boot Up Secure the Phone with a Cable Lock User Authentication Control Cisco IP Phone 8800 Series Multiplatform Phones User Guide... - Page 4 View the Customization State on the Phone View the Network Status View the Phone Status View the Status Messages on the Phone View the Line Status View Call Records in Call Statistics View 802.1X Transaction Status Cisco IP Phone 8800 Series Multiplatform Phones User Guide...
- Page 5 Secure Calls Answer Calls Answer a Call Answer Call Waiting Decline a Call Silence an Incoming Call Turn On Do Not Disturb Turn On or Turn Off DND Using a Star Code Cisco IP Phone 8800 Series Multiplatform Phones User Guide...
- Page 6 Adjust the Camera Exposure Adjust the Video Bandwidth Video Call Security and Troubleshooting Information Record a Call Instant Message and Presence Contacts Presence Make a Call to an IM and Presence Contact Cisco IP Phone 8800 Series Multiplatform Phones User Guide...
- Page 7 Pair a Mobile Device with Your Desk Phone Switch Connected Mobile Devices Delete a Mobile Device Search Your Mobile Contacts on Your Desk Phone View Your Paired Bluetooth Devices Intelligent Proximity for Mobile Phones Intelligent Proximity for Tablets Cisco IP Phone 8800 Series Multiplatform Phones User Guide...
- Page 8 Call a Contact in Your XML Directory Edit a Contact Number in Your XML Directory Reverse Name Lookup for Incoming and Outgoing Calls C H A P T E R 4 Recent Calls Recent calls list Cisco IP Phone 8800 Series Multiplatform Phones User Guide viii...
- Page 9 Turn on DND from the Phone Web Page Enable Call Waiting Enable Call Waiting from the Phone Web Page Block an Anonymous Call Enable Anonymous Call Blocking from the Phone Web Page Block Caller ID Cisco IP Phone 8800 Series Multiplatform Phones User Guide...
- Page 10 Change the Display Mode Specify an Audio Device for a Call Reboot Your Phone Set Language Set Password Set Password from Phone Web Page Set up the Profile Account Executive Settings Cisco IP Phone 8800 Series Multiplatform Phones User Guide...
- Page 11 Enable or Disable Noise Removal with the Phone Web Page Reboot Your Phone C H A P T E R 7 Accessories Accessories Overview for Cisco IP Phone 8800 Series with Multiplatform Firmware Cisco IP Phone 8800 Series Multiplatform Phones User Guide...
- Page 12 Remove a Bluetooth Headset Wireless Headsets Swap Headsets While on a Call Adjust Sidetone Gain Adjust the Microphone Gain Test the Microphone Tune the Speaker Specify an Audio Device for a Call Cisco IP Phone 8800 Series Multiplatform Phones User Guide...
- Page 13 CE Marking RF Exposure Statement for the European Union Compliance Statements for the USA Part 15 Radio Device Compliance Statements for Canada Canadian RF Exposure Statement Canadian High-Power Radars Statement Cisco IP Phone 8800 Series Multiplatform Phones User Guide xiii...
- Page 14 FCC Compliance Statements FCC Part 15.19 Statement FCC Part 15.21 Statement FCC RF Radiation Exposure Statement FCC Receivers and Class B Digital Statement Cisco Product Security Overview Cisco Circular Economy Important Online Information Cisco IP Phone 8800 Series Multiplatform Phones User Guide...
-
Page 15: Your Phone
• Additional Help and Information, on page 30 The Cisco IP Phone 8800 Series The Cisco IP Phones 8811, 8841, 8845, 8851, 8861, and 8865 deliver easy-to-use, highly-secure voice communications. Table 1: Cisco IP Phone 8800 Series Major Features Features... -
Page 16: Feature Support
Enable a VPN Connection, on page 126 Disable a VPN Connection, on page 126 Set Up a VPN Connection from the Phone Web Page, on page 127 View the VPN Status, on page 128 Cisco IP Phone 8800 Series Multiplatform Phones User Guide... -
Page 17: New And Changed For Firmware Release 11.3(6)
Only for the Call Forward All Service Setup Updated several steps for the feature Enhancements Search for a Contact in the All Directories Screen, on of Displaying Contact Numbers from the LDAP page 82 Directory Cisco IP Phone 8800 Series Multiplatform Phones User Guide... - Page 18 View your Recent Calls, on page 99 View Calls Logs from Server , on page 102 Updated the topic to add the new feature Phone Web Page, on page 22 Noise removal Cisco IP Phone 8800 Series Multiplatform Phones User Guide...
-
Page 19: New And Changed For Firmware Release 11.3(5)
New and Changed for Firmware Release 11.3(3) Revision New and Changed Sections Updated the step on how to add contacts in the topic Search for a Contact in the All Directories Screen, on page 82 Cisco IP Phone 8800 Series Multiplatform Phones User Guide... - Page 20 Updated the topic for the new softkeys of the calls View your Recent Calls, on page 99 history list Updated to topic to add the new menu item Find Information About Your Phone, on page 31 Cisco IP Phone 8800 Series Multiplatform Phones User Guide...
-
Page 21: New And Changed For Firmware Release 11.3(2)
Call a Contact in Your Personal Address Book, on page 81 Edit a Contact in Your Personal Address Book, on page 81 Remove a Contact from Your Personal Address Book, on page 82 Cisco IP Phone 8800 Series Multiplatform Phones User Guide... - Page 22 Updated the topic title Your Personal Voicemail Account, on page 107 Check Your Personal New Voice Messages, on page Access Your Personal Voicemail, on page 108 Access Your Personal Audio Voicemail, on page 108 Cisco IP Phone 8800 Series Multiplatform Phones User Guide...
-
Page 23: New And Changed For Firmware Release 11.3(1)
Trigger Wi-Fi Scan with Softkey, on page 148 Scan softkey Added a task to support Serviceability Enhancement Connect to a Wi-Fi Network When Your Phone Messages for Network Connection Failure Displays a Connection Failure Message, on page 149 Cisco IP Phone 8800 Series Multiplatform Phones User Guide... -
Page 24: New And Changed For Firmware Release 11.2(3)Sr1
Key Expansion Module Buttons and Hardware, on page 189 Column Modes , on page 190 Key Expansion Module Power Information, on page Allocate a Key Expansion Module Type with the Phone Menu, on page 191 Cisco IP Phone 8800 Series Multiplatform Phones User Guide... -
Page 25: New And Changed For Firmware Release 11.2(1)
Updated the topic to support XSI caller ID blocking Block Caller ID , on page 119 Added a new topic to support username and password Set up the Profile Account, on page 137 collection on HTTP authentication challenge Cisco IP Phone 8800 Series Multiplatform Phones User Guide... -
Page 26: New And Changed For Firmware Release 11.1(2)
Adjust Your Headset Microphone Volume, on page 171 Adjust your headset speaker feedback, on page 171 Test Your Headset Microphone, on page 172 Replace your Cisco Headset 500 Series ear pads, on page Reverse Name Lookup Administrators enable and disable this feature. For... -
Page 27: New And Changed For Firmware Release 11.1(1)
A star code is added to Conference hard key Conference with a Star Code, on page 56 from the phone web page Logo can be added as phone background Add a Logo as a Phone Background, on page 132 Cisco IP Phone 8800 Series Multiplatform Phones User Guide... -
Page 28: Phone Setup
You can change the angle of the phone to eliminate glare on the screen. If your phone has a video camera, you can change the angle to improve the camera view. Cisco IP Phone 8800 Series Multiplatform Phones User Guide... -
Page 29: Connect To The Network
You need to connect the phone to the network. • Wired network connection—The phone is plugged into the network with an Ethernet cable. • Wireless connection—The Cisco IP Phone 8861 and 8865 can connect to a Wireless Access Point using Wi-Fi. -
Page 30: Auto Provision Your Phone With Short Activation Code
Step 2 Press Save. Secure the Phone with a Cable Lock You can secure your Cisco IP Phone 8800 Series with a laptop cable lock up to 20 mm wide. Procedure Step 1 Take the looped end of the cable lock and wrap it around the object to which you want to secure your phone. -
Page 31: User Authentication Control
Sign in to a Phone as a Guest Your phone has a guest account when your administrator enables hoteling on your phone. You can then sign in to a different phone in your network as a guest. Cisco IP Phone 8800 Series Multiplatform Phones User Guide... -
Page 32: Sign Out Of A Phone As A Guest
Table 2: BLF Key LED Status LED Color Meaning Green The monitored line is available. The monitored line is busy. Blinking red The monitored line is ringing. Amber Error in BLF key configuration. Cisco IP Phone 8800 Series Multiplatform Phones User Guide... -
Page 33: Activate Or Deactivate Monitoring Of The Blf List
When you activate monitoring, the phone starts showing the status of the monitored lines on the BLF list keys. You can use each BLF list key to call the monitored line (speed dial), and to answer incoming calls to the monitored line (call pickup). Cisco IP Phone 8800 Series Multiplatform Phones User Guide... -
Page 34: Configure Monitoring Of An Individual Line
Note that the phone adjusts the BLF list key assignment every time it has to add or remove a line for automatic monitoring. This results in changes in the positions of BLF list keys. Cisco IP Phone 8800 Series Multiplatform Phones User Guide... -
Page 35: Remove The Feature Configured On A Line Key
BLF list. This can change the positions of BLF list keys. See Activate or Deactivate Monitoring of the BLF List, on page 19 for details. Note You cannot remove some features configured by your administrator. Cisco IP Phone 8800 Series Multiplatform Phones User Guide... -
Page 36: Add A Menu Shortcut To A Line Key
• Phone features include speed dial, do not disturb, and your personal address book. • Line settings affect a specific phone line (directory number) on your phone. Line settings can include call forward, visual and audio message indicators, ring patterns, and other line-specific settings. Cisco IP Phone 8800 Series Multiplatform Phones User Guide... -
Page 37: Speed-Dial Numbers
Your Phone Speed-Dial Numbers If you have a Cisco IP Phone 8800 Key Expansion Module connected to your phone, you can also configure the expansion module buttons for speed dial and other phone services. The following table describes some specific features that you configure using the phone web page. -
Page 38: Buttons And Hardware
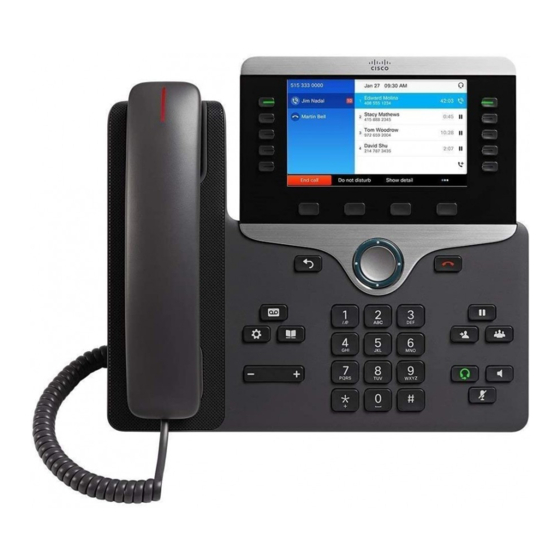
Buttons and Hardware The Cisco IP Phone 8800 Series has two distinct hardware types: • Cisco IP Phones 8811, 8841, 8851, and 8861—do not have a camera. • Cisco IP Phones 8845 and 8865—have a built-in camera. Cisco IP Phone 8800 Series Multiplatform Phones User Guide... - Page 39 End a connected call or session. Hold/Resume, Conference, Hold/Resume Place an active call on hold and resume the and Transfer held call. Conference Create a conference call. Transfer Transfer a call. Cisco IP Phone 8800 Series Multiplatform Phones User Guide...
-
Page 40: Navigation
• Line buttons—Used to answer a call or resume a held call. When not used for an active call, used to initiate phone functions, such as the missed calls display. Cisco IP Phone 8800 Series Multiplatform Phones User Guide... -
Page 41: Phone Screen Features
The icons display when features are active. The header row can display phone number, XMPP user ID, or phone name according to the setting by your administrator. If you want to change the setting, contact your administrator. Cisco IP Phone 8800 Series Multiplatform Phones User Guide... -
Page 42: Clean The Phone Screen
There will be no highlight for an active call. Active and incoming call screen supports more than 21 characters. The Cisco IP Phone can display 15 digits on the phone screen when line is inactive. -
Page 43: Mobile Device Charging
• In some situations, your device will not display the charging icon. For example, the icon may not display when the device is fully charged. • When more than one Cisco IP Phone 8800 Key Expansion Module is attached to your phone, the back USB port cannot fast-charge the device. -
Page 44: Energy Savings
Additional Help and Information If you have questions about the functions available on your phone, contact your administrator. The Cisco website (https://www.cisco.com) contains more information about the phones and call control systems. • For quick start guides and end-user guides in English, follow this link:... -
Page 45: Accessibility Features
• For licensing information, follow this link: https://www.cisco.com/c/en/us/support/collaboration-endpoints/ ip-phone-8800-series-multiplatform-firmware/products-licensing-information-listing.html Accessibility Features Cisco IP Phones provide accessibility features for the vision impaired, the blind, and the hearing and mobility impaired. For detailed information about the accessibility features on these phones, see http://www.cisco.com/c/en/us/ support/collaboration-endpoints/unified-ip-phone-8800-series/products-technical-reference-list.html. -
Page 46: View The Customization State On The Phone
Hardware version—Version number of the Cisco IP Phone hardware. VID—Version ID of the Cisco IP Phone. Certificate—Status of the client certificate, which authenticates the Cisco IP Phone for use in the ITSP network. This field indicates if the client certificate is properly installed in the phone. -
Page 47: View The Network Status
• MAC address—Unique Media Access Control (MAC) address of the phone. • Host name—Displays the current host name assigned to the phone. • Domain—Displays the network domain name of the phone. Default: cisco.com • Switch port link—Status of the switch port. -
Page 48: View The Status Messages On The Phone
Sign in to the phone so you can access to access the Call statistics menu. If a lock icon displays in the upper-right corner of the main screen, this means that you don't sign in to the phone yet. Cisco IP Phone 8800 Series Multiplatform Phones User Guide... -
Page 49: View 802.1X Transaction Status
View 802.1X Transaction Status Procedure Step 1 Press Applications Step 2 Select Network configuration > Ethernet configuration > 802.1X authentication > Transaction status. You can view the following information: • Transaction status Cisco IP Phone 8800 Series Multiplatform Phones User Guide... -
Page 50: View The Reboot History
Factory Reset the Phone from Phone Web Page You can restore your phone to its original manufacturer settings from the phone web page. After you reset the phone, you can reconfigure it. Cisco IP Phone 8800 Series Multiplatform Phones User Guide... -
Page 51: Identify Phone Issues With A Url In The Phone Web Page
For example, your softkeys might not work as you expect. When the phone reconnects to the call control system, you'll be able to use your phone normally again. Cisco IP Phone 8800 Series Multiplatform Phones User Guide... -
Page 52: Get More Information When Your Phone Displays A Provisioning Failure Message
You can view the renewal status and related information on the phone web page to check if the Manufacture Installed Certificate (MIC) renewal is completed. Your administrator might ask you about this information during the phone troubleshooting. Cisco IP Phone 8800 Series Multiplatform Phones User Guide... -
Page 53: Cisco One-Year Limited Hardware Warranty Terms
Cisco One-Year Limited Hardware Warranty Terms Special terms apply to your hardware warranty and services that you can use during the warranty period. Your formal Warranty Statement, including the warranties and license agreements applicable to Cisco software, is available at: Product Warranties. - Page 54 Your Phone Cisco One-Year Limited Hardware Warranty Terms Cisco IP Phone 8800 Series Multiplatform Phones User Guide...
-
Page 55: Calls
Your phone works just like a regular phone. But we make it easier for you to make calls. Make a Call Use your phone just like any other phone to make a call. Procedure Enter a number and pick up the handset. Cisco IP Phone 8800 Series Multiplatform Phones User Guide... -
Page 56: Make A Call With The Dial Assistance List
Use your phone to make an emergency call, similar to any other call. When you dial the emergency number, your emergency services get your phone number and location so that they can assist you. Note If your call disconnects, the emergency services can call you back. Cisco IP Phone 8800 Series Multiplatform Phones User Guide... -
Page 57: Redial A Number
Procedure Step 1 Press Applications Step 2 Select Speed dials. Step 3 Scroll to an unassigned speed-dial index. Step 4 Press Edit and do one of the following: Cisco IP Phone 8800 Series Multiplatform Phones User Guide... -
Page 58: Make A Call With A Speed-Dial Code
You can press a line key on your phone and delete speed dial assigned to it. The speed dial on the line key is removed. Check the phone web page to confirm that the speed dial is removed. Cisco IP Phone 8800 Series Multiplatform Phones User Guide... -
Page 59: Use The Line In Focus For Speed-Dial Calls
Press the speed-dial key to make a call. The call is made with the line in focus. Dial an International Number You can dial international calls when you prefix the phone number with a plus (+) sign. Cisco IP Phone 8800 Series Multiplatform Phones User Guide... -
Page 60: Secure Calls
Answer Calls Your Cisco IP Phone works just like a regular phone. But we make it easier for you to answer calls. Answer a Call Procedure Press the flashing red session button. -
Page 61: Decline A Call
When you enable DND, by default, it affects all lines on your phone. You can also enable DND on a specific line from the Preferences menu. When a line key has both feature key sync and DND enabled, the DND icon is displayed next to the line key label. Cisco IP Phone 8800 Series Multiplatform Phones User Guide... -
Page 62: Turn On Or Turn Off Dnd Using A Star Code
While you are on a call, you can mute the audio so that you can hear the other person, but they cannot hear you. If you have a video phone, when you mute your audio, your camera continues to transmit video. Cisco IP Phone 8800 Series Multiplatform Phones User Guide... -
Page 63: Hold Calls
• Ringing notification on the phone if a hold reminder is configured with phone web page Procedure Press Hold or Resume to resume the held call. Swap Between Active and Held Calls You can easily switch between active and held calls. Cisco IP Phone 8800 Series Multiplatform Phones User Guide... -
Page 64: Call Park
Retrieve a Call on Hold with Call Park You can pick up a parked call from anywhere in your network. Before you begin You need the number that was used to park the call. Cisco IP Phone 8800 Series Multiplatform Phones User Guide... -
Page 65: Park And Unpark A Call With One Line Key
See Coworker Line Status, on page 18 for the idle and Parked call icons. This feature doesn't apply to phone Cisco IP Phone 7811. Before you begin Activate or Deactivate Monitoring of the BLF List, on page 19 Procedure Step 1 Press the line key that monitors the user to park an active call. -
Page 66: Forward Calls
• Call Forward No Answer—Forward an incoming call to a target phone number when the call isn't answered. You can set up the call forward service or services by a specific softkey. Cisco IP Phone 8800 Series Multiplatform Phones User Guide... -
Page 67: Forward Calls With The Phone Web Page
In the Call Forward section, set the Cfwd All, Cfwd Busy, Cfwd No Answer, or combination of them to Yes, and enter a phone number for each of the call forward services that you want to enable: Cisco IP Phone 8800 Series Multiplatform Phones User Guide... -
Page 68: Activate Call Forward All With Feature Activation Code Synchronization
• Press Contacts and select a contact from your contact directories. • Press Redial and select an entry from the Placed calls list. Step 3 Press Call to forward all calls to the specified number. Cisco IP Phone 8800 Series Multiplatform Phones User Guide... -
Page 69: Transfer Calls
(Optional) Press the line key to return to the held call. Step 4 (Optional) Press the line key to return to the transfer target phone number. Step 5 Press Transfer or Transfer again. Cisco IP Phone 8800 Series Multiplatform Phones User Guide... -
Page 70: Conference Calls And Meetings
You can join Webex meetings from your phone. Also, you can ignore or temporarilty turn off meeting notifications. When your administrator enables meeting service on your phone, you can perfom the following tasks. • Check the list of meetings on the phone scheduled for next 24 hours. Cisco IP Phone 8800 Series Multiplatform Phones User Guide... -
Page 71: Video Calls
If the scheduled meeting time is changed, the list shows the updated meeting timing. Video Calls Cisco IP Phones 8845 and 8865 support video calls with a built-in video camera. You can make an audio call into a video call by opening your camera shutter. -
Page 72: Make A Video Call
Make a Video Call Make a Video Call Cisco IP Phones 8845 and 8865 support video calls as long as the person you're calling also has a video phone. The ring on the outside of the camera controls the shutter. -
Page 73: Adjust The Camera Exposure
If you configure a fixed bandwidth, select a setting and adjust downwards until there is no video lag. Procedure Step 1 Press Applications Step 2 Select User Preferences > Video > Bandwidth allowance. Step 3 Choose a bandwidth setting in the Bandwidth allowance screen. Cisco IP Phone 8800 Series Multiplatform Phones User Guide... -
Page 74: Video Call Security And Troubleshooting Information
(Optional) While recording is in progress, you can press PauseRec to pause the recording. Step 3 (Optional) Press ResumeRec to resume the recording. Step 4 (Optional) Press StopRec to stop the recording. Step 5 Press End Call to end the call. Cisco IP Phone 8800 Series Multiplatform Phones User Guide... -
Page 75: Instant Message And Presence Contacts
Select an entry. The entry shows the status of your contact. Step 6 (Optional) Press Select to view the contact details and press to return to the contacts list. Step 7 Press Call. Cisco IP Phone 8800 Series Multiplatform Phones User Guide... -
Page 76: Change Your Presence State
Multiple Lines If you share phone numbers with other people, you could have multiple lines on your phone. When you have multiple lines, you have more calling features available to you. Cisco IP Phone 8800 Series Multiplatform Phones User Guide... -
Page 77: Answer The Oldest Call First
If set up this way, you'll hear a tone letting you know that the system recognizes the access code. Note Step 3 Enter the phone number of the person whose call you want to barge in to. Cisco IP Phone 8800 Series Multiplatform Phones User Guide... -
Page 78: Call Center Features
If the status is Available, the icon displays beside your phone number. Otherwise, proceed with the next steps to manually set the status. Step 3 Press Agt status. Step 4 Highlight the Available status. Cisco IP Phone 8800 Series Multiplatform Phones User Guide... -
Page 79: Sign Out As A Call Center Agent
When you sign into the phone as a call center agent and your phone status is set to available, your phone are ready to accept call center calls. Before you answer a call, you see information about the call. Cisco IP Phone 8800 Series Multiplatform Phones User Guide... -
Page 80: Hold An Agent Call
Press Ok. Trace a Call You can trace an active call and the last incoming call in any agent status. Before you begin Your administrator enables your phone to trace a call. Cisco IP Phone 8800 Series Multiplatform Phones User Guide... -
Page 81: Escalate A Call To A Supervisor
• You can transfer an ongoing call from an assistant to yourself. Join an Ongoing Call as an Executive Dial the service activation code provided by your administrator, or follow the procedure described below to join an ongoing call. Cisco IP Phone 8800 Series Multiplatform Phones User Guide... -
Page 82: Transfer An Ongoing Call To Yourself As An Executive
• You can join a call that is in progress with an executive. • You can transfer an ongoing call from an executive to yourself. Cisco IP Phone 8800 Series Multiplatform Phones User Guide... -
Page 83: Initiate A Call On Behalf Of An Executive As An Assistant
You can transfer an ongoing call to an executive if it is the only ongoing call for the executive. If assistants are currently engaged in other calls for the executive, you cannot transfer a call. Cisco IP Phone 8800 Series Multiplatform Phones User Guide... -
Page 84: Join Or Transfer An Ongoing Call To Yourself As An Executive Assistant
If you have a mobile phone, you can connect the mobile device to your desk phone. This connection allows you to make and answer phone calls on either the mobile device or the desk phone. Cisco IP Phone 8800 Series Multiplatform Phones User Guide... -
Page 85: Phone Calls With Intelligent Proximity
Phone Calls with Intelligent Proximity Cisco IP Phone 8851 and 8861 support this feature. Do not pair two or more Cisco IP Phone 8800 Series desk phones. Note When your mobile device is connected to the desk phone, the mobile device can't access or use the desk phone contacts. -
Page 86: Switch Connected Mobile Devices
Calls Switch Connected Mobile Devices Switch Connected Mobile Devices If you have more than one paired mobile device in range of your Cisco IP Phone, you can choose which mobile device to connect. Procedure Step 1 Press Applications Step 2 Select Bluetooth >... -
Page 87: View Your Paired Bluetooth Devices
Before you begin Your mobile phone is paired to your desk phone. Procedure Step 1 Select a mobile line on your desk phone. Step 2 Enter a phone number. Step 3 Press Call. Cisco IP Phone 8800 Series Multiplatform Phones User Guide... - Page 88 Procedure Step 1 Press Contacts Step 2 Press Category, if it displays on the phone. Otherwise, skip the step. Step 3 Select your mobile phone from the list. Cisco IP Phone 8800 Series Multiplatform Phones User Guide...
- Page 89 Step 2 Press Category, if it displays on the phone. Otherwise, skip the step. Step 3 Select your mobile phone from the directory list. Step 4 Press Option, then select Delete all. Cisco IP Phone 8800 Series Multiplatform Phones User Guide...
-
Page 90: Intelligent Proximity For Tablets
Your tablet is paired to your desk phone and you are on a call on the tablet with the audio on the desk phone. Procedure Do one of the following actions: • Hang up the handset. • Press Release. Cisco IP Phone 8800 Series Multiplatform Phones User Guide... - Page 91 Calls Move the Audio from Your Desk Phone to Your Tablet • Answer another call on the desk phone. Cisco IP Phone 8800 Series Multiplatform Phones User Guide...
- Page 92 Calls Move the Audio from Your Desk Phone to Your Tablet Cisco IP Phone 8800 Series Multiplatform Phones User Guide...
-
Page 93: Contacts
Select the All directories, the BroadSoft directory, the LDAP directory, or the Bluetooth-paired device. b) Search for a contact that you want to add. c) Highlight the contact. d) Press Option, and then select Add contact. Cisco IP Phone 8800 Series Multiplatform Phones User Guide... -
Page 94: Add A New Contact To Your Personal Address Book With Phone Web Page
Press Category, if it displays. Otherwise, skip the step. Step 3 Select Personal address book. Step 4 Select Option > Search. Step 5 Enter the address entry to search for. The matched contacts will display on the phone. Cisco IP Phone 8800 Series Multiplatform Phones User Guide... -
Page 95: Call A Contact In Your Personal Address Book
Highlight the entry you want to change. Step 5 Press Select Step 6 Modify the entry information. Step 7 Press Save. Related Topics Search for a Contact in Your Personal Address Book, on page 80 Cisco IP Phone 8800 Series Multiplatform Phones User Guide... -
Page 96: Remove A Contact From Your Personal Address Book
• LDAP directory • Bluetooth-paired phone The manual search operation tries to retrieve the contacts from the directories in the following order: • Personal address book • BroadSoft directory • LDAP directory Cisco IP Phone 8800 Series Multiplatform Phones User Guide... - Page 97 Your administrator can change the target directory. If you don't see the Add contact option, contact your administrator. c) Enter the contact details and press Save. Step 7 To call a contact, follow these steps: Cisco IP Phone 8800 Series Multiplatform Phones User Guide...
-
Page 98: Corporate Directory
Edit the Webex Directory Name You can modify the display name of the Webex directory. Before you begin Your administrator configures support for Webex contacts. Procedure Step 1 Press Contacts Cisco IP Phone 8800 Series Multiplatform Phones User Guide... -
Page 99: Search For A Contact In Your Webex Directory
Work phone number has higher priority than the mobile phone number. From the details screen, if you select the name or the work phone number and make a call, the phone Cisco IP Phone 8800 Series Multiplatform Phones User Guide... -
Page 100: Search For A Webex Contact In All Directory
All directory. When search result has count more than the allowed display record value, you see a message: Too many matches found.Refine your search Before you begin • Your administrator enables the Webex directory. • Your administrator enables All directory search. Cisco IP Phone 8800 Series Multiplatform Phones User Guide... -
Page 101: Broadsoft Directory
You can search and view your personal, group, and enterprise contacts in your Broadsoft Directory, which makes it easier to give them a call. Your administrator configures the Broadsoft Directory in your phone. This application feature uses BroadSoft's Extended Services Interface (XSI). Cisco IP Phone 8800 Series Multiplatform Phones User Guide... -
Page 102: Search For A Contact In Your Broadsoft Directory
Extension, Mobile phone, Department, or Email address. • In BroadSoft Enterprise Common, Group Common, or Personal directory, search a contact by Name or Number. Step 6 Enter your search criteria, and press Search. Cisco IP Phone 8800 Series Multiplatform Phones User Guide... -
Page 103: Edit Your Contact Type In Your Broadsoft Directory
If your administrator disables the directory individual mode, the phone displays the menu item BroadSoft directory instead, select it. b) Wait for the preload operation to be completed or press Cancel to stop the preload operation. Cisco IP Phone 8800 Series Multiplatform Phones User Guide... -
Page 104: Edit Your Broadsoft Directory Name
Highlight the contact that you want to delete. d) Press Option, and then select Delete. Edit Your BroadSoft Directory Name When your administrator disables the directory individual mode, the phone only displays BroadSoft directory. Cisco IP Phone 8800 Series Multiplatform Phones User Guide... -
Page 105: Edit The Server Name Of Your Broadsoft Directory
When your administrator enables the directory individual mode, the phone displays all enabled directories with default or customized names. The default names are: • Enterprise • Group • Personal • Enterprise Common • Group Common Cisco IP Phone 8800 Series Multiplatform Phones User Guide... -
Page 106: Edit Credentials Of Your Broadsoft Directory
Step 1 Press Contacts Step 2 Press Category, if it displays on the phone. Otherwise, skip the step. Step 3 Do one of the following actions: • Highlight the BroadSoft directory. Cisco IP Phone 8800 Series Multiplatform Phones User Guide... -
Page 107: Ldap Directory
Press Save to apply the change. LDAP Directory The Cisco IP Phone supports Lightweight Directory Access Protocol (LDAP) v3. You can search for a specified LDAP directory for a name, phone number, or both. LDAP-based directories, such as Microsoft Active Directory 2003 and OpenLDAP-based databases, are supported. -
Page 108: Search For A Contact In Your Ldap Directory
Enter your search criteria, and then press Search. Related Topics Call a Contact in Your LDAP Directory, on page 95 Edit a Contact Number in Your LDAP Directory, on page 95 Cisco IP Phone 8800 Series Multiplatform Phones User Guide... -
Page 109: Call A Contact In Your Ldap Directory
After the search is completed, the matched contacts display in the form of entries in the search result list. Step 2 In the Company directory (LDAP) result list screen, use the outer ring of the navigation cluster to highlight an entry. Cisco IP Phone 8800 Series Multiplatform Phones User Guide... -
Page 110: Xml Directory
In the Directories screen, use the outer ring of the navigation cluster to highlight an entry. The phone displays an entry together with one or more contact numbers. Step 5 Press Call. Cisco IP Phone 8800 Series Multiplatform Phones User Guide... -
Page 111: Edit A Contact Number In Your Xml Directory
In the Corporate directory (XML) address entry screen, use the outer ring of the navigation cluster to highlight a contact number. An entry can contain up to 5 contact numbers. c. Press Edit call. Cisco IP Phone 8800 Series Multiplatform Phones User Guide... -
Page 112: Reverse Name Lookup For Incoming And Outgoing Calls
Reverse name lookup is enabled by default. Reverse name lookup searches the directories in the following order: 1. Phone contacts 2. Call History 3. LDAP Directory 4. XML Directory Cisco IP Phone 8800 Series Multiplatform Phones User Guide... -
Page 113: Recent Calls
ID based on the caller's STIR/SHAKEN verification result. Based on the verification result, the phone displays three types of icons. For more information on the icons, see View your Recent Calls, on page View your Recent Calls Check to see who's called you recently. Cisco IP Phone 8800 Series Multiplatform Phones User Guide... - Page 114 • Edit call-Enables to edit any call entry details, when pressed. Availability of this menu depends on your adminsitrator's softkey configuration on the phone web interface. • Delete entry-Deletes any selected entry, when pressed. Cisco IP Phone 8800 Series Multiplatform Phones User Guide...
-
Page 115: Spam Indication For Webex Calls
When the icon appears in red color, it indicates a missed call. Note Cisco IP Phone 8811 has grayscale screen therefore doesn't support color icons. When you go to the call details of any call, you can view if the call is a missed call or an answered call. -
Page 116: View Calls Logs From Server
If there is a missed call on a line, you can use the Missed softkey on the phone's home screen to access the Missed calls list. Step 2 Select the call record that you want to dial. Step 3 (Optional) Press Edit call to edit the call record. Cisco IP Phone 8800 Series Multiplatform Phones User Guide... -
Page 117: Clear The Recent Calls List
To view calls in the Display recents from option, see View Calls Logs from Server , on page 102. Step 5 Highlight the individual record that you want to add. Step 6 Press Option. Cisco IP Phone 8800 Series Multiplatform Phones User Guide... -
Page 118: Delete A Call Record
Step 7 Press OK. Delete All Call Records You can delete all call history records on your phone. Procedure Step 1 Press Applications Step 2 Select Recents. Step 3 Select All calls. Cisco IP Phone 8800 Series Multiplatform Phones User Guide... - Page 119 Recent Calls Delete All Call Records Step 4 Press Option and select Delete all. Step 5 Press OK. Cisco IP Phone 8800 Series Multiplatform Phones User Guide...
- Page 120 Recent Calls Delete All Call Records Cisco IP Phone 8800 Series Multiplatform Phones User Guide...
-
Page 121: Voicemail
If your administrator has not set up your personal voicemail phone number on your phone, you can set it up yourself. Procedure Step 1 Press Applications Step 2 Select User preferences > Call preferences. Step 3 Enter your personal voicemail phone number in Voice mail. Step 4 Press Set. Cisco IP Phone 8800 Series Multiplatform Phones User Guide... -
Page 122: Check Your Personal New Voice Messages
When prompted, enter your voicemail credentials. Phone Behavior with Voicemail Setting This table lists the phone behavior in various scenarios when the Handset LED Alert field in the Configuration Utility is set to Voicemail. Cisco IP Phone 8800 Series Multiplatform Phones User Guide... -
Page 123: Phone Behavior With Voicemail And Missed Call Configuration Setting
Missed Call Voicemail comes in LED On User interacts with the phone and calls the voicemail to retrieve a message. Cisco IP Phone 8800 Series Multiplatform Phones User Guide... -
Page 124: Voice Messages States Of Monitored Voicemail Accounts
• Your administrator must configure either a line key on the phone or an expansion module button to monitor a voicemail account. • Your administrator must assign speed dial to the configured key. Cisco IP Phone 8800 Series Multiplatform Phones User Guide... - Page 125 Press the line key on the phone or the expansion module button. You may be prompted to enter the monitored voicemail account ID and PIN. Step 2 Follow the voice prompts. Cisco IP Phone 8800 Series Multiplatform Phones User Guide...
- Page 126 Voicemail Access Monitored Voicemail Account Messages Cisco IP Phone 8800 Series Multiplatform Phones User Guide...
-
Page 127: Settings
• Adjust Backlight Timer from the Phone Web Interface, on page 134 • Change the Display Mode, on page 135 • Specify an Audio Device for a Call, on page 135 Cisco IP Phone 8800 Series Multiplatform Phones User Guide... -
Page 128: Phone Settings Overview
On the phone web page, select User Login > Voice > Ext(n), where (n) is the number of an extension. Step 2 In Call Feature Settings area, choose a ringtone from the Default Ring drop-down list. Cisco IP Phone 8800 Series Multiplatform Phones User Guide... -
Page 129: Control Ringer Volume
There are two other methods to set up the call forward services. To set up the call forward services by a specific softkey, see Forward Calls, on page 52. To set up the call forward services from the phone web page, see Forward Calls with the Phone Web Page, on page Cisco IP Phone 8800 Series Multiplatform Phones User Guide... -
Page 130: Procedure
Search for a Contact in the All Directories Screen, on page d) Press Call to assign the target phone number. You can find that the target phone number displays next to the call forward service. Cisco IP Phone 8800 Series Multiplatform Phones User Guide... -
Page 131: Enable Call Forwarding With The Phone Web Page
If the Do not disturb menu doesn't display on the screen, contact your administrator. Note Step 4 Select On to turn on DND or select Off to turn off DND. Step 5 Press Set to save the setting. Cisco IP Phone 8800 Series Multiplatform Phones User Guide... -
Page 132: Turn On Dnd From The Phone Web Page
Under Supplementary Services, set CW Setting to Yes. The setting applies to all lines, except for the ones where your administrator has enabled synchronization of Call Waiting between the lines and the BroadSoft XSI service. Cisco IP Phone 8800 Series Multiplatform Phones User Guide... -
Page 133: Block An Anonymous Call
This feature helps you to maintain privacy. Before you begin Your administrator enables Block CID feature on your phone. Your administrator enables Block CID feature on the XSI BroadWorks server. Cisco IP Phone 8800 Series Multiplatform Phones User Guide... -
Page 134: Secure A Call
Select User Preferences > Call Preferences > Dial assistance. Step 3 Press On to enable the dial assistance or press Off to disable it. Step 4 Press Set to apply the mode. Cisco IP Phone 8800 Series Multiplatform Phones User Guide... -
Page 135: Add Multiple Locations For A Broadworks Xsi User
Select User preferences > Call preferences > Auto answer page. Step 3 Select On to enable the Auto answer page or select Off to disable Auto answer page. Step 4 Press Set to save the changes. Cisco IP Phone 8800 Series Multiplatform Phones User Guide... -
Page 136: Set Up Voicemail
Highlight Auto discovery (WPAD), select On to turn on Web Proxy Auto-Discovery (WPAD) that is used to retrieve a PAC file automatically, select Off to turn off WPAD. By default, your phone uses WPAD in the auto proxy mode. Cisco IP Phone 8800 Series Multiplatform Phones User Guide... -
Page 137: Set Up A Proxy Server With The Manual Proxy Mode
You can choose the auto or manual proxy mode to set up an HTTP proxy server from the phone web page. Procedure Step 1 On the phone web page, select Voice > System. Step 2 Under the section HTTP Proxy Settings, set the parameters described in the following table: Cisco IP Phone 8800 Series Multiplatform Phones User Guide... - Page 138 Manual. Username Enter a username of a credential user on the proxy server. This parameter is available when you set Proxy Mode to Manual and Proxy Server Requires Authentication to Yes. Cisco IP Phone 8800 Series Multiplatform Phones User Guide...
-
Page 139: Vpn Connection Settings
Enter the IP address or FQDN of a VPN server in VPN server. Step 4 Enter the user credentials in Username and Password. Step 5 (Optional) If needed, enter the name of a tunnel group in Tunnel group. Cisco IP Phone 8800 Series Multiplatform Phones User Guide... -
Page 140: Enable A Vpn Connection
Disable a VPN Connection You can disable a VPN connection by rebooting your phone in an automatic or manual way. Before you begin A VPN connection is enabled on your phone. Cisco IP Phone 8800 Series Multiplatform Phones User Guide... -
Page 141: Set Up A Vpn Connection From The Phone Web Page
Table 7: VPN Settings Parameter Description VPN Server IP address or FQDN of the VPN server. Default: Empty VPN User Name Enter a username for a credential user on the VPN server. Default: Empty Cisco IP Phone 8800 Series Multiplatform Phones User Guide... -
Page 142: View The Vpn Status
• VPN subnet mask—VPN subnet mask assigned from the VPN server. • Sent bytes—Total bytes the phone sent out to the network through the VPN server. • Received bytes—Total bytes the phone received from the network through the VPN server. Cisco IP Phone 8800 Series Multiplatform Phones User Guide... -
Page 143: Change The Time Format
Select On to turn on screen saver and select Off to turn it off. Step 4 Select Screen saver settings to choose the settings: • Screen saver type—Choose one of the following options: Cisco IP Phone 8800 Series Multiplatform Phones User Guide... -
Page 144: Change Wallpaper From The Phone Page
The logo display area is the center of the phone screen. The logo display area size of the phone is 128x128 pixels. If original logo size does not fit display area, the logo scales to fit the display area. Cisco IP Phone 8800 Series Multiplatform Phones User Guide... -
Page 145: Configure The Screen Saver With The Phone Web Interface
If the phone does not have any wallpaper downloaded earlier, it displays a gray screen. Cisco IP Phone 8800 Series Multiplatform Phones User Guide... -
Page 146: Add A Logo As A Phone Background
If the aspect ratio of the target picture is not 5:3, some parts of the picture are lost. Cisco IP Phone 8800 Series Multiplatform Phones User Guide... -
Page 147: Download Wallpaper
Step 5 Click Submit All Changes. The phone does not reboot after you change the background image URL. Adjust the Phone Screen Brightness Procedure Step 1 Press Applications Cisco IP Phone 8800 Series Multiplatform Phones User Guide... -
Page 148: Adjust The Backlight Duration
In the Display Brightness field, enter an integer ranging from 4 to 15 for the desired brightness. You can also configure this parameter in the configuration file (cfg.xml) by entering a string in this format: Cisco IP Phone 8800 Series Multiplatform Phones User Guide... -
Page 149: Change The Display Mode
• None—Selects the last used audio device. • Speaker—Selects the speakerphone as the audio device. • Headset—Selects a headset as the audio device. A headset priority order is: • USB (highest) • Bluetooth (medium) Cisco IP Phone 8800 Series Multiplatform Phones User Guide... -
Page 150: Reboot Your Phone
Select a language from the list of available languages. Step 4 Select Save. Set Password Reset your phone password regularly and keep your network secure. Before you begin You must have your password. Cisco IP Phone 8800 Series Multiplatform Phones User Guide... -
Page 151: Set Password From Phone Web Page
If you missed the Profile account setup screen, you can also access it from the phone menu or the Setup softkey if available. If the phone fails to sign in, contact your administrator. Cisco IP Phone 8800 Series Multiplatform Phones User Guide... -
Page 152: Executive Settings
Perform this task to active call filtering. If your administrator configures your extension to connect to the XSI BroadWorks server, you can also select the call filtering mode and call filtering type. Cisco IP Phone 8800 Series Multiplatform Phones User Guide... - Page 153 • Call filter type—Choose one of the following options: This menu item is available when the Call filter mode is set to Simple. Note • All Calls—All your incoming calls go to your assistants. Cisco IP Phone 8800 Series Multiplatform Phones User Guide...
-
Page 154: Deactivate Call Filtering As An Executive
• If your administrator configures your extension to connect to the XSI BroadWorks server: a. Select Call filter > Call filter b. Press to select Off. c. Press Set to apply the changes. Cisco IP Phone 8800 Series Multiplatform Phones User Guide... -
Page 155: Check Assistant List As An Executive
If your administrator configures more than one executive on the phone, then the screen only displays the assistants of the first available executive. Step 3 (Optional) If you want to make a call to one of your assistants, then highlight the assistant's phone number, and press Call. Cisco IP Phone 8800 Series Multiplatform Phones User Guide... -
Page 156: Executive Assistant Settings
Your administrator grants you the permission to opt in to or out of the executive's pool. Procedure Step 1 Do one of the following actions: • If your administrator has programmed the Assistant function on a line key, press the line key. Cisco IP Phone 8800 Series Multiplatform Phones User Guide... -
Page 157: Activate Or Deactivate Call Filtering As An Executive Assistant
Select Assistant Step 2 Follow the below procedure according to the actual menus displayed on the phone. • If your administrator configures your extension to connect to the XSI BroadWorks server: Cisco IP Phone 8800 Series Multiplatform Phones User Guide... -
Page 158: Activate Call Diversion As An Executive Assistant
• If you do not have the Assistant function on a line key: a. Press Applications b. Select Assistant Step 2 Follow the below procedure according to the actual menus displayed on the phone. Cisco IP Phone 8800 Series Multiplatform Phones User Guide... -
Page 159: Deactivate Call Diversion As An Executive Assistant
• If you do not have the Assistant function on a line key: a. Press Applications b. Select Assistant Step 2 Follow the below procedure according to the actual menus displayed on the phone. Cisco IP Phone 8800 Series Multiplatform Phones User Guide... -
Page 160: Check Executive List As An Assistant
• If you do not have the Assistant function on a line key: a. Press Applications b. Select Assistant Step 2 Select Executive List. The Executive List screen displays a maximum of 10 executives on the phone. Cisco IP Phone 8800 Series Multiplatform Phones User Guide... -
Page 161: Troubleshooting Executive Assistant Settings
Ensure that DND is not activated for your extension. Wi-Fi Settings Wi-Fi settings are available only on Cisco IP phone 8861 and 8865 Multiplatform Phones. You can customize Wi-Fi settings for your phone from the Wi-Fi configuration menu under the Network configuration menu on the phone. -
Page 162: Trigger Wi-Fi Scan With Softkey
Turn the Wi-Fi On or Off from Your phone You can enable or disable the wireless LAN of your phone from the Wi-Fi configuration menu. By default, the wireless LAN on your phone is enabled. Cisco IP Phone 8800 Series Multiplatform Phones User Guide... -
Page 163: Connect The Phone To A Wi-Fi Manually
If your phone supports Wi-Fi, it provides status information if it doesn't have a network connection when it boots up. You see the message Verify your internet settings or contact your service provider. Before you begin The phone must not be connected to an Ethernet cable. Cisco IP Phone 8800 Series Multiplatform Phones User Guide... -
Page 164: Set Up A Wi-Fi Profile From The Phone
Step 4 Press the Select button. You can also press Options and then select Edit. Step 5 In the Edit profile screen, set the parameters as mentioned in the Profile Parameters table. Cisco IP Phone 8800 Series Multiplatform Phones User Guide... - Page 165 Allows you to enter password for the network profile that you create. This field is available when you set the security mode to WEP. This is a mandatory field and it allows maximum length of 32 alphanumeric characters. Cisco IP Phone 8800 Series Multiplatform Phones User Guide...
-
Page 166: Set Up A Wi-Fi Profile
Step 2 Select Network configuration > Wi-Fi configuration > Wi-Fi profile. Step 3 In the Wi-Fi profile screen, select the Wi-Fi profile that you want to remove. Step 4 Press Options. Cisco IP Phone 8800 Series Multiplatform Phones User Guide... -
Page 167: Change The Order Of A Wi-Fi Profile
PSK, you see only PSK in the Security mode screen. • When you scan a wireless network (SSID) which is the current connected wireless, you can't edit the Network name of this SSID. Procedure Step 1 Press Applications Cisco IP Phone 8800 Series Multiplatform Phones User Guide... - Page 168 This field is available when you set the security mode to Auto, EAP-FAST, PEAP-GTC, PEAP-MSCHAPV2. This is a mandatory field and it allows maximum length of 64 alphanumeric characters. Cisco IP Phone 8800 Series Multiplatform Phones User Guide...
-
Page 169: View The Wi-Fi Status
• AP MAC address: Indicates MAC address of the access point (SSID). • Channel: Indicated the channel on which the Wi-Fi network transmits and receives data. • Frequency: Indicates the wireless signal frequency band that is used in the Wireless LAN. Cisco IP Phone 8800 Series Multiplatform Phones User Guide... -
Page 170: View Wi-Fi Status Messages On The Phone
(Optional) Press Clear to delete all the messages. Accessibility with Voice Feedback Voice Feedback helps people who have trouble seeing use their Cisco IP phone. When enabled, a voice prompt helps you navigate your phone buttons, and to use and configure phone features. The voice feedback also reads incoming caller IDs, displayed screens and settings, and button functions. -
Page 171: Enable Or Disable Voice Feedback
Enable or Disable Voice Feedback Voice Feedback helps people who have trouble seeing use their Cisco IP phone. You can enable or disable Voice Feedback by pressing the Select button three times quickly. You can also access this feature from the Accessibility menu under Applications on your phone. -
Page 172: Adjust Voice Volume
Select User preferences > Audio preferences > Noise removal. Step 3 From the Navigation cluster, press the Select button to enable or disable the feature. Step 4 Press Set to save the changes. Cisco IP Phone 8800 Series Multiplatform Phones User Guide... -
Page 173: Enable Or Disable Noise Removal With The Phone Web Page
You may have to reboot your phone for a software upgrade or other changes to take effect. Your settings or other customizations do not change. Procedure Step 1 Press Applications Step 2 Select Device administration > Restart. Step 3 Select OK to confirm that you want to reboot your phone. Cisco IP Phone 8800 Series Multiplatform Phones User Guide... - Page 174 Settings Reboot Your Phone Cisco IP Phone 8800 Series Multiplatform Phones User Guide...
-
Page 175: Accessories
C H A P T E R Accessories • Accessories Overview for Cisco IP Phone 8800 Series with Multiplatform Firmware, on page 161 • View the Accessories Associated with Your Phone, on page 163 • Headsets, on page 163 •... - Page 176 *—For the Bluetooth connection with Cisco IP Phone Multiplatform Phones, the limited call features (for example, answer or end a call) are available. The call features will be fully supported in a future release. Currently, we recommend that you use the Cisco Headset 730 by a USB adapter or a USB-C cable.
- Page 177 • The EHS connects to the Cisco IP Phone 8811, 8841, and 8845 with the auxiliary port. • The EHS connects to the Cisco IP Phone 8851, 8861, and 8865 with the auxiliary port, the USB port, or with Bluetooth.
- Page 178 Cisco Headset 521 and 522 The Cisco Headsets 521 and 522 are two wired headsets that have been developed for use on Cisco IP Phones and devices. The Cisco Headset 521 features a single earpiece for extended wear and comfort. The Cisco Headset 522 features two earpieces for use in a noisy workplace.
- Page 179 The 532 headset features two earpieces for use in a noisy environment or busy office. The Cisco Headset 531 and 532 use one of two connectors with the Cisco IP Phone 8800 Series with Multiplatform Firmware: •...
- Page 180 Cisco Headset 531 and 532 LED and Buttons The Cisco Headset USB Adapter is available for use with the Cisco Headset 531 and 532. With the adapter, you can test your headset, and customize your bass and treble, gain or microphone volume, and sidetone or feedback settings.
- Page 181 The Cisco Headset 560 Series use a headset base to connect with Cisco IP Phones and charge the headsets. The available options for the base are Standard base and Multibase. The Cisco Headset 560 Series with Standard Base support connection with a single source from a phone or a computer.
- Page 182 Cisco Headset 561 and 562 Buttons and LED Cisco Headset 561 and 562 Buttons and LED Your headset buttons are used for basic call features. Figure 8: Cisco Headset 561 and 562 Headset Buttons Cisco IP Phone 8800 Series Multiplatform Phones User Guide...
- Page 183 Accessories Cisco Headset 561 and 562 Buttons and LED The following table describes the Cisco Headset 561 and 562 Headset buttons. Table 13: Cisco Headset 561 and 562 Headset Buttons Number Name Description Use to power the headset on and off.
- Page 184 • The Cisco Headset 520 Series is connected to the phone with the inline USB controller. • The Cisco Headset 531 and 532 is connected to the phone with the USB adapter. • The Cisco Headset 560 Series Standard Base or Multibase is connected to the phone with the Y-cable or the USB cable.
- Page 185 Feedback, also called sidetone, is the term for hearing your own voice in your headset. You can adjust the sidetone level or turn it off if you find it distracting to hear your own voice during a call. Cisco IP Phone 8800 Series Multiplatform Phones User Guide...
- Page 186 Your headset's ear pads are an important part of its performance. They provide comfort, grip, and sound enhancement. With time, it's natural for ear pads to wear out, but you can replace them easily. Note Cisco Headset 560 Series ear pads are not compatible with the Cisco Headset 520 Series and Cisco Headset 530 Series. Procedure Step 1 Rotate the old ear pad counterclockwise.
- Page 187 • Cisco IP Phone 8861 Multiplatform Phones • Cisco IP Phone 8865 Multiplatform Phones The Cisco Headset 700 Series is a wireless headset that uses Bluetooth connectivity to pair with Cisco IP Phone Multiplatform Phones. It provides the following features: •...
- Page 188 Cisco Headset 730 Cisco Headset 730 The Cisco Headset 730 is a wireless headset that uses Bluetooth connectivity to pair with the Cisco IP Phones Multiplatform Phones. The headset features full call control and music playback capabilities in addition to powerful noise cancellation and ambient audio enhancement systems for use in a busy office environment.
- Page 189 You will be prompted every 2 hours until you start the upgrade. Find Details of Your Headset 730 on the Phone You can find information about the name, model, serial number, and firmware version of the Cisco Headset 730 on the phone.
- Page 190 Highlight the Cisco Headset 730 from the Accessories menu. If the menu displays the Cisco USB HD Adapter instead, this means that the headset doesn't pair to the phone. You can proceed with the next step to find details about the USB adapter.
- Page 191 Accessories Wired Headsets Cisco does test the Cisco headsets with the Cisco IP Phones. For information about Cisco Headsets and Cisco IP Phone support, see https://www.cisco.com/c/en/us/products/collaboration-endpoints/headsets/index.html. Wired Headsets A wired headset works with all Cisco IP Phone features, including the Volume and Mute buttons. These buttons adjust the earpiece volume and mute the audio from the headset microphone.
- Page 192 The Cisco IP Phone uses a shared key authentication and encryption method to connect with headsets. The Cisco IP Phone can connect with up to 50 headsets, one at a time. The last connected headset is used as the default. Pairing is typically performed once for each headset.
- Page 193 When headsets are more than 30 feet (10 meters) away from the Cisco IP Phone, Bluetooth drops the connection after a 15- to 20-second timeout. The paired headset reconnects when it is comes back into range of the Cisco IP Phone. For certain phone types that operate in power-save modes, you can wake up the headset by tapping on the operational button.
- Page 194 Accessories Turn Bluetooth On or Off • Cisco IP Phone 8800 Series Multiplatform Phones User Guide , see Bluetooth Headsets. • User Guides provided with your headset Turn Bluetooth On or Off When Bluetooth is active, the Bluetooth icon appears in the phone screen header.
- Page 195 • When you connect only an analog headset to the phone, you make your analog headset the preferred audio device. Procedure Step 1 Before you make or answer a call, press Headset. Step 2 (Optional) If you place a call, dial the number. Cisco IP Phone 8800 Series Multiplatform Phones User Guide...
- Page 196 Select User preferences > Audio preferences > Microphone gain. Step 3 Press >> to make the gain level louder and press << to make it softer. The available options are: Softest, Softer, Soft, Default, Loud, Louder, Loudest. Cisco IP Phone 8800 Series Multiplatform Phones User Guide...
- Page 197 You can tune the speaker while you are on a call. If you save the settings during the call, the change is immediate and is used on subsequent calls. If you don't save the settings during the call, the change is only used for the current call. Cisco IP Phone 8800 Series Multiplatform Phones User Guide...
- Page 198 • Speaker—Selects the speakerphone as the audio device. • Headset—Selects a headset as the audio device. A headset priority order is: • USB (highest) • Bluetooth (medium) • analog headset (lowest) Cisco IP Phone 8800 Series Multiplatform Phones User Guide...
- Page 199 External speakers and microphones are plug-and-play accessories. You can connect an external PC-type microphone and powered speakers (with amplifier) on the Cisco IP Phone by using the line in/out jacks. Connecting an external microphone disables the internal microphone and connecting an external speaker disables the internal phone speaker.
- Page 200 Cisco IP Phone 8800 Key Expansion Module with a Cisco IP Phone 8851/8861 Key Expansion Module or with a Cisco IP Phone 8865 Key Expansion Module. You cannot mix audio expansion modules with video Cisco IP Phone 8800 Series Multiplatform Phones User Guide...
- Page 201 3; single LCD screen, 18 line keys, two pages, providing 108 buttons, Table 15: Cisco IP Phones and Supported Cisco IP Phone 8851/8861 Key Expansion Module and Cisco IP Phone 8865 Key Expansion Module Cisco IP Phone Model Supported Numbers of Key Expansion Modules and Buttons Cisco IP Phone 8851 2;...
- Page 202 Cisco IP Phone 8861, unless Cisco Universal PoE (UPoE) is used. • Cisco IP Phone 8851 with 2 key expansion modules works on 802.3at PoE only with v08 or later hardware. You can find the phone version information on the lower back of the phone as part of the TAN and PID label.
- Page 203 Cisco IP Phone 8861 and 8865, unless Cisco Universal PoE (UPoE) is used. • Cisco IP Phone 8851 with 2 key expansion modules works on 802.3at PoE only with v08 or later hardware. You can find the phone version information on the lower back of the phone as part of the TAN and PID label.
- Page 204 Column Modes If you are using the Cisco IP Phone 8800 Key Expansion Module, two-column mode is the default on the Cisco IP Phone 8800 Key Expansion Module. The Cisco IP Phone 8851/8861 Key Expansion Module and the Cisco IP Phone 8865 Key Expansion Module only support one-column mode and these key expansion modules do not support two-column mode.
- Page 205 Figure 16: Cisco IP Phone 8865 Key Expansion Module Two--Column Mode If you are using Cisco IP Phone 8800 Key Expansion Module single-LCD screen expansion module, you can set up the module in two-column mode. In two-column mode, each button on the left and right of the screen is assigned to a speed-dial number (or name or other text label), phone service, or phone feature.
- Page 206 View the UDI Information of the Key Expansion Module You can view the Unique Device Identifier (UDI) information of the key expansion module. The UDI information includes: • Product name (PID) Cisco IP Phone 8800 Series Multiplatform Phones User Guide...
- Page 207 Step 1 Press and hold the line key on the key expansion module for two seconds. The feature list is displayed. Step 2 Select None from the list and press Set. Cisco IP Phone 8800 Series Multiplatform Phones User Guide...
- Page 208 Accessories Remove Features or Menu Shortcuts from Key Expansion Module Line Keys Cisco IP Phone 8800 Series Multiplatform Phones User Guide...
- Page 209 External Devices We recommend that you use good-quality external devices that are shielded against unwanted radio frequency (RF) and audio frequency (AF) signals. External devices include headsets, cables, and connectors. Cisco IP Phone 8800 Series Multiplatform Phones User Guide...
- Page 210 EMC Directive [89/336/EC]. Bluetooth Wireless Headset Performance Cisco IP Phones support Bluetooth Class 2 technology when the headsets support Bluetooth. Bluetooth enables low-bandwidth wireless connections within a range of 30 feet (10 meters). The best performance is in the 3- to 6-foot (1- to 2-meter) range.
- Page 211 The product label is located on the bottom of the device. Compliance Statements Compliance Statements for the European Union CE Marking The following CE mark is affixed to the equipment and packaging. Cisco IP Phone 8800 Series Multiplatform Phones User Guide...
- Page 212 The Part 15 radio device operates on a non-interference basis with other devices operating at this frequency. Any changes or modification to said product not expressly approved by Cisco, including the use of non-Cisco antennas, could void the user’s authority to operate this device.
- Page 213 Telepermitted equipment of a different make or model, nor does it imply that any product is compatible with all of Spark NZ network services. Cisco IP Phone 8800 Series Multiplatform Phones User Guide...
- Page 214 Site Anatel: http://www.anatel.gov.br Model Certificate Number 8811 3965-14-1086 8841 3965-14-1086 8845 4243-15-9863 8851 3965-14-1086 8851NR 3965-14-1086 Cisco IP Phone 8800 Series Multiplatform Phones User Guide...
- Page 215 RF exposure compliance. This transmitter must be at least 20 cm from the user and must not be collocated or operating in conjunction with any other antenna or transmitter. Cisco IP Phone 8800 Series Multiplatform Phones User Guide...
- Page 216 Cisco Circular Economy Cisco has adopted circular design principles in its products by pioneering the use of post-consumer recycled plastic. The models listed below now reduce the use of natural resources while closing the loop with its own electronic waste.
- Page 217 Important Online Information End User License Agreement The End User License Agreement (EULA) is located here: https://www.cisco.com/go/eula Regulatory Compliance and Safety Information Regulatory Compliance and Safety Information (RCSI) is located here: https://www.cisco.com/c/dam/en/us/td/docs/voice_ip_comm/cuipph/8800-series/regulatory_compliance/ RCSI-0313-book.pdf Cisco IP Phone 8800 Series Multiplatform Phones User Guide...
- Page 218 Product Safety and Security Important Online Information Cisco IP Phone 8800 Series Multiplatform Phones User Guide...