Table of Contents
Advertisement
Advertisement
Table of Contents

Related Manuals for Blomberg KWD 9440 X A++


Summary of Contents for Blomberg KWD 9440 X A++
- Page 1 Refrigerator Frigorifero Koelkast Réfrigérateur Køleskab Холодильник Kühlschrank Koelkast Jääkaappi Ψυγείο σας Frigorifero Хладилник یخچال Kjøleskap Ledusskapis Frigorífico KWD 9440 XA++ KWD 9330 X A+ KWD 9440 X A+ IWD 1004 ET IWD 1005 XT IWD 1004 XT KWD 9440 X Instruction manual...
- Page 2 Please read this manual first! Dear Customer, We hope that your product, which has been produced in modern plants and checked under the most meticulous quality control procedures, will provide you an effective service. For this, we recommend you to carefully read the entire manual of your product before using it and keep it at hand for future references.
-
Page 3: Table Of Contents
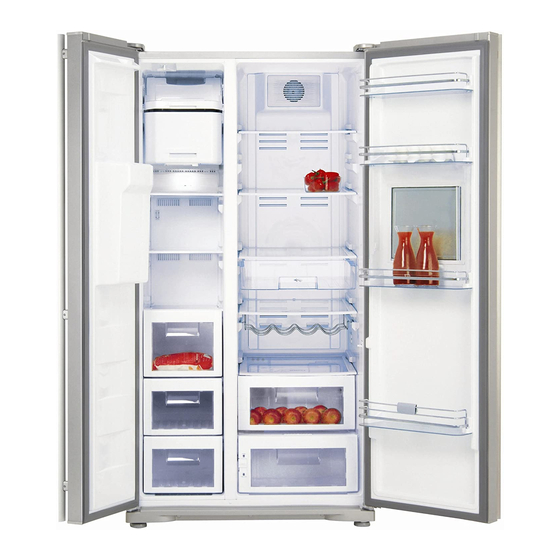
Your Refrigerator Ice Off ..........24 Using the water spring ....... 25 Your Refrigerator Spillage Tray ........25 Sliding Body Shelves ......25 2 Important Safety Warnings 5 Blue light ........... 26 Intended use ........5 Ion: ........... 26 General safety ........5 Egg tray .......... - Page 4 Your Refrigerator 6 * 25 *17 *26 1. Freezer compartment 14. Crisper cover 2. Fridge compartment 15. Adjustable front legs 3. Fridge compartment interior light 16. Blue light 4. Butter and cheese lid 17. Water reservoir 5. Fan 18. Ventilation lid 6.
-
Page 5: Your Refrigerator
Your Refrigerator 6 *16 26 1. Freezer compartment 14. Crisper cover 2. Fridge compartment 15. Adjustable front legs 3. Fridge compartment interior light 16. Blue light 4. Butter and cheese lid 17. Water reservoir 5. Fan 18. Ventilation lid 6. Ioniser 19. -
Page 6: Important Safety Warnings
Important Safety Warnings Please review the following information. If beverages in the freezer compartment. these are not followed, personal injury or Otherwise, these may burst. material damage may occur. Otherwise, • Do not touch frozen food by hand; they all warranty and reliability commitments may stick to your hand. - Page 7 • Do not store explosive substances • If the power supply is disconnected such as aerosol cans with a flammable in manually controlled refrigerators propellant in this appliance. please wait for at least 5 minutes before reconnecting the power. • Do not use mechanical devices or other means to accelerate the •...
-
Page 8: Child Safety
HCA Warning refrigerator door. • Materials that require certain If your product is equipped with a temperature conditions such as cooling system that contains R600a: vaccine, temperature sensitive This gas is flammable. Therefore, pay medicines, scientific materials etc attention to not damaging the cooling should not be kept in refrigerator. -
Page 9: Things To Be Done For Energy Saving
Things to be done for energy saving • Do not leave the doors of your refrigerator open for a long time. • Do not put hot food or drinks in your refrigerator. • Do not overload your refrigerator so that the air circulation inside of it is not prevented. -
Page 10: Installation
Installation 3. Insert the 2 plastic wedges onto the Please remember that the manufacturer rear ventilation as illustrated in the shall not be held liable if the information following figure. Unscrew the existing given in the instruction manual is not ones and use the screws given in the observed. -
Page 11: Electric Connection
4. Plug the refrigerator into the wall outlet. packing materials out of the reach of When the door is open the respective children or dispose them of by classifying interior light will come on. them in accordance with the waste instructions. -
Page 12: Floor Balance Adjustment
least 5 cm with the wall. Ensure that door shelves are empty when adjusting the door height. If the floor is covered with a carpet, your product must be elevated 2.5 cm from 1. Remove the lower ventilation cover by the floor. - Page 13 unscrewing its screws as shown in the higher than the fridge compartment figure below. (See Figure B) door, bring them to the same level by turning the elevation screw on the 2. Loosen the three screws of the hinges freezer compartment side in the reverse of the lower door, which you wish to direction of arrow using a M6 Allen escalate, with the help of a screwdriver...
-
Page 14: Adjusting The Gap Between The Upper Door
the upper door situation should be made to take care. You can adjust the gap between the Using a screwdriver, remove the fridge compartment doors as illustrated in the figures. Door shelves should be empty when adjusting the door height. Because of being wires in the hinge screw of upper hinge cover of the door you want to adjust. -
Page 15: Installing Water Filter
Installing Water Filter (in some models) Installation Requirements Two different water sources may be connected to the refrigerator for water supply: the mains cold water supply and water in a jug. A pump should be used for jug water usage. 3. -
Page 16: Connection Of The Water Pipe To The Refrigerator
1. After installing the union onto the water pipe, insert the water pipe to the refrigerator inlet valve by pressing Please follow the instructions below. Connection of the Water downwards firmly. Pipe to the Refrigerator 2. Fix union as seen in the opposite figure, by squeezing by hand on the refrigerator inlet valve. - Page 17 compartment by pulling it forward. mode is active before taking out the by- (Figure 2) pass cover. Note: It is normal that a few drops of water drip after the cover has been taken out. 4. Remove the lid on top of the water filter to place it as shown in the figure and turn upwards to lock it.
-
Page 18: Connection Of Water Hose To The Jug
water filter or installing the by-pass Note: You may refer to the user cover. manual of the pump while making the Connection of Water Hose to water connection. the Jug Connection of the Water (in some models) Pipe to the Cold Water Mains To connect water to the refrigerator from Line a jug, a pump is needed. -
Page 19: Connection Of The Water Pipe To The Cold Water Mains Line
Prior to first use of Ice/Water you will have to connect a standard 1/2” Dispenser valve connection fitting to the cold water supply in your house. In case this valve is not present or in case you are not sure, Water mains pressure must not be consult a qualified plumber. - Page 20 Pumps must be used in case the Always use the water filter when a jug supply water pressure drops below 1 bar is not being used. or if a jug is going to be used. Water system of the refrigerator must be connected to the cold water line.
-
Page 21: Preparation
Preparation Your refrigerator should be installed at least 30 cm away from heat sources such as hobs, ovens, central heater and stoves and at least 5 cm away from electrical ovens and should not be located under direct sunlight. The ambient temperature of the room where you install your refrigerator should at least be 10°C. -
Page 22: Using Your Refrigerator
Using your refrigerator Fridge Set button Vacation mode button Freezer Set button Quick freeze Quick Cool button button Key lock button Auto Eco button Filter Reset button Ice / Water Ice Off button selection button Water Dispenser light button Water Dispenser Lights Ioniser indicator Economy mode indicator Fast Freeze indicator... -
Page 23: Setting The Fridge Compartment Temperature
Freezer Fridge Explanations Compartment Compartment Adjustment Adjustment -18°C 4°C This is the normal recommended setting. These settings are recommended when -20,-22 or -24°C 4°C the ambient temperature exceeds 30°C. Use this when you wish to freeze your Fresh Freeze Display food or make ice in a short time. -
Page 24: Vacation Button
Water Dispenser Illumination After pressing the Quick Cool button, Quick Cool indicator will glow and fridge When the Light button is pressed, the compartment temperature setting will water dispenser lamp will light up and switch to 1°C whilst the Quick Wool it will go off when the button is pressed is active. -
Page 25: Using The Ice Dispenser
Using the Ice Dispenser the ice in the icebox. This may cause damage on the icebox. Please note, first ice cubes will not be Food stuff should never be placed ready before 12 hours after switching on into the icebox for quick cooling the appliance. -
Page 26: Using The Water Spring
Using the water spring Sliding Body Shelves Sliding body shelves can be pulled by slightly lifting up from the front and moved back and forth. They come to a stop point when pulled towards front to allow you reach the foods placed at the back of the shelf;... -
Page 27: Blue Light
Blue light Crisper humidity control sliders Foodstuff stored in the crispers that are enlightened with a blue light continue Using the crisper humidity control sliders their photosynthesis by means of the Crisper of your refrigerator is designed wavelength effect of blue light and thus, specially to keep your vegetables fresh preserve their freshness and increase without loosing their humidity. -
Page 28: Recommendations For Preservation Of Frozen Food
Recommendations for Replacing the Interior Light preservation of frozen food Bulb • Prepacked commercially frozen food Should the light fail to work, proceed as should be stored in accordance with the follows: frozen food manufacturer’s instructions 1. Switch off at the socket outlet and pull for a ( 4 star) frozen food storage out the mains plug. -
Page 30: Maintenance And Cleaning
Maintenance and cleaning surfaces of your refrigerator. In case of Never use gasoline, benzene or similar spilling or smearing oil on the plastic substances for cleaning purposes. surfaces, clean and rinse the relevant We recommend that you unplug the part of the surface at once with warm appliance before cleaning. -
Page 31: Chill Compartment
Chill compartment You can increase the inner volume of your refrigerator by removing the desired chill compartment. Pull the compartment towards yourself until it is stopped by the stopper. Raise the front part for approximately 1 cm and pull the compartment towards yourself again to remove it completely. -
Page 32: Icebox And Water Dispenser
Icebox and Water Dispenser Follow the procedure and warnings below to clean the icebox: A Remove the Icebox by lifting first and then pulling towards yourself as shown in the diagram. Empty the ice in the Icebox if any. To take out the stuck ice, use objects that are not sharp to avoid any damage on the Icebox. -
Page 33: Minibar
Minibar Minibar door provides you extra comfort when using your refrigerator. The door shelf in the refrigerator can be accessed without opening the refrigerator door; thanks to this feature, you can easily pick from the refrigerator the foods and drinks which you frequently consume. -
Page 34: Recommended Solutions For The Problems
Recommended solutions for the problems Please review this list before calling the service. It might save you time and money. This list includes frequent complaints that are not arising from defective workmanship or material usage. Some of the features described here may not exist in your product. - Page 35 The fridge is running frequently or for a long time. • Your new refrigerator may be wider than the previous one. This is quite normal. Large refrigerators operate for a longer period of time. • The ambient room temperature may be high.This is quite normal. •...
- Page 36 • This noise is coming from the solenoid valve of the refrigerator. Solenoid valve functions for the purpose of ensuring coolant passage through the compartment which can be adjusted to cooling or freezing temperatures, and performing cooling functions. This is normal and is not fault cause. The operation noise increases when the refrigerator is running.
- Page 37 • Food packages may prevent the door's closing. Replace the packages that are obstructing the door. • The refrigerator is probably not completely vertical on the floor and it might be rocking when slightly moved. Adjust the elevation screws. • The floor is not level or strong. Make sure that the floor is level and capable to carry the refrigerator.
- Page 38 48 8425 0002/AD EN-FR-DE-İT-DA-NL-FL-RUS-FIN EL-FA-LV-ES-NO-PT-BG...