Honeywell CN75 User Manual
75 series
Hide thumbs
Also See for CN75:
- User manual (256 pages) ,
- Quick start manual (18 pages) ,
- Configuration manual (18 pages)

Related Manuals for Honeywell CN75


Summary of Contents for Honeywell CN75
- Page 1 75 Series Mobile Computer Powered by Android® 6 CN75, CN75e, CN75 NI, CN75e NI, CK75 User Guide...
- Page 2 Disclaimer Honeywell International Inc. (“HII”) reserves the right to make changes in specifications and other information contained in this document without prior notice, and the reader should in all cases consult HII to determine whether any such changes have been made. The information in this publication does not represent a commitment on the part of HII.
-
Page 3: Table Of Contents
TABLE OF CONTENTS Customer Support ........................vii Technical Assistance ......................vii Product Service and Repair ....................vii Limited Warranty ........................vii Send Feedback ........................vii Chapter 1 - About the Computer Features........... 1 About the 75 Series Mobile Computers ................1 Overview of 75 Series Features.................. - Page 4 Adjust the Speaker Volume ....................25 Enable Vibrate Mode......................26 Configure Audio Settings....................26 Insert a MicroSD Card........................27 Install a MicroSD Card in a CN75 or CN75e ..............27 Install a MicroSD Card in a CK75 ...................29 How to Transfer Files........................32 Configure USB Connection and Transfer Files ............32 70 Series Accessories.........................33...
- Page 5 Restore Default Scanner Settings...................44 Add a Scanning Profile ......................44 Delete a Scanning Profile....................45 Scan Bar Codes..........................45 Use the Scan Demo App ......................46 How to Change the Default Symbology Settings in the App........46 Use the Imager as a Flashlight ..................47 Chapter 4 - Use the Phone................49 About the Phone...........................49 How to Add and Switch Between Network Carriers ............49 Activate the UMTS Phone....................50...
- Page 6 Clean the Computer........................75 Chapter A - Specifications ................77 Computer Agency Information....................77 Label Locations ........................77 Physical and Environmental Specifications ..............78 CN75/CN75e ..........................78 CN75/CN75e Non-Incendive (NI)..................79 CK75 ............................80 Back Accessory Interface Pin-outs ................81 Imager Specifications ........................82 75 Series Mobile Computer User Guide...
- Page 7 Bar Code Symbologies ......................82 EA30 Extended Reading Range..................83 EA30 Minimum Reading Distances................84 EX25 Minimum Reading Distance .................85 EX25 Typical Reading Distance (1D)................86 EX25 Typical Reading Distance (2D)................87 N5603 Extended Range Reading Distances ..............88 75 Series Mobile Computer User Guide...
- Page 8 75 Series Mobile Computer User Guide...
-
Page 9: Customer Support
For our latest contact information, see www.honeywellaidc.com/locations. Product Service and Repair Honeywell International Inc. provides service for all of its products through service centers throughout the world. To find your service center, go to www.honeywellaidc.com and select Support. - Page 10 viii 75 Series Mobile Computer User Guide...
-
Page 11: Chapter 1 - About The Computer Features
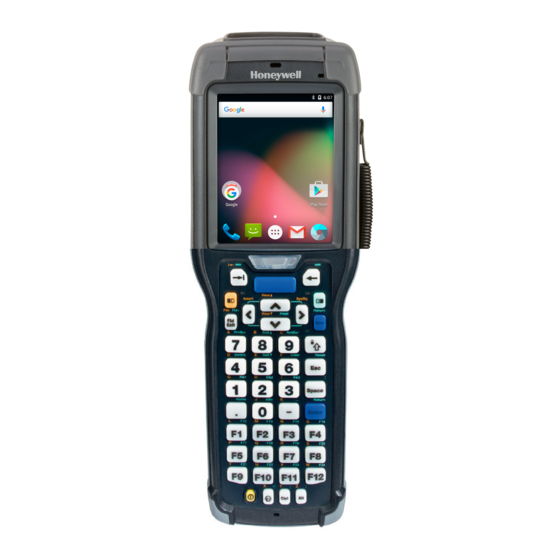
The CK75 has most of the same features as the CN75, but the CK75 offers a choice of imager options and does not offer WWAN or GPS radio versions. Honeywell offers heater-equipped cold storage CK75 versions to extend the use of the CK75 in cold storage and freezer environments. - Page 12 Camera feature is not available in CK75 cold storage modes. The 75 Series Mobile Computer with an IEEE 802.11a/b/g/n radio installed is Wi-Fi® certified for interoperability with other 802.11a/b/g/n wireless LAN devices. CN75 Front and Right Side View Speaker Touch Panel...
- Page 13 To learn more, see About the I/O Cover on Non-Incendive Models on page 6. Warning: The I/O cover must be attached when using the CN75/CN75e NI in a dangerous environment. Avertissement : Le couvercle entrée-sortie doit être fi xé lorsque le CN75/CN75e NI est utilisé...
- Page 14 CK75 Front and Right Side View Speaker Touch Panel Good Read LED Volume Buttons Notification LED Battery Status LED Scan Button Power Button Microphone CK75 Back and Left Side View Imager (LED/Laser Aperture) Camera Speaker Port Laser Safety Label Location Application Button Stylus microSD Card Socket...
-
Page 15: About The Battery
318-046-032 3.7 V, 5200 mAH (19.2 Wh) We recommend use of Honeywell Li-ion battery packs. Use of any non-Honeywell battery may result in damage not covered by the warranty. Caution: The battery used in this device may present a fire or chemical burn hazard if it is mistreated. -
Page 16: About The I/O Cover On Non-Incendive Models
• DX4 Quad Base (Model 1002UU04, 1002UU05) with Battery Cup Model 1002UC02 and power supply You can charge a 1000AB02 battery installed in a CN75 or CN75e with these accessories: • DX1 Desktop Base (Model 1002UU01) with Computer Cup Model 1002UD01 and power supply •... - Page 17 How to Replace the I/O Cover 1. Loosen the screws securing the I/O cover to the computer. 2. Press the release buttons on the sides of the cover, and then remove the cover. 3. Detach the security tether. 4. Attach the security tether on the replacement I/O cover to the computer. 5.
-
Page 18: About Battery Replacement
Battery Swap mode places the computer in a low power state so that the battery can be removed for a short period of time. Note: When you remove a battery from the computer, Honeywell recommends that you install a charged battery within one minute to maintain your network connections. - Page 19 Detach the Hand Strap From a CK75. 4. Remove the battery. • On the CN75 or CN75e, push the battery latch toward the bottom of the computer until the battery releases, and then lift the battery away from the computer.
-
Page 20: About Battery Status
Use the battery icon on the status bar to view the power status of your battery. If you want more information on your battery such as usage time or voltage, select All apps > Settings > Battery Info under Honeywell settings. Battery Icon Status Descriptions... -
Page 21: Set The Battery Status Led Activity
The battery status LED below the computer screen indicates the charging status of the battery. CN75/CN75e CK75 Battery Status LED Battery Status LED Out-of-Box Battery Status LED The HSM Battery LED option is active as the out-of-box default. HSM Battery LED Status Descriptions... -
Page 22: About Battery Life And Conservation
No Battery LED About Battery Life and Conservation Batteries that are stored outside the computer for long periods of time slowly discharge. Honeywell recommends storing the battery in a charger to maintain battery performance. When you want to: Do this to save battery power: Use the computer but the •... -
Page 23: About The Status Leds
The status LEDs turn on, turn off, or blink to indicate a specific activity on your computer. All six status LEDS are not available on every 75 Series computer. For example, the QWERTY versions of the CN75 and CN75e do not have a Green key status LED. -
Page 24: About The Keypad
The 75 Series is available in these keypad configurations: • The QWERTY keypad is available for both the CN75 and CN75e but the CN75e also includes a larger keypad with numeric keys (phone-style with 1-2-3 digits across the top). The QWERTY keypad is designed for applications that require primarily alphabetic data. - Page 25 CN75 QWERTY Keypad / CN75 Numeric Keypad & Enter Enter Space CN75e QWERTY Numeric Keypad / CN75e Numeric Keypad 75 Series Mobile Computer User Guide...
-
Page 26: About The Keypad Backlight
Press the key to turn the keypad backlight on for approximately 5 seconds. About the Color-Coded Keys Note: The QWERTY keypads on the CN75 and CN75e do not include a green key. Use the orange key and the green key to access additional characters, symbols, and functions printed on the keypad overlay. -
Page 27: Enter Characters On The Qwerty Keypad
Enter Characters on the QWERTY Keypad You need to use the orange modifier key and the shift key to access all characters and functions on the QWERTY keypad. To type a character: • Press the key for that character. To type a character or access a function on the overlay: •... -
Page 28: Enter Characters On The Ck75 Keypads
To only type letters: • Press to lock the green modifier key, and then press the key one to four times depending on the position of the letter. While the green modifier key is locked, press to toggle between only uppercase and lowercase letters. -
Page 29: About The Power Button
About the Power Button Press the Power button to turn the computer on. Once the computer is turned on, a quick press of the Power button toggles the computer in or out of Sleep mode. Sleep mode turns the touch panel off and initiates the screen lock. -
Page 30: Configure The Screen Brightness
To save power, the computer enters Sleep mode automatically if left inactive. Sleep mode turns off the screen and activates the screen lock. You can change the time limit before Sleep mode activates. Note: By default, the computer enters Sleep mode automatically after the computer is inactive for a programmed period of time. -
Page 31: How Automatic Mode Works
• Preemptive mode (pre-heat) for minimizing window defrost times with average battery life in cold storage environments. Manual mode is enabled. How Automatic Mode Works Automatic mode maximizes the cold storage battery life by only turning the heater on once the following conditions are met in the order listed: 1. -
Page 32: How To Manually Turn The Heaters On/Off
Pre-heating keeps the windows warm to minimize condensation and frost when the computer is removed from cold storage allowing for quicker defrost times. The heaters switch to full power to defrost the windows when the computer detects a quick rise in the ambient temperature. In Preemptive mode, the cold storage battery life ranges from a maximum of 6 hours to a minimum of 1.5 hours depending on the heater Power on time set. - Page 33 Settings App: DeviceConfig.xml: Description Heater Setting Heater Key Duration: Heater DurationHeater Set the length of time (minutes) the heaters stay on at full power (100%) once the computer detects a quick rise in temperature, defined by the DeltaT value (the Turn heater on when the temperature has changed by “x”...
- Page 34 Toggles turning the heater on or off during scanning. Configure the Heater in the Settings App 1. Tap All apps > Settings. 2. Tap Heater under Honeywell settings. 3. Modify the heater parameters. 4. Tap Update to apply the changes. 5. Tap OK.
-
Page 35: About Audio Features
3. Select the DeviceConfig.xml file. 4. Drill down to Honeywell Settings > Heater. You can expand sections by selecting the plus sign next to the section name. 5. Modify the heater parameters. a. Tap a Key in the Heater section. -
Page 36: Enable Vibrate Mode
• Use the slider for notifications and rings. • Use the slider for media (e.g., music, videos and other media). • Use the slider for alarms. Enable Vibrate Mode You can use the Volume down button to quickly enable Vibrate mode so the computer vibrates instead of emitting sound for notifications and rings. -
Page 37: Insert A Microsd Card
Note: Always power off the computer and remove the battery before attempting to install or remove a card. Install a MicroSD Card in a CN75 or CN75e You need a Phillips screwdriver to install the microSD card. Format the microSD card before initial use. - Page 38 4. Slide the SIM card holder to the left and up to reveal the microSD card holder. 5. Slide the microSD card holder towards the top of the computer, and then lift up to reveal the microSD card socket. 6. Place the microSD card in the holder with the contacts facing away from the holder.
-
Page 39: Install A Microsd Card In A Ck75
7. Close and latch the microSD card holder and SIM card holder. 8. Close the card access door and install the two screws. 9. Install the battery. Press down firmly on the bottom of the battery, and make sure that the battery release tab is fully engaged. 10. - Page 40 4. Remove the two screws that attach the card access door to the back of the computer. 5. Slide the SIM card holder to the left and up to reveal the microSD card holder. 6. Slide the microSD card holder towards the top of the computer, and then up to reveal the microSD card socket.
- Page 41 7. Place the microSD card in the holder with the contacts facing away from the holder. 8. Close and latch the microSD card holder and SIM card holder. 9. Replace the door and secure it with the two screws removed in Step 4. 10.
-
Page 42: How To Transfer Files
Desktop Base with battery cup, power supply and USB cable Note: To learn more about accessories available for 75 Series computers, go to www.honeywellaidc.com or contact your local Honeywell sales representative. Configure USB Connection and Transfer Files 1. Connect the mobile computer to your PC using a USB charge/communication accessory. -
Page 43: 70 Series Accessories
Use the Ethernet adapter to be able to connect the computer to an Ethernet network. Handstrap Replacement Kit You can order and install a replacement handstrap for the CN75, CN75e, and CK75. Each kit contains 5 handstraps. Holster Use the holster to store the computer when you need your hands free. - Page 44 Accessory Description Vehicle Dock Use the vehicle dock to provide power and hold your computer while you are using it in a vehicle. Vehicle Holder Use the vehicle holder to hold your computer while you are using it in a vehicle. Vehicle Power Adapter Use the vehicle power cable adapter to provide power to the computer from your vehicle.
-
Page 45: Chapter 2 - About The User Interface And Applications
ABOUT THE USER INTERFACE AND APPLICATIONS Learn about the Android user interface and how to interact with the screen. You can also use this chapter to learn about the Honeywell applications on your computer, as well as additional applications available for download from www.honeywellaidc.com. - Page 46 Screen Feature Description Favorites tray App icons in the tray are visible on every Home screen. All Apps Icon Select the All Apps icon to access all the apps available on the computer. The All Apps icon is always in the center of the Favorites tray. Navigation buttons Back to return to the previous screen, even if that screen was in a...
-
Page 47: Notification And Status Icons
View and Manage Notifications When notification icons appear at the top of the screen, swipe down from the status bar. • Tap a notification to view more details in the relevant app or to change available settings. • Swipe left or right on a single notification to dismiss only that notification. •... -
Page 48: About Screen Gestures
Icon Description Icon Description Error with text or multimedia message Terminal is connected to external power delivery and the battery is charging. New Gmail™ message Terminal is connected to external power and the battery is fully charging. New E-mail Airplane mode is turned on ADB active (USB debugging enabled) Bluetooth incoming file notification Uploading data... -
Page 49: About Honeywell Applications
Diagnostic Use the DiagnosticInfo app to view device information, Honeywell Apps, Information Radio Information, Battery Information, Memory Information, and Scanner Information. -
Page 50: Applications You Can Download To The Mobile Computer
URL bar, browsing history, favorites list and other elements common to typical web browsers. HTML5 can be downloaded at no charge from the Honeywell website. For more information, visit www.honeywellaidc.com. 75 Series Mobile Computer User Guide... -
Page 51: Unlock Developer Options
You can also use Honeywell Launcher together with Honeywell Enterprise Browser to create a single-purpose device configuration. If Launcher is not included on your computer model, you can download a trial version of the software for evaluation. - Page 52 75 Series Mobile Computer User Guide...
-
Page 53: Chapter 3 - Use The Imager
BarcodeReader API, the scan wedge feature is temporarily disabled. You can find information on how to create custom applications for the computer in the Honeywell Mobility SDK for Android, available from the Honeywell Technical Support Downloads Portal at https://hsmftp.honeywell.com. Once you create an account and enter the portal, navigate to Software >... -
Page 54: Change The Scanner Settings
Change the Scanner Settings Changes you make to the Default profile apply to all applications with no profile. 1. Tap All Apps > Settings. 2. Tap Scanning. 3. Tap Internal Scanner > Default Profile. 4. Select from the following: • Data Processing Settings, •... -
Page 55: Delete A Scanning Profile
About the On-Screen Keyboard If you want to use the on-screen keyboard when you input a new profile name: 1. Tap the profile name field. 2. Tap the keyboard icon in the lower right corner of the screen. 3. Tap the on/off button next to Show input method enable the on-screen keyboard. -
Page 56: Use The Scan Demo App
Use the Scan Demo App Use the Scan Demo app to read bar codes, or to test your symbology decode settings. 1. Tap All Apps > Demos. 2. Swipe left or right on the screen until the Scan Demo app is selected. The selected application is listed below the turntable. -
Page 57: Use The Imager As A Flashlight
Use the Imager as a Flashlight To use the imager as a flashlight. 1. Open Quick Settings. 2. Tap the Flashlight icon. Select again to turn the flashlight off. 75 Series Mobile Computer User Guide... - Page 58 75 Series Mobile Computer User Guide...
-
Page 59: Chapter 4 - Use The Phone
Phone features on the computer include a speaker and a microphone. You can also use a Bluetooth headset or hands-free kit. On CN75 and CN75e WWAN models the phone feature is enabled by default and a Flexible Network Radio provides the ability to connect to CDMA or UMTS networks in all regions that support these technologies. -
Page 60: Activate The Umts Phone
Carrier Selection screen. Activate the UMTS Phone You use a SIM card to activate the UMTS phone on your CN75/CN75e WWAN model computer. You can purchase the SIM card from your network provider. A Phillips screwdriver is needed to install the SIM card. - Page 61 6. Slide the SIM card holder to the left and up. 7. Place the SIM card in the holder with the contacts facing away from the holder. 8. Close and latch the SIM card holder. 9. Close the card access door and install the two screws. 10.
-
Page 62: Activate The Cdma Phone
Make a Phone Call Once the phone is activated, you can make a phone call. Note: Phone features are only supported on CN75 and CN75e WWAN models (CN75WAN). 1. On the Home or All Apps screen, tap 75 Series Mobile Computer User Guide... -
Page 63: Answer A Phone Call
2. Use one of the methods below to enter the telephone number you want to call. • Press the numbers on the computer keypad. • and use the on-screen dialer. • Select a person on your saved contact list • Select a favorite on your speed dial list •... - Page 64 2. Tap next to the microphone icon. 3. Select Settings. The Call settings menu appears. 4. Change phone settings as necessary. 75 Series Mobile Computer User Guide...
-
Page 65: Chapter 5 - Use The Camera
CHAPTER USE THE CAMERA Learn to use the color camera to take pictures and record videos, read bar codes, perform document capture, or perform signature capture. About the Color Camera The camera lens and flash are located on the back of the computer. You can open the Camera app from the Favorites tray on the Home screen or from the All Apps screen. -
Page 66: Change Basic Camera Settings
Change Basic Camera Settings You can change the camera settings for best results when taking pictures. 1. In the All Apps screen, tap Camera 2. Tap to view the camera options. 3. Tap one of the icons to change basic camera settings. •... -
Page 67: Change Basic Video Settings
Change Basic Video Settings You can change the camera settings for best results when recording video. 1. In the All Apps screen, tap Camera 2. When the Camera screen appears, swipe to the right. 3. Tap . The Video screen appears. 4. - Page 68 75 Series Mobile Computer User Guide...
-
Page 69: Chapter 6 - Configure The Computer
CHAPTER CONFIGURE THE COMPUTER Use this chapter to learn about the available methods for configuring your mobile computer. You can also use this chapter to learn how to configure network communications and wireless security. How to Configure the Computer You can configure many parameters on the computer such as the bar code symbologies it decodes or the network settings. - Page 70 Wireless & Networks Settings Description Bluetooth • Turn the Bluetooth radio on or off. • Lists Bluetooth enabled devices in range when the radio is turned on. • Connect to a Bluetooth Device. • Rename the computer. • Show received files. Ethernet •...
- Page 71 Key Remap Change (remap) a button or key function. Scanning Configures the imager. Web applications Enables access for the Honeywell Mobility SDK for Web apps and lets you set a port. Personal Description Location •...
-
Page 72: About Network Communications
Personal Description Language & input • Set the active language and default keyboard (on-screen and physical keyboard). • Configure auto-typing features such as capitalization, punctuation, spell check, and the personal dictionary. • Set text-to-speech output. • Adjusts the pointer speed for an external mouse or trackpad. - Page 73 2. Tap the Wi-Fi on/off switch to turn the radio On . A list of discovered networks appears. 3. On the list, tap the network name to initiate a connection. To add a network to the list: a. Tap , and then select Add network. b.
-
Page 74: Connect To An Ethernet Network
6. Enter the proxy settings for the network. 7. Tap Save. Disable Wi-Fi Notifications By default, when Wi-Fi is enabled, you receive notifications in the Status bar when the computer discovers a wireless network. You can disable these notifications. 1. Tap All Apps > Settings > Wi-Fi. 2. -
Page 75: About Wireless Security
Add a VPN Before you can connect to a VPN, you must create a VPN profile. 1. Tap All Apps > Settings > More > VPN. 2. Set up a screen lock security method if prompted. 3. Tap to add a VPN new profile. 4. -
Page 76: About Certificates
Honeywell recommends WPA2 security with PSK (Personal) or 802.1x (Enterprise) key management. Before you set security, you need to enable the radio, set the date, and set the SSID on your computer. To use 802.1x security, you need to load a root certificate on your computer. -
Page 77: About Bluetooth Communications
1. Tap All Apps > Settings > Security > Trusted credentials. The trusted credentials screen has two tabs: • System shows CA certificates that are installed in the ROM. • User shows CA certificates you have installed yourself. 2. Tap the name of the certificate to disable or remove. The certificate details screen appears. - Page 78 A list of available Bluetooth devices appears. 3. (Optional) If the device you want does not appear in the list, make sure the device is turned on and set to discoverable, tap , and then tap Refresh. 4. Tap a device on the list to initiate a pairing request. 5.
-
Page 79: Rename The Computer
Rename the Computer You can change the computer Bluetooth name from the Settings app. 1. Tap All Apps > Settings > Bluetooth. 2. Tap the Bluetooth on/off switch to turn the radio On 3. Tap , and then select Rename this device. 4. -
Page 80: Share The Data Connection Through Bluetooth
4. Tap USB tethering to enable feature. The device is now sharing the computer data connection. To stop sharing the connection, disconnect the USB cable, or disable tethering. Share the Data Connection Through Bluetooth If your device is Bluetooth-capable, you can configure the computer to share its mobile data connection with the device through Bluetooth. -
Page 81: Chapter 7 - Manage And Maintain The Computer
You can update multiple computers at the same time using a device management system. Several mobile device management systems support the 75 Series mobile computers powered by Android, including SOTI MobiControl, Honeywell Skynax™ Mobility Management System, and other third-party solutions. Contact these sup- pliers for information about obtaining their agent or client software for use with the 75 Series. -
Page 82: Upgrade The System Software
Upgrade the System Software Upgrades for Power Tools and other system software on the computer are provided as compressed .zip files and are available from the Honeywell Technical Support Downloads Portal at https://hsmftp.honeywell.com. 1. Copy the upgrade .zip file into one of these folders on the computer: •... -
Page 83: Perform A Factory Data Reset
Perform a Factory Data Reset Caution: Performing a factory data reset completely erases all data, files, and downloaded apps from the computer memory. Back up your data and files before proceeding. You can perform a factory data reset, which restores all default settings on the computer and erases all data, files, and downloaded apps. -
Page 84: Factory Reset: Method 2
1. Press and hold the Power button for approximately 8 seconds until the com- puter starts to reboot. 2. When the Honeywell splash screen appears, press and hold the Power and Volume down buttons until the Recovery screen appears. 3. Verify “Recovery Mode” appears at the top of the screen. -
Page 85: Clean The Computer
SIM card as described in this user manual does not void the warranty. Honeywell recommends that you leave the battery installed and on CK75 models the SD Card Door installed when you clean the computer as described. - Page 86 75 Series Mobile Computer User Guide...
-
Page 87: Chapter A - Specifications
APPENDIX SPECIFICATIONS Computer Agency Information All 75 Series mobile computers meet or exceed the requirements of all applicable standards organizations for safe operation. The best way to ensure safe operation is to use the mobile computer according to the agency guidelines on the product regulatory sheet, quick start guide and in this user guide. -
Page 88: Physical And Environmental Specifications
This section lists the physical and environmental specifications for the computer. Note: Product data sheets are available for download at www.honeywellaidc.com. CN75/CN75e Parameter Specification Physical Dimensions (Battery Included) Length (CN75) 16.9 cm (6.65 in) Length (CN75e) 19.5 cm (7.66 in) Width 8.0 cm (3.16 in) Depth 3.4 cm (1.34 in) -
Page 89: Cn75/Cn75E Non-Incendive (Ni)
8.9 cm (3.5 in) Transmissive VGA • 65,536 (16-bit RGB) colors • Hardened Corning® Gorilla® Glass display • LED backlight • Ambient light sensor Keypad Options Keypad Options (CN75) • Numeric • Qwerty Keypad Options (CN75e) • Large Numeric • Qwerty Keypad... -
Page 90: Ck75
+/-15 kV air discharge, +/-8 kV direct discharge Sealant rating IP67 The CN75 and CN75e mobile computers with non-incendive (NI) certification comply with the following specifications for North America and Canada regions only. Location Suitable for use in Division 2 locations Safety cULus Listing - ISA/ANSI 12.12.01... -
Page 91: Back Accessory Interface Pin-Outs
Parameter Specification Power and Electrical Rechargeable Li-ion battery pack Model 1001AB01 (PN 318-046-031) (Standard Model) Rechargeable Li-ion battery pack Model 1001AB01 (PN 318-046-032) (Cold Storage Model) Nominal output and capacity 3.7 VDC, 5200 mAh (19.2 Wh) Environment Standard Model Operating temperature -20°C to 60°C (-4°F to 140°F) Storage temperature -20°C to 60°C (-4°F to 140°F) -
Page 92: Imager Specifications
The 75 Series offers these high-performance imager options. Parameter Specification Imager EA30 (CN75/CN75e only) EA30 High-Performance Motion-Tolerant 2D Imager with (up to 500 in/s) white LED illumination, red laser aimer and framer optimized for all lighting conditions. Capable of scanning all common 1D and 2D bar codes, including 1D as small as 4 mils and 2D as small as 6.6 mils. -
Page 93: Ea30 Extended Reading Range
EA30 Extended Reading Range These typical reading distances are measured in an office environment (250 lux) for the EA30 standard model with Extended Reading Range activated. Extended Reading Range is enabled by default. 0" 4" 8" 12" 16" 20" 24" 28"... -
Page 94: Ea30 Minimum Reading Distances
EA30 Minimum Reading Distances Minimum distances are measured in the dark (0 lux). 0" 4" 8" 12" 16" 20" 24" 28" 12" Data Matrix 10 mils 8" PDF417 10 mils 4" 0" 4" 0.125mm/5 mils EAN/UPC 8" 0.5 mm / 20 mils 12"... -
Page 95: Ex25 Minimum Reading Distance
EX25 Minimum Reading Distance Minimum reading distances are measured in the dark (0 lux). The following graphic does not include the 0.24 cm (0.09 in) setback for the CK75. 144” 160” 128” 112” 176” 0” 16” 32” 48” 64” 80” 96”... -
Page 96: Ex25 Typical Reading Distance (1D)
EX25 Typical Reading Distance (1D) Typical reading distances are measured in an office environment (200 lux). The following graphics do not include the 0.24 cm (0.09 in) setback for the CK75. 80” 120” 160” 200” 240” 280” 320” 360” 400” 440”... -
Page 97: Ex25 Typical Reading Distance (2D)
EX25 Typical Reading Distance (2D) 80” 120” 160” 200” 240” 280” 320” 360” 400” 440” 480” 0” 40” 160” 128” 96” 64” 32” 0” 32” 0.25 mm 10 mils 64” 0.76 mm/30 mils 1.4 mm/55 mils 96” 128” 2.5 mm/100 mils 160”... -
Page 98: N5603 Extended Range Reading Distances
N5603 Extended Range Reading Distances Red Illumination Monochrome and Monocolor Sensors - Guaranteed Specifications Minimum reading distances are measured in the dark (0 lux). Symbology Near Distance Far Distance Delta 5 mil Code39/128 14.7 cm/5.8 in 22.4 cm/8.8 in 7.6 cm/3.0 in 7.5 mil Code 39/128 11.2 cm/4.4 in 33.2 cm/13 in... - Page 99 Red Illumination Monochrome and Monocolor Sensors - Typical Specifications Minimum reading distances are measured at 535 lux. Symbology Near Distance Far Distance Delta 10 mil Code 39/128 6.1 cm/2.4 in 44.2 cm/17.4 in 38.1 cm/15.0 in 15 mil Code 39/128 3.8 cm/1.5 in 54.9 cm/21.6 in 51.1 cm/20.1in...
- Page 100 Honeywell 9680 Old Bailes Road Fort Mill, SC 29707 www.honeywellaidc.com ™ Cx75-W65-EN-UG Rev A 10/17...