Makita PM7650H Instruction Manual
Petrol mist blower
Hide thumbs
Also See for PM7650H:
- Owner's and safety manual (84 pages) ,
- Instruction manual (112 pages) ,
- Technical information (26 pages)
Table of Contents
Advertisement
Available languages
Available languages
Quick Links
Instruction Manual
Petunjuk penggunaan
Tài liệu hướng dẫn
คู ม ื อ การใช ง าน
Warning:
Read this instruction manual carefully before putting the petrol mist blower into operation and strictly observe the safety regulations!
Save instruction manual for future reference.
PERINGATAN:
Bacalah petunjuk penggunaan ini dengan teliti sebelum mengoperasikan penyemprot kabut bermesin bensin dan patuhilah dengan ketat
peraturan keselamatan yang berlaku!
Simpanlah petunjuk penggunaan untuk acuan di masa mendatang.
CẢNH BÁO:
Đọc kỳ tài liệu hướng dẫn này trước khi vận hành Máy phun sương chạy xăng và tuân thủ nghiêm ngặt các quy định về an toàn!
Lưu tài liệu hướng dẫn để tham khảo trong tương lai.
คำเตื อ น:
โปรดอ่ า นคู ่ ม ื อ นี ้ โ ดยละเอี ย ดก่ อ นใช้ ง านเครื ่ อ งพ่ น หมอกน้ ำ มั น และปฏิ บ ั ต ิ ต ามข้ อ กำหนดด้ า นความปลอดภั ย อย่ า งเคร่ ง ครั ด !
เก็ บ รั ก ษาคู ่ ม ื อ การใช้ ง านไว้ ใ ช้ อ ้ า งอิ ง ในอนาคต
PM7650H
Advertisement
Chapters
Table of Contents

Related Manuals for Makita PM7650H


Summary of Contents for Makita PM7650H
- Page 1 โปรดอ่ า นคู ่ ม ื อ นี ้ โ ดยละเอี ย ดก่ อ นใช้ ง านเครื ่ อ งพ่ น หมอกน้ ำ มั น และปฏิ บ ั ต ิ ต ามข้ อ กำหนดด้ า นความปลอดภั ย อย่ า งเคร่ ง ครั ด ! เก็ บ รั ก ษาคู ่ ม ื อ การใช้ ง านไว้ ใ ช้ อ ้ า งอิ ง ในอนาคต PM7650H...
-
Page 2: Table Of Contents
Thank you very much for selecting the MAKITA petrol mist blower. We are Table of Contents Page pleased to be able to offer you the MAKITA petrol mist blower, which is the Symbols .................2 result of a long development program and many years of knowledge and Important safety instructions..........3... -
Page 3: Important Safety Instructions
IMPORTANT SAFETY INSTRUCTIONS WARNING: Read all safety warnings and all instructions. Failure to follow the warnings and instructions may result in electric shock, fire and/or serious injury. Save all warnings and instructions for future reference. General Instructions • To ensure correct and safe operation, the user must read, understand and follow this instruction manual to assure familiarity with the handling of the mist blower (1). - Page 4 Pay particular attention to the following regulations • Clothing must be sturdy and snug-fitting, but allow complete freedom of movement. Avoid loose-fitting jackets, flared or cuffed pants, scarves, unconfined long hair or anything that could be drawn into the air intake. Wear long pants to protect your legs.
- Page 5 Preparing chemicals – Prepare chemical solutions of according to the chemical manufacturer’s instructions. – Prepare solution only enough for the job at hand so that no solution is left over. – Mix chemicals only by following instructions - wrong mixtures can produce toxic fumes or explosive mixtures.
- Page 6 Starting up the mist blower • Please make sure that there are no children or other people within a working range of 20 meters (6), also pay attention to any animals in the working vicinity. Never use the mist blower in urban areas. •...
- Page 7 • Switch off the engine when resting and when leaving the mist blower unattended. Place it in a safe location prevent danger to others, setting fire to combustible materials, or damage to the machine (8). • Never lay the hot mist blower onto dry grass or onto any combustible materials. •...
-
Page 8: After Finishing Work
Use only genuine spare parts and accessories supplied by MAKITA. Use of non-approved accessories and tools means increased risk of accidents and injuries. MAKITA will not accept any liability for accidents or damage caused by the use of any non-approved attachment or accessories. -
Page 9: Technical Data
Max air volume with nozzle Note: 1. Use the oil and spark plug specified by MAKITA. 2. This specification is subject to change without prior notice. 3. Use the level line 10 l as a guide line for the gross weight 25 kg of the mist blower including the solution. -
Page 10: Designation Of Parts
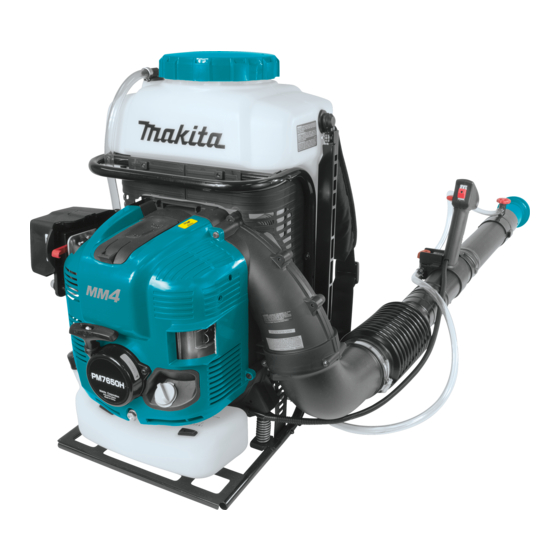
DESIGNATION OF PARTS DESIGNATION OF PARTS DESIGNATION OF PARTS DESIGNATION OF PARTS DESIGNATION OF PARTS Stop switch Starter handle Oil cap Hose band diameter 76 Control handle Fuel tank Oil drain bolt Liquid adjustment knob Trigger lever Fuel tank cap Elbow Solution tank Cruise control lever... -
Page 11: Assembly Instructions
ASSEMBLY INSTRUCTIONS Assembling mist blower pipes CAUTION: • Before performing any work on the mist blower, always stop the engine and pull the spark plug connectors off the spark plug. • Always wear protective gloves! • Start the mist blower only after having assembled it completely. •... -
Page 12: Before Starting The Engine
Please change the oil whenever it becomes dirty or significantly changes color. (Refer to P. 23 for the oil change procedure and frequency.) Recommended oil: MAKITA genuine oil or SAE10W-30 oil of API type SF grade or better (4 stroke motor oil for automobiles) Oil capacity: Approximately 0.22 L (220 ml) - Page 13 Check Point #2: If oil is spilled when adding oil • Oil spillage on the outside on the mist blower may result in the engine oil becoming dirty or adulterated. Therefore, please wipe off any oil spillage before starting the engine. Fuel supply WARNING: •...
-
Page 14: Operation
OPERATION Starting WARNING: • Never attempt engine start in a place where the unit was refueled. When starting the engine, keep a distance of at least 3 m (10 feet). – Otherwise, it will may cause ignition or fire. • Exhaust gas from the engine is toxic. - Page 15 Lifting the choke lever of the air cleaner right side, close the choke lever. Hold the element cover with a left hand to prevent the engine from moving, settle down to take the stable position. Pull out slowly the starter handle till a certain resistance is felt. Return the starter handle backward once from this position, then pull it out with force.
-
Page 16: Adjustment Of Idling
Stopping When the cruise control lever is a low-speed position. Release the trigger lever to reduce the engine speed, and set the stop switch to the “O” position. When the cruise control lever (1) is except a low-speed position. Set the cruise control lever to the low-speed position, reduce the engine speed, and set the stop switch (2) to the “O”... -
Page 17: Operation Method
OPERATION METHOD Installing the strainer The mist blower is provided with the strainers at the solution tank opening and the pipe inlet head. Always make sure the strainer is installed in place. To install the strainer, push it in place. To remove the strainer, pry it out of place. - Page 18 2) Put the mist blower on a flat surface. 3) Before filling the solution tank, be sure to close the solution discharge lever (2). 4)-1 For Brazil: The solution tank is capable of 15 liters of solution. When the tank is full, the total weight including solution is nearly 30 kg. Adjust the solution pouring volume so that the mist blower with solution in tank does not overweigh and can be within an operator’s strength.
- Page 19 Mist blower operation While operating the mist blower, adjust the throttle bar so that the wind force is appropriate for the work location and conditions. Low speed: 2,800/min High speed: 7,400/min The cruise control lever allows the operator to maintain a constant engine RPM without operating the trigger lever.
- Page 20 Installing and removing the dispersion cover To install the dispersion cover (1), mount the dispersion cover on the top nozzle (2) so that its protrusion (3) is aligned with the notch (4) in the top nozzle. Secure the dispersion cover by turning it fully clockwise. To remove the dispersion cover, follow the above procedure in reverse.
- Page 21 3. Mount another supplied nozzle with a small discharge hole. NOTE: Choose a right nozzle out of the following two according to the kind (viscosity) of the chemical you use. Viscosity of chemical Example of chemical Discharge rate (L/min)* Aluminum nozzle (silver color) (7) High MALATHION (Mix the oil.) 0.14...
- Page 22 1) Draining the solution tank To clean the solution tank (1), remove the shoulder strap (2) from the hook (3) by pressing the bottom of the buckle to open it and then taking it off. Clean the tank inside with water. And then remove the draining cap (4) to drain the waste water after cleaning.
-
Page 23: Inspection And Maintenance
INSPECTION AND MAINTENANCE DANGER: • Before inspection and maintenance, stop the engine and allow it to cool. Remove also the spark plug and plug cap. – If inspection or maintenance is attempted immediately after engine stop or with the plug cap left attached, the operator may suffer burn or an accident due to careless startup. -
Page 24: Checking The Spark Plug
Cleaning of air cleaner WARNING: INFLAMMABLES STRICTLY PROHIBITED Interval of Cleaning and Inspection: Daily (every 10 operating hours) Loosen the knob bolt (1). Remove the air cleaner cover (2). Take out the element (3) and remove any dirt with the brush. Note: The element is a dry type and should not get wet. - Page 25 Cleaning the fuel filter • Clogged fuel filter may cause difficulty of start-up or failure of engine speed increase. • Check the fuel filter regularly as follows: Remove the fuel tank cap, drain the fuel to empty the tank. Check the tank inside for any foreign materials.
-
Page 26: Storage
Replacement of gaskets and packings In reassembling after the engine is dismounted, be sure to replace the gaskets and packings with new ones. Any maintenance of adjustment work that is not included and described in this manual is only to be performed by Authorized Service Agents. STORAGE Draining the fuel WARNING:... - Page 27 Fault location Fault System Observation Cause Engine not starting or with Ignition system Ignition spark O.K. Fault in fuel supply or compression system, mechanical difficulty defect No ignition spark STOP-switch operated, wiring fault or short circuit, spark plug or connector defective, ignition module faulty Fuel supply Fuel tank filled Incorrect choke position, carburetor defective, fuel...
-
Page 28: Troubleshooting
TROUBLESHOOTING Before making a request for repairs, check a trouble for yourself. If any abnormality is found, control your machine according to the description of this manual. Never tamper or dismount any part contrary to the description. For repairs, contact Authorized Service Agent or local dealership. State of abnormality Probable cause (malfunction) Remedy... -
Page 29: Daftar Isi Simbol-Simbol
Bahasa Indonesia Terima kasih telah memilih penyemprot kabut bermesin bensin MAKITA. Kami Daftar Isi Halaman bangga dapat menawarkan kepada Anda produk penyemprot kabut bermesin Simbol-simbol ..............29 bensin MAKITA yang merupakan hasil program pengembangan yang panjang Petunjuk keselamatan penting ........30 dan akumulasi pengetahuan dan pengalaman bertahun-tahun. -
Page 30: Petunjuk Keselamatan Penting
PETUNJUK KESELAMATAN PENTING PERINGATAN: Bacalah semua peringatan keselamatan dan semua petunjuk. Kelalaian mematuhi peringatan dan petunjuk dapat menyebabkan sengatan listrik, kebakaran dan/atau cedera serius. Simpanlah semua peringatan dan petunjuk untuk acuan di masa mendatang. Petunjuk Umum • Untuk memastikan pengoperasian yang benar dan aman, pengguna harus membaca, memahami, dan mengikuti petunjuk penggunaan ini guna memastikan pengenalan yang mendalam dengan penanganan penyemprot kabut ini (1). - Page 31 Perhatikanlah secara khusus peraturan berikut ini • Pakaian harus kuat dan terpasang pas, tetapi masih memungkinkan kebebasan bergerak. Hindari memakai jaket yang kendur, celana cutbray atau bermanset, syal, rambut panjang terurai, atau apa saja yang dapat tersedot ke lubang isap udara.
- Page 32 Mempersiapkan bahan kimia – Persiapkan larutan kimia sesuai dengan petunjuk produsen bahan kimianya. – Persiapkan larutan hanya sejumlah yang cukup untuk pekerjaan yang akan dilakukan, sehingga tidak akan ada larutan yang tersisa. – Campurkan bahan kimia hanya dengan mengikuti petunjuk - campuran yang salah dapat menghasilkan uap beracun atau campuran yang dapat meledak.
- Page 33 Menghidupkan penyemprot kabut • Pastikan tidak ada anak-anak atau orang lain dalam radius kerja sejauh 20 meter (6), juga perhatikan binatang yang ada di dekat tempat kerja. Jangan sekali-kali menggunakan penyemprot kabut di daerah perkotaan. • Sebelum mengoperasikan, selalu pastikan bahwa penyemprot kabut aman untuk dioperasikan: Periksa keamanan tuas gasnya.
- Page 34 • Matikan mesin bila beristirahat dan bila meninggalkan penyemprot kabut tanpa ditunggui. Letakkan di tempat aman untuk mencegah bahaya bagi orang lain, terbakarnya bahan mudah terbakar, atau kerusakan pada mesin (8). • Jangan sekali-kali meletakkan penyemprot kabut yang masih panas di atas rumput kering atau bahan mudah terbakar lainnya.
- Page 35 Gunakanlah hanya suku cadang dan aksesori asli yang dipasok oleh MAKITA. Menggunakan aksesori dan alat yang tidak disetujui berarti meningkatkan risiko kecelakaan dan cedera. MAKITA tidak bertanggung jawab atas kecelakaan atau kerusakan yang disebabkan oleh penggunaan alat tambahan atau aksesori yang tidak disetujui.
-
Page 36: Data Teknis
Volume udara maks. dengan nozel Catatan: 1. Gunakan oli dan busi yang ditentukan oleh MAKITA. 2. Spesifikasi ini dapat mengalami perubahan tanpa pemberitahuan. 3. Gunakan garis level 10 l sebagai garis panduan untuk berat kotor penyemprot kabut sebesar 25 kg termasuk larutan. -
Page 37: Penamaan Bagian
PENAMAAN BAGIAN PENAMAAN BAGIAN PENAMAAN BAGIAN PENAMAAN BAGIAN PENAMAAN BAGIAN Sakelar stop Gagang starter Tutup oli Pengikat slang diameter 76 Gagang pengendali Tangki bahan bakar Baut pengeluaran oli Kenop pengatur cairan Tuas picu Tutup tangki bahan bakar Siku Tangki larutan Tuas pengendali jelajah Knalpot Pipa putar... -
Page 38: Petunjuk Perakitan
PETUNJUK PERAKITAN Merakit pipa penyemprot kabut PERHATIAN: • Sebelum melakukan pekerjaan apa pun pada penyemprot kabut, selalu hentikan mesin dan tarik lepas konektor busi dari busi. • Selalu kenakan sarung tangan pelindung! • Hidupkan penyemprot kabut hanya setelah alat ini selesai dirakit lengkap. •... -
Page 39: Sebelum Menghidupkan Mesin
Gantilah oli setiap kali oli sudah kotor atau berubah warna secara signifikan. (Lihat Hal. 50 untuk prosedur dan frekuensi penggantian oli.) Oli yang dianjurkan: Oli asli MAKITA atau oli SAE10W-30 tipe API kelas SF atau lebih baik (oli mesin 4-tak untuk mobil) - Page 40 Poin Pemeriksaan #2: Jika oli sampai tumpah saat menambahkan oli • Tumpahan oli di bagian luar penyemprot kabut dapat mengakibatkan oli mesin menjadi kotor atau tercemar. Karena itu, lap bersih setiap tumpahan oli sebelum menghidupkan mesin. Pasokan bahan bakar PERINGATAN: •...
-
Page 41: Pengoperasian
PENGOPERASIAN Menghidupkan PERINGATAN: • Jangan sekali-kali mencoba menghidupkan mesin di tempat unit diisi bahan bakar. Saat menghidupkan mesin, jagalah jarak paling sedikit 3 m (10 kaki). – Jika tidak, bahan bakar dapat tersulut atau terjadi kebakaran. • Gas buang dari mesin adalah racun. Jangan menyalakan mesin di tempat yang berventilasi buruk, seperti dalam terowongan, bangunan, dll. - Page 42 Mengangkat tuas cuk di sisi kanan pembersih udara akan menutup tuas cuk. Tahan tutup elemen dengan tangan kiri agar mesin tidak bergerak, tekan ke bawah untuk mengambil posisi stabil. Tarik keluar perlahan-lahan gagang starter sampai terasa ada tahanan. Kembalikan gagang starter mundur sekali dari posisi ini, kemudian tarik keluar dengan kuat.
-
Page 43: Penyetelan Stasioner
Menghentikan Bila tuas pengendali jelajah berada pada posisi kecepatan rendah. Lepaskan tuas picu untuk mengurangi kecepatan mesin, dan geser sakelar stop ke posisi “O”. Bila tuas pengendali jelajah (1) tidak berada pada posisi kecepatan rendah.Setel tuas pengendali jelajah ke posisi kecepatan rendah, kurangi kecepatan mesin, dan geser sakelar stop (2) ke posisi “O”. -
Page 44: Metode Pengoperasian
METODE PENGOPERASIAN Memasang saringan Penyemprot kabut ini dilengkapi dengan saringan pada bukaan tangki larutan dan head masukan pipa. Selalu pastikan bahwa saringan terpasang di tempatnya. Untuk memasang saringan, dorong saringan masuk ke tempatnya. Untuk melepas saringan, congkel saringan keluar dari tempatnya. PERINGATAN: •... - Page 45 2) Letakkan penyemprot kabut di atas permukaan datar. 3) Sebelum mengisi tangki larutan, pastikan untuk menutup tuas pengeluaran larutan (2). 4)-1 Untuk Brazil: Tangki larutan mampu menampung 15 liter larutan. Bila tangki penuh, berat total alat termasuk larutan hampir 30 kg. Sesuaikan volume larutan yang dituang sehingga penyemprot kabut dengan larutan di dalam tangkinya tidak akan terlalu berat dan masih sesuai dengan kekuatan operator.
- Page 46 Pengoperasian penyemprot kabut Saat mengoperasikan penyemprot kabut, setel bilah gas sehingga dorongan anginnya sesuai dengan lokasi dan kondisi kerja. Kecepatan rendah: 2.800/men Kecepatan tinggi: 7.400/men Tuas pengendali jelajah memungkinkan operator mempertahankan RPM mesin yang konstan tanpa mengoperasikan tuas picu. Mengangkat tuas pengendali jelajah akan menaikkan RPM mesin. Menurunkan tuas pengendali jelajah akan menurunkan RPM.
- Page 47 Memasang dan melepas tutup penyebar Untuk memasang tutup penyebar (1), pasang tutup penyebar pada nozel atas (2) sehingga tonjolannya (3) terluruskan dengan takik (4) pada nozel atas. Kencangkan tutup penyebar dengan memutarnya sepenuhnya searah jarum jam. Untuk melepaskan tutup penyebar, ikuti prosedur di atas secara terbalik. Mengganti nozel dengan nozel pengeluaran-larutan- berjumlah-kecil (aksesori tambahan) Bila larutan dalam jumlah kecil perlu disemprotkan, gantilah tutup nozel...
- Page 48 3. Pasang nozel lain dengan lubang pengeluaran kecil yang disertakan. CATATAN: Pilih nozel yang tepat dari antara dua nozel berikut sesuai dengan jenis (viskositas [kekentalan]) bahan kimia yang Anda gunakan. Viskositas (kekentalan) bahan Contoh bahan kimia Laju pengeluaran (L/men)* kimia Nozel aluminium MALATHION Tinggi...
- Page 49 1) Mengosongkan tangki larutan Untuk membersihkan tangki larutan (1), lepaskan tali bahu (2) dari kait (3) dengan menekan bagian bawah gesper untuk membukanya dan kemudian lepaskan. Bersihkan bagian dalam tangki dengan air. Dan kemudian lepaskan tutup pembuangan (4) untuk mengeluarkan air cucian setelah membersihkan.
-
Page 50: Pemeriksaan Dan Perawatan
PEMERIKSAAN DAN PERAWATAN BAHAYA: • Sebelum melakukan pemeriksaan dan perawatan, matikan mesin dan biarkan mendingin. Lepaskan juga busi dan cop busi. – Jika pemeriksaan atau perawatan coba dilakukan segera setelah mesin dimatikan atau dengan cop busi dibiarkan terpasang, operator dapat mengalami luka bakar atau kecelakaan akibat terhidupkannya mesin secara tak sengaja. - Page 51 Membersihkan pembersih udara PERINGATAN: BAHAN MUDAH MENYALA DILARANG KERAS Interval Pembersihan dan Pemeriksaan: Harian (setiap 10 jam pengoperasian) Kendurkan baut kenop (1). Lepaskan penutup pembersih udara (2). Keluarkan elemen (3) dan bersihkan kotoran yang ada dengan sikat. Catatan: Elemen yang digunakan adalah tipe kering dan tidak boleh basah. Jangan sekali-kali mencucinya dengan air.
- Page 52 Membersihkan filter bahan bakar • Filter bahan bakar yang tersumbat dapat menyebabkan mesin sulit dihidupkan atau kegagalan peningkatan kecepatan mesin. • Periksa filter bahan bakar secara rutin seperti berikut: Lepaskan tutup tangki bahan bakar, keluarkan bahan bakar untuk mengosongkan tangki. Periksa bagian dalam tangki dari adanya bahan asing. Jika ada, lap bersih bahan asing tersebut.
-
Page 53: Penyimpanan
Penggantian gasket dan paking Dalam merakit mesin kembali setelah mesin dibongkar, pastikan untuk mengganti gasket dan paking dengan yang baru. Semua pekerjaan pemeliharaan atau penyetelan yang tidak tercakup atau diuraikan dalam buku petunjuk ini harus dilakukan hanya oleh Agen Servis Resmi. PENYIMPANAN Mengeluarkan bahan bakar PERINGATAN:... - Page 54 Lokasi kegagalan Kegagalan Sistem Pengamatan Penyebab Mesin tidak mau hidup Sistem pengapian Api busi baik Kegagalan dalam sistem pasokan bahan bakar atau atau sulit hidup kompresi, kerusakan mekanis Tidak ada api busi Sakelar-STOP bekerja, kegagalan atau hubung singkat dalam pengawatan, busi atau konektor busi rusak, modul pengapian rusak Pasokan bahan bakar Tangki bahan bakar terisi...
-
Page 55: Menyelesaikan Masalah
MENYELESAIKAN MASALAH Sebelum meminta bantuan perbaikan, periksalah masalahnya sendiri lebih dahulu. Jika ditemukan hal yang tidak normal, kendalikan mesin sesuai dengan deskripsi dalam buku petunjuk ini. Jangan sekali-kali mengubah-ubah atau melepas komponen mana pun yang bertentangan dengan deskripsi tersebut. Untuk perbaikan, hubungi Agen Servis Resmi atau dealer setempat. Keadaan tidak normal Kemungkinan penyebab (malfungsi) Cara mengatasi... -
Page 56: Biểu Tượng
Chúng tôi rất vui vì có thể cung cấp cho bạn Máy phun sương chạy xăng của Biểu tượng ..............56 MAKITA, đây là kết quả của một chương trình phát triển lâu dài và kiến thức Hướng dẫn an toàn quan trọng ........57 cũng như... -
Page 57: Hướng Dẫn An Toàn Quan Trọng
HƯỚNG DẪN AN TOÀN QUAN TRỌNG CẢNH BÁO: Đọc tất cả cảnh báo an toàn và hướng dẫn. Không tuân theo các cảnh báo và hướng dẫn có thể dẫn đến điện giật, hoả hoạn và/hoặc thương tích nghiêm trọng. Lưu giữ... - Page 58 Đặc biệt chú ý tới các quy định sau đây • Quần áo phải bền chắc và vừa vặn, gọn gàng, nhưng cho phép di chuyển hoàn toàn thoải mái. Tránh mặc áo khoác rộng lùng thùng, quần ống loe hoặc gập gấu, đeo khăn quàng, để...
- Page 59 Chuẩn bị hoá chất – Chuẩn bị các dung dịch hoá chất theo hướng dẫn của nhà sản xuất hoá chất. – Chỉ chuẩn bị vừa đủ lượng dung dịch cần thiết cho công việc trước mắt để không để sót lại dung dịch thừa. –...
- Page 60 Khởi động máy phun sương • Hãy đảm bảo rằng không có trẻ em hoặc người khác trong phạm vi làm việc 20 mét (6), đồng thời, chú ý đến bất kỳ con vật nào đang ở gần khu vực làm việc. Không sử...
- Page 61 • Tắt động cơ khi nghỉ và khi bỏ máy phun sương lại không có người trông. Đặt máy ở vị trí an toàn để tránh gây nguy hiểm cho những người khác, gây bắt lửa cho vật liệu dễ cháy nổ hoặc làm hỏng máy (8). •...
- Page 62 Chỉ sử dụng bộ phận thay thế chính hãng và các phụ tùng được MAKITA cung cấp. Sử dụng cac phụ tùng và dụng cụ không được phê duyệt làm tăng nguy cơ tai nạn và thương tích. MAKITA sẽ không chấp nhận bất kỳ trách nhiệm pháp lý...
-
Page 63: Dữ Liệu Kỹ Thuật
/giờ) Chú ý: 1. Sử dụng dầu và bu-gi do MAKITA chỉ định. 2. Thông số kỹ thuật này có thể thay đổi mà không cần thông báo trước. 3. Sử dụng đường mức 10 l làm đường ngắm chuẩn cho tổng trọng lượng 25 kg của máy phun sương kể cả dung dịch. -
Page 64: Chỉ Mục Các Bộ Phận
CHỈ MỤC CÁC BỘ PHẬN CHỈ MỤC CÁC BỘ PHẬN CHỈ MỤC CÁC BỘ PHẬN CHỈ MỤC CÁC BỘ PHẬN CHỈ MỤC CÁC BỘ PHẬN Công tắc dừng Tay cầm khởi động Nắp dầu Đường kính dải ống mềm 76 Tay điều khiển Bình nhiên liệu Bulông xả... -
Page 65: Hướng Dẫn Lắp Ráp
HƯỚNG DẪN LẮP RÁP Lắp ráp các ống dẫn của máy phun sương THẬN TRỌNG: • Trước khi thực hiện bất kỳ công việc nào trên máy phun sương ̣ , luôn dừng động cơ và kéo đầu nối bu-gi khỏi bu-gi. •... -
Page 66: Trước Khi Khởi Động Động Cơ
Hãy thay dầu bất cứ khi nào dầu bẩn hoặc đổi màu đáng kể. (Tham khảo Trang 77 để biết quy trình và tần suất thay dầu.) Dầu nên dùng: Dầu chính hãng của MAKITA hoặc dầu SAE10W-30 thuộc loại API cấp SF hoặc tốt hơn (dầu động cơ 4 thì dành cho ô tô) Dung tích dầu: Xấp xỉ... - Page 67 Điểm Kiểm tra Số 2: Nếu dầu bị tràn khi nạp dầu • Tràn dầu ở bên ngoài của máy phun sương có thể dẫn đến dầu động cơ bị bẩn hoặc lẫn tạp chất. Vì vậy, hãy lau sạch mọi vết dầu tràn trước khi khởi động động cơ.
-
Page 68: Vận Hành
VẬN HÀNH Khởi động CẢNH BÁO: • Không cố khởi động động cơ ở nơi đã nạp lại nhiên liệu cho thiết bị. Khi khởi động động cơ, giữ khoảng cách tối thiểu là 3 m (10 feet). – Nếu không, sẽ gây đánh lửa hoặc cháy. •... - Page 69 Nâng lẫy gạt bướm gió của bộ lọc gió sang bên phải, đóng lẫy gạt bướm gió. Dùng tay trái giữ nắp bộ phận để ngăn động cơ khỏi di chuyển, ngồi xuống để có tư thế chắc chắn. Từ từ kéo tay cầm khởi động ra cho đến khi cảm nhận thấy lực cản nhất định. Đưa tay cầm khởi động quay ngược lại một lần từ...
-
Page 70: Điều Chỉnh Chạy Không Tải
Dừng Khi cần điều khiển hành trình ở vị trí tốc độ thấp.Nhả cần khởi động ra để giảm tốc độ động cơ và đặt công tắc dừng về vị trí “O”. Khi cần điều khiển hành trình (1) ở ngoài vị trí tốc độ thấp.Đặt cần điều khiển hành trình về... -
Page 71: Phương Pháp Vận Hành
PHƯƠNG PHÁP VẬN HÀNH Lắp bộ lọc Máy phun sương được cung cấp cùng với các bộ lọc ở miệng bình dung dịch và đầu ống nạp. Luôn đảm bảo rằng bộ lọc được lắp ở đúng vị trí. Để lắp bộ lọc, đẩy nó vào vị trí. Để... - Page 72 2) Đặt máy phun sương lên bề mặt bằng phẳng. 3) Trước khi nạp đầy bình dung dịch, đảm bảo đóng cần xả dung dịch (2). 4)-1 Dành cho Braxin: Bình dung dịch có khả năng chứa 15 lít dung dịch. Khi bình đầy, tổng trọng lượng kể...
- Page 73 Vận hành máy phun sương Trong khi vận hành máy phun sương, điều chỉnh thanh tiết lưu sao cho lực gió thích hợp đối với vị trí công việc và điều kiện làm việc. Tốc độ thấp: 2.800/phút Tốc độc cao: 7.400/phút Cần điều khiển hành trình cho phép người vận hành duy trì...
- Page 74 Lắp và tháo nắp phân tán Để lắp nắp phân tán (1), gắn nắp phân tán lên vòi phun trên cùng (2) sao cho phần nhô ra của nắp (3) gióng thẳng với khấc (4) ở vòi phun trên cùng. Vặn chặt nắp phân tán bằng cách xoay nắp hết cỡ...
- Page 75 3. Lắp một vòi phun khác được cung cấp có lỗ phun nhỏ. CHÚ Ý: Chọn đúng vòi phun trong hai vòi phun sau theo loại (độ nhớt) hoá chất sử dụng. Độ nhớt hoá chất Ví dụ về hoá chất Tốc độ...
- Page 76 1) Xả bình dung dịch Để làm sạch bình dung dịch (1), tháo dây đeo vai (2) ra khỏi móc (3) bằng cách bấm phần dưới khoá đai để mở khoá sau đó lấy dây ra. Làm sạch bên trong bình bằng nước. Sau đó...
-
Page 77: Kiểm Tra Và Bảo Dưỡng
Kiểm tra và bảo dưỡng NGUY HIỂM: • Trước khi kiểm tra và bảo dưỡng, dừng động cơ và để động cơ nguội. Đồng thời tháo bu-gi và nắp bu-gi ra. – Nếu cố thực hiện kiểm tra và bảo dưỡng ngay sau khi dừng động cơ hoặc khi chưa tháo nắp bu-gi, người vận hành có... - Page 78 Lau sạch bộ lọc gió CẢNH BÁO: NGHIÊM CẤM CÁC CHẤT DỄ CHÁY Định kỳ vệ sinh và kiểm tra: Hàng ngày (cứ 10 giờ vận hành một lần) Nới lỏng chốt núm vặn (1). Tháo nắp bộ lọc gió (2). Lấy bộ...
- Page 79 Làm sạch bộ lọc nhiên liệu • Bộ lọc nhiên liệu bị tắc có thể khiến khó khởi động hoặc không tăng được tốc độ động cơ. • Thường xuyên kiểm tra bộ lọc nhiên liệu như sau: Mở nắp bình nhiên liệu, rút hết nhiên liệu khỏi bình. Kiểm tra xem có bất kỳ vật lạ...
-
Page 80: Bảo Quản
Thay mới các gioăng và tấm lót Khi lắp lại sau khi đã tháo động cơ, đảm bảo thay mới các gioăng và tấm lót. Công việc bảo dưỡng điều chỉnh không được bao gồm và mô tả trong tài liệu này chỉ... - Page 81 Vị trí hỏng hóc Hỏng hóc Hệ thống Quan sát Nguyên nhân Động cơ không khởi động Hệ thống đánh lửa Tia lửa điện O.K. Lỗi trong cấp nhiên liệu hoặc hệ thống nén, lỗi cơ khí hoặc khó khởi động Không có...
-
Page 82: Khắc Phục Sự Cô
KHẮC PHỤC SỰ CỐ Trước khi yêu cầu sửa chữa, hãy tự mình kiểm tra sự cố. Nếu thấy bất kỳ hiện tượng bất thường nào, hãy kiểm soát máy của bạn theo mô tả của tài liệu này. Không bao giờ làm xáo trộn hoặc tháo bất kỳ bộ phận nào ngược với mô tả. Để sửa chữa, liên hệ với Đại lý Dịch vụ Uỷ quyền hoặc người đại lý... -
Page 83: สั ญ ลั ก ษณ
ขอขอบคุ ณ ที ่ ท ่ า นสั ่ ง ซื ้ อ เครื ่ อ งพ่ น หมอกน้ ำ มั น ของ MAKITA เราขอแนะนำให้ ท ่ า นใช้ พ ่ น หมอก น้ ำ มั น ของ MAKITA ซึ ่ ง เป็ น ผลิ ต ภั ณ ฑ์ ท ี ่ เ กิ ด ขึ ้ น จากโครงการพั ฒ นาระยะยาว รวมถึ ง การใช้ ค วามรู ้... -
Page 84: คำแนะนำด้ า นความปลอดภั ย ที ่ ส ำคั ญ
คำแนะนำด้ า นความปลอดภั ย ที ่ ส ำคั ญ คำเตื อ น: อ่ า นคำเตื อ นด้ า นความปลอดภั ย และคำแนะนำทั ้ ง หมด การไม่ ป ฏิ บ ั ต ิ ต ามคำเตื อ นและ คำแนะนำดั ง กล่ า วอาจส่ ง ผลให้ เ กิ ด ไฟฟ้ า ช็ อ ต ไฟไหม้ และ/หรื อ ได้ ร ั บ บาดเจ็ บ อย่ า งร้ า ยแรง เก็... - Page 85 เอาใจใส่ ก ั บ ข้ อ กำหนดต่ อ ไปนี ้ • เสื ้ อ ผ้ า ต้ อ งแข็ ง แรงและพอดี แต่ ต ้ อ งทำให้ ผ ู ้ ส วมใส่ เ คลื ่ อ นที ่ ไ ด้ อ ย่ า งอิ ส ระ หลี ก เลี ่ ย งเสื ้ อ คลุ ม ที ่ ห ลวม, กางเกงขาบานหรื...
- Page 86 การเตรี ย มสารเคมี เตรี ย มส่ ว นผสมสารเคมี ต ามคู ่ ม ื อ ของผู ้ ผ ลิ ต สารเคมี เตรี ย มส่ ว นผสมให้ เ พี ย งพอสำหรั บ งานหนึ ่ ง ๆ เพื ่ อ ไม่ ใ ห้ ม ี ส ารเคมี เ หลื อ ผสมสารเคมี...
- Page 87 การสตาร์ ท เครื ่ อ งพ่ น หมอก • โปรดตรวจสอบว่ า ไม่ ม ี เ ด็ ก หรื อ บุ ค คลอื ่ น อยู ่ ภ ายในรั ศ มี ก ารทำงาน 20 เมตร (6) และระมั ด ระวั ง ไม่ ใ ห้ มี...
- Page 88 • ดั บ เครื ่ อ งยนต์ เ มื ่ อ พั ก การใช้ ง าน และเมื ่ อ ต้ อ งทิ ้ ง เครื ่ อ งพ่ น หมอกไว้ โ ดยไม่ ม ี ผ ู ้ ด ู แ ล วางเครื ่ อ งไว้ ใ น สถานที...
- Page 89 หี บ ห่ อ เครื ่ อ งพ่ น หมอก’ของ MAKITA จะถู ก จั ด ส่ ง ในกล่ อ งกระดาษแข็ ง ที ่ ม ี ก ารป้ อ งกั น เพื ่ อ ป้ อ งกั น ความเสี ย หายระหว่ า งขนส่ ง กล่ อ งกระดาษแข็ ง นี ้ เ ป็ น วั ต ถุ ด ิ บ พื ้ น ฐาน และสามารถนำไปใช้ ไ ด้ ใ หม่...
-
Page 90: ข้ อ มู ล ทางเทคนิ ค
หมายเหตุ : 1. ใช้ น ้ ำ มั น และหั ว เที ย นของ MAKITA 2. คุ ณ สมบั ต ิ น ี ้ อ าจเปลี ่ ย นได้ โ ดยไม่ ต ้ อ งแจ้ ง ล่ ว งหน้ า... -
Page 91: รายละเอี ย ดของชิ ้ น ส่ ว นต่ า งๆ
รายละเอี ย ดของชิ ้ น ส่ ว นต่ า งๆ รายละเอี ย ดของชิ ้ น ส่ ว นต่ า งๆ รายละเอี ย ดของชิ ้ น ส่ ว นต่ า งๆ รายละเอี ย ดของชิ ้ น ส่ ว นต่ า งๆ รายละเอี... -
Page 92: คำแนะนำในการประกอบเครื ่ อ ง
คำแนะนำในการประกอบเครื ่ อ ง การประกอบท่ อ ของเครื ่ อ งพ่ น หมอก ข้ อ ควรระวั ง : • ก่ อ นที ่ จ ะทำงานใดๆ กั บ เครื ่ อ งพ่ น หมอก ให้ ห ยุ ด การทำงานของเครื ่ อ งยนต์ แ ละดึ ง ขั ้ ว ต่ อ หั ว เที ย น ออกจากหั... -
Page 93: ก่ อ นเริ ่ ม การทำงานเครื ่ อ งยนต
และความถี ่ ใ นการเปลี ่ ย นน้ ำ มั น ในหน้ า 104) น้ ำ มั น เครื ่ อ งที ่ แ นะนำให้ ใ ช้ : น้ ำ มั น เครื ่ อ งแท้ ข อง MAKITA หรื อ น้ ำ มั น เครื ่ อ ง SAE10W-30 ประเภท... - Page 94 สิ ่ ง ที ่ ต ้ อ งตรวจสอบ #2: หากน้ ำ มั น เครื ่ อ งหกในขณะเติ ม น้ ำ มั น เครื ่ อ ง • คราบน้ ำ มั น เครื ่ อ งที ่ ห กเลอะด้ า นนอกตั ว เครื ่ อ งพ่ น หมอกอาจทำให้ น ้ ำ มั น เครื ่ อ งยนต์ ส กปรกหรื อ ถู ก เจื อ ปนได้ ดั ง นั ้ น โปรดเช็ ด คราบน้ ำ มั น เครื ่ อ งที ่ ห กก่ อ นสตาร์ ท เครื ่ อ งยนต์ การจ่...
-
Page 95: การทำงาน
การทำงาน การสตาร์ ท คำเตื อ น: • อย่ า พยายามสตาร์ ท เครื ่ อ งยนต์ ใ นพื ้ น ที ่ เ ติ ม น้ ำ มั น เมื ่ อ สตาร์ ท เครื ่ อ งยนต์ ให้ อ อกห่ า งออกมา อย่... - Page 96 ยกแกนโช้ ค ของตั ว ทำความสะอาดอากาศด้ า นขวา ปิ ด แกนโช้ ค จั บ ฝาครอบด้ ว ยมื อ ซ้ า ยเพื ่ อ ป้ อ งกั น เครื ่ อ งยนต์ เ คลื ่ อ นที ่ วางลงให้ อ ยู ่ ใ นตำแหน่ ง ที ่ ส มดุ ล ดึ...
-
Page 97: การปรั บ ความเร็ ว รอบเดิ น เบา
การดั บ เครื ่ อ ง เมื ่ อ คั น ควบคุ ม ครู ส อยู ่ ใ นตำแหน่ ง ความเร็ ว ต่ ำ ปล่ อ ยคั น ทริ ก เกอร์ เ พื ่ อ ลดความเร็ ว เครื ่ อ งยนต์ ล ง แล้ ว ตั ้ ง สวิ ต ช์ ห ยุ ด ไปที ่ ต ำแหน่ ง "O" เมื... -
Page 98: วิ ธ ี ก ารใช้ ง าน
วิ ธ ี ก ารใช้ ง าน การติ ด ตั ้ ง ตั ว กรอง เครื ่ อ งพ่ น หมอกมี ต ั ว กรองติ ด ตั ้ ง อยู ่ แ ล้ ว ที ่ จ ุ ด เปิ ด ของถั ง บรรจุ ส ารละลายและหั ว ทางเข้ า ท่ อ ตรวจสอบให้... - Page 99 2) วางเครื ่ อ งพ่ น หมอกบนพื ้ น ระนาบ 3) ก่ อ นเติ ม ถั ง บรรจุ ส ารละลาย ให้ ต รวจสอบให้ แ น่ ใ จว่ า ได้ ป ิ ด คั น โยกปล่ อ ยสารละลาย (2) แล้ ว 4)-1 สำหรั...
- Page 100 การใช้ ง านเครื ่ อ งพ่ น หมอก เมื ่ อ ใช้ ง านเครื ่ อ งพ่ น หมอก ให้ ป รั บ แถบบั ง คั บ เพื ่ อ ให้ แ รงลมเหมาะสมต่ อ สถานที ่ แ ละสภาพการทำงาน ความเร็ ว ต่ ำ : 2,800/min ความเร็...
- Page 101 การติ ด ตั ้ ง และการถอดฝาครอบกระจายตั ว หากต้ อ งการติ ด ตั ้ ง ฝาครอบกระจายตั ว (1) ให้ ใ ส่ ฝ าครอบกระจายตั ว ที ่ ห ั ว ฉี ด ด้ า นบน (2) ให้ ส ่ ว นที ่ ย ื ่ น ออกมา (3) อยู ่ ใ นแนวรอยบาก (4) ของหั ว ฉี ด ด้ า นบน ล็...
- Page 102 3. ใส่ ห ั ว ฉี ด อี ก ชิ ้ น ที ่ ม ี ร ู พ ่ น ขนาดเล็ ก ที ่ ใ ห้ ม าด้ ว ย หมายเหตุ : เลื อ กหั ว ฉี ด ที ่ ถ ู ก ต้ อ งจากสองชิ ้ น ต่ อ ไปนี ้ โดยขึ ้ น อยู ่ ก ั บ ชนิ ด (ความหนื ด ) ของสารเคมี...
- Page 103 1) ระบายสารในถั ง สารละลาย ในการทำความสะอาดถั ง สารละลาย (1) ให้ ถ อดสายพาดไหล่ (2) ออกจากตะขอ (3) โดยกดที ่ ด้ า นใต้ ข องตั ว ยึ ด เพื ่ อ เปิ ด ออก แล้ ว ถอดสายสะพายออก ทำความสะอาดภายในถั ง ด้ ว ยน้ ำ จากนั ้ น จึ ง ถอดฝาระบาย (4) เพื ่ อ ระบายน้ ำ เสี ย หลั ง จากการทำความสะอาด ข้...
-
Page 104: การตรวจสอบและการบำรุ ง รั ก ษา
การตรวจสอบและการบำรุ ง รั ก ษา อั น ตราย: • ก่ อ นการตรวจสอบและการบำรุ ง รั ก ษา ให้ ห ยุ ด การทำงานของเครื ่ อ งยนต์ แ ละปล่ อ ยให้ เ ครื ่ อ งยนต์ เ ย็ น ถอดหั ว เที ย น และฝาครอบหั... - Page 105 การทำความสะอาดเครื ่ อ งฟอกอากาศ คำเตื อ น: ห้ า มมิ ใ ห้ อ ยู ่ ใ กล้ ก ั บ วั ต ถุ ไ วไฟโดยเด็ ด ขาด ระยะเวลาของการทำความสะอาดและการตรวจสอบ: ทุ ก วั น (ทุ ก 10 ชั ่ ว โมงของการทำงาน) คลายสลั ก เกลี ย วปุ ่ ม (1) ถอดที...
- Page 106 การทำความสะอาดไส้ ก รองน้ ำ มั น เชื ้ อ เพลิ ง • ไส้ ก รองน้ ำ มั น เชื ้ อ เพลิ ง ที ่ อ ุ ด ตั น เป็ น สาเหตุ ใ ห้ ส ตาร์ ท ติ ด ยากหรื อ เร่ ง ความเร็ ว เครื ่ อ งยนต์ ไ ม่ ข ึ ้ น •...
-
Page 107: การจั ด เก็ บ
การเปลี ่ ย นปะเก็ น และการอั ด ปะเก็ น ในการประกอบเครื ่ อ งยนต์ เ ข้ า ไปใหม่ ห ลั ง จากถอดชิ ้ น ส่ ว น ให้ ต รวจสอบว่ า ได้ เ ปลี ่ ย นปะเก็ น และ ปะเก็ น เชื อ กเป็ น ชุ ด ใหม่ การบำรุ... - Page 108 จุ ด ที ่ ม ี ข ้ อ ผิ ด พลาด ข้ อ ผิ ด พลาด ระบบ การสั ง เกต สาเหตุ เครื ่ อ งยนต์ ส ตาร์ ท ไม่ ต ิ ด หรื อ ระบบจุ ด ระเบิ ด ประกายไฟจากการจุ ด ระเบิ ด ปกติ การจ ่ า ยน ้ ำ ม ั น เช ื ้ อ เพล ิ ง หร ื อ ระบบการบ ี บ อ ั ด ผ ิ ด ปกต ิ กลไกม ี ข ้ อ บกพร ่ อ ง ติ...
-
Page 109: การแก้ ไ ขปั ญ หา
การแก้ ไ ขปั ญ หา ก่ อ นจะนำเครื ่ อ งไปซ่ อ มแซม ให้ ต รวจสอบปั ญ หาด้ ว ยตั ว ท่ า นเองก่ อ น หากพบสิ ่ ง ปกติ ให้ ต รวจสอบเครื ่ อ งยนต์ ต ามที ่ อ ธิ บ ายไว้ ใ นคู ่ ม ื อ นี ้ อย่ า ดั ด แปลงหรื อ ถอดแยกชิ ้ น ส่ ว นที ่ แตกต่... - Page 112 Makita Corporation Anjo, Aichi, Japan www.makita.com 885104E374...