
Related Manuals for NETGEAR N150 D500


Summary of Contents for NETGEAR N150 D500
- Page 1 N150 WiFi DSL Modem Router—Essentials Edition M o d e l D 5 00 N300 WiFi DSL Modem Router—Essentials Edition M o d e l D 1 500 U s e r M a n u a l August 2014 202-11390-01 350 East Plumeria Drive San Jose, CA 95134...
- Page 2 See the regulatory compliance document before connecting the power supply. Trademarks NETGEAR, the NETGEAR logo, and Connect with Innovation are trademarks and/or registered trademarks of NETGEAR, Inc. and/or its subsidiaries in the United States and/or other countries. Information is subject to change without notice.
-
Page 3: Table Of Contents
Types of Logins ........... 13 NETGEAR genie Automatic Setup Utility and Setup Wizard ....14 Set Up Your Modem Router for DSL Service. - Page 4 N150 and N300 WiFi DSL Modem Routers Chapter 4 Manage the WiFi Network Settings Manage the Basic WiFi Settings and WiFi Security......49 Configure WPA/WPA2 Enterprise WiFi Security .
- Page 5 N150 and N300 WiFi DSL Modem Routers Chapter 7 Troubleshooting Quick Tips for Troubleshooting ........101 Troubleshoot with the LEDs .
-
Page 6: Chapter 1 Hardware Overview Of The Modem Router
1. Actual data throughput and WiFi coverage will vary. Network conditions and environmental factors, including volume of network traffic, building materials and construction, and network overhead, lower actual data throughput rate and WiFi coverage. NETGEAR makes no express or implied... -
Page 7: Unpack Your Modem Router
N150 and N300 WiFi DSL Modem Routers Unpack Your Modem Router Your package contains the following items. ADSL filter (varies by region) Modem router (N300 shown) Power adapter Phone cable Ethernet cable (varies by region) Figure 1. Package contents for the modem router Your package might contain more items. -
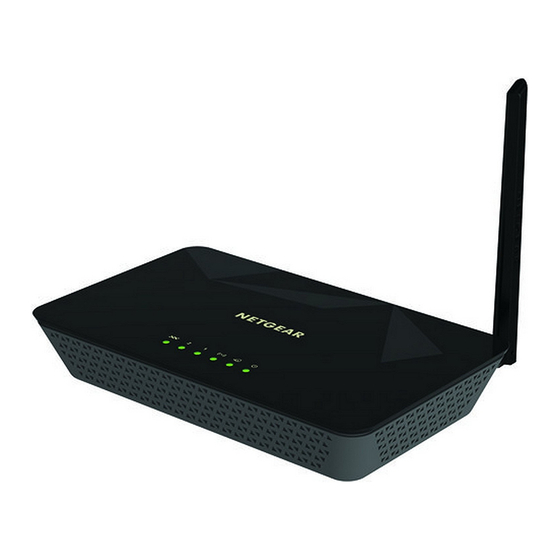
Page 8: Top Panel With Leds
N150 and N300 WiFi DSL Modem Routers Top Panel with LEDs The modem router displays status LEDs on top. Figure 2. Modem router top view The following table describes the LEDs from right to left. Table 1. LED descriptions Icon Description Power •... -
Page 9: Back Panel With Ports, Dc Connector, On/Off Button, And Antennas
Figure 3. Modem router back panel (N300 shown) Although you can swivel the antennas of the N300 WiFi DSL Modem Router Model D1500 in any direction, for best performance, NETGEAR recommends that you position the antennas perpendicular, that is, at a 90-degree angle to each other. -
Page 10: Bottom Panel Product Label
N150 and N300 WiFi DSL Modem Routers Bottom Panel Product Label The product label on the bottom panel of the modem router lists the WiFi login information, serial number, and MAC address of the modem router. Figure 5. Modem router product label Hardware Overview of the Modem Router... -
Page 11: Chapter 2 Install And Access The Modem Router And Its Network
Install and Access the Modem Router and Its Network This chapter describes how you can install and access the modem router and its network. The chapter contains the following sections: • Position Your Modem Router • Before You Connect to the Modem Router •... -
Page 12: Position Your Modem Router
N150 and N300 WiFi DSL Modem Routers Position Your Modem Router The modem router lets you access your network anywhere within the operating range of your WiFi network. However, the operating distance or range of your WiFi connection can vary significantly depending on the physical placement of your modem router. -
Page 13: Before You Connect To The Modem Router
N150 and N300 WiFi DSL Modem Routers Before You Connect to the Modem Router During and after installation, you can connect to the modem router’s network through a wired or WiFi connection. If you set up your computer to use a static IP address, change the settings of your computer so that it uses Dynamic Host Configuration Protocol (DHCP). -
Page 14: Netgear Genie Automatic Setup Utility And Setup Wizard
DSL service. If you install your modem router for DSL service, you can set up your modem router with the NETGEAR genie automatic setup utility, which launches the first time that you set up the Internet connection for your modem router. The NETGEAR genie automatic setup utility runs on any device with a web browser. -
Page 15: Set Up Your Modem Router For Dsl Service
For example, you could say, “I need my DSL service user name and password. Can you help me?” Note: If your provider says that they do not support NETGEAR services, tell them that you need only your DSL user name and password; you do not need support. -
Page 16: Cable The Modem Router For Dsl Service And Access The Modem Router
N150 and N300 WiFi DSL Modem Routers Cable the Modem Router for DSL Service and Access the Modem Router The following figure shows the cabling of your modem router for DSL service. Line Figure 7. Modem router cabling for DSL service ... - Page 17 Your computer or WiFi device connects to the modem router’s WiFi network. Launch a web browser. The NETGEAR genie automatic setup utility displays. If the NETGEAR genie automatic setup utility displays, skip to Step 12. If it does not display, do the following: a.
-
Page 18: Set Up Your Modem Router For Cable Or Fiber Service
Follow the onscreen instructions. The NETGEAR genie automatic setup utility guides you through connecting the modem router to the Internet. When you are connected to the Internet, the NETGEAR genie BASIC Home screen displays. If this screen does not display, see Step If the modem router does not connect to the Internet, do the following: a. -
Page 19: Cable The Modem Router For Cable Or Fiber Service And Access The Modem Router
N150 and N300 WiFi DSL Modem Routers Cable the Modem Router for Cable or Fiber Service and Access the Modem Router The following figure shows the cabling of your modem router for cable or fiber service. Figure 8. Modem router cabling for cable or fiber service ... - Page 20 If the computer is set to a static or fixed IP address (this setting is uncommon), change it to obtain an IP address automatically from the modem router. On the NETGEAR genie automatic setup utility screen, select the No, I want to configure the Internet connection myself radio button.
- Page 21 If the computer is disconnected from the modem router, reconnect the computer to the modem router (see Step 8), relaunch the web browser, and access NETGEAR genie again: a. In the address field of the web browser, enter www.routerlogin.net. b. When prompted, enter admin for the user name and password for the password.
- Page 22 Contact your ISP to verify that you are using the correct configuration information. c. Read Troubleshoot the Internet Connection on page 104. If problems persist, register your NETGEAR product and contact NETGEAR technical support. Install and Access the Modem Router and Its Network...
-
Page 23: Log In To The Modem Router After Setup To View Or Change Settings
Log In to the Modem Router After Setup to View or Change Settings After you set up the modem router for DSL, cable, or fiber service, you can view or change the settings for the modem router by accessing NETGEAR genie. To log in to the modem router: Launch an Internet browser from a computer or WiFi device that is connected to the network. -
Page 24: Change The Language
Change the admin Password and Automatic Login Time-Out NETGEAR recommends that you change the default password that you use to log in to the modem router with a more secure password. This is the default password that you use to log in to the modem router with the user name admin. - Page 25 N150 and N300 WiFi DSL Modem Routers The BASIC Home screen displays. Select ADVANCED > Administration > Set Password. The Set Password screen displays. Type the old password. Type the new password twice. To change the automatic login time-out, enter a new value in minutes in the field. By default, you are logged out of the web management interface after five minutes of inactivity.
-
Page 26: Chapter 3 Manage The Internet Settings Manually
This chapter describes how you can manage the Internet settings of the modem router manually. Usually, the quickest way to set up the modem router is to allow the NETGEAR genie automatic setup utility to detect the Internet connection when you first access the modem router with an Internet browser. -
Page 27: Use The Internet Setup Wizard After Initial Setup
Change the WAN Connection Preference and Second Ethernet Port on page 64. Note: The Setup Wizard is not the same as the NETGEAR genie automatic setup utility that launches the first time you connect to your modem router in a DSL service setup. - Page 28 Click the Next button. The Setup Wizard searches your Internet connection for servers and protocols to determine your ISP configuration. When you are connected to the Internet, the NETGEAR genie BASIC Home screen displays. If this screen does not display, see...
-
Page 29: Manually Set Up The Internet Connection
N150 and N300 WiFi DSL Modem Routers Manually Set Up the Internet Connection You can view or change the modem router’s Internet connection settings manually. The following sections describe the options to manually set up the Internet connection: • Specify an Internet Connection Without a Login on page 29 •... - Page 30 N150 and N300 WiFi DSL Modem Routers Enter the settings that are described in the following table. Field Description Account Name (If Required) Enter the account name provided by your ISP. This name might also be called the host name. If you do not know the account name, leave this field blank.
-
Page 31: Specify An Internet Connection That Uses A Login And Pppoe Service
Disable. NAT is disabled. Click the Apply button. Your settings are saved. Click the Test button to test your Internet connection. If the NETGEAR website does not display within one minute, see Troubleshoot the Internet Connection on page 104. Specify an Internet Connection That Uses a Login and PPPoE... - Page 32 N150 and N300 WiFi DSL Modem Routers To view or specify the Internet connection settings with a login for PPPoE service: Launch an Internet browser from a computer or WiFi device that is connected to the network. Type http://www.routerlogin.net or http://www.routerlogin.com. A login screen displays.
- Page 33 N150 and N300 WiFi DSL Modem Routers From the Encapsulation menu, select PPPoE (PPP over Ethernet). Enter the settings that are described in the following table. Field Description Login Enter the login name that your ISP gave you. This login name is often an email address.
-
Page 34: Specify An Internet Connection That Uses A Login And Pppoa Service
Disable. NAT is disabled. Click the Apply button. Your settings are saved. Click the Test button to test your Internet connection. If the NETGEAR website does not display within one minute, see Troubleshoot the Internet Connection on page 104. Specify an Internet Connection That Uses a Login and PPPoA... - Page 35 N150 and N300 WiFi DSL Modem Routers In the Does your Internet connection require a login? section, make sure that the Yes radio button is selected (it is selected by default). From the Encapsulation menu, select PPPoA (PPP over ATM). Enter the settings that are described in the following table.
-
Page 36: Specify An Ipv6 Internet Connection
Disable. NAT is disabled. Click the Apply button. Your settings are saved. Click the Test button to test your Internet connection. If the NETGEAR website does not display within one minute, see Troubleshoot the Internet Connection on page 104. Specify an IPv6 Internet Connection If you want to use an IPv6 Internet connection, you must specify the settings manually. -
Page 37: Set Up An Ipv6 6To4 Tunnel Connection
N150 and N300 WiFi DSL Modem Routers • Fixed. For more information, see Set Up an IPv6 Fixed Connection on page 39. • DHCP. For more information, see Set Up an IPv6 DHCP Connection on page 41. • PPP over Ethernet. For more information, see Set Up an IPv6 PPPoE Connection page 43. - Page 38 N150 and N300 WiFi DSL Modem Routers Select ADVANCED > Advanced Setup > IPv6. The IPv6 screen displays. From the Internet Connection Type menu, select 6to4 Tunnel. The screen adjusts. The modem router automatically detects the information in the Router’s IPv6 Address On LAN field.
-
Page 39: Set Up An Ipv6 Pass-Through Connection
N150 and N300 WiFi DSL Modem Routers (Optional) Change the NAT filtering mode: • Secured. In secured mode, the modem router inspects both TCP and UDP packets. • Open. In open mode, the modem router inspects UDP packets only. This is the default mode. - Page 40 N150 and N300 WiFi DSL Modem Routers To set up a fixed IPv6 Internet connection: Launch an Internet browser from a computer or WiFi device that is connected to the network. Type http://www.routerlogin.net or http://www.routerlogin.com. A login screen displays. Enter the modem router user name and password.
-
Page 41: Set Up An Ipv6 Dhcp Connection
N150 and N300 WiFi DSL Modem Routers • Primary DNS Server. The primary DNS server that resolves IPv6 domain name records for the modem router. • Secondary DNS Server. The secondary DNS server that resolves IPv6 domain name records for the modem router. Note: If you do not specify the DNS servers, the modem router uses the DNS servers that are configured for the IPv4 Internet connection on the... - Page 42 N150 and N300 WiFi DSL Modem Routers Enter the modem router user name and password. The user name is admin. The default password is password. The user name and password are case-sensitive. Click the OK button. The BASIC Home screen displays. Select ADVANCED >...
-
Page 43: Set Up An Ipv6 Pppoe Connection
N150 and N300 WiFi DSL Modem Routers You can type the domain name of your IPv6 ISP. Do not enter the domain name for the IPv4 ISP here. For example, if your ISP’s mail server is mail.xxx.yyy.zzz, type xxx.yyy.zzz as the domain name. If your ISP provided a domain name, type it in this field. For example, Earthlink Cable might require a host name of home, and Comcast sometimes supplies a domain name. - Page 44 N150 and N300 WiFi DSL Modem Routers The BASIC Home screen displays. Select ADVANCED > Advanced Setup > IPv6. The IPv6 screen displays. From the Internet Connection Type menu, select PPPoE. The screen adjusts. The modem router automatically detects the information in the following fields: •...
-
Page 45: Manage The Mtu Size
“fragmented” to accommodate the device with the smallest MTU. The best MTU setting for NETGEAR equipment is often the default value. In some situations, changing the value fixes one problem but causes another. -
Page 46: Change The Mtu Size
Table 2. Common MTU sizes Application 1500 The largest Ethernet packet size. This setting is typical for connections that do not use PPPoE or VPN and is the default value for NETGEAR modem routers, adapters, and switches. 1492 Used in PPPoE environments. - Page 47 N150 and N300 WiFi DSL Modem Routers To change the MTU size: Launch an Internet browser from a computer or WiFi device that is connected to the network. Type http://www.routerlogin.net or http://www.routerlogin.com. A login screen displays. Enter the modem router user name and password. The user name is admin.
-
Page 48: Chapter 4 Manage The Wifi Network Settings
Manage the WiFi Network Settings This chapter describes how you can manage the WiFi network settings of the modem router. The chapter includes the following sections: • Manage the Basic WiFi Settings and WiFi Security • Manage the WiFi Radio •... -
Page 49: Manage The Basic Wifi Settings And Wifi Security
Bottom Panel Product Label on page 10). IMPORTANT: NETGEAR recommends that you do not change your preset security settings. If you do decide to change your preset security settings, make a note of the new settings and store the note in a safe place where you can easily find it. - Page 50 Label on page 10). Note: NETGEAR recommends that you do not change the default SSID. If you must change the SSID, enter a 32-character (maximum), case-sensitive name in this field. Region From the Region menu, select the region in which you use the modem router.
- Page 51 Note: If you use multiple WiFi access points (APs), reduce interference by selecting different channels for adjacent APs. NETGEAR recommends a channel spacing of four channels between adjacent APs (for example, use Channels 1 and 5, or 6 and 10).
- Page 52 Bottom Panel Product Label on page 10). NETGEAR recommends that you do not change the default passphrase. If you must change the passphrase, in the Passphrase field, enter a phrase of 8 to 63 characters. To join the modem router’s WiFi network, a user must enter this passphrase.
-
Page 53: Configure Wpa/Wpa2 Enterprise Wifi Security
N150 and N300 WiFi DSL Modem Routers Configure WPA/WPA2 Enterprise WiFi Security Remote Authentication Dial In User Service (RADIUS) is an enterprise-level method for centralized Authentication, Authorization, and Accounting (AAA) management. To provide WPA/WPA2 enterprise WiFi security, the WiFi network that the modem router provides must be able to access a RADIUS server. -
Page 54: Configure Wep Legacy Wifi Security
N150 and N300 WiFi DSL Modem Routers In the Security Options (WPA/WPA2 Enterprise) section, enter the settings that are described in the following table. Field Description WPA Mode From the WPA Mode menu, select the enterprise mode: • WPA2 [AES]. WPA2 provides a secure connection but some older WiFi devices do not detect WPA2 and support only WPA. - Page 55 N150 and N300 WiFi DSL Modem Routers Enter the user name and password for the modem router. The user name is admin. The default password is password. The user name and password are case-sensitive. Click the OK button. The BASIC Home screen displays. Select Wireless.
-
Page 56: Manage The Wifi Radio
N150 and N300 WiFi DSL Modem Routers From the Encryption Strength menu, select the encryption key size: • 64-bit. Standard WEP encryption, using 40/64-bit encryption. • 128-bit. Standard WEP encryption, using 104/128-bit encryption. This selection provides higher encryption security. Specify the active key by selecting the Key 1, Key 2, Key 3, or Key 4 radio button. Only one key can be the active key. - Page 57 N150 and N300 WiFi DSL Modem Routers To manage the WiFi radio: Launch an Internet browser from a computer or WiFi device that is connected to the network. Type http://www.routerlogin.net or http://www.routerlogin.com. A login screen displays. Enter the user name and password for the modem router. The user name is admin.
-
Page 58: Manage Advanced Wifi Features
N150 and N300 WiFi DSL Modem Routers Manage Advanced WiFi Features For most WiFi networks, the advanced WiFi features work fine and you do not need to change the settings. Note: If you want to change the modem router’s advanced WiFi features, use a wired connection to avoid being disconnected when the changes take effect. -
Page 59: Set Up The Modem Router As A Wireless Repeater
2347), and the preamble mode (the default is Long Preamble) are reserved for WiFi testing and advanced configuration only. Do not change these settings unless CTS/RTS Threshold directed by NETGEAR support or unless you are sure what the consequences are. (1-2347) Incorrect settings might disable the WiFi function of the modem router unexpectedly. - Page 60 N150 and N300 WiFi DSL Modem Routers Note: If you want to change the modem router’s WiFi settings, use a wired connection to avoid being disconnected when the new WiFi settings take effect. The following figure shows a wireless repeating scenario. WiFi router functioning Modem router as base station...
- Page 61 N150 and N300 WiFi DSL Modem Routers Select the Enable Wireless Repeating Function check box. Click the Check button. The modem router checks for available WiFi networks. The Wireless Repeating Function screen adjusts to show the detected WiFi networks. Select the radio button that corresponds to the WiFi network that must function as the uplink. The screen adjusts to show the security option for the selected WiFi network.
-
Page 62: Chapter 5 Manage The Wan And Lan Network Settings
Manage the WAN and LAN Network Settings This chapter describes how you can manage the WAN and LAN network settings of the modem router. The chapter includes the following sections: • Manage the ADSL Settings • Change the WAN Connection Preference and Second Ethernet Port •... -
Page 63: Manage The Adsl Settings
N150 and N300 WiFi DSL Modem Routers Manage the ADSL Settings NETGEAR recommends that you use the NETGEAR genie automatic setup utility to detect the DSL connection and automatically set up the modem router (see Set Up Your Modem Router for DSL Service on page 15). -
Page 64: Change The Wan Connection Preference And Second Ethernet Port
N150 and N300 WiFi DSL Modem Routers • ADSL2. Legacy version of ADSL2. • ADSL2+. ADSL2+ provides the fastest downstream rates and can interoperate with ADSL2 and ADSL (g.dmt). Click the upper Apply button. Your DSL mode changes are saved. From the Multiplexing Method menu, select LLC-based or VC-based, as indicated by your ISP. - Page 65 N150 and N300 WiFi DSL Modem Routers Select ADVANCED > Setup > WAN Setup. The WAN Setup screen displays. From the WAN Preference menu, select one of the following options: • Must use DSL WAN. The modem router uses the ADSL port for an Internet connection over DSL service and both Ethernet ports are available for LAN connections.
-
Page 66: Manage The Wan Security Settings
N150 and N300 WiFi DSL Modem Routers Manage the WAN Security Settings The WAN security settings include port scan protection and denial of service (DoS) protection, which can protect your LAN against attacks such as Syn flood, Smurf Attack, Ping of Death, and many others. -
Page 67: Manage Igmp Proxying And Vpn Pass-Through
N150 and N300 WiFi DSL Modem Routers To enable port scan and DoS protection, clear the Disable Port Scan and DoS Protection check box. Note: Enabling port scan and DoS protection might affect the performance of the modem router. To enable modem router to respond to a ping, select the Respond to Ping on Internet Port check box. -
Page 68: Manage Nat Filtering
N150 and N300 WiFi DSL Modem Routers To enable IGMP proxying, clear the Disable IGMP Proxying check box. By default, the Disable IGMP Proxying check box is selected and IGMP proxying is disabled. To disable VPN pass-through for one or more protocols, select the corresponding Disable radio buttons in the VPN Passthrough section. - Page 69 N150 and N300 WiFi DSL Modem Routers A login screen displays. Enter the user name and password for the modem router. The user name is admin. The default password is password. The user name and password are case-sensitive. Click the OK button. The BASIC Home screen displays.
-
Page 70: Manage The Application Level Gateway
N150 and N300 WiFi DSL Modem Routers Manage the Application Level Gateway The Application Level Gateways (ALGs) for the Session Initiation Protocol (SIP) and for the File Transfer Protocol (FTP) are enabled by default for enhanced address and port translation. However, some types of VoIP and video traffic might not work well when the SIP ALG is enabled, and some types of FTP transfers might not work well when the FTP ALG is enabled. -
Page 71: Manage The Modem Router's Lan Ip Address
N150 and N300 WiFi DSL Modem Routers To disable the SIP ALG, select the Disable SIP ALG check box. The SIP ALG is enabled by default. To disable the FTP ALG, select the Disable FTP ALG check box. The FTP ALG is enabled by default. Click the Apply button. -
Page 72: Change The Modem Router's Device Name
N150 and N300 WiFi DSL Modem Routers In the IP Address field, type the LAN IP address for the modem router. In the IP Subnet Mask, type the LAN subnet mask for the modem router. Click the Apply button. Your changes are saved. If you changed the LAN IP address of the modem router, you are disconnected when the changes take effect. -
Page 73: Manage The Dhcp Server Address Pool
N150 and N300 WiFi DSL Modem Routers Click the Apply button. Your change is saved. Manage the DHCP Server Address Pool By default, the modem router acts as a Dynamic Host Configuration Protocol (DHCP) server. The router assigns IP, DNS server, and default gateway addresses to all computers that are connected to its LAN and WiFi network. -
Page 74: Disable The Built-In Dhcp Server
N150 and N300 WiFi DSL Modem Routers Make sure that the Use Router as DHCP Server check box is selected. This check box is selected by default. Specify the range of IP addresses that the router assigns: a. In the Starting IP Address field, type the lowest number in the range. This IP address must be in the same subnet as the modem router. -
Page 75: Set Up And Manage Static Routes
N150 and N300 WiFi DSL Modem Routers The user name is admin. The default password is password. The user name and password are case-sensitive. Click the OK button. The BASIC Home screen displays. Select ADVANCED > Setup > LAN Setup. The LAN Setup screen displays. -
Page 76: Set Up A Static Route
N150 and N300 WiFi DSL Modem Routers Set Up a Static Route You can add a static route to a destination IP address and specify the subnet mask, gateway IP address, and metric. To set up a static route: Launch an Internet browser from a computer or WiFi device that is connected to the network. - Page 77 N150 and N300 WiFi DSL Modem Routers To prevent the route from becoming active after you click the Apply button, clear the Active check box. In some situations, you might want to set up a static route but keep it disabled until a later time.
-
Page 78: Change A Static Route
N150 and N300 WiFi DSL Modem Routers Change a Static Route You can change an existing static route. To change a static route: Launch an Internet browser from a computer or WiFi device that is connected to the network. Type http://www.routerlogin.net or http://www.routerlogin.com. -
Page 79: Manage Universal Plug And Play
UPnP devices on the network. If you use applications such as multiplayer gaming, peer-to-peer connections, or real-time communications such as instant messaging or remote assistance, NETGEAR recommends that you keep UPnP enabled, which is the default setting. - Page 80 N150 and N300 WiFi DSL Modem Routers The UPnP Portmap Table displays the IP address of each UPnP device that is accessing the modem router and which internal and external ports that device opened. The UPnP Portmap Table also displays what type of port (that is, the protocol that is associated with port) is open and whether that port is still active for each IP address.
-
Page 81: Chapter 6 Manage The Modem Router And Monitor The Traffic
Manage the Modem Router and Monitor the Traffic This chapter describes how you can manage the settings for administering and maintaining your modem router and monitor the network. The chapter includes the following sections: • Update the Firmware of the Modem Router •... -
Page 82: Update The Firmware Of The Modem Router
You can check to see if new firmware is available and update the modem router to the new firmware. You can also visit the NETGEAR support website, download the firmware manually, and update the modem router to the new firmware. -
Page 83: Manually Check For New Firmware And Update The Modem Router
To download new firmware manually and update your modem router: Visit downloadcenter.netgear.com, locate the support page for your product, and download the new firmware. Read the new firmware release notes to determine whether you must reconfigure the modem router after updating. - Page 84 N150 and N300 WiFi DSL Modem Routers The user name is admin. The default password is password. The user name and password are case-sensitive. Click the OK button. The BASIC Home screen displays. Select ADVANCED > Administration > Firmware Update. The Firmware Update screen displays.
-
Page 85: Manage The Configuration File Of The Modem Router
N150 and N300 WiFi DSL Modem Routers c. Enter the user name and password for the modem router. The user name is admin. The default password is password. The user name and password are case-sensitive. d. Click the OK button. The BASIC Home screen displays. -
Page 86: Restore The Settings
N150 and N300 WiFi DSL Modem Routers Click the Back Up button. Choose a location to store the file on your computer. The name of the backup file is NETGEAR_D500.cfg or NETGEAR_D500.cfg. Follow the directions of your browser to save the file. Restore the Settings If you backed up the configuration file, you can restore the configuration from this file. -
Page 87: Return The Modem Router To Its Factory Default Settings
N150 and N300 WiFi DSL Modem Routers The configuration is uploaded to the modem router. When the restoration is complete, the modem router reboots. This process takes about one minute. WARNING: To avoid the risk of corrupting the firmware, do not interrupt the restoration. -
Page 88: Erase The Settings
N150 and N300 WiFi DSL Modem Routers Using a straightened paper clip, press and hold the Reset button for eight seconds. Release the Reset button. The configuration is reset to factory default settings. When the reset is complete, the modem router reboots. This process takes about one minute. WARNING: To avoid the risk of corrupting the firmware, do not interrupt the reset. -
Page 89: View The Status And Statistics Of The Modem Router
N150 and N300 WiFi DSL Modem Routers Click the Erase button. The configuration is reset to factory default settings. When the reset is complete, the modem router reboots. This process takes about one minute. WARNING: To avoid the risk of corrupting the firmware, do not interrupt the reset. - Page 90 N150 and N300 WiFi DSL Modem Routers The user name is admin. The default password is password. The user name and password are case-sensitive. Click the OK button. The BASIC Home screen displays. Select ADVANCED > ADVANCED Home. The ADVANCED Home screen displays. The following table describes the fields of the four panes on the ADVANCED Home screen.
- Page 91 N150 and N300 WiFi DSL Modem Routers Field Description IP Address The IP address that the Ethernet LAN port uses. The default IP address is 192.168.0.1. DHCP Displays whether the DHCP server of the modem router is enabled for devices that are attached to the LAN.
-
Page 92: View The Traffic Statistics
N150 and N300 WiFi DSL Modem Routers Field Description Region The location (country). Channel The channel that the WiFi network of the modem router uses. Wireless AP Displays whether the WiFi radio of the modem router is enabled. If the radio is disabled, the WiFi LED on the front of the modem router is off. - Page 93 N150 and N300 WiFi DSL Modem Routers The following table describes the fields and columns of the Show Statistics pop-up screen. Field or Column Description System Up Time The time elapsed since the modem router was last restarted. Port The statistics for the LAN (Ethernet) ports, WLAN (WiFi) port, and WAN port (that is, the ADSL or Ethernet port that connects to the Internet).
-
Page 94: View Or Change A Pppoe Or Pppoa Internet Connection
N150 and N300 WiFi DSL Modem Routers View or Change a PPPoE or PPPoA Internet Connection You can view information about a PPPoE or PPPoA Internet connection of the modem router and establish or terminate such a connection. To view or change the PPPoE or PPPoA Internet connection status: Launch an Internet browser from a computer or WiFi device that is connected to the network. -
Page 95: View Or Change A Tcp/Ip Internet Connection
N150 and N300 WiFi DSL Modem Routers Field Description Negotiation The negotiation can be a series of dashes, which indicates that the connection is not established, or successful (Success). Authentication The authentication can be a series of dashes, which indicates that the connection is not established, or successful (Success). -
Page 96: View The Xdsl Line Status And Modem Statistics
N150 and N300 WiFi DSL Modem Routers The following table describes the fields of the Connection Status pop-up screen. Field Description IP Address The IP address that is assigned by the ISP to the modem router. Subnet Mask The subnet mask that is assigned by the ISP to the modem router. Default Gateway The IP address of the default gateway of the ISP that the modem router communicates with. - Page 97 In the Modem pane, click the Modem Statistics button. The xDSL Line Status pop-up screen displays. The information that is displayed on this screen is not described in this manual. This information is typically used by NETGEAR support. Manage the Modem Router and Monitor the Traffic...
-
Page 98: View Devices Currently On The Network
N150 and N300 WiFi DSL Modem Routers Click the Close Window button. The pop-up screen closes. View Devices Currently on the Network You can view the active wired and WiFi devices in both the network to which the modem router is connected and the modem router network. If you do not recognize a WiFi device, it might be an intruder. - Page 99 N150 and N300 WiFi DSL Modem Routers The following table describes the fields on the Attached Devices screen. Field Description The order in which the device joined the network. IP Address The IP address that the modem router assigned to the device when it joined the network. This number can change when a device is disconnected and rejoins the network.
-
Page 100: Chapter 7 Troubleshooting
Troubleshooting This chapter provides information to help you diagnose and solve problems you might experience with your modem router. If you do not find the solution here, check the NETGEAR support site at http://support.netgear.com for product and contact information. This chapter contains the following sections: •... -
Page 101: Quick Tips For Troubleshooting
N150 and N300 WiFi DSL Modem Routers Quick Tips for Troubleshooting The following table includes tips for troubleshooting some common problems. Table 3. Quick tips for troubleshooting Problem Possible Solution Your network is unresponsive Restart your network: or does not function normally. Turn off and unplug the DSL, cable, or fiber modem. -
Page 102: Troubleshoot With The Leds
• Check that you are using the 12 VDC 0.5A power adapter that NETGEAR supplied for this product. If the error persists, a hardware problem might exist. For recovery instructions or help with a hardware problem, contact technical support at www.netgear.com/support. -
Page 103: Lan Led Is Off
If you are attempting to set up your modem router as a replacement for an ADSL gateway in your network, the modem router cannot perform many gateway services. For example, the modem router cannot convert ADSL or cable data into Ethernet networking information. NETGEAR does not support such a configuration. Troubleshooting... -
Page 104: Troubleshoot The Internet Connection
N150 and N300 WiFi DSL Modem Routers Troubleshoot the Internet Connection If your modem router cannot access the Internet, check the DSL connection, then the WAN TCP/IP connection. Troubleshoot the DSL Link If your modem router is unable to access the Internet, first determine whether the DSL link with the service provider is working. -
Page 105: Internet Led Is Off
N150 and N300 WiFi DSL Modem Routers Internet LED Is Off If the Internet LED is off, the modem router cannot connect to the Internet. Verify the following: • Check that your login credentials are correct or that the information you entered for the ISP connection is correct (see Manually Set Up the Internet Connection on page 29). -
Page 106: Troubleshoot Pppoe Or Pppoa
N150 and N300 WiFi DSL Modem Routers • Your ISP might check for your computer’s host name. Assign the computer host name of your ISP account as the account name. For more information, see Manually Set Up the Internet Connection on page 29. -
Page 107: Troubleshoot Internet Browsing
N150 and N300 WiFi DSL Modem Routers A login screen displays. Enter the user name and password for the modem router. The user name is admin. The default password is password. The user name and password are case-sensitive. Click the OK button. The BASIC Home screen displays. -
Page 108: Changes Are Not Saved
N150 and N300 WiFi DSL Modem Routers Changes Are Not Saved If the modem router does not save the changes you make in the web management interface, do the following: • When entering configuration settings, always click the Apply button before moving to another screen or tab or your changes are lost. -
Page 109: Troubleshoot Your Network Using The Ping Utility
N150 and N300 WiFi DSL Modem Routers Troubleshoot Your Network Using the Ping Utility Most network devices and routers contain a ping utility that sends an echo request packet to the designated device. The device then responds with an echo reply. You can easily troubleshoot a network using the ping utility in your computer or workstation. -
Page 110: Test The Path From Your Computer To A Remote Device
N150 and N300 WiFi DSL Modem Routers Test the Path from Your Computer to a Remote Device After you verify that the LAN path works correctly, test the path from your computer to a remote device: From the Windows toolbar, click the Start button and select Run. In the field provided, type ping -n 10 IP address where IP address is the IP address of a remote device such as your ISP’s DNS server. -
Page 111: Appendix A Supplemental Information
Supplemental Information This appendix covers the following topics: • Factory Settings • Technical and Environmental Specifications... -
Page 112: Factory Settings
N150 and N300 WiFi DSL Modem Routers Factory Settings You can return the modem router to its factory default settings (see Return the Modem Router to Its Factory Default Settings on page 87). The following table shows the factory default settings. Table 4. -
Page 113: Technical And Environmental Specifications
N150 and N300 WiFi DSL Modem Routers Table 4. Factory default settings (continued) Feature Default Behavior WiFi WiFi radio Enabled SSID name See router label Security WPA2-PSK (AES) See router label Broadcast SSID Enabled Country/region Varies by region RF channel Auto Operating mode •... - Page 114 N150 and N300 WiFi DSL Modem Routers Table 5. Modem router specifications (continued) Feature Description Operating humidity 90% maximum relative humidity, noncondensing Electromagnetic emissions EN 55 022 (CISPR 22), Class B C-Tick N10947 10BASE-T or 100BASE-TX, RJ-45 10BASE-T or 100BASE-TX, RJ-45 WiFi Maximum WiFi signal rate complies with the IEEE 802.11 standard.