Cisco SPA 504g User Manual
Small business
Hide thumbs
Also See for SPA 504g:
- Quick start manual ,
- User manual (68 pages) ,
- Owner's manual (54 pages)
Table of Contents
Advertisement
Advertisement
Table of Contents

Related Manuals for Cisco SPA 504g


Summary of Contents for Cisco SPA 504g
- Page 1 Cisco Small Business Model SPA 504g User Guide Version 1...
-
Page 2: Table Of Contents
Getting Started ..................... 1 About This Document ........................1 Organization ..........................1 Overview of the Cisco Small Business IP Phones ................ 3 Understanding Your Phone Lines and Buttons ................4 Entering Numbers and Text in Fields ..................13 Installing Your Phone ................... 18 Before You Begin ........................ - Page 3 Picking Up a Call ......................... 39 Parking a Call ..........................39 Placing a Three-Way Conference Call ..................40 Using the Phone Directories ......................41 Using the Call History Lists ......................42 Setting or Changing a Phone Password ..................43 Accessing Voicemail ........................44 Using Advanced Phone Features ..............
-
Page 4: Getting Started
This guide describes the concepts and tasks necessary to use and configure your Cisco Small Business IP Phone. The Cisco Small Business IP Phone features vary, depending on the type of call control system that you are using and the customizations performed by your phone system administrator. This document describes using the Cisco Small Business IP Phones with a SIP phone system, such as a Broadsoft or Asterisk system. - Page 5 Appendix A Where to Go From Here Cisco provides a wide range of resources to help you obtain the full benefits of the Cisco SPA500 Series phones. This appendix provides links to many of these...
-
Page 6: Overview Of The Cisco Small Business Ip Phones
IP phone. Cisco Small Business IP phones require a separate power source. You can power the phones by connecting them to a switch that provides Power over Ethernet (PoE), or by using the optional a Cisco PA100 power adapter. -
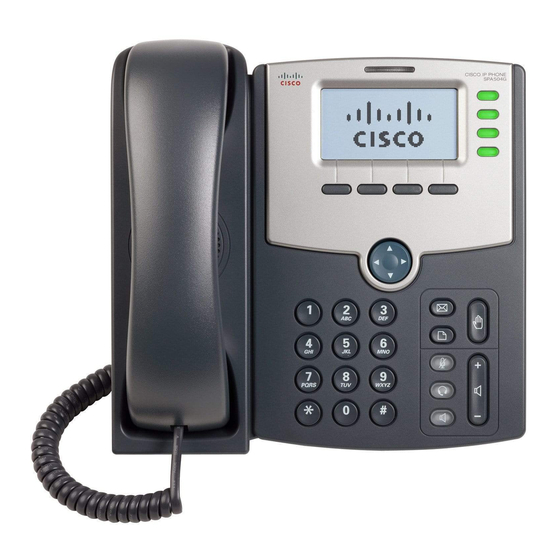
Page 7: Understanding Your Phone Lines And Buttons
Message Waiting Displays solid red when you have a new voice mail indicator message. Blinks red during an incoming call. IP phone screen Displays date and time, phone station name, line extensions, and softkey options (except on the Cisco SPA501G). - Page 8 Softkey buttons Press a softkey button to perform the action shown on IP phone screen the label on the Note: The Cisco SPA501G has the following four buttons: Redial—Dials the last number called. Cancel—Cancels an action (such as a transfer).
- Page 9 Hold button Press to place a call either on hold or to resume. NOTE SPA501 phone does not support this feature.
- Page 10 (such as call forwarding), and provide phone status information. For the Cisco SPA501G, press Setup to access the Interactive Voice Response (IVR) menu that allows you to perform tasks such as getting the IP address of the phone.
-
Page 11: Entering Numbers And Text In Fields
Entering Numbers and Text in Fields Some fields on the IP phones require you to enter numbers and text by using the keypad or softkey buttons. In general, the following guidelines apply: Use the keypad to enter numbers and characters, pressing the key multiple times to select the •... -
Page 12: Softkey Buttons
The softkey buttons on your phone display might vary depending on your phone model and the phone system setup. (Softkey buttons are not available on the Cisco SPA501G.) Press the Right Arrow or Left Arrow keys on the navigation button to view additional softkey buttons. - Page 13 -dnd Clears Do Not Disturb. edit Opens an item so that you can edit numbers or letters, or enable or disable a feature. grPick Allows you to answer a call ringing on an extension by discovering the number of the ringing extension. ignore Ignores an incoming call.
-
Page 14: Using Keypad Shortcuts
When using the phone menus, you can use the keypad to enter the number shown next to the menu or sub-menu item on the IP phone screen. (Not applicable to the Cisco SPA501G.) For example, to obtain your IP address on the Cisco SPA 504G, press the Setup button and dial 9. - Page 15 The IP address is displayed on the Network screen. NOTE Menus and options vary depending on phone model.
-
Page 16: Installing Your Phone
Do not plug a telephone line cord into the port marked AUX. The RJ-11 port marked AUX is reserved for connection with the Cisco Attendant Console. It is not for use as a telephone line port or IP device connection. -
Page 17: Connecting The Handset
Numbered objects in Figure 1 are described in the following table. Description Auxiliary port. (For use only with the Cisco Attendant Console.) Upper slots. Lower slots. PC port. Network (switch) port. Cable run. Handset port. Power port. (Use only with a Cisco PA100 power adapter.) -
Page 18: Installing The Desk Stand Or Wall Mount (Optional)
If you are attaching a Cisco SPA500S or SPA500DS attendant console, attach the console before attaching the desk stand. To mount the phone to the wall, you must use the MB100 wall mount bracket kit (available separately). -
Page 19: Connecting The Power
Connecting the Power The Cisco 500 Series IP phones do not ship with power supplies. If you are not using Power over Ethernet (PoE), you must order a Cisco PA100 power supply for each phone. -
Page 20: Connecting Your Phone To The Network
Connecting the Phone to the Wireless Network You can use a wireless device, such as a Cisco Wireless-N Bridge for Phone Adapters (WNBP), to connect the IP phone to a wireless network. This example procedure requires the Cisco PA100 power adapter to provide power to the Cisco WNBP. -
Page 21: Connecting A Pc To Your Phone
Connecting a PC to Your Phone A PC can be connected to the network through the phone. Cisco does not recommend connecting a PC to the phone if the phone is connected to the network wirelessly. To connect a PC to your phone:... -
Page 22: Verifying Phone Startup
Verifying Phone Startup After receiving power and network connectivity, the phone executes a boot-up sequence. During this sequence, phones with screens display the Cisco logo and then Initializing Network. All of the lights on the phone flash. After your phone is successfully connected to the network and receives a basic configuration, your phone line keys should glow green (on models with phone line keys). -
Page 23: Determining Your Current Firmware Version
Determining Your Current Firmware Version Cisco SPA504G STEP 1 Press the Setup button. STEP 2 Scroll to Product Info and press select. -
Page 24: Using Basic Call Management Functions
To adjust the ringer volume, press + on the Volume button to increase the volume, or press - to decrease the volume when the handset is on-hook and the speaker button is off. Press Save. (Not available for the Cisco SPA501G.) Using Mute To mute the handset, speaker, and headset microphones, press Mute. -
Page 25: Using The Headset With Your Ip Phone
Using the Headset with Your IP Phone Once you install the headset, use these steps to use your headset with the IP phone might vary. Consult the user documentation for your headset for more information. To use a wired headset, press Headset on your phone and dial the number to place a call, or press Headset to answer a ringing call. -
Page 26: Sending Audio To The Speaker And Handset
Sending Audio to the Speaker and Handset You can send the audio to the speaker while the handset is lifted (except on the Cisco SPA501G). The handset operates normally, but the speaker is muted. -
Page 27: Answering Or Placing A Call
• Press Headset. • Press an (optionally) configured blinking red line button. (Not applicable to the Cisco • SPA502G or Cisco SPA512G.) If you are on a call and another call comes in, press the flashing red line button or press Hold to place the call on hold and answer the incoming call. -
Page 28: Putting A Call On Hold
Resume softkey. (Not applicable to the Cisco SPA502G or Cisco SPA512G.) Placing a Call To place a call, pick up the receiver or press Speaker or Headset and dial the number. It might be necessary to dial a prefix number or numbers to reach an outside line. (Ask your phone administrator.) You can also redial a number or select a number from the call history. -
Page 29: Ending A Call
Ending a Call To end a call, do one of the following: If you are using the handset, hang up. • If you are using the speakerphone, press Speaker. • If you are using a headset, either press Headset (wired) or replace the handset (wireless). •... -
Page 30: Performing An Attended Transfer
Performing an Attended Transfer To perform an attended transfer for all phones (except the Cisco SPA501G): STEP 1 During an active call, press xfer. The call is placed on hold and a new line is opened to dial the number. -
Page 31: Transferring A Held Call To An Active Call
This is different from a conference call, because you no longer remain part of the call after the transfer. (Not available for the Cisco SPA501G.) With one active call and one or more calls on hold: Press the xfer softkey. -
Page 32: Managing Missed Calls
Managing Missed Calls When enabled, the IP phone screen on your IP phone notifies you if a call came in that was unanswered. (Not available for the Cisco SPA501G.) To view and return a missed call: If the IP phone screen shows a missed call, press the lcr softkey to return the missed call. -
Page 33: Forwarding Calls
You can forward all calls, forward calls when the phone is busy, or forward calls to a phone when there is no answer. For the Cisco SPA501G, you can only use the IP phone Web interface or Call Forward All Star Code set call forwarding. -
Page 34: Forwarding Calls When Your Phone Is Busy
Forwarding Calls When Your Phone is Busy You can forward all incoming calls to another number when your phone is busy. For example, forward calls to voice mail, another extension, or an outside line. If forwarding calls to an outside line, be sure to use any access and area codes required to complete the call. -
Page 35: Canceling Call Forwarding All
STEP 4 Press ok. STEP 5 Press save. Canceling Call Forwarding All This procedure only cancels the Call Forward All feature; it does not cancel Call Forward Busy or Call Forward No Answer. To stop Call Forwarding All, press the -cfwd softkey, or: STEP 1 Press the Setup button and select Call Forward >... -
Page 36: Setting Do Not Disturb
Do Not Disturb Softkey To activate Do Not Disturb, press the dnd softkey. The IP phone screen indicates that Do Not Disturb is turned on for your phone (except on the Cisco SPA501G). Do Not Disturb by using Setup To access Do Not Disturb: STEP 1 Press the Setup button and select Preferences >... -
Page 37: Setting Call Waiting
Disabling Do Not Disturb Do Not Disturb Softkey To deactivate Do Not Disturb, press the -dnd softkey. Do Not Disturb Deactivation by using Setup You can also deactivate Do Not Disturb by pressing the Setup button and selecting Preferences > Do Not Disturb. Setting Call Waiting Call waiting alerts you to an incoming call while you are on another call by ringing your phone and displaying a status message. -
Page 38: Picking Up A Call
Pick up a call that is ringing at an extension in your group by using the grPick softkey. (Not • available for the Cisco SPA501G.) Pick up a call that is ringing at specific extension using the pickup softkey. (Not available for •... -
Page 39: Placing A Three-Way Conference Call
Placing a Three-Way Conference Call You can start conference calls by: calling both numbers and pressing the conf softkey. • conferencing an active and held call using the confLX softkey • Three-way Conference Calling: To initiate a conference call: STEP 1 Press the conf softkey during an active call. -
Page 40: Using The Phone Directories
Using the Phone Directories Your IP phones provide several different types of phone directories, depending on the phone model and what the system administrator has set up for the company. (except on the Cisco SPA501G). The phones provide the following types of directories: A Personal directory that provides a place for you to store and view frequently dialed •... -
Page 41: Using The Call History Lists
You can also view the Call History Lists from your PC using the web configuration utility. You can only view call history lists for the Cisco SPA501G using the web configuration utility. To view or call a number on the Call History lists: STEP 1 Press the Setup button. -
Page 42: Setting Or Changing A Phone Password
To delete a number from the call history lists: STEP 1 In the Redial, Answered Calls, or Missed Calls list, choose the call. STEP 2 Press delete. STEP 3 Press OK. To save a call history number to your directory: STEP 1 In the Redial, Answered Calls, or Missed Calls list, choose the call. -
Page 43: Accessing Voicemail
Messages button automatically dials your voicemail system. If you need to change the number for your voicemail (for example, if your phone is not part of a Cisco Voice System and you have external voicemail), perform the following steps: STEP 1 Press the Setup button. -
Page 44: Using Advanced Phone Features
This chapter describes how to configure advanced features on your IP Phone. You can also configure many of these features by using your PC and the web configuration utility. For the Cisco SPA501G, configure these features by using the web configuration utility or the star codes (described below). -
Page 45: Enabling And Using Dial Assistance
If you enable dial assistance, when you place calls, the display shows phone numbers based on the best matched entries from the Directory and Call History lists. You can call a number on the matched entries list. (Not available for the Cisco SPA501G.) To enable dial assistance: STEP 1 Press the Setup button. -
Page 46: Creating Speed Dials
Each speed dial can be a phone number, IP address or URL. You can create and edit speed dials using your PC and the web configuration utility. NOTE For the Cisco SPA501G, create speed dials by using the web configuration utility. -
Page 47: Creating Speed Dials On Unused Line Buttons
After creating the speed dial, it displays next to the line button. Press the line button to use the speed dial. NOTE For the Cisco SPA501G, your phone administrator can use the web interface to create speed dials. This is an administrative function available from the Admin > Advanced Configuration pages. -
Page 48: Using Speed Dials
Using Speed Dials To call one of your configured speed dial numbers, either: Open a phone line and press the number on the phone keypad for the speed dial, then • press Dial. Press the Setup button, select Speed Dial, choose the number, and press Dial. •... -
Page 49: Monitoring And Accessing Another Phone
Monitoring and Accessing Another Phone Your system administrator can configure your phone so that you can monitor other phones on the network from your phone if the feature is available on your system. If this feature is configured, some line buttons on your phone are assigned to display the status of another user phone. For example, if your line 4 is configured to display Bob’s phone line, the button color shows you the status of that phone line: Green: Line is idle. -
Page 50: Customizing Your Ip Phone Screen
Customizing Your IP Phone Screen You can customize the appearance of the IP phone screen (except on the Cisco SPA501G). Changing the IP Phone Screen Contrast You can also change your IP phone screen contrast from your PC using the web configuration utility. -
Page 51: Configuring The Phone Screen Saver
always on • STEP 5 Press ok. STEP 6 Press save. Configuring the Phone Screen Saver You can enable your phone’s screen saver and specify its appearance and the amount of time for the phone to be idle before it begins. Some of these options can be configured from your PC using the web configuration utility. -
Page 52: Turning On The Screen Saver
STEP 4 Press save. To change your screen saver picture: STEP 1 In Screen Saver Mode, choose Screen Saver Icon and press edit. STEP 2 Press option multiple times to display the choices available until the one you want is displayed. -
Page 53: Using Ring Tones
Using Ring Tones Each extension of your phone can have a different ring tone. You can also create your own ring tones (except on the Cisco SPA501G). Changing Your Ring Tone To change a ring tone: STEP 1 Press the Setup button. -
Page 54: Configuring Date And Time
Configuring Date and Time Setting Your Phone’s Date and Time The date and time for your phone normally come from the SIP proxy server or NTP server. However, if you need to change some date and time parameters, you can follow these steps: STEP 1 Press the Setup button. -
Page 55: Advanced Procedures For Technical Support Personnel
You should not change these settings or perform these actions unless directed to do so by your phone administrator. To access advanced menus on the Cisco SPA502G, Cisco SPA504G, Cisco SPA508G, Cisco SPA509G, Cisco SPA512G, Cisco SPA514G, follow the procedures below. -
Page 56: Rebooting Your Phone
your system administrator). Rebooting Your Phone This setting is to configure and troubleshoot the network. You should not change this settings unless directed to by your phone administrator as this can negatively affect your phone’s function. To reboot your phone: STEP 1 Press the Setup button. -
Page 57: Using The Phone Web User Interface
The features of the Cisco SPA phones that can be modified by the user by using the web configuration utility are described in this chapter; however, not all features are available on all phones. -
Page 58: Saving The Configuration Profile
Call History—Calls received and made from your phone. • Personal Directory—Personal address book. • Attendant Console Status—Information about Cisco SPA500S or SPA500DS Attendant • Consoles, if installed. Saving the Configuration Profile Click Submit All Changes when you have finished modifying the fields in the web configuration utility to update the configuration profile. -
Page 59: Setting Voice System Parameters
Setting Voice System Parameters The voice system parameters control password protection for the phone configuration profile and the values used to identify the phone to the network. Typically a user should not modify these parameters. The table identifies and describes the parameters in the System tab. Parameter Description User Password... -
Page 60: Setting Voice Phone Parameters
Setting Voice Phone Parameters The voice phone parameters control the screen saver. The table identifies and describes the parameters in the Phone tab. Parameter Description Screen Saver Choose yes from the drop-down menu to enable the phone screen Enable saver. Choose no to disable the screen saver. Screen Saver Wait Enter the number of seconds that must elapse before the phone goes into screen saver mode. -
Page 61: Setting Voice User Parameters
Setting Voice User Parameters The voice User parameters control the phone user options, such as caller ID and speed dial numbers. The table identifies and describes the parameters in the User tab. Parameter Description Cfwd Setting Choose yes from the drop-down menu to enable call forwarding. Choose no to disable the feature. - Page 62 Block CID Setting Choose yes from the drop-down menu to block your caller ID from displaying on another phone. Choose no to disable the feature.
- Page 64 The IP phone screen indicates that Do Not Disturb is turned on for your phone. On the Cisco SPA501G, the Message Indicator Light blinks red when Do Not Disturb is enabled. If you have voice mail configured, incoming callers are immediately sent to voice mail.
- Page 65 Text Message Choose yes from the drop-down menu to enable text messaging from the phone. Choose no to disable the feature. Text Message Choose yes from the drop-down menu to enable receiving text from 3rd Party messaging from others on the phone. Choose no to disable the feature.
- Page 66 Parameter Description Alert Tone Off Choose yes from the drop-down menu to disable the alert tone sounded when a text message is received on the phone. Choose no to enable the alert tone. Ringer Volume Enter a volume between 1 and 10, with 1 being the lowest level. Speaker Volume Headset Volume Headset Volume...
-
Page 67: Viewing Call History Lists
Viewing Call History Lists To view Call History Lists: STEP 1 Log in to the web configuration utility. STEP 2 Click the Call History tab. A window appears with the call history lists for your phone. These include: Placed—Shows the last 100 numbers dialed from your phone. •... -
Page 68: Viewing Attendant Console Status
HW Version Hardware version of the attendant console. SW Version Firmware (software) version of the attendant console. Name assigned to each key (1-32) on the Cisco SPA5000S or key 1-30 on the Cisco SPA500DS. Name Name identifying the entry. Type Function (for example, speed dial) that is enabled for each key on the attendant console. - Page 69 Subscribed Subscription status of the unit/key. The value can be Yes, Fail, or N/A. N/A indicates that the feature/function (fnc) of that line does not require a subscription (such as speed dial).
-
Page 70: Where To Go From Here
Where to Go From Here Cisco provides a wide range of resources to help you obtain the full benefits of the Cisco Small Business IP phone. Product Resources Support Cisco Small Business Support www.cisco.com/go/smallbizsupport Community Online Technical Support and www.cisco.com/support... - Page 71 Cisco Unified Communications www.cisco.com/en/US/products/ps7293/ 500 Series for Small Business tsd_products_support_series_home.html...
- Page 72 Regulatory Compliance and http://www.cisco.com/en/US/docs/ Safety Information for the Cisco voice_ip_comm/csbpipp/ip_phones/ SPA300 Series and Cisco regulatory_compliance/guide/ rcsi_500_series.pdf SPA500 Series IP Phones Cisco Small Business Cisco Partner Central for Small www.cisco.com/web/partners/sell/smb Business (Partner Login Required) Cisco Small Business Home www.cisco.com/smb Marketplace www.cisco.com/go/marketplace...
- Page 73 List of Documents See the following documents (available at the URLs listed above) for more information about your product. Cisco Small Business SPA50X and SPA51X IP Phone Quick Start Guide— Installation and • initial configuration of your Cisco IP phone.
- Page 74 Cisco and the Cisco logo are trademarks or registered trademarks of Cisco and/or its affiliates in the U.S. and other countries. To view a list of Cisco www.cisco.com/go/trademarks trademarks, go to this URL: . Third-party trademarks mentioned are the property of their respective owners.