Cisco SPA 504G Quick Start Manual
Small business ip phone
Hide thumbs
Also See for SPA 504G:
- Quick start manual ,
- User manual (74 pages) ,
- Owner's manual (54 pages)
Advertisement
Quick Links
QUICK START GUIDE
Cisco Model SPA 504G Quick Start Guide
Welcome
Thank you for choosing the Cisco Small Business IP phone. This guide describes how to install your phone and how to perform some
basic tasks.
1
Installing Your IP Phone
Use this procedure to install the phone and connect it to your network.
Do not insert a telephone line cord into the port marked "AUX".
Step 1. Turn the phone body over to expose the ports on the back of
the unit.
Step 2. Insert one end of the phone cord into the slot marked with a
phone symbol (the Handset Port). Insert the other end into
the jack at the bottom of the handset (not shown).
Step 3. (Optional) Connect the desk stand by lining up the tabs on
the desk stand with the slots on the back of the phone. Slide
the bottom tabs into the slots and lightly press down on the
top of the desk stand. It should easily slide into the top slots.
Do not force.
Step 4. If you are using an external power source, plug one end of the power cord into the building's power outlet and insert the other end of
the power cord into the phone base.
Step 5. Connect your phone to the network using an Ethernet Connection. Insert one end of the Ethernet cable into the network port on the
phone body marked "SW." Insert the other end of the Ethernet cable into the appropriate device, such as a network switch, on your
network.
Step 6. (Optional) To provide network access to a PC, connect one end of an additional Ethernet cable (not provided) to the PC port on the
back of the phone body. Connect the other end of the Ethernet cable to the network port on your PC.
Step 7. (Optional) To install the phone on a vertical surface, use the Cisco MB100 Wall Mount bracket. See the Cisco Small Business IP Phone
SPA 50X User Guide (SIP) or the Cisco Unified Communications Manager Express for the Cisco Small Business IP Phone SPA 50X
documents on
www.cisco.com
on www.cisco.com.
1
for more information. The Where to Go From Here section contains links to the documentation area
Advertisement

Related Manuals for Cisco SPA 504G


Summary of Contents for Cisco SPA 504G
- Page 1 Connect the other end of the Ethernet cable to the network port on your PC. Step 7. (Optional) To install the phone on a vertical surface, use the Cisco MB100 Wall Mount bracket. See the Cisco Small Business IP Phone...
-
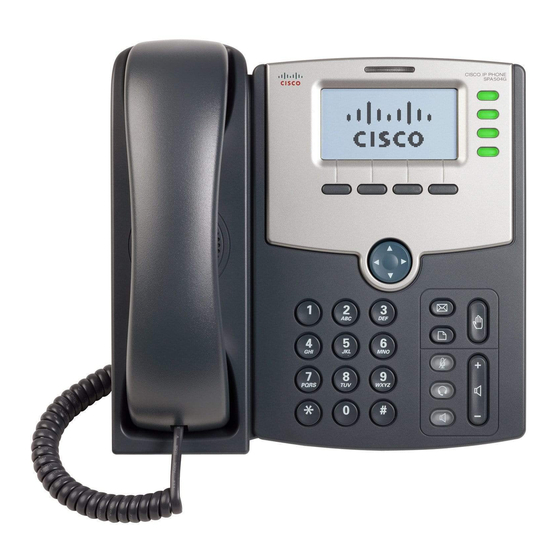
Page 2: Phone Lines And Buttons
QUICK START GUIDE Cisco SPA 504G Phone Lines and Buttons Numbered objects in the photo are explained in the following table. Phone Feature Description Handset Pick up to place or answer a call. Message Waiting When lit red, you have a new voice mail message. When lit flashing red, you have an incoming call or the Indicator phone’s firmware is being updated. -
Page 3: Softkey Buttons
QUICK START GUIDE Cisco SPA 504G Phone Feature Description Setup button Press to access a menu to configure features and preferences (such as your directory and speed dials), access your call history and set up functions (such as call forwarding). -
Page 4: Using Your Ip Phone
QUICK START GUIDE Cisco SPA 504G Phone Feature Description Returns the last missed call by dialing the number that called you. missed calls Shows the Missed Calls list. more Displays other softkey buttons that are available. record Records the call in progress. -
Page 5: Using Keypad Shortcuts
QUICK START GUIDE Cisco SPA 504G Using Keypad Shortcuts When using the phone menus, you can use the keypad to enter the number shown next to the menu or sub-menu item on the LCD screen. For example, to obtain your IP address, press the Setup button and dial 9.