Advertisement
Quick Links
Advertisement

Related Manuals for Draytek VIGORAP 810


Summary of Contents for Draytek VIGORAP 810
- Page 2 Product: VigorAP 810 DrayTek Corp. declares that VigorAP 810 is in compliance with the following essential requirements and other relevant provisions of R&TTE Directive 1999/5/EEC. The product conforms to the requirements of Electro-Magnetic Compatibility (EMC) Directive 2004/108/EC by complying with the requirements set forth in EN55022/Class B and EN55024/Class B.
-
Page 3: Package Content
Package Content Quick Start Guide RJ-45 Cable (Ethernet) Antenna The type of the power adapter depends on the country that the router will be installed: UK-type power adapter EU-type power adapter USA/Taiwan-type power adapter AU/NZ-type Power Adapter... -
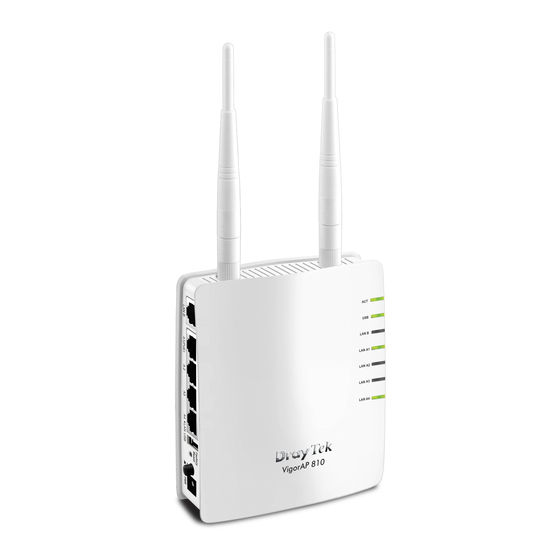
Page 4: Descriptions Of Components
Descriptions of Components Status Explanation The system is not ready or is failed. Blinking The system is ready and can work normally. A USB device is connected and active. Blinking The data is transmitting. LAN B A normal connection is through its corresponding port. - Page 5 client to connect with it. Connector for a printer. Interface Description LAN B Connecter for xDSL / Cable modem or router. LAN A1 Connecter for xDSL / Cable modem or router. (PoE) - A4 Restore the default settings. Usage: Turn on the router.
-
Page 6: Installing Your Router
1. Connect VigorAP 810 to ADSL modem, router, or switch/hub in your network through the LAN A port of the access point by Ethernet cable. Note: You can also connect VigorAP 810 to a Vigor router via wireless connection. For detailed information, refer to VigorAP 810 User’s Guide. - Page 7 Configuring Web Pages The Operation Mode is designed for you to easily set up your router for Internet access. Note: Such VigorAP is treated as DHCP client. So, if it is connected as the figure on the previous page, the default IP will be changed and assigned by the DHCP server of Vigor router.
- Page 8 4. The first page is set for 2.4G wireless connection. There are several operation modes for you to choose. Simply click any one of modes. In this example, choose AP and click Next. 5. For the SSID configuration, choose the mode you want and type related information for client authentication.
- Page 9 6. In the next page, click Finish. The system will make a connection automatically. Open Online Status to see the result of network connection. Now, VigorAP 810 is ready for any station to connect for accessing Internet. Contacting Your Dealer If the router still cannot work correctly after trying many efforts, please contact your dealer for further help right away.