
Related Manuals for microHAM ARCO


Summary of Contents for microHAM ARCO
- Page 1 © 2021 All rights reserved ARCO Smart Antenna Rotator Controller microHAM www.microham.com microHAM s.r.o. Maticna 28 92401 Galanta Slovakia tel. +421 2 45945100 Preliminary 2021...
-
Page 2: Table Of Contents
7 - PACKAGE CONTENTS ......................27 8 - WARRANTY ..........................27 DECLARATION OF CONFORMITY ....................28 APPENDIX A – ARCO CONNECTORS ...................29 APPENDIX B – ROTATOR SETTINGS & CONNECTIONS .............30 APPENDIX C – CUSTOM ROTATOR SETTINGS & CONNECTIONS ..........39 APPENDIX D – LINE INPUT 115/230 VAC SWITCHING ..............43... - Page 3 © 2021 All rights reserved IMPORTANT PRECAUTIONS Before using the device, check the voltage rating of your local AC mains supply system and compare to the label located at the rear panel near LINE socket describing the device LINE input setup.
-
Page 4: Device Description
Unique feature of ARCO is a direct control of rotators connected to another ARCO controllers, located either on the same LINK bus or anywhere in the world using Internet connection. -
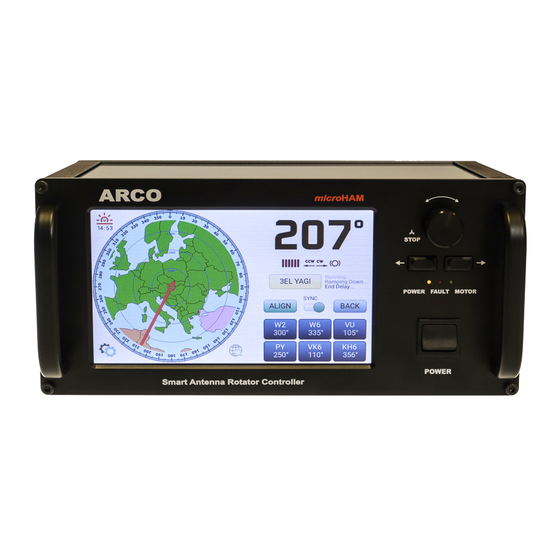
Page 5: Panel Description
ARCO goes to the power down mode, in order to minimize possible damage by high static or nearby lightning during storms. -
Page 6: Rear Panel
Power line input. IEC C14 socket. 2. FUSE Power line fuse, 5x20mm T type. 3. LINK Bus port for linking multiple ARCO controllers together. 3.5mm (1/8”) stereo jack. 4. SERIAL RS-232 serial port for legacy computer control. DB9 female socket. 5. LAN Ethernet port, for control over internet. -
Page 7: Setup
YAESU rotators. Corresponding pins on both connectors are internally wired in parallel. At first step, DO NOT connect any rotator cables to the ARCO. Make sure the front panel power switch is off, you should see O sign on its top side. On rear panel verify that the mains voltage setup label next to the mains FUSE (2) shows the same voltage as is your local mains distribution. -
Page 8: Rotator Preset
As you cut wires of the cable, one by one, and connect their rotator end to the male terminal block for ARCO, simply connect the other end of the cut wire to the respective terminal of the female terminal block. In this way, whenever desired, the original connection can be simply restored by plugging in the cable into the stub on the original controller, ending with the newly installed female terminal block. -
Page 9: Rotator Center
(mechanically, DO NOT TURN ROTATOR BY THE ARCO) to the North or to the South or to any other desired antenna rotation center, and firmly tight all clamps. Antenna positioning does not need to be super accurate as caused error will only influence position of CW and CCW limits. -
Page 10: Calibration
Calibrate antenna heading. • ARCO needs at least one calibration point to show antenna heading and it can be entered by accurate aiming antenna to the known specific direction and than register this direction as a calibration point by touching appropriate calibration button. ARCO provides several ways of entering a calibration point. - Page 11 (Total Rotation / 72) degrees, what is 5º for rotators with 360º rotation range. If new calibration point is within +/- 5º from old, ARCO will delete old, and use new point instead. Position of calibration points are shown on calibration strip as small yellow vertical lines.
-
Page 12: User Interface
Point and Shot knob dialing in required heading, instantly by CCW ← and CW → buttons on front panel, by numeric keypad attached to the USB A (FW) port on ARCO, and by computer, either thru the RS-232, USB or Ethernet port. - Page 13 USB device, e.g. embedding an USB HUB, and these may not work with ARCO. Simple and cheap USB keypads work well.
-
Page 14: Settings Menu
Settings proper location is important for various calculation, greyline and sun position, and calibration. DISTANCE UNITS: Sets ARCO to use kilometers (km) or miles (mil) as a distance units. TIME: UTC Time in the HH:MM:SS format DATE: UTC Date in the DD:MM:YYYY format. Accurate time and date is necessary for various calculations, same as rotator location. -
Page 15: Appearance
© 2021 All rights reserved Appearance Appearance tab serves to define look of the main screen for four different presets – Zooms. Appearance - Global DISPLAY BRIGHTNESS (DAY): Sets display brightness level used during the day time. DISPLAY BRIGHTNESS (NIGHT): Sets display brightness level used during the night. -
Page 16: Rotator - Settings
AC: 3 leads (1 phase) AC motor with an external start/run capacitor (capacitor is not • used with ARCO). These motors are used in old Yaesu, Hy-Gain and Alliance rotators. AC+CAP: 3 leads (1 phase) AC motor with internal start/run capacitor build in the rotator. - Page 17 If you are moving to a specific direction, rotator may overshot targets. That's normal, ARCO will use overshot value for next more accurate stop on target. Status of “learning” process is indicated by OK sign next to READY CCW and CW marks.
-
Page 18: Rotator - Link
ID numbers setting up identification, assignment to the towers and synchronization groups. If you have only one ARCO controller or not going to link them, you can skip this chapter. LINK is an unique ARCO feature using two wire CAN bus allowing ARCO to digitally communicate to another ARCOs present on a bus and exchange data. - Page 19 COUNTER TO ROTATOR ID: Enables counter rotation to the specified ARCO controller present on the LINK bus. This is a special setting for the ARCO controlled rotator which is installed over another rotator or on a rotating tower also controlled by own ARCO controller.
-
Page 20: Heading
Heading tab is only place on ARCO where ramps are disabled even if they are enabled on Rotator tab. To avoid stress on the rotator and tower, use only necessary power to turn the rotator, default setting is set to 50%. -
Page 21: Lan
CONTROL PROTOCOL: Enables and defines type of the control protocol and TCP port number used for ARCO control over the LAN. It also shows number of active connections. ARCO allows max. four (4) parallel LAN connections. ARCO supports Yaesu, DCU-1/Rotor EZ and SPID HR... -
Page 22: Internet Remote Control
This feature is designed solely for smart control over the Internet, when one ARCO plays a SERVER role, (remotely located controller connected to the rotator) and second plays a CLIENT role (at operator place), connecting ARCO which is set as a SERVER. -
Page 23: System
ARCO first downloads update to its internal flash memory and if download passes without any integrity check errors, update procedure starts automatically. During update display is blank, various leds blink or lit, just wait until update finishes and ARCO boots to its main screen, it takes a while, up to one minute. -
Page 24: Usb Firmware Update
4. Remove the USB FLASH drive from ARCO and continue operating. If the update process fails the POWER, FAULT and MOTOR leds will indicate the possible cause of failure: MOTOR and POWER leds flash – arco.upd file not found in the root directory of USB • FLASH drive. -
Page 25: Usb Serial Port
“COM(x)”, on macOS “usbmodem(xxxxx)” where x stands for the port number. If is desired to use different COM port number for ARCO than was automatically assigned by Windows, it can be changed it in the Device Manager by double-click on ARCO COM port under Ports folder, Port Settings, Advanced button. -
Page 26: Hardware Specifications
© 2021 All rights reserved 6 - HARDWARE SPECIFICATIONS POWER INPUT INPUT POWER 500 VA max. IEC 60320, C14 (E) socket, filtered LINE VOLTAGE 90-130 VAC / 215-245 VAC, internally switchable FREQUENCY 50/60 Hz FUSE 5x20 mm, T, 3.15 A/250 V for 230 VAC INPUT, 6.3 A/250 V for 115 VAC INPUT... -
Page 27: Package Contents
SLOVAKIA 8 - WARRANTY microHAM warrants this product for two (2) years. The product must not be modified in any way or the warranty is voided. What is covered: During the warranty, microHAM, s.r.o., will repair or replace defective product at their sole discretion. -
Page 28: Declaration Of Conformity
DECLARATION OF CONFORMITY European Union Declaration of Conformity We, microHAM s.r.o., Matičná 28, 92401 Galanta, Slovakia, declare under our sole responsibility for the equipment name ARCO, model ARCO-2, serial number 0001 and higher that the equipment is in conformity with the following relevant Union... -
Page 29: Appendix A - Arco Connectors
© 2021 All rights reserved APPENDIX A – ARCO CONNECTORS ROTATOR (9), 10 pin terminal block + ROTATOR (10), 6 pin (2x3) receptacle NAME TYPE 10 PIN 6 PIN DESCRIPTION SENSOR LO ANALOG GND SENSOR C INPUT ANALOG/DIGITAL SENSE INPUT, max. 9 V... -
Page 30: Appendix B - Rotator Settings & Connections
© 2021 All rights reserved APPENDIX B – ROTATOR SETTINGS & CONNECTIONS BRAND: Yaesu TYPE: G-650C, G-800(any), G-1000(any), G-2700(any), G-2800(any), G-5500DC (AZ part) Factory cable connects rectangular ROTATOR (10) connector Rotator tab settings: Rotator connection to 10 pin ROTATOR (9) terminal:... - Page 31 © 2021 All rights reserved BRAND: Yaesu TYPE: G-400RC Rotator tab settings: Rotator connection to 10 pin ROTATOR (9) terminal: PARAMETER VALUE ROTATOR ARCO SENSOR RHEO 500 Ω WIRE NAME MOTOR WIPER SENSOR HI POWER 24 V POT LO...
- Page 32 © 2021 All rights reserved BRAND: Yaesu TYPE: G-650A Factory cable connects rectangular ROTATOR (10) connector Rotator tab settings: Rotator connection to 10 pin ROTATOR (9) terminal: PARAMETER VALUE ROTATOR ARCO SENSOR POT 500 Ω WIRE NAME MOTOR AC+CAP...
- Page 33 © 2021 All rights reserved BRAND: Yaesu TYPE: G-600RC Rotator tab settings: Rotator connection to 10 pin ROTATOR (9) terminal: PARAMETER VALUE ROTATOR ARCO SENSOR RHEO 500 Ω WIRE NAME MOTOR WIPER SENSOR HI POWER 24 V POT LO...
- Page 34 © 2021 All rights reserved BRAND: Create TYPE: RC5x Rotator connection to 10 pin ROTATOR (9) terminal: Rotator tab settings: ROTATOR ARCO WIRE NAME PARAMETER VALUE MOTOR D + LSW CCW 5 + 8 SENSOR POT 1 kΩ or 5 kΩ...
- Page 35 © 2021 All rights reserved BRAND: Daiwa TYPE: MR-300E, 750E/PE Rotator tab settings: Rotator connection: PARAMETER VALUE ROTATOR ARCO SENSOR POT 500 Ω WIRE NAME MOTOR AC+CAP POT HI SENSOR HI POWER 24 V WIPER SENSOR C BRAKE YES*...
- Page 36 © 2021 All rights reserved BRAND: Prosistel TYPE: D series PST-71, PST-110 Rotator tab settings: Rotator connection: PARAMETER VALUE ROTATOR ARCO SENSOR M-TURN POT 10 kΩ WIRE NAME MOTOR DC (reversible) MOTOR A + B 6 + 7 POWER...
- Page 37 © 2021 All rights reserved BRAND: Spid TYPE: RAK/HR, BIG-RAK/HR, RAS/HR, BIG RAS/HR (AZ part), Hall quadrature encoder Rotator tab settings: EL part of RAS Rotator tab settings: AZ PARAMETER VALUE PARAMETER VALUE SENSORD-QUAD D-QUAD SENSOR D-QUAD P/360º 2880 P/360º...
- Page 38 © 2021 All rights reserved BRAND: Alliance TYPE: HD-73 Rotator tab settings: Rotator connection to 10 pin ROTATOR (9) terminal: PARAMETER VALUE ROTATOR ARCO SENSOR POT 75 Ω WIRE NAME MOTOR MOTOR A POWER 24 V WIPER SENSOR C...
-
Page 39: Appendix C - Custom Rotator Settings & Connections
© 2021 All rights reserved APPENDIX C – CUSTOM ROTATOR SETTINGS & CONNECTIONS MOTOR and SENSOR CONNECTIONS MOTOR: AC or AC+CAP Wiring for all 3 leads (2 phase) AC motors. If rotator has no brake solenoid, keep MOTOR B pin... - Page 40 ROTATOR PORT NAME PIN NUMBER MOTOR A MOTOR C ENABLE MOTOR B MOTOR D NEG COM If inverter has no build in ramps, ARCO can provide industrial 0-10V output at D-SENSOR connector. INVERTER INPUT D-SENSOR PORT NAME PIN NUMBER RAMP RAMP OUT...
- Page 41 © 2021 All rights reserved SENSOR: POT Wiring for three wires pot with CENTER, LOW (left) and HIGH (right) leads. Resistance between LOW and CENTER leads should decrease towards CCW limit. POTENTIOMETER ROTATOR PORT NAME PIN NUMBER LOW side...
- Page 42 © 2021 All rights reserved SENSOR: DIGITAL ENCODER Wiring for differential quadrature encoder, connects D-SENSOR connector DIGITAL ENCODER D-SENSOR PORT NAME PIN NUMBER POWER + +12 V OUT LINE REF If encoder has single ended push-pull outputs, connect them to XB, YB ports keeping XA, •...
-
Page 43: Appendix D - Line Input 115/230 Vac Switching
Fuse specification is: 5x20 mm, T, 0.5 A 250 V For real time clock backup ARCO uses an internal CR2032 battery. Battery is not charged, and is connected only to the micro-controller dedicated battery pin. Battery capacity should last for very long time and normally doesn't need to be replaced.