Table of Contents
Advertisement
Quick Links
Advertisement
Table of Contents

Related Manuals for AEG AWUS018B7B


Summary of Contents for AEG AWUS018B7B
- Page 1 AWUS018B7B User Manual Wine Cabinet USER MANUAL...
-
Page 2: Table Of Contents
13. ENVIRONMENTAL CONCERNS..............17 FOR PERFECT RESULTS Thank you for choosing this AEG product. We have created it to give you impeccable performance for many years, with innovative technologies that help make life simpler – features you might not find on ordinary appliances. Please spend a few minutes reading to get the very best from it. - Page 3 ENGLISH of incorrect installation or usage. Always keep the instructions in a safe and accessible location for future reference. 1.1 Children and vulnerable people safety This appliance can be used by children aged from 8 • years and above and persons with reduced physical, sensory or mental capabilities or lack of experience and knowledge if they have been given supervision or instruction concerning the use of the appliance in a...
-
Page 4: Safety Instructions
WARNING: Do not use mechanical devices or other • means to accelerate the defrosting process, other than those recommended by the manufacturer. WARNING: Do not damage the refrigerant circuit. • WARNING: Do not use electrical appliances inside the •... - Page 5 ENGLISH 2.2 Electrical connection • Do not change the specification of this appliance. WARNING! • Any use of the built-in product as free- Risk of fire and electric standing is strictly prohibited. shock. • Do not put electrical appliances (e.g. ice cream makers) in the appliance WARNING! unless they are stated applicable by...
-
Page 6: Installation
• Disconnect the appliance from the appliance. mains supply. • Cut off the mains cable and discard it. 2.6 Service • Remove the door to prevent children and pets to be closed inside of the •... - Page 7 ENGLISH If you have any doubts Overall dimensions ¹ regarding where to install the appliance, please turn to the vendor, to our customer service or to the nearest ¹ the height, width and depth of the Authorised Service Centre. appliance without the handle It must be possible to Space required in use ²...
-
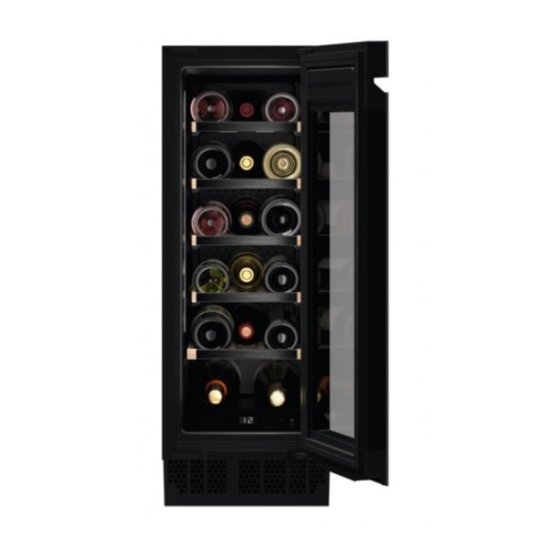
Page 8: Product Description
4. PRODUCT DESCRIPTION 4.1 Product overview Control panel Triple-glazed glass door Shelf Handle Foot Gasket Decorative frame 5. OPERATION WARNING! Do not spill any liquids on the control panel. This may damage the equipment and increase the risk of electric shock. - Page 9 ENGLISH 5.2 Display A. Temperature indicator 5.3 Switching on and off By default, the temperature digits show the current To switch on the appliance: temperature. When you tap 1. Insert the plug into the wall socket. once or start selecting a new 2.
- Page 10 • 2A door open - lights on at the highest The Child Lock mode dimming level, door closed - lights on deactivates after electricity at the selected dimming level, interruption or unplugging • 3A door open and closed - lights on at the appliance.
-
Page 11: Daily Use
ENGLISH The alarm activates when the • If the temperature is still too high or compartment's temperature is 5°C higher too low, the alarm activates again than the set temperature for more than after 60 minutes. 60 minutes. The alarm does not activate During the alarm: within the first 90 minutes after switching on the... - Page 12 Storage levels for 18 bottles Installing shelves To put the shelf back into its initial position: 1. Push the rails on both sides into the appliance until they stop. 6.2 Removing and installing shelves Removing shelves The bottom part of the shelf is equipped with a pair of guides in the middle and a pair of hooks in the back.
-
Page 13: Hints And Tips
ENGLISH 6. Push the shelf back into the CAUTION! appliance. Before placing any wine bottles on the shelves, make sure they are properly hooked. Use the wooden shelves only to store bottles. 7. HINTS AND TIPS 7.1 Hints for energy saving •... -
Page 14: Troubleshooting
8.4 Cleaning the drain Refer to the "Removing and Periodically clean the drain hole to installing shelves" chapter prevent water from overflowing and for instructions on how to dripping onto the stored bottles. The remove and install the drain hole is located in the lower left part shelves. - Page 15 ENGLISH Problem Possible cause Solution The circuit breaker tripped Turn on the circuit breaker or or a blown fuse. change the fuse. The compressor operates Temperature is set incor‐ Refer to the "Operation" chap‐ continually. rectly. ter. The room temperature is Refer to the "Installation"...
-
Page 16: Noises
9.3 Closing the door If the advice does not lead to the desired result, call the 1. Clean the door gaskets. nearest Authorised Service 2. If necessary, adjust the door. Refer Centre. to the "Installation" chapter. 3. If necessary, replace the defective 9.2 Replacing the lamp... -
Page 17: Information For Test Institutes
ENGLISH 12. INFORMATION FOR TEST INSTITUTES Installation and preparation of the clearances shall be as stated in this User appliance for any EcoDesign verification Manual at Chapter 3. Please contact the shall be compliant with EN 62552. manufacturer for any other further Ventilation requirements, recess information, including loading plans. - Page 20 www.aeg.com/shop...