Table of Contents
Advertisement
Quick Links
Advertisement
Table of Contents
Troubleshooting

Related Manuals for GE Corometrics 126


Summary of Contents for GE Corometrics 126
- Page 1 Corometrics 120 Series V3.5 ® SERVICE MANUAL MANUAL P/N 2015590-001 REV. B...
- Page 3 Corometrics 120 Series V3.5 ® SERVICE MANUAL MANUAL P/N 2015590-001 REV. B...
- Page 4 All equipment sold by GE Medical Systems Information Technologies, is fully guaranteed as to materials and workmanship for a period of 1 year. GE reserves the right to perform guarantee service operations in its own factory, at an authorized repair station, or in the customer’s installation.
- Page 5 CE MARKING INFORMATION 0459 Compliance This monitor bears the CE Mark indicating its conformity with the provisions of the Council Directive 93/42/EEC concerning medical devices. Components of the The IEC electromagnetic compatibility (EN) standards require individual equipment (components and accessories) to be configured Certified Systems as a system for evaluation.
- Page 6 CE MARKING INFORMATION 0459 For Your Notes ii •...
-
Page 7: Table Of Contents
Contents Safety ......... 1-1 General Information . - Page 8 Controls, Indicators, and Connectors ....3-1 Front Panel Description ..........3-2 Front Panel Displays .
- Page 9 Functional Overview ..........4-24 DSP Section .
- Page 10 Fetal Movement Filters ........4-51 UA/FECG Board .
- Page 11 FECG Setup Screen ..........5-8 Volume .
- Page 12 FSpO2 Setup Screen ..........5-19 Response Time .
- Page 13 VS Print Interval ..........5-30 Recorder Font Size .
- Page 14 NBP Test ............6-35 Preventative Maintenance Inspection Report .
- Page 15 Calibration for Cat. No. (REF) 2264 AAX/BAX/CAX/DAX/EAX/FAX ..7-26 Reassembly ..........7-27 Testing the Tocotransducer .
- Page 16 Cleaning the UA Strain Gauge ........9-4 Cleaning the Maternal NBP Cuffs and Hoses .
- Page 17 Thermal Printhead ..........10-8 Removing the Printhead .
- Page 18 Modes ..........11-11 Annotations .
- Page 19 Installation ........... . . 12-28 Software Version 3.5 .
- Page 20 Maternal Pulse Oximetry Troubleshooting ......15-12 Factory Defaults ....... . .A-1 Table of Defaults .
-
Page 21: Safety
Chapter 1 Safety The information presented in this section is important for the safety of both the patient and operator. This chapter describes how the terms Danger, Warning, Caution, Important, and Note are used throughout the manual. In addition, standard equipment symbols are defined. -
Page 22: General Information
Responsibility of the Manufacturer GE is responsible for the effects on safety, reliability, and performance if: assembly operations, extensions, readjustments, modifications, or repairs are carried out by persons authorized by GE;... -
Page 23: Definitions Of Terminology
Safety: Definitions of Terminology Definitions of Terminology Six types of special notices are used throughout this manual. They are: Danger, Warning, Caution, Contraindication, Important, and Note. The warnings and cautions in this Safety section relate to the equipment in general and apply to all aspects of the monitor. -
Page 24: Monitor Contraindications, Warnings, And Precautions
Safety: Monitor Contraindications, Warnings, and Precautions Monitor Contraindications, Warnings, and Precautions Warnings WARNINGS ACCIDENTAL SPILLS—In the event that fluids are accidentally spilled on the monitor, take the monitor out of operation, clean, and inspect for damage. APPLICATION—This monitor is not designed for direct cardiac connection. - Page 25 Safety: Monitor Contraindications, Warnings, and Precautions WARNINGS ELECTROSURGERY—The monitor is not designed for use with high-frequency surgical devices. In addition, measurements may be affected in the presence of strong electromagnetic sources such as electrosurgery equipment. EXPLOSION HAZARD—Do not use this equipment in the presence of flammable anesthetics or contained oxygen.
- Page 26 Safety: Monitor Contraindications, Warnings, and Precautions WARNINGS LINE ISOLATION MONITOR TRANSIENTS—Line isolation monitor transients may resemble actual cardiac waveforms, and thus cause incorrect heart rate determinations and alarm activation (or inhibition). MRI USE—Do not use the electrodes during MRI scanning; conducted current could potentially cause burns.
-
Page 27: Cautions
CAUTIONS ANNUAL SERVICING—For continued safety and performance of the monitor, verify the calibration, accuracy, and electrical safety of the monitor annually. Contact your GE Service Representative for further information. DAILY TESTING—It is essential that the monitor and accessories be inspected every day. It is recommended practice to initiate the monitor’s self-test feature at the beginning of each... -
Page 28: Electromagnetic Interference
Turn equipment in the vicinity off and on to isolate the offending equipment. Reorient or relocate the other receiving device. Increase the separation between the interfering equipment and this equipment. If assistance is required, contact your GE Service Representative. 120 Series Maternal/Fetal Monitor Revision B... -
Page 29: Equipment Symbols
Safety: Equipment Symbols Equipment Symbols The following is a list of symbols used on products manufactured by GE. Some symbols may not appear on your unit. Table 1-2. Equipment Symbols ATTENTION: Consult accompanying documents. TYPE B EQUIPMENT. Type B equipment is... - Page 30 Safety: Equipment Symbols For your notes 1-10 120 Series Maternal/Fetal Monitor Revision B 2015590-001...
-
Page 31: Introduction
Chapter 2 Introduction This section lists the indications for use for maternal/fetal monitors in the Corometrics 120 Series. The Corometrics 120 Series is extremely flexible, allowing you to mix and match features. This section provides information about your monitor in relation to this manual, as well as the intended uses of the device: Indications for Use . -
Page 32: Indications For Use
Introduction: Indications for Use Indications for Use Fetal Monitoring A Corometrics 120 Series Monitor can be used for routine non-invasive and invasive fetal monitoring throughout labor and delivery (i.e. fetal heart rate and uterine activity monitoring) Fetal movement detection and fetal heart rate alarm options (user selectable high/low and poor signal quality alarms) are available. -
Page 33: Series Overview
Introduction: Series Overview Series Overview The Model 126 Monitor The Model 126 Monitor provides standard fetal monitoring parameters—dual ultrasound, fetal ECG, and uterine activity. The Model 126 has the following features: Dual ultrasonic heart rate monitoring allows for non-invasive monitoring of twins. - Page 34 Introduction: Series Overview Alarm conditions have audible and visual indications. Audible alarms can be disabled. Fetal heart rate threshold and signal quality alarms can be cancelled. The monitor can be interfaced to the most widely used non-invasive blood pressure monitors and pulse oximeters. The FECG waveform can be optionally displayed and can be “frozen”...
-
Page 35: The Model 128 Monitor
Introduction: Series Overview The Model 128 Monitor The Model 128 Monitor provides all of the features of the Model 126 Monitor with the addition of integrated maternal pulse oximetry and non-invasive blood pressure monitoring, plus the following: Built-in maternal vital signs monitoring eliminates the need for separate blood pressure and maternal pulse oximetry monitors. -
Page 36: The Model 129 Monitor
Introduction: Series Overview The Model 129 Monitor The Model 129 has all of the features of the Model 128, plus the following: Built-in independent MECG monitoring is provided with selection of lead I, II, or III. Twins and maternal monitoring can be accomplished simultaneously using dual ultrasound and MECG;... -
Page 37: Illustrations
Introduction: About the Manual About the Manual Purpose This manual documents all possible parameters so that when you upgrade you will not require any new documentation. The manual also provides an opportunity to read about features you may not have to assist you with your upgrade decisions. Some sections will not apply if your monitor is not equipped with MSpO , maternal NBP, MECG, or FSpO... -
Page 38: Design Changes
GE Medical Systems Information Technologies reserves the right to change software/hardware design at any time and any such changes could affect the contents of the manual. GE assumes no responsibility for any errors or inconsistencies appearing in this manual that result from product design changes and upgrades. -
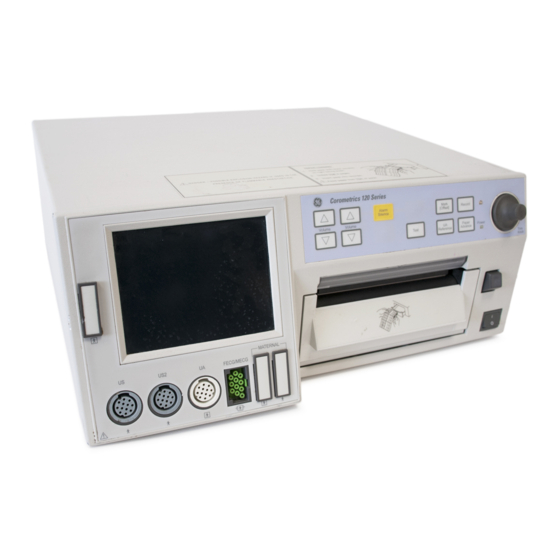
Page 39: Controls, Indicators, And Connectors
Chapter 3 Controls, Indicators, and Connectors This section describes all possible controls, indicators, and connectors in the 120 Series of monitors. The section contains the following: Front Panel Description ........Front Panel Displays . -
Page 40: Front Panel Description
Controls, Indicators, and Connectors: Front Panel Description Front Panel Description TOCO Alarm Mark Record Silence Start/Stop [Offset] Volume Volume Paper Test Power Reference Advance MECG MSP02 02:15 130/ 85 Trim Knob FSpO MAP (107) 03:15 25 mm/s 03:22:45 PRINT FREEZE ALARMS SETUP VSHX... - Page 41 Controls, Indicators, and Connectors: Front Panel Description Table 3-1. Model 129 Front Panel Name Description The monitor’s display is divided into several sections. The content and layout of the Display display can change, depending on which functions are installed in the monitor and the modes of operation in use.
- Page 42 Controls, Indicators, and Connectors: Front Panel Description Table 3-1. Model 129 Front Panel Name Description Connect a pneumatic hose and blood pressure cuff assembly to this black twin lumen Maternal NBP Connector receptacle. Connect a 120 Series MSpO intermediate cable to this royal blue receptacle. Use only Maternal SpO Connector Nellcor cables if you have Nellcor technology installed and only Masimo cables if you...
-
Page 43: Front Panel Displays
Controls, Indicators, and Connectors: Front Panel Displays Front Panel Displays The monitor’s display is divided into five horizontal sections. The content and layout of the display can change, depending on which functions are installed in the monitor and the modes of operation in use. Table 3-2. - Page 44 Controls, Indicators, and Connectors: Front Panel Displays TOCO FECG MECG MSpO 25 mm/s MECG 15:52:58 PRINT FREEZE ALARMS SETUP VSHX Figure 3-2. Model 129 Display Example The Model 126 has a unique feature which automatically centers the primary fetal parameters in the display when no waveform is active. See figure below. FECG TOCO 165 172...
-
Page 45: Primary Labor Parameters
Controls, Indicators, and Connectors: Front Panel Displays Primary Labor Parameters The primary labor parameters section displays FHR1, FHR2, and UA data. FHR Display The FHR1 and FHR 2 areas are summarized by Figure 3-4 Table 3-3. FECG Figure 3-4. FHR Display Table 3-3. - Page 46 Controls, Indicators, and Connectors: Front Panel Displays Table 3-4. Connectors vs. Display Modes Active Connectors FHR1 Area FHR2 Area FECG FECG INOP FECG/US FECG FECG/US2 FECG INOP US/US2 INOP — INOP INOP FECG FECG/US/US2 If three FHR transducers are plugged in, the FECG signal overrides the US signal. 120 Series Maternal/Fetal Monitor Revision B 2015590-001...
-
Page 47: Ua Display
Controls, Indicators, and Connectors: Front Panel Displays UA Display The UA area is summarized by Figure 3-5 Table 3-5. TOCO Figure 3-5. UA Display Table 3-5. UA Display Name Description Up to three digits indicate the uterine activity UA Value value—mmHg for internal monitoring or relative units for external monitoring. -
Page 48: Additional Parameters
Controls, Indicators, and Connectors: Front Panel Displays Additional Parameters The additional parameters area displays NBP, MHR/P, and MSpO data. Maternal NBP The maternal NBP section is summarized by Figure 3-6 Table 3-6. 11:41 130/ 85 MAP (107) 03:15 Figure 3-6. NBP Display Table 3-6. -
Page 49: Mhr/P Area
Controls, Indicators, and Connectors: Front Panel Displays MHR/P Area The MHR/P area is summarized by Figure 3-7 Table 3-7. MECG Figure 3-7. MHR/P Display Table 3-7. MHR/P Display Name Description Up to three-digits indicate the MHR/P in beats per MHR/P Value minute. -
Page 50: Fspo Area
Controls, Indicators, and Connectors: Front Panel Displays FSpO Area The FSpO area is summarized by Figure 3-8 Table 3-8. IMPORTANT If FSpO is monitored while MSpO is inactive, FSpO displays in the Additional Parameters Area. When dual SpO monitoring occurs, FSpO information is displayed in the Waveform Area beneath the MSpO area. -
Page 51: Mspo 2 Area
Controls, Indicators, and Connectors: Front Panel Displays MSpO Area The MSpO area is summarized by Figure 3-9 Table 3-9. Figure 3-9. MSpO Display Table 3-9. MSpO Display Name Description Up to three digits indicate the percentage of MSpO Value oxygen in the mother’s blood. This symbol provides information about the MSpO audio alarm and the MSpO high/low alarm limit... -
Page 52: Battery-Backed Ram Status
Icon appears after Battery requires service. Call GE Service to report. multiple power cycles. Softkeys A softkey is an area on the screen that can be selected with the Trim Knob control. When the softkey is activated by pressing the Trim Knob control, it may cycle through available settings or it may display a setup screen. - Page 53 Controls, Indicators, and Connectors: Front Panel Displays TOCO 165 172 MECG MSPO2 02:15 130/ 85 MAP (107) 03:15 25 mm/s II AUTO 09:22:06 MECG 09:21:41 ECG FROZEN PRINT FREEZE ALARMS SETUP VSHX Figure 3-11. Display Summary Table 3-11. Display Summary Name Description Selects US, US2, FECG, NBP, MHR/P, or SpO...
- Page 54 Controls, Indicators, and Connectors: Front Panel Displays Figure 3-12. Maternal Vital Signs History Screen Softkeys Table 3-12. Maternal Vital Signs History Screen Softkeys Name Description PRINT Softkey Prints one page (screen) of the table. PRINTALL Softkey Prints all pages (screens). Scrolls through the data: VIEW Softkey Left for recent data...
-
Page 55: Rear Panel Description
Controls, Indicators, and Connectors: Rear Panel Description Rear Panel Description Figure 3-13. 120 Series Rear Panel Connectors (Standard and Optional) IMPORTANT––The fetal acoustic stimulator connector (J) and the remote event marker (K) connector are identical in size. To ensure data accuracy, be sure to plug sensors into the correct connectors. - Page 56 Controls, Indicators, and Connectors: Rear Panel Description Table 3-13. 120 Series Rear Panel (Standard and Optional Features) Name Description Provides ventilation for the monitor’s internal Vent circuitry. Connector for Corometrics telemetry system J101 Telemetry interface. (Installed as part of an optional Connector communications package.) Connector for data entry system interface.
- Page 57 Controls, Indicators, and Connectors: Rear Panel Description Table 3-13. 120 Series Rear Panel (Standard and Optional Features) Name Description A binding post terminal is directly connected to the Equipotential Lug chassis for use as an equipotentiality connection. This switch is intended for qualified service personnel to select a voltage range for the AC input: AC Voltage Selection...
-
Page 58: Communication Option
Controls, Indicators, and Connectors: Rear Panel Description Communication Option The communication option is an additional circuit board that can be installed in the 120 Series Monitor. Refer to “Chapter 12, Upgrading a 120 Series Monitor” , for upgrade information. The following four connectors are part of the optional communications package: J101, J102, J103, and J104. -
Page 59: Theory Of Operation
Chapter 4 Theory of Operation This section of the manual contains the electronic theory of operation for the 120 Series Monitor. For parts information, refer to “Chapter 14, Replacement Parts”. This chapter contains the following information: Main Motherboard ........DSP Board . -
Page 60: Main Motherboard
Theory of Operation: Main Motherboard Main Motherboard NOTE: Main Motherboard 2000608-003 (with software version 2.0) replaces earlier version 11619 Boards. If you update an older monitor (11619 Main Board and 3-inch x 3.75-inch display) with a new Main board, which is factory-set for the new larger display (3.5-inch x 4.5-inch display), the Main screen will have space below the bottom row of softkeys. - Page 61 Theory of Operation: Main Motherboard from the host processor is summed into the main audio and is not controlled by the main processor. Figure 4-4 provides a summary of the audio control flow. Figure 4-1. Main Motherboard Input Parameter Data Flow Figure 4-2.
- Page 62 Theory of Operation: Main Motherboard Figure 4-3. Main Motherboard Communications Data Flow Figure 4-4. Main Motherboard Audio Control Flow 120 Series Maternal/Fetal Monitor Revision B 2015590-001...
- Page 63 Theory of Operation: Main Motherboard Table 4-1. Main Power Connector Pin Number Signal Name Signal Description AGND Analog Ground Digital Ground Digital Ground Digital Ground +5V Logic Supply +5V Logic Supply +5V Logic Supply GNDAUD Audio Ground for +12 V GNDBP NBP and Isolated Supply Ground +15BP...
- Page 64 Theory of Operation: Main Motherboard Table 4-2. RS-232 Connectors J11 and J13 Pin Number Signal Name Signal Description Request to Send Output from Monitor Receive Data Input to Monitor Signal Ground Frame Ground Transmit Data Output from Monitor Clear to Send Input to Monitor Table 4-3.
- Page 65 Theory of Operation: Main Motherboard Table 4-4. Corolan Connector J2 Pin Number Signal Name Signal Description No connection — Ground ADR0 Junction Box Address Line Input ADR1 Junction Box Address Line Input ADR2 Junction Box Address Line Input ADR3 Junction Box Address Line Input ADR4 Junction Box Address Line Input ADR5...
- Page 66 Theory of Operation: Main Motherboard Table 4-5. DSP Board Connector J7 Signal Type Pin Number Signal Name (Relative To Main Signal Description Motherboard) IRQ7/ Input Interrupt Line from DSP Board Shared RAM SHEM/ Output DSP Shared Memory Chip Select Line No Connection —...
- Page 67 Theory of Operation: Main Motherboard Table 4-5. DSP Board Connector J7 (Continued) Signal Type Pin Number Signal Name (Relative To Main Signal Description Motherboard) Output Buffered Address Line Output Buffered Address Line Output +5 Volt Power Ground Return Output Buffered Address Line A11B Output Buffered Address Line...
- Page 68 Theory of Operation: Main Motherboard Table 4-5. DSP Board Connector J7 (Continued) Signal Type Pin Number Signal Name (Relative To Main Signal Description Motherboard) FECG 80db Input FECG Analog for Rear Panel Output AGND Output Analog Ground US1audio Input Ultrasound Channel One Audio MECG 60db Input MECG Analog for Rear Panel...
- Page 69 Theory of Operation: Main Motherboard Table 4-5. DSP Board Connector J7 (Continued) Signal Type Pin Number Signal Name (Relative To Main Signal Description Motherboard) LDSB/ Output Processor Lower Data Strobe R/WB/ Output Processor Read/Write Line No Connection — — Output Processor Clock Line 16/20 MHz Output +5 Volts Logic Power...
- Page 70 Theory of Operation: Main Motherboard Table 4-6. NBP Board Connector J4 Pin Number Signal Name Signal type Signal Description Output +5 V Power Ground Return Buffered Data Line Buffered Data Line Buffered Data Line Buffered Data Line Buffered Data Line D10B Buffered Data Line Output...
- Page 71 Theory of Operation: Main Motherboard Table 4-6. NBP Board Connector J4 (Continued) Pin Number Signal Name Signal type Signal Description SPARESTAT0 Input NBP Board Present Line—active Low Spare Present Line—active Low SPARESTAT1 Input NOTE: These lines also go to the spare slot. GNDBP Output NBP Module Ground...
- Page 72 Theory of Operation: Main Motherboard Table 4-6. NBP Board Connector J4 (Continued) Pin Number Signal Name Signal type Signal Description SP3B/ Output Spare Chip Select Line Output Volt Logic Supply LDSB/ Output Processor Lower Data Strobe R/WB/ Output Processor Read/Write Line +15BP Output +15 Volt Supply for NBP Module...
- Page 73 Theory of Operation: Main Motherboard Table 4-7. Communications Board Connector J5 Pin Number Signal Name Signal Type Signal Description Output +5 V Power Ground Return Buffered Data Line Buffered Data Line Buffered Data Line Buffered Data Line Buffered Data Line D10B Buffered Data Line Output...
- Page 74 Theory of Operation: Main Motherboard Table 4-7. Communications Board Connector J5 (Continued) Pin Number Signal Name Signal Type Signal Description Output Digital Ground SPRXD Input Processor Serial Input TMECG Input Telemetry MECG TELMAUDIO Input Telemetry Audio US1AUDIO Output Ultrasound Unbuffered Audio US2AUDIO Output Ultrasound 2 Unbuffered Audio...
- Page 75 Theory of Operation: Main Motherboard Table 4-7. Communications Board Connector J5 (Continued) Pin Number Signal Name Signal Type Signal Description SP3B/ Output Spare Chip Select Line Output +5 Volt Logic Supply LDSB/ Output Processor Lower Data Strobe R/WB/ Output Processor Read/Write Line AGND Output Analog Ground...
- Page 76 Theory of Operation: Main Motherboard Table 4-8. Recorder Board Connector J9 PIN NUMBER Signal Name Signal Type Signal Description No Connection — — STB4/ Output Strobe Line for 4th Set of 256 Dots (1024 element) PLOW/ Input Paper Low Line STB3/ Output Strobe Line for 3rd Set of 256 Dots (1024 element)
- Page 77 Theory of Operation: Main Motherboard Table 4-9. Remote Mark Jack—PH2 Pin Number Description Inner Conductor Remote Mark Input Line Outer Ring Remote Mark Ground Table 4-10. Fetal Acoustic Stimulator (FAST) Jack—PH3 Pin Number Description Inner Conductor FAST Mark Input Line Outer Ring Mark Ground Table 4-11.
-
Page 78: Control Block
Theory of Operation: Main Motherboard Control Block The control block contains the basic processing engine (68302), system RAM, system ROM, address decoder, power-on reset module, oscillator, and control/setup section. The 68302 device (U33) contains a 68000 core processor, chip select logic (CS0/–CS3/), two timers, DTACK generation/wait state logic, a general purpose DMA controller, watchdog timer, interrupt controller, three USARTs with six dedicated DMA channels for transmit/receive, three-wire serial link, and 1152 bytes... - Page 79 Theory of Operation: Main Motherboard The 7960 encoder/decoder operates in mode 0, thus inserting its own preamble and removing it at the receiver end. On the receiving end, the CS/ line becomes active along with the receive clock after the preamble is stripped off, thus enabling the USART.
-
Page 80: Options Interface
Theory of Operation: Main Motherboard Options Interface The options interface consists of a buffered processor address/control and data bus, three 80-pin connectors, and one 100-pin connector. All options connectors contain 16-bit address and data buses, along with four spare chip select lines. The Communications Board connector (J5) contains ultrasound audio lines and telemetry signals from the rear panel. -
Page 81: Recorder Interface Section
Theory of Operation: Main Motherboard Recorder Interface Section The recorder interface section consists of 7032 interface PAL (U38), recorder clock and data buffers (U36), and clock divider 74HC4040 (U39). The interface PAL contains latches to create the four strobe lines, load line, and stepper motor four phases along with head protection circuitry which automatically shuts off all of the strobes and the HDSHUT* line (turns head power supply off). -
Page 82: Dsp Board
Theory of Operation: DSP Board DSP Board NOTE: Refer to “Chapter 14, Replacement Parts”, to determine the correct DSP Board for your monitor. Functional Overview This board consists of two independently functioning modules: DSP and front panel interface. The DSP section processes analog and digital data from the front ends and interfaces to the main processor. -
Page 83: Status/Control Module
Theory of Operation: DSP Board Status/Control Module This module consists of control latches (U5, U7) and a status buffer (U6). The control latch has bits which select the input multiplexor (MUX0–MUX3), control the high/low bytes coming from the A/D (BYTE), reset the front end (RESFR*), enable the front-end control interface (U1 CNTRLEN*), control flash ROM paging, and control the pressure channel interface (IUPCLR*). - Page 84 Theory of Operation: DSP Board The shared memory consists of a 8k x16 dual port RAM (U29) which has contention logic. The processor is given priority to read or write data into the RAM without waiting. In a contention situation, the graphics side of the memory could possibly receive wrong or changing data;...
-
Page 85: Front Panel Switch Interface
Theory of Operation: DSP Board Front Panel Switch Interface This section consists of simple buffers (U2, U3) for the incoming switch closures as well as static protection resistors (RN10, RN11) and capacitors. An additional latch (U4) is used to control the recorder LED line as well as the video pattern, stop scan, and invert lines. - Page 86 Theory of Operation: DSP Board Table 4-13. Front End Connector J1 (Continued) Signal Type Pin Number Signal Name (Relative to Main Signal Description Motherboard AGND Output Analog Ground GNDUS Output Analog Ground –15V Output –15 V Supply AGND Output Analog Ground US2AUDIO Input Ultrasound CH2 Audio...
- Page 87 Theory of Operation: DSP Board Table 4-13. Front End Connector J1 (Continued) Signal Type Pin Number Signal Name (Relative to Main Signal Description Motherboard Status/Control Bus Data Bit 3 Status/Control Bus Data Bit 4 Status/Control Bus Data Bit 5 Output +5 V Logic Supply BWR* Output...
- Page 88 Theory of Operation: DSP Board Table 4-13. Front End Connector J1 (Continued) Signal Type Pin Number Signal Name (Relative to Main Signal Description Motherboard TELMAUDIO Output Telemetry Ultrasound Audio From Rear Panel MECG 60DB Input MECG 60 dB Analog AIN1 Input Spare MUX Input Channel 3 No Connection...
- Page 89 Theory of Operation: DSP Board Table 4-14. Emulation Test Port Connector J3 Signal Type Pin Number Signal Name (Relative to Main Signal Description Motherboard) Input Test Mode Select Line TRST/ Input Test Reset Line Input Test Data Input Line Output Power Ground Output Presence Detect Line...
- Page 90 Theory of Operation: DSP Board Table 4-15. Front Panel Interface Connector J4 Pin Number Signal Name Signal Description HR1VOLUP/ HR1 Volume Up Switch Input No Connection — HR1VOLDN/ HR1 Volume Down Switch Input TSW/ Trim Knob Push Button Switch Input HR2VOLUP/ HR2 Volume Up Switch Input RECLED1/...
- Page 91 Theory of Operation: DSP Board Table 4-16. EL Panel Connector J5 (for 2001904-001 Board) Pin Number Signal Name Signal Description +12EL +12 Volt Power GNDEL Ground Ground — No Connection +5 Volt Supply GNDEL Ground VSYNCB Vertical Sync Line GNDEL Ground HSYNCB Horizontal Sync Line...
-
Page 92: Recorder Led Board Interface
Theory of Operation: DSP Board Table 4-17. EL Panel Connector J5 (for 11888 Board) Pin Number Signal Name Signal Description +12V +12 Volt Power +12V +12 Volt Power +5 Volt Power +5 Volt Power Power Ground Power Ground Power Ground Power Ground VSYNC Vertical Sync Line... -
Page 93: Nbp Board
Depending on when your monitor was manufactured, your unit may have one of three blood pressure boards installed: Manufactured by GE Medical Systems Information Technologies with DINAMAP blood pressure technology Manufactured by GE Marquette with Marquette Electronics blood pressure technology Manufactured by CAS Medical Systems, Inc. with CAS blood pressure technology Refer to “Chapter 14, Replacement Parts”... -
Page 94: Mux And A/D
Theory of Operation: NBP Board connected to the A/D converter through three FET switches used to select an input for conversion. MUX and A/D The MUX is composed of a DG444 quad FET switch pack (U15). Three switches in this device are used. The drain leads connect to the individual input signals, and the sources connect together and go to a unity gain noninverting amplifier (U12). -
Page 95: Nbp Board Manufactured By Cas Medical Systems, Inc
When a problem does exist with the CAS Blood Pressure Board, contact your GE Service Representative for information about repair/exchange of the board. -
Page 96: Instrumentation Amplifier
Theory of Operation: NBP Board Instrumentation Amplifier Compensated pressure transducer U16, produces an output voltage that is proportional to the cuff pressure; the output is input to the instrumentation amplifier section. Amplifiers U14 and U15 amplify the pressure transducer’s output and separate it into two channels. -
Page 97: Communications Board
Theory of Operation: Communications Board Communications Board NOTE: The 15297 surface-mount board, found in newer builds, replaces earlier 13388 versions. Functionally, the boards are the same. The optional Communications Board performs three major functions: Central Systems Interface (J102) Model 2116B Keyboard Interface (J103) 340 Series Telemetry Interface (J101) Central Systems Interface This section consists of three digital-to-analog convertors (U1, U2, U5) and... -
Page 98: Model 2116B Keyboard Interface
Theory of Operation: Communications Board Model 2116B Keyboard Interface The keyboard interface consists of a data latch (U7), a status receive buffer (U8), a control latch (U6), and a PAL device (U15). Data is latched into U7 by an inverted version of the incoming STB* signal. - Page 99 Theory of Operation: Communications Board Table 4-18. Central Systems Interface Connector J102 Signal type Pin Number Signal Name (Relative to Signal Description Communications Board) HR2MODE Output HR2 Analog Mode Line Output UA Analog Out AGND Output Analog Ground No Connection —...
- Page 100 Theory of Operation: Communications Board Table 4-19. Model 2116B Keyboard Connector J2 Signal type Pin Number Signal Name (Relative to Signal Description Communications Board) Output Ground Output Ground Output +5 V Busy Signal Sent to Keyboard KBDBUSY* Output when Monitor is Busy Sent to Keyboard when Monitor KBDINVLD* Output...
- Page 101 Theory of Operation: Communications Board Table 4-20. 340 Series Telemetry Connector J2 Signal type Pin Number Signal Name (Relative to Signal Description Communications Board) TMARK* Input Telemetry Mark Line—Active Low TELPR* Input Telemetry Present—Active Low TFECGEN* Input Telemetry FECG Enable—Active Low TMECG Input Telemetry MECG...
-
Page 102: System Power Supply
This information is not intended to provide a complete circuit theory and should not be used to repair any problems on the board. When a problem does exist on the board, contact your GE Service Representative for information about repair/ exchange of the power supply assembly. -
Page 103: Display Board
Theory of Operation: Display Board Display Board The display in the 120 Series Monitor is an electroluminescent (EL) glass panel with two circuit boards mounted on the back, referred to as the Controller Power Unit and the Driver Board. (The display assembly is manufactured by Planar Systems, Inc.) The following technical information is a summary of the display circuitry. -
Page 104: Dual Ultrasound Board
Theory of Operation: Dual Ultrasound Board Dual Ultrasound Board Overview The Ultrasound Board is a dual channel pulsed Doppler ultrasound system with Channel A and Channel B. Each channel generates a 1.151 MHz (center frequency) pulsed carrier signal. This carrier signal causes the crystals in the transducer to emit ultrasonic sound waves. -
Page 105: Digital Control Section
Theory of Operation: Dual Ultrasound Board Digital Control Section The digital control section of the Ultrasound Board is common to both Channel A and Channel B and is composed of ultrasound oscillator U18, PALs U20 and U23, and counters U19, U21, U22, and U24. Counters U19, U21, and U22 count down from the oscillator providing sequencing inputs to PALs U20 and U23, as well as the 144 kHz and 72 kHz clocks used to synchronize the monitor’s switching power supplies. -
Page 106: Channel A Pin Diode Circuitry
Theory of Operation: Dual Ultrasound Board The actual switching of the ultrasound input/output to the two transducers is accomplished using PIN diodes D1–D4. The signals PIN1* and PIN2* control the switching of quad analog switch U25 which routes +6 V and –6 V to resistors R1 and R2 and consequently bias the PIN diodes on or off. -
Page 107: Transmission, Channel A Or Channel B
Theory of Operation: Dual Ultrasound Board Transmission, Channel A or Channel B Two channels are implemented; however, both channels share part of the same signal path. The ultrasound transmitter circuitry is formed by transistors Q1, Q2, Q3, and Q4, and associated components. Transmission is initiated by the signal TRANS from PAL U23. -
Page 108: Channel A Filtering
Theory of Operation: Dual Ultrasound Board U6 drives analog switch U4 through R28. Signals CH1* and CH2* steer the demodulated output to the appropriate filter channel (Channel A or Channel B) when U11 is active. Switch U4 is kept inactive when U11 is inactive. Capacitor C23 holds the demodulated signal amplitude for Channel A between samples;... -
Page 109: Ultrasound Envelope
Theory of Operation: Dual Ultrasound Board Ultrasound Envelope To generate the Channel A ultrasound envelope, the output of the main filter is amplitude scaled by resistive divider R180/R48 and then connected to compandor (U2) which provides at least 40 dB of signal compression. The output from the compandor is limited by diodes D18–D19 and then precision rectified by a stage of U1 and its associated components. -
Page 110: Ua/Fecg Board
Theory of Operation: UA/FECG Board UA/FECG Board Isolated FECG Circuitry The isolated FECG section of this board consists of instrumentation amplifier U16, amplifier U3, and right leg drive amplifiers U11. The right arm and left arm signals from the patient are differentially amplified by U16 which provides a gain of 10 and a single-ended output for the following stage. -
Page 111: Isolated Ua Circuitry
Theory of Operation: UA/FECG Board The output from the FECG amplifier is coupled from the isolated circuitry to unisolated circuitry by isolation amplifier U2. This device is a capacitive coupled VCO/PLL type design that provides unity gain output with a frequency response of DC to about 500 Hz and has a breakdown voltage of 8000 V-pk. - Page 112 Theory of Operation: UA/FECG Board The serial data from the A/D is transferred from the isolated circuitry to the unisolated circuitry by the use of opto-isolators. The A/D clock and data are buffered by gates in U15 which in turn drive the LED side of dual opto-isolator U14. The restored clock and data on the output side of this isolator is sent to the DSP Board where the data is converted to a parallel format that the processor can access.
- Page 113 Theory of Operation: UA/FECG Board Table 4-21. Front End Motherboard Connector J1 Pin Number Signal Name Signal Description No Connection — No Connection — AGND Analog Ground MECG1EN* MECG Mode Enable EXCITREF +4 V Reference Ground BRGEXCIT +4 V Reference PRESS–...
- Page 114 Theory of Operation: UA/FECG Board Table 4-22. Front End Motherboard Connector J3 Pin Number Signal Name Signal Description +5 V Logic Supply Status/Control Bus Bit 6 Status/Control Bus Bit 7 CSO* Status/Control Bus Chip Select 0 CS1* Status/Control Bus Chip Select 1 CS2* Status/Control Bus Chip Select 2 CS3*...
- Page 115 Theory of Operation: UA/FECG Board Table 4-22. Front End Motherboard Connector J3 (Continued) Pin Number Signal Name Signal Description AGND Analog Ground AGND Analog Ground No Connection — FECG FECG Analog FECG 80 DB FECG 80 dB Analog No Connection —...
- Page 116 Theory of Operation: UA/FECG Board Table 4-22. Front End Motherboard Connector J3 (Continued) Pin Number Signal Name Signal Description No Connection — No Connection — No Connection — +5 V Supply +5 V Supply +5 V Supply +5 V Supply PACER* Pacemaker Detection Signal No Connection...
- Page 117 Theory of Operation: UA/FECG Board Table 4-22. Front End Motherboard Connector J3 (Continued) Pin Number Signal Name Signal Description No Connection — No Connection — No Connection — No Connection — No Connection — +15VISOL2 +15 V Isolated Power Supply ISOGND2 Isolated Ground –15VISOL2...
- Page 118 Theory of Operation: UA/FECG Board Table 4-23. MECG Board Connector J5 Pin Number Signal Name Signal Description +15VISOL +15 V Isolated Power Supply –15VISOL –15 V Isolated Power Supply AGND Analog Ground MECG1EN* MECG Mode Enable LEADSOFF Leads Off Detection Signal SEL1 MECG Lead Select Bit 1 SEL2...
-
Page 119: Mecg Board
Theory of Operation: MECG Board MECG Board Defibrillator Protection The defibrillator protection is primarily a function of neon bulbs DS1–DS3 and 1 Ω resistors located in each lead of the ECG cable assembly. When the voltage on any patient lead exceeds 70 to 90 V with respect to isolated ground, the associated neon bulb will light, discharging the energy on the lead to isolated ground. -
Page 120: Single-Wire Ecg Amplifier With Right Leg Drive
Theory of Operation: MECG Board Single-Wire ECG Amplifier with Right Leg Drive The ECG amplifier itself consists of an instrumentation amplifier, an amplifier/ limiter stage, a low-pass filter/output buffer stage, an integrator stage for the right leg drive, and an integrator stage for baseline restoration. Before connecting to any active circuitry, the patient signals from MUX U14 are first low-pass filtered by a differential filter consisting of resistors R19 and R22, and capacitors C15, C16, and C18. -
Page 121: Pacemaker Detection
Theory of Operation: MECG Board increasing its input voltage when the ECG output exceeds ±5.7 volts. This allows the baseline to be rapidly restored when the output offset becomes too large. The right leg drive is used to feed back to the patient, out-of-phase common-mode signals, in order to cancel out the effects of these signals. - Page 122 Theory of Operation: MECG Board junction of D23 and D24, and 0 V at the output across C39. Under these conditions, a conduction path exists between the input and the output of the limiter. When a step change occurs at the input, for example a +1 V step, diode D21 will become reverse biased turning off the current path from the input to the junction of D21 and D22, and to the output.
-
Page 123: Leads Off Detection
Theory of Operation: MECG Board Leads Off Detection The leads off detection relies on the equal DC biasing of the two patient input leads, along with canceling effects of the right leg drive to common mode signals. Resistors R17, R18, R20, and R21 apply a small DC common mode voltage to the input leads. -
Page 124: Test Generator
Theory of Operation: MECG Board Test Generator The test generator is composed of monostable U3 and an attenuation network consisting of resistors R104–R110. U3, by the values of resistor R111 and capacitor C54, is set to provide a 100 ms pulse every time it’s triggered from a control line from the FECG/UA Board. -
Page 125: Low-Pass And Notch Filters
Theory of Operation: MECG Board restore the signal to the original output level before the voltage division at the isolator’s input. Resistors R116, R118 and potentiometer R117 provide an offset adjustment from the un-isolated ±10 V references for the output amplifier. The voltage at the wiper of the potentiometer is buffered by a unity gain non-inverting amplifier from the last op-amp of U8. - Page 126 Theory of Operation: MECG Board Table 4-25. FECG/UA Connector P5 Pin Number Signal Name Signal Description +15VISOL +15 V Isolated Power Supply –15VISOL –15 V Isolated Power Supply AGND Analog Ground PACEMAKER DET/ Pacemaker Detection Signal LEADSOFF* Leads Off Detection Signal SEL1 MECG Lead Select Bit 1 SEL2...
- Page 127 Theory of Operation: MECG Board Table 4-26. FECG/UA Board Connector P6 Pin Number Signal Name Signal Description MECG1 MECG Analog +15V +15 V Supply –15V –15 V Supply AGND Analog Ground 50/60HZ MECG 50/60 Hz Filter Control Bit +15V +15 V Supply –15V –15 V Supply AGND...
-
Page 128: Oximeter Carrier Board
Theory of Operation: Oximeter Carrier Board Oximeter Carrier Board Optical isolators provide the RS-232C interface between the Front End Motherboard and the MSpO Board. The Isolated Power Supply Board provides the ±15 V and +5 V signals. 4-70 120 Series Maternal/Fetal Monitor Revision B 2015590-001... -
Page 129: Mspo 2 Board
Theory of Operation: MSpO Board MSpO Board Nellcor Module Functional Overview This internal module is manufactured by Nellcor Puritan Bennett, Inc. The module handles all circuitry involving MSpO with the exception of the display circuitry. The module measures the maternal oxygen saturation and pulse rate using the principles of spectrophotometry and plethysmography. -
Page 130: Input Amplifier And Synchronous Detector
Theory of Operation: MSpO Board RCAL resistor in the sensor which connects between pin 6 of JP1 and ground to become part of a voltage divider with R16. Power for this divider is a 2.5 V reference on the Nellcor module. This calibration voltage (VCAL2) is communicated to the DAC via buffer U21B. -
Page 131: Analog-To-Digital Conversion Circuitry
Theory of Operation: MSpO Board The red filter/amplifier circuit is an active low-pass filter (total gain = 8) which responds to the patient’s pulse modulation — reproducing the patient’s pulse waveform at the filter/amplifier output. The red pulses (RED) are coupled to the first of two identical filter/amplifier stages (U22A and U22C), each having a gain of approximately two. - Page 132 Theory of Operation: MSpO Board The Masimo SET MS-5 pulse oximeter as well as traditional pulse oximetry determines SpO2 by passing red and infrared light into a capillary bed and measuring changes in light absorption during the pulsatile cycle. Red and infrared light-emitting diodes (LEDs) in oximetry sensors serve as the light sources, a photodiode serves as the photodetector.
- Page 133 Theory of Operation: MSpO Board relative output power versus possible SpO2 value as shown in the following figure where R corresponds to SpO2 = 97%: The DST plot has two peaks: the peak corresponding to the higher saturation is selected as the SpO2 value. This entire sequence is repeated once every two seconds on the most recent four seconds of raw data.
-
Page 134: Isolated Power Supply Board
Theory of Operation: Isolated Power Supply Board Isolated Power Supply Board NOTE: A newer, surface-mount board replaces earlier versions. Functionally, the boards are equivalent. Refer to “Chapter 14, Replacement Parts” for further information. Controller The isolated fly-back converter is based around the LT1270 (U4) high-efficiency switching regulator. -
Page 135: External Synchronization
Theory of Operation: Isolated Power Supply Board External Synchronization The external synchronization of the LT1270 (U4) occurs when its Vc pin is pulled to ground with an external transistor. To avoid disturbing the DC characteristics of the internal error amplifier, the width of the synchronizing pulse must be under 1 µs. The circuitry for synchronizing is comprised of Q1, D1-3, C2, C3, R1, R24-26, and The external synchronizing clock (72 kHz) is connected to an input of a two input AND gate (U5). -
Page 136: Isolated Feedback
Theory of Operation: Isolated Power Supply Board potential, the parallel combination of C24 and R27 was connected across the two grounds. Isolated Feedback The feedback for the supply crosses the isolation barrier via a linear optocoupler (U2). The complete feedback circuit is comprised of U1–3, VR4, R7–13, C10,19,20,21,25. -
Page 137: Short Circuit Protection
Theory of Operation: Isolated Power Supply Board Short Circuit Protection Short circuit protection for the entire supply is provided by R14, R30 and Q2. When the voltage at the Vc pin of U4 reaches approximately 1.33 V, Q2 will start conducting current from its emitter to collector which limits the amount of power the supply can deliver. - Page 138 Theory of Operation: Isolated Power Supply Board Table 4-28. Power Connector J1 Pin Number Signal Name Signal Description GNDI Power Ground (earth) GNDI Power Ground (earth) GNDI Power Ground (earth) GNDI Power Ground (earth) GNDI Power Ground (earth) GNDI Power Ground (earth) GNDI Power Ground (earth) GNDI...
- Page 139 Theory of Operation: Isolated Power Supply Board Table 4-29. Power Connector J2 Pin Number Signal Name Signal Description +15VISO2 Isolated +15 Vdc (2) +15VISO2 Isolated +15 Vdc (2) ISOGND2 Return for Outputs (2) ISOGND2 Return for Outputs (2) –15VISO2 Isolated –15 Vdc (2) –15VISO2 Isolated –15 Vdc (2) No Connection...
-
Page 140: Recorder Board
Theory of Operation: Recorder Board Recorder Board NOTE: A newer, surface-mount board replaces earlier versions. Functionally, the boards are equivalent. Refer to “Chapter 14, Replacement Parts” for further information. The recorder board provides the interface between the Main Motherboard and the strip chart recorder. - Page 141 Theory of Operation: Recorder Board Table 4-30. Power Input Connector J1 Pin Number Signal Name Signal Description +5VM –5 Volt Supply for Motor +5VM –5 Volt Supply for Motor GNDM Motor Ground GNDM Motor Ground GNDH Ground for Head Regulator GNDH Ground for Head Regulator GNDVR...
- Page 142 Theory of Operation: Recorder Board Table 4-31. Head Output Connector J4 Pin Number Signal Name Signal Description +V Head Supply Voltage (15.5 V nominal) +V Head Supply Voltage (15.5 V nominal) GNDH VHEAD Supply Ground Return GNDH VHEAD Supply Ground Return STRB4/ Strobe Line for 4th Set of 256 Dots STRB3/...
- Page 143 Theory of Operation: Recorder Board Table 4-32. Stepper Motor Connector J4 Pin Number Signal Name Signal Description No Connection KEY (cut pin) Motor Phase 3 Motor Phase 4 +5 V No Connection — Motor Phase 2 Motor Phase 1 +5 V Table 4-33.
- Page 144 Theory of Operation: Recorder Board Table 4-35. Paper Tray Sensor Connector J8 Pin Number Signal Name Signal Description No Connection PLOAD Collector of Sensor LED of Sensor Ground Table 4-36. Test Connector J9 Pin Number Signal Name Signal Description Head Supply Voltage HGND Head Supply Ground POUT...
-
Page 145: Setup Procedures
Chapter 5 Setup Procedures This section describes the routine setup procedures for the 120 Series Monitor, as well as information about tailoring the monitor to meet the individual needs of the hospital. This section contains the following information: Loading Strip Chart Recorder Paper . -
Page 146: Loading Strip Chart Recorder Paper
Setup Procedures: Loading Strip Chart Recorder Paper Loading Strip Chart Recorder Paper CAUTIONS LOADING PAPER—The instructions for loading paper into the 120 Series Monitor are different than the instructions for loading paper into other Corometrics monitors. Improper loading can cause paper jams. Follow the instructions carefully. PAPER TYPE—Do not use non-Corometrics paper or paper designed for use with other Corometrics monitors. - Page 147 Setup Procedures: Loading Strip Chart Recorder Paper To install Corometrics strip chart paper in the 120 Series Monitor, follow these steps: CAUTION LOADING PAPER—Paper loading instructions for the 120 Series Monitor are different than other Corometrics Monitors. Improper loading can cause paper jams. Follow the instructions carefully. Press down on the latch on the right side of the strip chart recorder door.
- Page 148 Setup Procedures: Loading Strip Chart Recorder Paper NOTE: The paper is marked, “This side up for 120 Series.” Unfold two sheets from the top of the package so that they extend toward you. Place the pack in the drawer so that the pack is laying flat in the recorder. 120 Series Maternal/Fetal Monitor Revision B 2015590-001...
-
Page 149: Mounting A Strain Gauge For Iup Monitoring
Setup Procedures: Mounting a Strain Gauge for IUP Monitoring Slowly close the strip chart recorder door, being careful not to skew the paper. Mounting a Strain Gauge for IUP Monitoring To mount a strain gauge post, refer to the manufacturer’s directions. Revision B 120 Series Maternal/Fetal Monitor 2015590-001... -
Page 150: User Setup Screens
Setup Procedures: User Setup Screens User Setup Screens The 120 Series Monitor provides a variety of options that are all selected using setup screens shown on the display. (The illustrations in this section are representative of all possible features. Your monitor screens may vary.) All functions are performed easily using the front panel Trim Knob control. - Page 151 Setup Procedures: User Setup Screens IMPORTANT EFFECTIVITY—All changes take effect immediately after a selection is enacted in step six (6). NOTE: While any setup screen is displayed, the primary labor parameters remain displayed. While using a setup screen, if an alarm condition exists for a maternal parameter that is not displayed, only an audio alarm (if enabled) is issued.
-
Page 152: Fecg Setup Screen
Setup Procedures: FECG Setup Screen FECG Setup Screen FECG Select the softkey to access the FECG Setup screen (Figure 5-1). For information on settings, refer to Appendix A, “Factory Defaults” Figure 5-1. FECG Setup Screen Volume This field controls the volume for the FHR derived from FECG. This works in conjunction with the four front panel Volume pushbuttons. -
Page 153: Us/Us2 Setup Screen
Setup Procedures: US/US2 Setup Screen US/US2 Setup Screen Select the softkey to access the US/US2 Setup screen (Figure 5-2). The title of the screen (US vs. US2) is dependent on the mode selected when the screen is activated. For information on settings, refer to Appendix A, “Factory Defaults”... -
Page 154: Volume
Setup Procedures: US/US2 Setup Screen Volume This field adjusts the volume for the FHR derived from the selected mode, US or Volume US2. This field works in conjunction with the front panel buttons. FHR Audio Alarm This field enables/disables the audio alarm function for FHR when derived from US/ US2. -
Page 155: Maternal Nbp Setup Screen
Setup Procedures: Maternal NBP Setup Screen Maternal NBP Setup Screen Select the softkey to display the NBP Setup screen (Figure 5-3). For information on settings, refer to Appendix A, “Factory Defaults” Figure 5-3. Maternal NBP Setup Screen Display Timer This field determines the time period, in minutes, that a blood pressure reading remains displayed before being automatically erased, starting from the time the reading is displayed. -
Page 156: Nbp Done Volume
Setup Procedures: Maternal NBP Setup Screen NBP Done Volume This field sets the volume of the sound emitted at the completion of each blood pressure determination. As you adjust the volume, a sample tone sounds. Alarm Limits These fields adjust the high and low alarm limits for maternal systolic, diastolic, and mean arterial pressures, as well as for MHR/P—in increments of 5 mmHg or 5 BPM. -
Page 157: Mspo2 Setup Screen
Setup Procedures: MSpO2 Setup Screen MSpO Setup Screen MSPO2 Select the softkey to display the MSpO Setup screen (Figure 5-4). For settings information, refer to Appendix A, “Factory Defaults” FECG TOCO 165 172 MSpO SETUP RESPONSE TIME: NORMAL MSpO PRINT INTERVAL: 5 MIN % O2 TRACE: OFF ALARM HIGH... -
Page 158: Averaging Time (Masimo Module Only)
Setup Procedures: MSpO2 Setup Screen Averaging Time (Masimo Module Only) This menu option only appears when using a Masimo module and sensor. Choose a response time in order to compensate for different levels of patient activity: 2, 4, 8, 10, 12, 14, or 16 seconds. For the 2 and 4 second averaging settings: The actual averaging times may range from 2 to 4. -
Page 159: Mhr/P Setup Screen
Setup Procedures: MHR/P Setup Screen MHR/P Setup Screen MECG PULSE Select the mode title softkey— —to access the MHR/P Setup screen (Figure 5-5). NOTE: Figure 5-5 provides an example where MECG is selected as the MHR/P MECG source, as indicated by the mode title. -
Page 160: Volume
Setup Procedures: MHR/P Setup Screen Volume This field sets the volume of the “beep” sounded with each detected valid heartbeat—for MECG and MSpO only. Alarm Limits These fields adjust the high and low alarm limits for MHR/P— in increments of 5 BPM. -
Page 161: Mecg Pacer
Setup Procedures: MHR/P Setup Screen MECG Pacer This field enables/disables pacemaker pulse rejection circuitry. Off: Use this setting for a patient without a pacemaker. All ECG events are monitored; all complexes, including pacer spikes may be displayed and may be included in the heart rate calculation. -
Page 162: Master Alarm Setup Screen
Setup Procedures: Master Alarm Setup Screen Master Alarm Setup Screen ALARMS Select the softkey to display the Master Alarm Setup screen (Figure 5-8). Each of the fields on this screen can be accessed under the individual parameter setup screens. For available settings, refer to Appendix A, “Factory Defaults”... -
Page 163: Response Time
Setup Procedures: FSpO2 Setup Screen FSpO Setup Screen FSPO Select the softkey to access the FSpO Setup screen (Figure 6-2). IMPORTANT SOFTKEY ACTIVATION—The Corometrics fetal patient FSpO module cable must be plugged into the connector in order to FSpO activate the mode softkey. -
Page 164: O 2 Trace
Setup Procedures: FSpO2 Setup Screen Trace This setting enables or disables the printing of the %FSpO trend on the bottom grid of the strip chart paper. On: The %FSpO trend is printed as a beaded trace on the bottom (or right) grid annotated by %FSpO Off: The %FSpO trend is not printed. - Page 165 Setup Procedures: FSpO2 Setup Screen FECG TOCO 165 172 FSpO SETUP RESPONSE TIME: SLOW FSpO PRINT INTERVAL: 5 MIN TRACE: OFF MODE: FSp0 2 EXIT Figure 5-11. Display of Fetal Pulse Oximetry TOCO MECG MSpO 02:15 130/ 25 mm/s II 2X 03:22:45 MECG PRINT...
-
Page 166: General Setup Screen
Setup Procedures: FSpO2 Setup Screen General Setup Screen SETUP Select the softkey to display the General Setup screen (Figure 5-13). GENERAL SETUP TIME: 12:01:00 DATE: 01-JUN-2003 PLAY SONG: OFF VOLUME: 5 SPO2 SCALE: 0-100 % RECORDER SETUP PAPER SPEED: 3 CM/MIN LIGHT: ON PAPER CHIME: OUT ONLY VOLUME: 5... -
Page 167: Spo Scale
Setup Procedures: FSpO2 Setup Screen Scale Two scale options are available for printing the %MSpO trend, for compatibility with %FSpO trending. (%FSpO is always trended on a scale of 0–100 %.) The scale is printed on the paper along with the trend. Auto: If only the %MSpO trend is printing, the trend plots on an expanded scale of 60–100 % or 50–100 %, depending on the paper. -
Page 168: Paper Chime Volume
Setup Procedures: FSpO2 Setup Screen Paper Chime Volume This field sets the volume of the paper chime. As you adjust the volume, a sample tone sounds. MSpO Print Interval This field sets the time interval for printing MSpO values received from an external maternal pulse oximetry monitor. -
Page 169: Service Mode Screens
Setup Procedures: Service Mode Screens Service Mode Screens The 120 Series Monitor is programmed with five service mode screens. These screens are listed below: Service Lock Install Options Error Log (Refer to “Chapter 8, Self-Tests”.) Communications Setup (Also, refer to “Chapter 11, Peripheral Devices”.) Diagnostic Control (Refer to... -
Page 170: Install Options Screen
Setup Procedures: Service Mode Screens Install Options Screen Use the Install Options screen (Figure 5-15) to: select the default settings used when the 120 Series Monitor is turned on; select the line frequency; enable/disable ECG artifact elimination; configure the recorder’s vertical scale; select the language used on the display and printed on the strip chart paper;... -
Page 171: Default Settings
Setup Procedures: Service Mode Screens To access the Install Options screen: Select the softkey from the General Setup screen. SERVICE The Service Lock screen appears and the access code is displayed 0 0 0 0 Use the Trim Knob control to set the access code to the current month and day. 0 4 2 3 0 3 2 8 For example: April 23 is... -
Page 172: New Hospital
Setup Procedures: Service Mode Screens New Hospital To define hospital-wide menu settings for the first time, or to re-define existing settings: Select NEW HOSPITAL in the Defaults field on the Install Options screen. Exit the service mode. Configure each of the user setup screens as desired. Cycle power on the monitor. -
Page 173: What Is It
Setup Procedures: Service Mode Screens What is it? When monitoring dual heart rates using US/US2 or FECG/US, overlapping traces may be difficult to interpret. All 120 Series Monitors provide a +20 BPM shift for the secondary fetal heart rate trend to alleviate this problem. When using US/US2 or US2 + 20 FECG/US2, and the US2 trace is shifted +20 BPM, the symbol prints on... -
Page 174: Corolan Address Checking
Setup Procedures: Service Mode Screens Corolan Address Checking This field enables/disables Corolan address checking. Use the Trim Knob control to alternate between ON and OFF. (The factory default setting is OFF.) If the monitor is not a device on a Corolan daisy-chain network, configure this field to OFF. If the monitor is a device on a Corolan daisy-chain network, configure this field to ON. -
Page 175: Fetal Alert/Alarms
Setup Procedures: Service Mode Screens Fetal Alert/Alarms If the Spectra Alerts option is installed in your monitor, use this field to select between the built-in FHR alarm features of the monitor and the Spectra Alerts option. Alarms: The monitor generates alarms based on the limit settings provided on the FHR setup screens. - Page 176 Setup Procedures: Service Mode Screens Figure 5-16 shows a portion of a sample printout. Figure 5-16. Install Options Portion of System Setup Printout 5-32 120 Series Maternal/Fetal Monitor Revision B 2015590-001...
-
Page 177: Communications Setup Screen
Setup Procedures: Service Mode Screens Communications Setup Screen The Communications Setup screen, allows you to configure the unit’s J109, J110, and J111 RS-232C Serial Interface ports for connecting to optional peripheral equipment. Each port is configured for baud rate and mode. To use the Communications Setup screen: Select the SERVICE... -
Page 178: Hardware Switches
Setup Procedures: Hardware Switches Hardware Switches The 120 Series Monitor Main Motherboard contains one dip switch pack SW1, which is used to: enable/disable a factory test mode (for factory use only); select between Corometrics- or Hewlett-Packard–compatible outputs from the rear panel J102 connector; set the clock speed;... -
Page 179: Functional Checkout Procedure
Chapter 6 Functional Checkout Procedure NOTE: Read each step of this This chapter contains the following: procedure thoroughly prior to Before You Begin........performing the tests. -
Page 180: Before You Begin
Visually inspect the monitor, patient cables, and other accessories for cracks, fissures, or other signs of wear or damage. Do not use any monitor or accessory which appears to be worn or damaged. If unsure, contact your GE Service Representative to arrange for evaluation, replacement, or repair of the suspect item(s). -
Page 181: Self-Test Routine
Functional Checkout Procedure: Self-Test Routine Self-Test Routine The 120 Series Monitor contains test routines which verify the unit’s calibration and internal circuitry. These routines are initiated by depressing the front panel Test pushbutton. The test results are printed on the strip chart recorder paper, verifying the integrity of the unit. - Page 182 Functional Checkout Procedure: Self-Test Routine The recorder returns to its original on, off, or maternal-only mode state from when the pushbutton was depressed. Test NOTE: To disable the test, depress the Test pushbutton or open the recorder door. NOTE: If the simulated fetal heart rate trends do not appear in the correct positions on the strip chart recorder paper, ensure the monitor’s vertical scale setting matches the type of paper being used, i.e.
-
Page 183: Front Panel Pushbutton Test
Functional Checkout Procedure: Front Panel Pushbutton Test Front Panel Pushbutton Test This procedure ensures the functionality of the front panel pushbuttons. Apply power to the 120 Series Monitor. Disconnect all transducers from the front panel. Access the General Setup screen and set the recorder speed to 1 cm/min; then exit the setup screen. -
Page 184: Connecting The Simulator
Functional Checkout Procedure: Connecting the Simulator Connecting the Simulator This part of the procedure prepares the simulator for use. NOTE: You must use a Model 325 Simulator for the functional checkout procedure. (Monitors in the 120 Series do not work with Model 305 Simulators.) Ensure the Model 325 switch is in the off position. -
Page 185: Mecg Test
Functional Checkout Procedure: MECG Test MECG Test This portion of the functional checkout procedure ensures the integrity of the MECG circuitry and the heart rate channel of the recorder. Connect the simulator’s ECG sub-cable to the connector on the monitor MECG adapter cable. - Page 186 Functional Checkout Procedure: MECG Test Table 6-1. MECG Test Simulator Settings Section Switch Setting Main RATE Rate MANUAL FECG/MECG Mode MECG QRS Amplitude 500 µV QRS Polarity GENERAL Pattern Memory Main Mode TOCO 10. Repeat step 9 for each of the following rates: 30, 120, 210, and 240 BPM. 11.
- Page 187 Functional Checkout Procedure: MECG Test 15. Set the simulator’s ECG Rate switch to the MANUAL position and the Manual knob to the fully counterclockwise position. Disconnect the ECG Adjustment simulator sub-cable from the monitor’s y-adapter cable. Verify the following on the monitor: The MHR/P value and mode are both blank.
- Page 188 Functional Checkout Procedure: MECG Test Figure 6-3. MECG Oscillation 6-10 120 Series Maternal/Fetal Monitor Revision B 2015590-001...
-
Page 189: Fecg Test
Functional Checkout Procedure: FECG Test FECG Test This portion of the functional checkout procedure ensures the integrity of the FECG circuitry and the heart rate channel of the recorder. Connect the simulator’s ECG sub-cable to the connector on the monitor FECG adapter cable. - Page 190 Functional Checkout Procedure: FECG Test Table 6-2. FECG Test Simulator Settings Section Switch Setting Main RATE Rate MANUAL FECG/MECG Mode FECG QRS Amplitude 15 µV QRS Polarity GENERAL Pattern Memory Main Mode TOCO Repeat step 7 for each of the following rates: 30, 60, 210, and 240 BPM. Change the simulator’s QRS Polarity switch from + to –.
- Page 191 Functional Checkout Procedure: FECG Test switch to the ∆15 position. Verify the following 15. Set the simulator’s ECG Rate on the monitor: The FHR1 value oscillates by 15 BPM. The FHR1 heartbeat indicator ( ) flashes for each input signal. The ECG “beep”...
- Page 192 Functional Checkout Procedure: FECG Test Figure 6-4. FECG Ramp 6-14 120 Series Maternal/Fetal Monitor Revision B 2015590-001...
- Page 193 Functional Checkout Procedure: FECG Test Figure 6-5. FECG Artifact Elimination Revision B 120 Series Maternal/Fetal Monitor 6-15 2015590-001...
-
Page 194: Ultrasound Test
Functional Checkout Procedure: Ultrasound Test Ultrasound Test This portion of the functional checkout procedure ensures the integrity of the ultrasound circuitry and the heart rate channel of the recorder. Connect the simulator’s US sub-cable to the receptacle on the monitor. Set the switches on the Model 325 Input Simulator according to Table 6-3. - Page 195 Functional Checkout Procedure: Ultrasound Test Table 6-3. Ultrasound Test Simulator Settings Section Switch Setting Mode US/FMD Signal Level Rate MANUAL GENERAL Pattern Memory Main Mode TOCO Place the simulator’s US Rate switch in each of the individual rate settings (50, 60, 120, and 210 BPM).
- Page 196 Functional Checkout Procedure: Ultrasound Test Figure 6-6. Ultrasound Ramp 6-18 120 Series Maternal/Fetal Monitor Revision B 2015590-001...
-
Page 197: Fetal Movement Detection Test
Functional Checkout Procedure: Fetal Movement Detection Test Fetal Movement Detection Test This portion of the functional checkout procedure ensures the integrity of the fetal movement detection circuitry and the heart rate channel of the recorder. (Refer to Figure 6-7.) Connect the simulator’s US sub-cable to the receptacle on the monitor. - Page 198 Functional Checkout Procedure: Fetal Movement Detection Test Figure 6-7. Fetal Movement Detection 6-20 120 Series Maternal/Fetal Monitor Revision B 2015590-001...
-
Page 199: Ultrasound Transducer Test
Functional Checkout Procedure: Ultrasound Transducer Test Ultrasound Transducer Test Inspect a Model 116/118/120 ultrasound transducer as follows: Ensure there are no cracks around the transducer face. Visibly assess the condition of the cable, strain relief, and connector pins. Disconnect the simulator’s ultrasound cable from the front panel of the 120 Series Monitor. -
Page 200: Uterine Activity Test
Functional Checkout Procedure: Uterine Activity Test Uterine Activity Test This portion of the functional checkout procedure tests the uterine activity section of the 120 Series Monitor. Set the switches on the Model 325 Simulator according to Table 6-5. Connect the simulator’s UA sub-cable to the receptacle on the monitor. - Page 201 Functional Checkout Procedure: Uterine Activity Test Table 6-5. Uterine Activity Test Simulator Settings Section Switch Setting GENERAL Pattern Memory Main LEVEL Level 0 mmHg Mode TOCO Place the simulator’s switch at each of the level settings: 0, 10, 50, UA Level and 100 mmHg.
- Page 202 Functional Checkout Procedure: Uterine Activity Test Figure 6-8. Uterine Activity Ramp 6-24 120 Series Maternal/Fetal Monitor Revision B 2015590-001...
-
Page 203: Tocotransducer Test
Functional Checkout Procedure: Tocotransducer Test Tocotransducer Test Inspect a Nautilus Tocotransducer as follows: Check for any cracks or contaminants on the tocotransducer especially on the diaphragm located on the bottom of the tocotransducer. Visibly assess the condition of the cable, strain relief, and connector pins. 12. -
Page 204: Strain Gauge Transducer Test
Functional Checkout Procedure: Strain Gauge Transducer Test Strain Gauge Transducer Test Inspect a Model 116/118/120 strain gauge as follows: Unscrew the plastic dome from the transducer and check for any cracks or contaminants on the transducer. Visibly assess the condition of the cable, strain relief, and the connector pins. -
Page 205: Pattern Memory Test
Functional Checkout Procedure: Pattern Memory Test Pattern Memory Test The pattern memory of the simulator can be used to test any of the following mode combinations of the monitor. • FECG/TOCO • US2/IUP • FECG/IUP • FECG/US/TOCO • MECG/TOCO • FECG/US/IUP •... -
Page 206: Dual Heart Rate Test (Non-Pattern)
Functional Checkout Procedure: Dual Heart Rate Test (Non-Pattern) Dual Heart Rate Test (Non-Pattern) FECG/US Modes Connect the FECG/MECG adapter cable to the connector on the FECG/MECG 120 Series Monitor. Connect the Model 325 simulator’s ECG sub-cable to the input on the FECG monitor’s adapter cable. - Page 207 Functional Checkout Procedure: Dual Heart Rate Test (Non-Pattern) Table 6-6. Dual Heart Rate Test (Non-Pattern) Simulator Settings Section Switch Setting Main RATE Rate 120 BPM FECG/MECG Mode FECG QRS Amplitude 50 µV QRS Polarity Mode ULTRASOUND/FMD Level Rate RAMP GENERAL Pattern Memory Revision B 120 Series Maternal/Fetal Monitor...
- Page 208 Functional Checkout Procedure: Dual Heart Rate Test (Non-Pattern) Figure 6-9. Dual Heart Rate, FECG and US 6-30 120 Series Maternal/Fetal Monitor Revision B 2015590-001...
-
Page 209: Dual Ultrasound Modes
Functional Checkout Procedure: Dual Heart Rate Test (Non-Pattern) Dual Ultrasound Modes As stated previously, the dual ultrasound mode of the 120 Series Monitor cannot be tested unless two Model 325 Simulators are used or two Model 116/118/120 ultrasound transducers. Do not attempt to test dual ultrasound using one Model 325 Simulator and one ultrasound transducer. -
Page 210: Alarm Test
Functional Checkout Procedure: Alarm Test Alarm Test This portion of the test ensures the integrity of the audio alarms and tests the alarm limit software. Connect the FECG/MECG adapter cable to the input receptacle FECG/MECG on the 120 Series Monitor. Connect the Model 325 Simulator’s ECG sub-cable to the adapter’s MECG input. - Page 211 Functional Checkout Procedure: Alarm Test Table 6-7. Alarm Test Simulator Settings Section Switch Setting Main RATE Rate MANUAL FECG/MECG Mode MECG QRS Amplitude 500 µV QRS Polarity GENERAL Pattern Memory 18. Wait 30 seconds and verify the following: The alarm tone is once again emitted from the rear panel speaker. The MECG value flashes again.
- Page 212 Functional Checkout Procedure: Alarm Test 25. Wait ten seconds and verify the following: The alarm tone is once again emitted from the rear panel speaker. The MECG value flashes again. 26. Depress the monitor’s front panel pushbutton again. Alarm Silence 27.
-
Page 213: Mspo 2 Test
Functional Checkout Procedure: MSpO Test MSpO Test Access the 120 Monitor’s MSpO Setup window and configure as follows: (Nellcor only) Response Time = Normal (Masimo only) Sensitivity = Normal (Masimo only) Averaging = 8 Print Interval = 2 minutes Trace = On Access the monitor’s MSpO Setup window and set the MSpO Scale to AUTO. -
Page 214: Preventative Maintenance Inspection Report
NBP Hose/Cuff (Models 128/128F/129/129F Power Supply Fan only) NOTE: GE Medical Systems Information Technologies hereby gives its customers permission to reproduce pages 6-36 through 6-39 of this manual for the purpose of servicing the equipment. 6-36 120 Series Maternal/Fetal Monitor... -
Page 215: Inspection Checklist
Functional Checkout Procedure: Preventative Maintenance Inspection Report Inspection Checklist Page Description Complete Actual Pass Fail Cleaning page Clean the monitor exterior. Clean the monitor interior using a hand-held vacuum. page Clean the recorder printhead. 10-4 page Clean the monitor accessories (tocos, transducers, cables) page Clean the monitor accessories (cuffs, hoses) - Page 216 Functional Checkout Procedure: Preventative Maintenance Inspection Report Page Description Complete Actual Pass Fail Patient-to-Ground leakage for MSp0 page 50µA) < 9-18 Patient-to-Line leakage for MSp0 page 50µA) < 9-19 Patient-to-Ground leakage for FSp0 page 50µA) < 9-20 Patient-to-Line leakage for FSp0 page 50µA) <...
- Page 217 Functional Checkout Procedure: Preventative Maintenance Inspection Report Page Description Complete Actual Pass Fail Pattern Memory Test page 6-27 Dual Heart Rate Test page 6-28 Dual Ultra Sound Modes page 6-31 Alarm Test page 6-32 MSp0 Test page 6-35 Manometer Pressure Check (annual) page See Table 9-1 on page 9-10...
- Page 218 Functional Checkout Procedure: Preventative Maintenance Inspection Report For your notes 6-40 120 Series Maternal/Fetal Monitor Revision B 2015590-001...
-
Page 219: Calibration
This procedure is not intended to replace a complete instrument checkout and alignment as performed at the GE factory. It should be considered a performance check and troubleshooting guide to be used in conjunction with other information supplied throughout this service manual. -
Page 220: Before You Begin
Calibration: Before You Begin Before You Begin General Refer to the associated assembly drawings in "Chapter 15, Block Diagrams", for the location of adjustments and test points referred to in this section. The board assembly drawing numbers are given for each board in this section. The electronic calibration procedure outlined in this section necessitates removal of the monitor’s top cover. -
Page 221: Power Supply Voltages-Verification
Calibration: Power Supply Voltages—Verification Power Supply Voltages—Verification There are no adjustments for the power supply voltages; however, you can verify them as follows: Main Board Power Supply Voltages Using a digital voltmeter, measure and verify the power supply voltages using the J14 connector on the Main Board. -
Page 222: Isolated Power Supply Board Voltages
Calibration: Power Supply Voltages—Verification Isolated Power Supply Board Voltages This procedure performs an adjustment on the Isolated Power Supply Board. Connect the positive lead of a digital voltmeter to TP7 on the Isolated Power Supply Board. Connect the negative lead to TP8 (isolated ground). Adjust R7 for a reading of +16.50 Vdc ±... -
Page 223: Recorder Photosensor Calibration
Calibration: Recorder Photosensor Calibration Recorder Photosensor Calibration Adjusting the Paper-Low Photosensor Load paper in the recorder. Ensure that there are no black squares showing to indicate a paper-low condition. Press the button to turn on the recorder. Allow the paper to advance for Record a few seconds in order to tension the paper. -
Page 224: Adjusting The Paper-Out Photosensor
Calibration: Recorder Photosensor Calibration Adjusting the Paper-Out Photosensor Load paper in the recorder. Ensure that there are no black squares showing to indicate a paper-low condition. Press the button to turn on the recorder. Allow the paper to advance for Record a few seconds in order to tension the paper. -
Page 225: Display Check
The 120 Series Display is manufactured by Planar Systems, Inc. All adjustments are made at the Planar factory. There is no calibration or replacement procedure for either the Display Driver Board or the Power Controller Unit. Contact your GE Service Representative for information about repair/exchange of the entire display assembly. -
Page 226: Checking A 3" X 3.75" Display
DSP Board. 12. If you suspect that the interconnect cable is not working properly, refer to “Chapter 14, Replacement Parts” for parts information. Your GE Service Representative for part ordering information. 120 Series Maternal/Fetal Monitor Revision B... -
Page 227: Removing The Display Assembly
14. Upon inspection, you may need to replace the spacer display frame applied to the face of the display. Refer to “Chapter 14, Replacement Parts” for parts information. Contact GE Service Representative for part ordering information. Revision B 120 Series Maternal/Fetal Monitor 2015590-001... -
Page 228: Replacing The Display Assembly
Calibration: Display Check Replacing the Display Assembly Turn off the 120 Series Monitor and disconnect the power cord from the monitor. Ensure that a washer and spacer is in place on each of the four studs used to mount the display assembly. If the display lens has become dusty, remove it from the front bezel and clean the lens’... -
Page 229: Upgrading To A 3.5" X 4.5" Display
Calibration: Display Check Upgrading to a 3.5” x 4.5” Display If you wish to replace an existing 3” x 3.75” display with a larger 3.5” x 4.5” display, refer to “Chapter 14, Replacement Parts”to select the correct kit. The display kit contains a new front bezel assembly and DSP Board. Equipment Required You will need the following equipment: Phillips Torque Driver... -
Page 230: Reassembly
Calibration: Display Check 16. If MSpO is installed in the monitor, disconnect the front panel MSpO harness cable from the Oximeter Carrier Board at J6 and remove the cable bushing from the enclosure. Pull the cable’s ferrite bead out from the retaining clip. 17. - Page 231 Calibration: Display Check 10. Connect the front panel US2 harness cable to the Ultrasound Board at J6. Guide the plastic cable bushing into the front-end enclosure until it snaps into place. 11. Connect the front panel US1 harness cable to the Ultrasound Board at J5. Snap the bushing in place in the enclosure.
- Page 232 Calibration: Display Check Notch in DSP Board Connector for switch panel cable Connector for display cable Connector for main power switch harness Connector for recorder power cable Connector for recorder output cable Nipples for Clip for MSpO BP tubes ferrite bead (if MSpO installed) Figure 7-1.
- Page 233 Calibration: Display Check Clip for FSpO ferrite bead (if Clip for FSpO cable ferrite Clip for MECG ferrite Clip for FECG/MECG FSpO bead, if installed installed) ferrite beads bead (if MECG installed) Clip for FECG ferrite bead Clip for MSpO ferrite bead (if MSpO Ferrite bead is moun...
-
Page 234: Testing
Calibration: Display Check Figure 7-3. Front Bezel Testing CAUTIONS Following completion of the procedure: LEAKAGE TEST—Perform a leakage and dielectric test on the 120 Series Monitor per applicable standards. FUNCTIONAL TEST—Perform a functional test of the overall monitor following the instructions provided in “Chapter 6, Functional Checkout Procedure”. -
Page 235: Checking A 3.5" X 4.5" Display
120 Series Monitor, substitute the DSP Board and check for proper operation. Contact your GE Service Representative for information about repair/exchange of the DSP Board. 12. If you suspect that the interconnect cable is not working properly, refer to “Chapter 14, Replacement... -
Page 236: Removing The Display Assembly
Series Monitor, substitute the entire display assembly and check for proper operation. Refer to “Removing the Display Assembly” “Replacing the Display Assembly”. Contact your GE Service Representative for ordering information. Removing the Display Assembly Turn off the 120 Series Monitor and disconnect the power cord from the monitor. -
Page 237: Replacing The Display Assembly
Calibration: Display Check Replacing the Display Assembly Turn off the 120 Series Monitor and disconnect the power cord from the monitor. Ensure that a washer and spacer is in place on each of the four studs used to mount the display assembly. If the display lens has become dusty, remove it from the front bezel and clean the lens’... -
Page 238: Trimline Tocotransducer Calibration
Calibration: Trimline Tocotransducer Calibration Trimline Tocotransducer Calibration The Corometrics Trimline tocotransducer must be calibrated using the following procedure for use with the 120 Series Monitor. Equipment Required Refer to “Chapter 14, Trimline Tocotransducer Calibration” for part numbers. Digital voltmeter: DM501 or equivalent with x1 probe or leads Corometrics Common Mode Rejection (CMR) Test Jack (Refer to Figure 7-4.) - Page 239 Calibration: Trimline Tocotransducer Calibration 10. Adjust the ZERO CTR and/or the ZERO TRIM potentiometer(s) so that the voltage measured across TP6 and TP2 (or TP3) matches the reading recorded in step 7, ± 0.04 V. This voltage is referred to as the WEIGHT ON voltage. The ZERO CTR potentiometer provides course adjustment.
- Page 240 Calibration: Trimline Tocotransducer Calibration Pin 1* –P Pin 2* +4 V Pin 4* 475 W Pin 6* *Front Panel UA Connector Figure 7-4. CMR Test Jack Figure 7-5. Trimline Tocotransducer Potentiometer Locations 7-22 120 Series Maternal/Fetal Monitor Revision B 2015590-001...
-
Page 241: Nautilus Tocotransducer Calibration
Calibration: Nautilus Tocotransducer Calibration Nautilus Tocotransducer Calibration Calibrating a Nautilus Tocotransducer requires a Calibration Kit. Refer to “Chapter 14, Nautilus Tocotransducer” to order the correct kit. Revision B 120 Series Maternal/Fetal Monitor 7-23 2015590-001... -
Page 242: Equipment Required
Calibration: Nautilus Tocotransducer Calibration Equipment Required You will need the following: Phillips Head Torque Driver Screw Cap Extraction Tool Digital Voltmeter: DM501 or equivalent with x1 probe or leads Common Mode Rejection (CMR) Test Jack (Figure 7-4) Potentiometer Adjustment Tool 52.5 gram weight NOTE: You will need a specific weight to calibrate the Nautilus Tocotransducer. -
Page 243: Calibration Procedure
Calibration: Nautilus Tocotransducer Calibration Calibration Procedure Disassembly CAUTION HANDLING—Take care not to damage the transducer base sealing groove. Turn off the monitor. Unplug the transducer from the monitor. Use the screw cap extraction tool to pry off the five screw caps (Figure 7-6). -
Page 244: Calibration For Cat. No. (Ref) 2264 Aax/Bax/Cax/Dax/Eax/Fax
Calibration: Nautilus Tocotransducer Calibration Calibration for Cat. No. (REF) 2264 AAX/BAX/CAX/DAX/EAX/FAX Set the Gain (R15) and Offset (R5) potentiometers fully counterclockwise. Set the Offset Trim (R6) potentiometer to its mid-position—approximately six turns from fully counterclockwise. Connect the positive lead of the digital voltmeter to TP6 on the FECG/UA board;... -
Page 245: Reassembly
Calibration: Nautilus Tocotransducer Calibration Reassembly CAUTIONS VISIBLE INSPECTION—Ensure the base sealing groove, flat- seal o-ring, sealing surface, and sealing screws are free of visible surface defects, dust, dirt, and foreign material. SINGLE-USE COMPONENTS—Do not reuse case top, flat-seal o-ring, sealing screws, or screw caps. Discard these items each time a transducer is opened. -
Page 246: Maternal Spo2 Calibration
Calibration: Maternal SpO Calibration Maternal SpO Calibration The 120 Series Monitor automatically calibrates the pulse oximetry module upon power up, whenever a new sensor is attached, and at periodic intervals during use. The intensity of the sensor’s LEDs are also automatically adjusted to compensate for differences in tissue density. -
Page 247: Self-Tests
Chapter 8 Self-Tests This section of the manual provides information which will help the biomedical engineer isolate 120 Series Monitor problems to the board or component level. The 120 Series Monitor incorporates a number of software-based self-test diagnostic features designed to enhance verification of the unit’s internal circuitry. This section of the manual is not intended as a substitute for proper professional training, or familiarity with the 120 Series Monitor. -
Page 248: Power-On Diagnostic Tests
Self-Tests: Power-On Diagnostic Tests Power-On Diagnostic Tests Upon power-up, the 120 Series Monitor’s Main Motherboard and DSP Board perform a number of tests before allowing the monitor to enter the normal operational mode. After setting the switch to the on ( ) position, the tests run Power for approximately two seconds. -
Page 249: Monitor Self-Test
Self-Tests: Monitor Self-Test Monitor Self-Test The 120 Series Monitor contains test routines which verify the unit’s calibration and internal circuitry. These routines are initiated by depressing the front panel Test pushbutton. The test results are printed on the strip chart recorder paper, verifying the integrity of the unit. - Page 250 Self-Tests: Monitor Self-Test The recorder returns to its original on, off, or maternal-only mode state from when the pushbutton was depressed. Test NOTE: To disable the test, depress the Test pushbutton or open the recorder door. NOTE: If the simulated fetal heart rate trends do not appear in the correct positions on the strip chart recorder paper, ensure the monitor’s vertical scale setting matches the type of paper being used, i.e.
-
Page 251: Error Log Screen
Self-Tests: Error Log Screen Error Log Screen The Error Log screen, Figure 8-2, displays a service log of the 120 Series Monitor. The service log is helpful to service representatives when diagnosing intermittent problems. There are up to 230 error codes which can be detected by the monitor. The Error Log is comprised of multiple pages with up to 20 error codes per screen. - Page 252 Self-Tests: Error Log Screen To use the Error Log screen: Select the softkey from the General Setup screen. SERVICE The Service Lock screen appears. Enter the correct access code; the Install Options screen displays. Select the softkey from the Install Options screen. The first Error Log screen displays.
- Page 253 Self-Tests: Error Log Screen Table 8-1. Error Codes (Continued) Error # Description 6894 Channel A communications error—J111 6894 Channel B communications error— FSpO 6894 Channel C communications error—MSpO 6894 Channel D communications error—NBP 84–89 Reserved for future use DSP communications watchdog timer DSP Error 1—CRC on program in flash ROM is bad DSP Error 2—A/D converter conversion time test failed Unused...
- Page 254 Self-Tests: Error Log Screen Table 8-1. Error Codes (Continued) Error # Description CAS Error 3—No error CAS Error 4—reserved for future use CAS Error 5—reserved for future use CAS Error 6— Loose cuff CAS Error 7—Air leak CAS Error 8—Air pressure error CAS Error 9—Cuff positioning error CAS Error 10—Range exceeded CAS Error 11—Excessive motion...
- Page 255 Self-Tests: Error Log Screen Table 8-1. Error Codes (Continued) Error # Description NPB MSpO —Watchdog timer error 155–159 Reserved for future use Model 2116B Keyboard parity error 161–169 Reserved for future use NPB FSpO —Fast message error NPB FSpO —Slow message error NPB FSpO —Communications error NPB FSpO...
- Page 256 Self-Tests: Error Log Screen Table 8-1. Error Codes (Continued) Error # Description Task 10 timeout Task 11 timeout Task 12 timeout Task 13 timeout Task 14 timeout Task 15 timeout 226–229 Reserved for future use Power fault 231–239 Reserved for future use 8-10 120 Series Maternal/Fetal Monitor Revision B...
-
Page 257: Diagnostic Control Screen
Self-Tests: Diagnostic Control Screen Diagnostic Control Screen The Diagnostic Control screen, Figure 8-3, is used to perform the following diagnostic self-tests: manometer pressure check; pneumatic pressure check; recorder calibration test; CPU software version number; DSP software version number; monitor run time; recorder run time;... -
Page 258: Recorder Calibration Test
Self-Tests: Diagnostic Control Screen Recorder Calibration Test This test provides a method of testing the recorder calibration alignments. Use the Trim Knob control to set the recorder calibration field on the Diagnostic Control service mode screen to ON. The recorder prints three continuous horizontal lines at: 0 mmHg, 30 bpm, and 240 bpm. -
Page 259: Dsp Version
Self-Tests: Diagnostic Control Screen DSP Version This field displays the software version number of the processor installed on the DSP Board in your monitor. Run Time This field displays the amount of time the monitor has been turned on—since the field was cleared. -
Page 260: Corolan Network Status
Meaning Monitor is successfully communicating with the Corolan master device (e.g. QS Server). JUST STARTED Contact GE Service Representative. ADDRESS NEVER CHECKED FLOATING ADDRESS There is a faulty address line in the wallplate. A wallplate has been changed from one address to another. This could be INVALID ADDRESS CHANGE the result of a partially disconnected cable. - Page 261 Wallplate cable may be disconnected; or Corolan address checking is NO ADDRESS disabled. NO DATA YET Contact GE Service Representative. There is no communication with the Corolan master device (e.g. QS Server). NEVER INTERRUPTED The master device is not polling the monitor.
- Page 262 AWAITING POLL handshaking message; however no further communication occurred. MANAGER NOT ACTIVE MANAGER TOO SLOW Contact GE Service Representative. MANAGER RUNNING SLOW Fifteen seconds have elapsed since monitor was first turned on. (Data is AWAITING FIRST PACKET DATA usually sent in 15-second packets.) NO I FRAME FORMATTED YET Contact GE Service Representative.
-
Page 263: Corolan Address Check
Self-Tests: Corolan Address Check Corolan Address Check The Diagnostic Control service mode screen provides an indication of whether a monitor is connected to a Corolan network and if so, provides the wallplate address. If the monitor is not connected to a Corolan network, or if there is a wallplate address error and the monitor is automatically taken offline, the message appears at the bottom left of the screen. -
Page 264: J102 Analog Output Connector Dac Static Test
Self-Tests: J102 Analog Output Connector DAC Static Test J102 Analog Output Connector DAC Static Test This screen displays the J102 pin numbers, the signal descriptions, the range of allowable values for measured voltages, the expected output voltages, and the settings (meaning) adjustable using the Trim Knob control. Use this screen while verifying and calibrating the digital-to-analog converters (DACs) on the Communications Board (No. -
Page 265: Hr1 Mode
Self-Tests: J102 Analog Output Connector DAC Static Test HR1 Mode Use the Trim Knob control to select: – – –, FECG, OFF, US, or INOP. HR2 Mode Use the Trim Knob control to select: TEST, FECG, INOP, US, or MECG. UA Mode Use the Trim Knob control to select: –... - Page 266 Self-Tests: J102 Analog Output Connector DAC Static Test Table 8-4. DAC Output Voltages and Adjustment Points for Corometrics Central Station Outputs Service Screen Analog Signal Measurement Site Expected Voltage Adjustment Site Setting – – – –1.2 V ± 10 mV J102, pin 7 240 BPM +1.2 V ±...
-
Page 267: Rs-232C Connector Loopback Test
Verify that, after a few seconds, the status LOOPBACK OK displays. OK indicates that the test has passed. NOTE: If OFF remains displayed, the test has failed; contact your GE Service Representative. Do not use this port to connect to any peripheral equipment until the port or Communications Board has been serviced. - Page 268 Self-Tests: RS-232C Connector Loopback Test Table 8-6. J109, J110, and J111 Communications Ports Connector Pinout J109, J110, Or J111 Pin # Signal Description Figure 8-7. Communications Screen 8-22 120 Series Maternal/Fetal Monitor Revision B 2015590-001...
-
Page 269: General Maintenance
Chapter 9 General Maintenance All equipment, no matter how reliable, needs to be maintained on a regular basis. This section describes general care and cleaning instructions for the 120 Series Monitor and its accessories. CAUTION BEFORE YOU START—Unplug the monitor from the AC power source and detach all accessories from the monitor. -
Page 270: Cleaning
General Maintenance: Cleaning Cleaning The following cleaning instructions are provided. If an accessory is not listed, consult the manufacturer’s instructions. Cleaning the Monitor Exterior Wipe any fluids from the surface of the monitor. Dampen a cloth or paper towel with isopropyl alcohol and gently rub soiled area until clean. -
Page 271: Cleaning The Tocotransducer, Ultrasound Transducer, And Mecg Cables
General Maintenance: Cleaning Cleaning the Tocotransducer, Ultrasound Transducer, and MECG Cables CAUTIONS ABRASION—Do not use abrasive cloth, sharp objects, or abrasive cleaners. ALCOHOL—Do not use Alcohol in cleaning solutions. DISCONNECTION—Detach all transducers and cables from the monitor. IMMERSION—Only Nautilus Tocotransducers may be immersed. -
Page 272: Cleaning The Ua Strain Gauge
General Maintenance: Cleaning Cleaning the UA Strain Gauge Remove the plastic dome. If desired, wash the transducer with sterile water or saline solution. Carefully clean the diaphragm seal with a cotton swab to remove deposits. Avoid excessive pressure since this may damage the diaphragm. If there are excessive stains on the diaphragm or sides of the transducer, remove with a cotton swab and solvents of increasing strength. -
Page 273: Main Board Battery
General Maintenance: Main Board Battery Main Board Battery The 120 Series Monitor contains a battery-backed RAM component on the Main Board at U30 (414775-001) which stores default settings when the monitor is turned off. To replace this chip: Turn off the monitor and disconnect the power cord from the monitor. Remove the nine screws which secure the monitor top cover. -
Page 274: Maternal Blood Pressure Tests
General Maintenance: Maternal Blood Pressure Tests Maternal Blood Pressure Tests Accessing the Diagnostic Control Screen The manometer and pneumatic pressure tests are initiated from one of several service screens: SETUP Select the softkey from the main operating screen to display the General Setup screen (Figure 9-1). - Page 275 General Maintenance: Maternal Blood Pressure Tests GENERAL SETUP TIME: 12:01:00 DATE: 01-JUN-2003 PLAY SONG: OFF VOLUME: 5 SPO2 SCALE: 0-100 % RECORDER SETUP PAPER SPEED: 3 CM/MIN LIGHT: ON PAPER CHIME: OUT ONLY VOLUME: 5 EXTERNAL MONITOR SETUPS MSPO2 PRINT INTERVAL: 5 MIN FSPO2 PRINT INTERVAL: 5 MIN FSPO2 TRACE: OFF EXIT...
- Page 276 General Maintenance: Maternal Blood Pressure Tests INSTALL OPTIONS DEFAULT SETTINGS: FACTORY LINE FREQUENCY: 60 HZ ECG ARTIFACT ELIMINATION: OFF SCALING: 30-240 LANGUAGE: ENGLISH NBP 1 MIN INTERVAL: OFF HR OFFSET: 10 MIN DEFAULT TOCO REFERENCE: 10 FM REMOTE MARK: ON COROLAN ADDRESS CHECKING: OFF HBC: OFF SMART BP: OFF...
-
Page 277: Manometer Pressure Check
General Maintenance: Maternal Blood Pressure Tests Manometer Pressure Check This test is used to perform a calibration check of the internal blood pressure module. This test should be performed annually by a qualified service person. The following equipment is required in order to perform the test: Mercury manometer with a range of 300 mmHg minimum;... - Page 278 General Maintenance: Maternal Blood Pressure Tests 10. Slowly inflate the manometer, using the inflation hand bulb, to 285 mmHg ± 15 OVERPRESSURE mmHg. Verify that the message displays. WARNING OVERPRESSURE—If the overpressure message is not indicated, or if the overpressure reading is not within the specified tolerance, contact your Service Representative.
-
Page 279: Pneumatic Pressure Check
General Maintenance: Maternal Blood Pressure Tests Pneumatic Pressure Check This procedure provides a pneumatic test of the monitor’s internal blood pressure module. This test should be performed annually by a qualified Service Representative. The following equipment is required to perform this test: Corometrics standard hose with a female Luer fitting for a single-tube cuffs—... -
Page 280: Electrical Safety Tests
General Maintenance: Maternal Blood Pressure Tests Electrical Safety Tests Perform all electrical safety tests in this section. IMPORTANT UNITS OF MEASURE—The specified leakage tester (E278-06) measures in mV. There is a direct correlation of mV to µA. In other words, on this text fixture, 1 mV = 1 µA. IMPORTANT 220/230/240 VAC POWER CORD—For 220/230/240 VAC testing, use only P/N 600034 line cord to power the E278-06 test... -
Page 281: Unit To Primary Leakage
General Maintenance: Maternal Blood Pressure Tests Unit to Primary Leakage Leakage Unit Set the fixture’s switch to Turn ON the monitor using the monitor’s power switch. Verify the following: < 300 µA (100, 120, 220, 230, or 240 VAC monitors) Record the primary leakage for the following conditions: Table 9-2. -
Page 282: Patient-To-Ground Leakage For Ecg
General Maintenance: Maternal Blood Pressure Tests Patient-to-Ground Leakage for ECG Connect an ECG test body to the monitor’s front panel input. The ECG test body can be shorted MECG cable, or the assembly leakage cable. IMPORTANT TEST CABLES—If you use transducers in lieu of the assembly leakage cable, and you are testing a Model 129/129F Monitor, you must test both FECG and MECG. -
Page 283: Patient-To-Line Leakage For Ecg
General Maintenance: Maternal Blood Pressure Tests Patient-to-Line Leakage for ECG Connect an ECG test body to the monitor’s front panel input. The ECG test body can be the assembly leakage cable. Leakage Line Set the fixture’s switch to Turn ON the monitor using the monitor’s power switch. Verify the following: <... -
Page 284: Patient-To-Ground Leakage For Iup
General Maintenance: Maternal Blood Pressure Tests Patient-to-Ground Leakage for IUP Connect an IUP test body to the monitor’s front panel input. The IUP test body can be a SensorTip transducer (wrapped in aluminum foil) or the assembly leakage cable. Leakage Patient Set the fixture’s switch to... -
Page 285: Patient-To-Line Leakage For Iup
General Maintenance: Maternal Blood Pressure Tests Patient-to-Line Leakage for IUP Connect an IUP test body to the monitor’s front panel input. The IUP test body can be a SensorTip transducer (wrapped in aluminum foil) or the assembly leakage cable. Leakage Line Set the fixture’s switch to... -
Page 286: Patient-To-Ground Leakage For Mspo
General Maintenance: Maternal Blood Pressure Tests Patient-to-Ground Leakage for MSpO MSpO Connect an MSpO test body to the monitor’s front panel input. Use the assembly leakage cable for the test body. Leakage Patient Set the fixture’s switch to Turn ON the monitor using the monitor’s power switch. Verify the following: <... -
Page 287: Patient-To-Line Leakage For Mspo
General Maintenance: Maternal Blood Pressure Tests Patient-to-Line Leakage for MSpO MSpO Connect an MSpO test body to the monitor’s front panel input. Use the assembly leakage cable for the test body. Leakage Line Set the fixture’s switch to Turn ON the monitor using the monitor’s power switch. Verify the following: <... -
Page 288: Patient-To-Ground Leakage For Fspo
General Maintenance: Maternal Blood Pressure Tests Patient-to-Ground Leakage for FSpO FSpO Connect an FSpO test body to the monitor’s front panel input. Use the assembly leakage cable for the test body. Leakage Patient Set the fixture’s switch to Turn ON the monitor using the monitor’s power switch. Verify the following: <... -
Page 289: Patient-To-Line Leakage For Fspo
General Maintenance: Maternal Blood Pressure Tests Patient-to-Line Leakage for FSpO FSpO Connect an FSpO test body to the monitor’s front panel input. Use the assembly leakage cable for the test body. Leakage Line Set the fixture’s switch to Turn ON the monitor using the monitor’s power switch. Verify the following: <... -
Page 290: Patient-To-Ground Leakage For Us
General Maintenance: Maternal Blood Pressure Tests Patient-to-Ground Leakage for US Connect an US test body to the monitor’s front panel input. The US test body should be an ultrasound transducer wrapped in aluminum foil. Leakage Patient Set the fixture’s switch to Turn ON the monitor using the monitor’s power switch. -
Page 291: Patient-To-Line Leakage For Us
General Maintenance: Maternal Blood Pressure Tests Patient-to-Line Leakage for US Connect an US test body to the monitor’s front panel input. The US test body should be an ultrasound transducer wrapped in aluminum foil. Leakage Line Set the fixture’s switch to Turn ON the monitor using the monitor’s power switch. -
Page 292: Patient-To-Ground Leakage For Us2
General Maintenance: Maternal Blood Pressure Tests Patient-to-Ground Leakage for US2 Connect an US test body to the monitor’s front panel input. The US test body should be an ultrasound transducer wrapped in aluminum foil. Leakage Patient Set the fixture’s switch to Turn ON the monitor using the monitor’s power switch. -
Page 293: Patient-To-Line Leakage For Us2
General Maintenance: Maternal Blood Pressure Tests Patient-to-Line Leakage for US2 Connect an US test body to the monitor’s front panel input. The US test body should be an ultrasound transducer wrapped in aluminum foil. Leakage Line Set the fixture’s switch to Turn ON the monitor using the monitor’s power switch. -
Page 294: Dielectric (Hi-Pot) Tests
General Maintenance: Maternal Blood Pressure Tests Dielectric (Hi-Pot) Tests CAUTION POWER OFF—Turn OFF the monitor prior to performing any of the hi-pot tests. Patient–to–AC-Line Using DC Voltage for One Minute Connect the monitor to the hi-pot tester as shown in Figure 9-5. - Page 295 General Maintenance: Maternal Blood Pressure Tests FECG: Connect an FECG test body to the monitor’s front panel input. The FECG test body can be the assembly leakage cable. Measure the voltage breakdown. pass fail MECG: Connect an ECG test body to the monitor’s front panel input.
-
Page 296: Patient-To-Chassis Using Ac Voltage For One Minute
General Maintenance: Maternal Blood Pressure Tests Patient–to–Chassis Using AC Voltage for One Minute Connect the monitor to the hi-pot tester as shown in Figure 9-6. NOTE: The hi-pot tester voltage is 2.5 kVAC. Figure 9-6. Patient–to–Chassis Using AC Voltage for One Minute (2.5 kVAC) FECG: Connect an FECG test body to the monitor’s front panel input. -
Page 297: Mains-To-Chassis Using Dc Voltage For One Minute
General Maintenance: Maternal Blood Pressure Tests pass fail US: Connect an US test body to the monitor’s front panel input. The US test body should be an ultrasound transducer wrapped in aluminum foil. Measure the voltage breakdown. pass fail US2: Connect an US test body to the monitor’s front panel input. - Page 298 General Maintenance: Maternal Blood Pressure Tests For your notes 9-30 120 Series Maternal/Fetal Monitor Revision B 2015590-001...
-
Page 299: Strip Chart Recorder Servicing
Chapter 10 Strip Chart Recorder Servicing This section of the manual provides information which will aid the biomedical engineer in performing routine service and maintenance on the 120 Series strip chart recorder. This section of the manual is not intended as a substitute for proper professional training, or familiarity with the 120 Series Monitor. -
Page 300: Removing The Strip Chart Recorder
Strip Chart Recorder Servicing: Removing the Strip Chart Recorder Removing the Strip Chart Recorder Removing the strip chart recorder requires loosening the monitor’s front panel bezel. Following this procedure carefully will avoid unnecessary damage to bezel’s mounting screws and the unit’s front panel connectors. Turn off the 120 Series Monitor and disconnect the power cord from the monitor. -
Page 301: Installing The Strip Chart Recorder
Strip Chart Recorder Servicing: Installing the Strip Chart Recorder Installing the Strip Chart Recorder Carefully place the recorder into the monitor housing. Install the four front recorder mounting screws which secure the frame to the bezel. Re-connect the Power Supply cable harness to the Recorder Board at J1. Re-connect the Main Motherboard ribbon cable to the Recorder Board at J2. -
Page 302: Periodic Thermal Printhead Cleaning
Strip Chart Recorder Servicing: Periodic Thermal Printhead Cleaning Periodic Thermal Printhead Cleaning The thermal printhead heater elements must be cleaned at regular intervals to remove any accumulated paper dust. The heater elements may be cleaned with methanol or isopropyl alcohol. Care must be taken to avoid touching the heater elements with bare hands. -
Page 303: Field Serviceable Assemblies
Servicing of any recorder parts, other than the five subassemblies outlined above, should be referred to the nearest GE Service Representative. Stepper Motor and Harness Prior to removing/replacing the stepper motor, follow all instructions in the section, “Removing the Strip Chart... -
Page 304: Printhead Adjustments
Strip Chart Recorder Servicing: Field Serviceable Assemblies Printhead Adjustments Refer to Figure 10-1 Figure 10-2 for identification of the adjustment points outlined in this section, and to assist in clarifying adjustment procedures. Figure 10- Figure 10-2 show top and right side views of the 120 Series Monitor strip chart recorder assembly removed from the unit’s chassis. - Page 305 Strip Chart Recorder Servicing: Field Serviceable Assemblies Table 10-1. Printhead Adjustments Adjustment Description Set screws loosened to perform a vertical offset adjustment. Hex-head screw loosened to perform a horizontal offset adjustment. Hex-head screw which determines the vertical offset of a horizontal line. (See Figure 10-3.) Captive hex-head screw which controls...
-
Page 306: Thermal Printhead
Strip Chart Recorder Servicing: Field Serviceable Assemblies Thermal Printhead The thermal printhead is a part of the printhead assembly. Refer to the parts list in “Chapter 16, Assembly Drawings and Parts Lists”, of this manual for ordering information and illustrations showing the printhead assembly. Removing the Printhead Use the following procedure for removing the 120 Series Monitor printhead. - Page 307 Strip Chart Recorder Servicing: Field Serviceable Assemblies Press the Record pushbutton to turn on the recorder. 10. Adjust R2 on the Recorder Board until the reading on the digital voltmeter is within ±100 mV of the VHEAD voltage stamped on the printhead. 11.
- Page 308 Strip Chart Recorder Servicing: Field Serviceable Assemblies Figure 10-1. Recorder Top View Figure 10-2. Recorder Right Side View 10-10 120 Series Maternal/Fetal Monitor Revision B 2015590-001...
- Page 309 Strip Chart Recorder Servicing: Field Serviceable Assemblies Figure 10-3. Vertical Offset Adjustment Self-Test Trace Revision B 120 Series Maternal/Fetal Monitor 10-11 2015590-001...
-
Page 310: Paper-Low/Paper-Out Photosensor
Although these two reflective-sensors may be replaced in the field, tight tolerance repositioning is required to ensure that the sensors function properly. Therefore, it is recommended that the photosensors be replaced by a GE Service Representative. If the replacement is done locally, it must be done according to the following procedure. -
Page 311: Adjusting The Paper-Out Photosensor
Strip Chart Recorder Servicing: Field Serviceable Assemblies NOTE: If you open and then close the recorder door, the reading may vary 5–10 mV, due to the loss of tension in the paper. This is acceptable and you do not need to re-adjust. Open the door and verify that the reading on the digital voltmeter is greater than +4.75 Vdc. -
Page 312: Paper-Loading Sensor
Strip Chart Recorder Servicing: Field Serviceable Assemblies Paper-Loading Sensor Follow the instructions for “Removing the Strip Chart Recorder” page 10-2 before following this procedure: Removing the Paper-Loading Photosensor Disconnect the paper-loading sensor cable from J8 on the Recorder Board. Turn over the recorder and place face down. Cut and remove the cable tie which holds the sensor cable. -
Page 313: Adjusting The Paper-Loading Sensor
Strip Chart Recorder Servicing: Field Serviceable Assemblies Adjusting the Paper-Loading Sensor Load paper in the recorder. (Refer to page 5-2 for proper loading instructions— paper should feed from the top of the pack.) Ensure that there are no black squares showing to indicate a paper-low condition. You must load at least nine sheets of paper. - Page 314 Strip Chart Recorder Servicing: Field Serviceable Assemblies For your notes 10-16 120 Series Maternal/Fetal Monitor Revision B 2015590-001...
-
Page 315: Peripheral Devices
Chapter 11 Peripheral Devices The 120 Series Monitor allows connection to optional peripheral equipment. Some of the connectors are standard on each monitor while others are part of an optional communications package. All connectors are described in this section. NOTE: Refer to “Chapter 12, Upgrading a 120 Series Monitor”, for more information. -
Page 316: Standard Input/Output Connectors
Peripheral Devices: Standard Input/Output Connectors Standard Input/Output Connectors Remote Marks Connector This receptacle is provided for connection to a Corometrics Model 146 Fetal Acoustic Stimulator. Remote Marks Connector This receptacle is provided for connection to an optional Corometrics Remote Event Marker. -
Page 317: J109, J110, And J111 Connectors (Rs-232C)
DINAMAP Model 1846, 1846SX, 8100, 8100T NIBP Monitors DINAMAP Model 1846SX/Oxytrak Critical Care Monitor Quantitative Sentinel/Perinatal System (any RS-232C connector) When shipped from the GE factory, all three ports are configured as follows: communications mode = NELLCOR baud rate (bps) = 2400 At the above settings, connectors J109 and J111 are ready for connection to an NPB Model N-200. - Page 318 Peripheral Devices: Standard Input/Output Connectors COMMUNICATIONS SETUP BAUD RATE MODE J111 2400 NELLCOR J110 2400 NELLCOR J109 2400 NELLCOR EXIT Figure 11-1. Communications Setup Screen 11-4 120 Series Maternal/Fetal Monitor Revision B 2015590-001...
-
Page 319: Nellcor Puritan Bennett Model N-200 Maternal Pulse Oximeter
Peripheral Devices: Nellcor Puritan Bennett Model N-200 Maternal Pulse Oximeter Nellcor Puritan Bennett Model N-200 Maternal Pulse Oximeter Through this interface, MSpO readings provided by an NPB Model N-200 are printed at selected intervals on the strip chart paper of the 120 Series Monitor. When the recorder is on, each reading is printed in the annotation area between the top and bottom grids. -
Page 320: Nellcor Puritan Bennett Model N-400 Fetal Pulse Oximeter
Peripheral Devices: Nellcor Puritan Bennett Model N-400 Fetal Pulse Oximeter Nellcor Puritan Bennett Model N-400 Fetal Pulse Oximeter Through this interface, FSpO readings provided by an NPB Model N-400 are printed at selected intervals on the strip chart paper of the 120 Series Monitor. When the recorder is on, each reading is printed in the annotation area between the top and bottom grids. -
Page 321: Dinamap Models 1846, 1846Sx, And 1846Sx/Oxytrack, 8100, And 8100T
Peripheral Devices: DINAMAP Models 1846, 1846SX, and 1846SX/Oxytrack, 8100, and 8100T DINAMAP Models 1846, 1846SX, and 1846SX/ Oxytrack, 8100, and 8100T All of the above DINAMAP monitors can be interfaced to a 120 Series Monitor to provide a printout of NBP values on the strip chart paper; the Models 1846SX/ Oxytrack also provides a printout of the MSpO values on the 120 Series Monitor strip chart as well. -
Page 322: Quantitative Sentinel/Perinatal System
Peripheral Devices: Quantitative Sentinel/Perinatal System Quantitative Sentinel/Perinatal System Through this interface, the 120 Series Monitor outputs MHR data, FHR data, and UA data to a central information such as a Quantitative Sentinel/Perinatal System. Annotations made at the central station can be optionally printed on the strip chart paper of the 120 Series Monitor as summarized below: Each message is preceded by a computer icon ( ). -
Page 323: Model 115-Compatible Communications Protocols
Peripheral Devices: Model 115-Compatible Communications Protocols Model 115-Compatible Communications Protocols Two options provide backward-compatibility so that the 120 Series Monitor can operate in a Model 115-compatible communication mode. 115 Update Mode: The 115 Update mode outputs all available information and ignores requests from a host computer system. -
Page 324: 115 Transmit/Receive Mode
Peripheral Devices: Model 115-Compatible Communications Protocols NOTE: Refer to “Requested Data Format” later in this document for information about the response data format. The format is the same for both the 115 Update mode and the 115 Transmit/Receive mode. 115 Transmit/Receive Mode Once a valid request for data is received, the 120 Series Monitor will send only the information that is requested. -
Page 325: Transmitted Data Format
Peripheral Devices: Model 115-Compatible Communications Protocols Transmitted Data Format The format of the information transmitted from the 120 Series Monitor to the external computer is shown in Figure 11-3. NOTE: This applies to both 115 Update mode and 115 Transmit/Receive mode. The definitions of the bytes are as follows: Monitor Type This field contains a 1-byte ASCII value indicating the type of monitor sending the... -
Page 326: Fetal Movement
Peripheral Devices: Model 115-Compatible Communications Protocols Fetal Movement This field contains one ASCII character representing the current status of the signal: low or high. If the data byte is a 0 (30H), then the signal is low indicating no movement is detected; if the data byte is 1 (31H), then the signal is high indicating fetal movement is detected. -
Page 327: Request Errors
Peripheral Devices: Model 115-Compatible Communications Protocols Request Errors These errors apply to the 115 Transmit/Receive Mode only. Request errors are detected by the monitor as parity errors, framing errors, and invalid Monitor ID. If the monitor fails to respond properly to a request, it is suggested that the external computer re-transmit a request sequence. - Page 328 Peripheral Devices: Model 115-Compatible Communications Protocols Table 11-3. Heart Rate Modes Hr1 Mode Hr2 Mode Ascii Character Hexadecimal Value INOP INOP FECG INOP INOP MECG FECG FECG < INOP MECG INOP > If HR2 mode is INOP and HR3 mode is MECG, then HR3 mode and data are sent as HR2 mode and data. Table 11-1.
-
Page 329: Cabling Information
Peripheral Devices: Model 115-Compatible Communications Protocols Cabling Information Monitor RS-232 Connector The 120 Series Monitor’s RS-232C Ports each use a 6-pin RJ-11C connector, shown Figure 11-4. The following control signals are supported: Request to Send (RTS) This output line is asserted (+12 V) whenever the 120 Series Monitor is on and operating;... -
Page 330: Data Communications Equipment Cabling
Peripheral Devices: Model 115-Compatible Communications Protocols Data Communications Equipment Cabling When the 120 Series Monitor is connected to a Data Communications Equipment (DCE) device (a modem), a standard normal-modem cable is required as shown in Figure 11-6. Figure 11-4. RJ-11C Connector (while facing the monitor’s rear panel) Table 11-2. - Page 331 Peripheral Devices: Model 115-Compatible Communications Protocols 120 SERIES MONITOR SIDE DATA TERMINAL EQUIPMENT (DTE) SIDE 6-PIN SIGNAL NAME SIGNAL NAME 25-PIN 9 PIN 6 PIN Figure 11-5. Standard Null-Modem Cable 120 SERIES MONITOR SIDE DATA TERMINAL EQUIPMENT (DTE) SIDE 6-PIN SIGNAL NAME SIGNAL NAME 25-PIN...
-
Page 332: Optional Communication Package
Peripheral Devices: Optional Communication Package Optional Communication Package The communication option is an additional circuit board that can be installed in the 120 Series Monitor. Contact your GE Service Representative for upgrade information. J101 Connector (Model 340 Telemetry System Interface) This connector is for future interfacing to the receiver of a Corometrics Model 340 Telemetry System. -
Page 333: Upgrading A 120 Series Monitor
Upgrading a 120 Series Monitor This chapter provides a table of available upgrade kits as well as instructions for installing each kit. Contact your GE Service Representative for information about purchasing a kit. This section discusses the following: General Information . -
Page 334: General Information
Upgrading a 120 Series Monitor: General Information General Information Handling Precautions The following guidelines should be followed when handling circuit boards or assemblies containing circuit boards. Following these procedures helps resist damage that can be caused by static electricity. Discharge any static charge you may have built up before handling parts. Wear a grounded, anti-static wristband at all times. -
Page 335: Communications Option Upgrade Kit
Upgrading a 120 Series Monitor: Communications Option Upgrade Kit Communications Option Upgrade Kit The Communications Option Upgrade Kit adds the following communications ports to the monitor: J101: interface to Corometrics 340 Series Telemetry System J102 (analog interface): interface to central station system such as Corometrics Spectra 400 Surveillance and Alert System J103: optional data entry system such as Corometrics Model 2116 J104: interface to standard Nurse Call System... - Page 336 16. Fill out the Update Installation Verification Form included in the kit. Be sure to include the monitor’s serial number and catalog number on the form. Follow the instructions on the form to fax or mail the form to GE Medical Systems, Inc. 12-4...
- Page 337 Upgrading a 120 Series Monitor: Communications Option Upgrade Kit Main Motherboard Figure 12-1. Top View Revision B 120 Series Maternal/Fetal Monitor 12-5 2015590-001...
- Page 338 Upgrading a 120 Series Monitor: Communications Option Upgrade Kit Communications BP Board Switch Pack SW1 Board Connector Connector Figure 12-2. Main Motherboard Figure 12-3. Rear Panel 12-6 120 Series Maternal/Fetal Monitor Revision B 2015590-001...
-
Page 339: Nellcor Mspo And Nbp Option Upgrade Kit
Unpacking Unpack the kit and ensure it contains all items on the packing list. If something is missing, contact your GE Medical Systems Service Representative immediately. Installation NOTE: Unless otherwise instructed, retain all hardware for re-assembly. Turn off the 120 Series Monitor and disconnect the power cord from the monitor. - Page 340 Upgrading a 120 Series Monitor: Nellcor MSpO and NBP Option Upgrade Kit 14. Peel off the adhesive backing from the new membrane switch panel supplied with the kit. 15. Insert the new membrane switch panel into place in the front bezel—adhesive side up.
- Page 341 Upgrading a 120 Series Monitor: Nellcor MSpO and NBP Option Upgrade Kit NOTE: The Oximeter Carrier Board is designed so that the MSpO Board mounts on one side, while the FSpO Board (if installed) mounts on the other side. The MSpO Board mounts on the component side—with the two ribbon cables.
- Page 342 49. Fill out the Update Installation Verification Form included in the kit. Be sure to include the monitor’s serial number and catalog number on the form. Follow the instructions to fax the form to GE. Figure 12-4. DSP Board 12-10...
- Page 343 Upgrading a 120 Series Monitor: Nellcor MSpO and NBP Option Upgrade Kit Notch in BP Board Connector on DSP Board Main Motherboard BP Board Attach BP tubing here Oximeter Carrier Board Recorder Cavity Divider Clip for MSpO ferrite Recorder bead Board Front Panel Overlay Label...
- Page 344 Upgrading a 120 Series Monitor: Nellcor MSpO and NBP Option Upgrade Kit Clip for FSpO cable ferrite Clip for FECG/MECG bead, if installed ferrite beads Clip for FECG/MECG Clip for FSpO cable ferrite bead, if ferrite beads FSpO installed Ferrite bead is mounted to clip Ferrite bead is moun attached to back side of display FSpO2...
- Page 345 Upgrading a 120 Series Monitor: Nellcor MSpO and NBP Option Upgrade Kit Alarm Mark Record Silence Start / Stop [Offset] Volum Volum Volum Volum Paper Power Test Reference Advance Figure 12-7. Front Panel Overlay Label Communications BP Board Switch Pack SW1 Switch Pack SW1 Board Connector Connector...
- Page 346 Upgrading a 120 Series Monitor: Nellcor MSpO and NBP Option Upgrade Kit Use flat washer Use shoulder washer Figure 12-9. Oximeter Carrier Board 12-14 120 Series Maternal/Fetal Monitor Revision B 2015590-001...
- Page 347 Upgrading a 120 Series Monitor: Nellcor MSpO and NBP Option Upgrade Kit Oximeter Carrier Board Connectors UA/FECG Board Connectors Figure 12-10. Front End Motherboard Revision B 120 Series Maternal/Fetal Monitor 12-15 2015590-001...
- Page 348 Upgrading a 120 Series Monitor: Nellcor MSpO and NBP Option Upgrade Kit INOP INOP INOP PULSE MSpO 03:22:45 ALARMS SETUP VSHX Figure 12-11. NBP and MSpO Areas on Display INOP INOP INOP PULSE MSpO (Waveform iArea) 03:22:45 SETUP ALARMS VSHX Figure 12-12.
-
Page 349: Monitors With A 3.5-Inch X 4.5-Inch Display
Unpacking Unpack the kit and ensure it contains all items on the packing list. If something is missing, contact your GE Medical Systems Information Technologies Service Representative immediately. Installation NOTE: Unless otherwise instructed, retain all hardware for re-assembly. - Page 350 Upgrading a 120 Series Monitor: Nellcor MSpO and NBP Option Upgrade Kit 16. Guide the metal tabs of the new membrane switch panel through the front panel. Secure the switch panel to the bezel with the nuts retained in step 12.
- Page 351 49. Fill out the Update Installation Verification Form included in the kit. Be sure to include the monitor’s serial number and catalog number on the form. Follow the instructions to fax the form to GE. Revision B 120 Series Maternal/Fetal Monitor...
- Page 352 Upgrading a 120 Series Monitor: Nellcor MSpO and NBP Option Upgrade Kit Figure 12-13. DSP Board 12-20 120 Series Maternal/Fetal Monitor Revision B 2015590-001...
- Page 353 Upgrading a 120 Series Monitor: Nellcor MSpO and NBP Option Upgrade Kit Notch in BP Board Connector on DSP Board Main Motherboard BP Board Attach BP tubing here Oximeter Carrier Board Recorder Cavity Divider Clip for MSpO ferrite Recorder bead Board Front Panel Overlay Label...
- Page 354 Upgrading a 120 Series Monitor: Nellcor MSpO and NBP Option Upgrade Kit Clip for FSpO cable ferrite Clip for FECG/MECG bead, if installed ferrite beads Ferrite bead is mounted to FSpO2 clip attached to back side of display shield on front bezel, if FSpO installed MATERNAL...
- Page 355 Upgrading a 120 Series Monitor: Nellcor MSpO and NBP Option Upgrade Kit Alarm Mark Record Silence Start/Stop [Offset] Volume Volume Paper Test Power Reference Advance Trim Knob Figure 12-16. Front Panel Overlay Label Comm Board Communications BP Board BP Board Connector Switch Pack SW1 Switch Pack SW1 Board Connector...
- Page 356 Upgrading a 120 Series Monitor: Nellcor MSpO and NBP Option Upgrade Kit Use flat washer Use shoulder washer Figure 12-18. Oximeter Carrier Board 12-24 120 Series Maternal/Fetal Monitor Revision B 2015590-001...
- Page 357 Upgrading a 120 Series Monitor: Nellcor MSpO and NBP Option Upgrade Kit Oximeter Carrier Board Connectors UA/FECG Board Connectors Figure 12-19. Front End Motherboard Revision B 120 Series Maternal/Fetal Monitor 12-25 2015590-001...
- Page 358 Upgrading a 120 Series Monitor: Nellcor MSpO and NBP Option Upgrade Kit INOP INOP INOP PULSE MSpO 03:22:45 ALARMS SETUP VSHX Figure 12-20. NBP and MSpO Areas on Display INOP INOP INOP PULSE MSpO (Waveform iArea) 03:22:45 SETUP ALARMS VSHX Figure 12-21.
-
Page 359: Masimo Msp02 Upgrade Kit
Upgrading a 120 Series Monitor: Masimo MSp02 Upgrade Kit Masimo MSp0 Upgrade Kit To upgrade from Nellcor MSp0 to Masimo MSp0 , your monitor must be shipped to depot repair. Contact your local service center to make arrangements for this upgrade. -
Page 360: Mecg Option Upgrade Kit
Unpacking Unpack the upgrade kit and ensure it contains all items on the packing list. If something is missing, contact your GE Service Representative immediately. Installation Turn off the 120 Series Monitor and disconnect the power cord from the monitor. - Page 361 19. Fill out the Update Installation Verification Form included in the kit. Be sure to include the monitor’s serial number and catalog number on the form. Follow the instructions on the form to fax or mail the form to GE UA/FECG Board Top View Figure 12-22.
- Page 362 Upgrading a 120 Series Monitor: MECG Option Upgrade Kit Figure 12-23. UA/FECG Board 12-30 120 Series Maternal/Fetal Monitor Revision B 2015590-001...
- Page 363 Upgrading a 120 Series Monitor: MECG Option Upgrade Kit Oximeter Carrier Board Connectors UA/FECG Board Connectors Figure 12-24. Front End Motherboard Revision B 120 Series Maternal/Fetal Monitor 12-31 2015590-001...
- Page 364 Upgrading a 120 Series Monitor: MECG Option Upgrade Kit Connect front panel MECG harness cable here Figure 12-25. MECG Board Communications BP Board Switch Pack SW1 Board Connector Connector Figure 12-26. Main Motherboard 12-32 120 Series Maternal/Fetal Monitor Revision B 2015590-001...
- Page 365 Upgrading a 120 Series Monitor: MECG Option Upgrade Kit Figure 12-27. MHR/P Setup Screen INOP INOP INOP MECG – – – 15:52:58 ALARMS SETUP VSHX Figure 12-28. MHR Area on Display Revision B 120 Series Maternal/Fetal Monitor 12-33 2015590-001...
-
Page 366: Software Version 3.5
Upgrading a 120 Series Monitor: Software Version 3.5 Software Version 3.5 You can upgrade to software version 3.5 by using the Flasher Software Utility or by replacing the EEPROMS. Refer to “Chapter 14, Replacement Parts” for kit numbers. Flasher Software Utility Upgrade Method Flasher is a software utility program which uses one of the monitor’s RS-232 serial ports to upgrade to a newer software release. - Page 367 23. Fill out the Update Installation Verification Form provided in the kit. Be sure to include the monitor’s serial number and catalog number on the form. Follow the instructions on the form to fax or mail the form to GE. 24. Re-use the antistatic packaging to mail the old flash ROMs to the factory...
- Page 368 Upgrading a 120 Series Monitor: Software Version 3.5 BP Board Membrane Switch Panel Cable Notch in Display Cable DSP Board Nipples for BP Tubing Recorder Cavity Divider Figure 12-29. Top View 12-36 120 Series Maternal/Fetal Monitor Revision B 2015590-001...
- Page 369 Upgrading a 120 Series Monitor: Software Version 3.5 Membrane Switch Panel Connector Flash ROMs Figure 12-30. DSP Board Revision B 120 Series Maternal/Fetal Monitor 12-37 2015590-001...
- Page 370 Upgrading a 120 Series Monitor: Software Version 3.5 Flash ROMs Communications BP Board Switch Pack SW1 Board Connector Connector DSP Board Connector Figure 12-31. Main Motherboard 12-38 120 Series Maternal/Fetal Monitor Revision B 2015590-001...
- Page 371 Upgrading a 120 Series Monitor: Software Version 3.5 SERVICE LOCK ENTER ACCESS CODE CPU V3.52 DSP 03.07 EXIT Figure 12-32. Service Screen Revision B 120 Series Maternal/Fetal Monitor 12-39 2015590-001...
-
Page 372: Display Upgrade
Upgrading a 120 Series Monitor: Display Upgrade Display Upgrade To upgrade to a 3.5” x 4.5” display, refer to “Chapter 14, Replacement Parts” for kit information. Fetal Movement Detection Flasher is a software utility program which uses one of the monitor’s RS-232 serial ports to install a purchased option such as fetal movement detection. -
Page 373: Technical Specifications
Chapter 13 Technical Specifications This section contains a detailed list of the technical specifications for the 120 Series Monitor. This chapter lists specifications for the following: General Monitor ........13-2 Operating Modes . -
Page 374: General Monitor
Technical Specifications: General Monitor General Monitor Table 13-1. General Monitor Technical Specifications Category Technical Specifications Power Requirements Nominal Line Voltage: 100VAC 120 VAC 220 VAC 230 VAC 240 VAC Line Frequency: 50/60 Hz 50/60 Hz 50/60 Hz 50/60 Hz 50/60 Hz Power Consumption (maximum): 100 W 100 W... -
Page 375: Operating Modes
Technical Specifications: Operating Modes Operating Modes Table 13-2. Operating Mode Specifications FECG Mode Technique: Peak detecting, beat-to-beat cardiotachometer Heart Rate Counting Range: 30–240 BPM Heart Rate Resolution: ±1 BPM Artifact Elimination: Selectable, ±25 BPM artifact rejection Countable Input Signal Range: 15 µV to 2 mV peak-to-peak Offset Voltage Tolerance (Differential): ±300 mVdc maximum... - Page 376 Technical Specifications: Operating Modes Table 13-2. Operating Mode Specifications (Continued) MECG Mode Technique: Peak detecting, beat-to-beat cardiotachometer Maternal ECG Electrode Type: Medtronic 1700-003 or equivalent Leads Available: I, II, and III Heart Rate Counting Range: 30–240 BPM Heart Rate Resolution: ±1 BPM Heart Rate Averaging: 1 second average...
- Page 377 Technical Specifications: Operating Modes Table 13-2. Operating Mode Specifications (Continued) Maternal Blood Pressure Mode Technique: Oscillometric. Microprocessor software eliminates most ambient noise and motion artifact. Blood Pressure Range: 20–255 mmHg (2.7–34.0 kPa) Pulse Rate Range: 40–240 BPM Blood Pressure Accuracy: ±5 mmHg (0.7 kPa) with a standard deviation no greater than 8 mmHg (1.1 kPa) Pulse Rate Accuracy: ±2 BPM or ±2 % (whichever is greater)
- Page 378 Technical Specifications: Operating Modes Table 13-2. Operating Mode Specifications (Continued) Maternal Pulse Oximetry Mode (Nellcor) Technique: Spectrophotometry and plethysmography. Sensor Type: Nellcor Puritan Bennett (D-25 or D-25L recommended) Saturation Range: 0–100 % Pulse Rate Range: 30–250 BPM Saturation Accuracy: %SpO ±1 standard deviation (with Nellcor Puritan Bennett D-25 Sensor) 70–100 % ±2 digits...
- Page 379 Technical Specifications: Operating Modes Table 13-2. Operating Mode Specifications (Continued) Maternal Pulse Oximetry Mode (Masimo) Resolution Saturation(%Sp0 Pulse Rate (bpm) Low Perfusion Performance Saturation (%Sp0 ) ±2 digits >0.02% Pulse Amplitude Pulse Rate ±3 digits and % Transmission > 5% Interfering Substances Carboxyhemoglobin may erroneously increase readings.
-
Page 380: Strip Chart Recorder
Technical Specifications: Strip Chart Recorder Strip Chart Recorder Table 13-3. Strip Chart Recorder Technical Specifications Heart Rate Scale Domestic International 7 cm 8 cm Chart Width: 30 BPM/cm 20 BPM/cm Scaling: 30–240 BPM 50–210 BPM Range: 1 BPM 1 BPM Resolution: Fetal Pulse Oximetry %FSpO Scale... -
Page 381: Replacement Parts
This section of the manual provides parts lists for the 120 Monitor. Parts lists should be used in conjunction with the other chapters of this manual. GE makes every effort possible to provide the most up-to-date reference documentation for your equipment. However, in special cases involving field- installed upgrades, the revision level of a diagram or parts list in this manual may not reflect the revision level of your unit’s subassemblies. -
Page 382: Replacement Parts Table
Replacement Parts: Replacement Parts Table Replacement Parts Table Table 14-1. Replacement Parts Name FRU or Part No. UA/FECG Board 11867E FECG/MECG adapter (for cables with round plugs) 1442AA0 Front End Motherboard 13542A Oximeter Carrier Board 13551A MSpO Front Panel Connector Board 13690A MECG Board 13691A... - Page 383 Replacement Parts: Replacement Parts Table Table 14-1. Replacement Parts Name FRU or Part No. 15096A 15096B 15097A Switch Panel Replacement Kit 15097B (Note: Parts with the “A” suffix are required for older 15098A units.) 15098B 15099A 15099B MSpO Board 330037 Cable Assembly, Patient Adapter, Nellcor (from 2006644-001 SPO2 sensor to monitor)
- Page 384 Upgrade Kit (Nellcor), NBP/MSpO , non-English monitors with a 1210DAO 3.5-inch x 4.5-inch display 2017259-001 Upgrade Kit (Masimo) Contact GE Service. Monitor must be shipped to depot repair to upgrade. Oximeter Carrier Board (Masimo) 2007055-001 Masimo module 2007964-001 Front panel connector (Masimo)
- Page 385 Replacement Parts: Replacement Parts Table Table 14-1. Replacement Parts Name FRU or Part No. 3.5-inch x 4.5-inch Display Upgrade, non-English 2009256-003 monitors 3.5-inch x 4.5-inch Display Upgrade, non-English 2009256-004 monitors Fetal Movement Detection, English monitors 1202AAO Fetal Movement Detection, non-English monitors 1202BAO Assembly Leakage Cable, 120 Series 2009726-001...
-
Page 386: Calibration Parts
Replacement Parts: Calibration Parts Calibration Parts Trimline Tocotransducer Calibration Table 14-2. Trimline Tocotransducer Calibration Part Description Order Number 52.5 gram weight 13131AA1 Sealing tape 11043AA CMR Jack Components Table 14-3. CMR Jack Components Part Description Order Number Pressure Connector 6158J 475 Ω, 1/8 W, 1% Resistor 472127 Nautilus Tocotransducer... -
Page 387: Troubleshooting
Chapter 15 Troubleshooting This section of the manual provides a troubleshooting guide for the most basic 120 Series Monitor operational problems. If the response to a specific question is not found, contact the Service Department at one of the following numbers: Inside the United States: 1-800-558-5120. -
Page 388: General Troubleshooting
Troubleshooting: General Troubleshooting General Troubleshooting Table 15-1. General Troubleshooting Problem Probable Cause Possible Solution Monitor is not connected to an AC line Connect the power cord to an AC line receptacle. receptacle. The AC power cord is defective. Replace the power cord. No monitoring functions and green Power The AC outlet is defective. -
Page 389: Ultrasound Troubleshooting
Troubleshooting: Ultrasound Troubleshooting Ultrasound Troubleshooting Table 15-2. Ultrasound Troubleshooting Problem Probable Cause Possible Solution Transducer not properly connected to Ensure that transducer is securely monitor. attached to monitor. Transducer placement. Wait before moving transducer; FHR often returns. Reposition transducer. Too little gel applied to transducer. Apply more gel. -
Page 390: Fecg Troubleshooting
Troubleshooting: FECG Troubleshooting FECG Troubleshooting Table 15-3. FECG Troubleshooting Problem Probable Cause Possible Solution Transducer not properly connected to Ensure transducer is securely attached monitor. to the monitor. Attachment pad or legplate not securely Secure attachment pad or legplate to attached to patient. -
Page 391: Fetal Pulse Oximetry Troubleshooting
Troubleshooting: Fetal Pulse Oximetry Troubleshooting Fetal Pulse Oximetry Troubleshooting Table 15-4. Fetal Pulse Oximetry Troubleshooting Problem Probable Cause Possible Solution Close correlation requires simultaneous blood sampling and pulse oximeter measurements from the same arterial supply. Blood samples exposed to air during the sampling process may not accurately reflect true arterial values. - Page 392 Troubleshooting: Fetal Pulse Oximetry Troubleshooting Table 15-4. Fetal Pulse Oximetry Troubleshooting (Continued) Problem Probable Cause Possible Solution Fetal distress. Check the fetus for other signs of distress. Excessive maternal or fetal patient If possible, keep the patient still. motion may be making it impossible for the monitor to find a pulse pattern.
- Page 393 Troubleshooting: Fetal Pulse Oximetry Troubleshooting Table 15-4. Fetal Pulse Oximetry Troubleshooting (Continued) Problem Probable Cause Possible Solution Sensor not making adequate contact at Assess sensor position relative to fetal the sensor site on the fetus. head. Assess sensor depth relative to the fetal presenting part;...
-
Page 394: External Uterine Activity Troubleshooting
Troubleshooting: External Uterine Activity Troubleshooting External Uterine Activity Troubleshooting Table 15-5. External UA Troubleshooting Problem Probable Cause Possible Solution Transducer not properly connected to Ensure that transducer is securely monitor. attached to monitor. Transducer not properly placed. Reposition transducer. Transducer not secured to patient. Secure or re-apply transducer to patient. -
Page 395: Internal Ua Troubleshooting
Troubleshooting: Internal UA Troubleshooting Internal UA Troubleshooting Table 15-6. Internal UA Troubleshooting Problem Probable Cause Possible Solution Transducer not properly connected to Ensure transducer is securely attached monitor. to monitor. Air bubble in dome; or catheter blocked. Flush dome and catheter. Dome is cracked. -
Page 396: Mecg Troubleshooting
Troubleshooting: MECG Troubleshooting MECG Troubleshooting Table 15-7. MECG Troubleshooting PROBLEM PROBABLE CAUSE POSSIBLE SOLUTION Transducer not properly connected to Ensure transducer is securely attached monitor. to monitor. Electrodes not properly placed. Re-apply electrodes. Clips not attached to electrodes properly. Check clip attachments. Electrode gel dried. -
Page 397: Blood Pressure Troubleshooting
Troubleshooting: Blood Pressure Troubleshooting Blood Pressure Troubleshooting Table 15-8. Blood Pressure Troubleshooting Problem Probable Cause Possible Solution Annotate chart, then take a manual reading in-between contractions. Measurement taken during uterine If possible, cancel reading during High reading. contraction. contraction. Enable the monitor’s Smart BP feature. -
Page 398: Maternal Pulse Oximetry Troubleshooting
Troubleshooting: Maternal Pulse Oximetry Troubleshooting Maternal Pulse Oximetry Troubleshooting Table 15-9. Maternal Pulse Oximetry Troubleshooting Problem Probable Cause Possible Solution Communication error between the built-in message shown in MSpO area of Contact Biomedical Engineering COMM MSpO module and the remainder of the display. -
Page 399: Factory Defaults
Appendix A Factory Defaults Factory Defaults are found in the table that follows. Revision B 120 Series Maternal/Fetal Monitor 2015590-001... -
Page 400: Table Of Defaults
Factory Defaults: Table of Defaults Table of Defaults Table A-1. Summary of Factory Defaults Setup Field Description Factory Default Default Options Hospital Preference Screen HR Offset (Applies to US or US2— On, Off, 10 minutes whichever is FHR2) FHR Volume FECG or US/US2 FHR Alarm Limits... - Page 401 Factory Defaults: Table of Defaults Table A-1. Summary of Factory Defaults Setup Field Description Factory Default Default Options Hospital Preference Screen Response Time (Nellcor) Normal Slow, Normal, Fast Averaging Time (Masimo) 2, 4, 8, 10, 12, 14, 8 seconds 16 seconds Sensitivity (Masimo) Normal Normal, Maximum...
- Page 402 Factory Defaults: Table of Defaults Table A-1. Summary of Factory Defaults Setup Field Description Factory Default Default Options Hospital Preference Screen Audio Alarms On, Off MHR/P On, Off MSpO On, Off Re-Alarm 30-120 120 sec (MECG and MSpO only) (in 5 second increments) Master Alarm Limits AlarmSetup...
- Page 403 Factory Defaults: Table of Defaults Table A-1. Summary of Factory Defaults Setup Field Description Factory Default Default Options Hospital Preference Screen Default Settings Factory, Current, New Factory Hospital, Hospital-wide Line Frequency United States: 60 Hz 50 Hz, 60 Hz International: 50 Hz ECG Artifact Elimination On, Off Scaling...
- Page 404 Factory Defaults: Table of Defaults For your notes 120 Series Maternal/Fetal Monitor Revision B 2015590-001...
-
Page 405: Alarms Summary
Appendix B Alarms Summary A summary of the 120 series alarms is found in the table that follows. Revision B 120 Series Maternal/Fetal Monitor 2015590-001... -
Page 406: Table Of Alarms
Alarms Summary: Table of Alarms Table of Alarms Table B-1. Summary of 120 Series Alarms Type Condition Visible Advisory Audible Advisory Paper Speed United States: 3 cm/min 1-3 cm/min International: 1 cm/min An alarm setting (audio or high/low — displays to the left of the limit) is turned off. - Page 407 Alarms Summary: Table of Alarms Table B-1. Summary of 120 Series Alarms Type Condition Visible Advisory Audible Advisory An alarm setting (audio or high/low — displays to the left of the limit) is turned off. NBP mode title. Alarm Defaults Audio: on Volume: 5 Systolic Limits: High = 160 mmHg,...
- Page 408 Alarms Summary: Table of Alarms Table B-1. Summary of 120 Series Alarms Type Condition Visible Advisory Audible Advisory An alarm setting (audio or high/low — displays to the left of the limit) is turned off. MSpO mode title. Alarm Defaults Audio: on Volume: 5 Limits: High = 100%, Low = 95%...
-
Page 409: Drawings
Appendix C Drawings Revision B 120 Series Maternal/Fetal Monitor 2015590-001... - Page 410 Drawings For your notes 120 Series Maternal/Fetal Monitor Revision B 2015590-001...
- Page 411 OVERALL LAYOUT (1/2) BLOCK DIAGRAM Revision B 120 Series Maternal/Fetal Monitor 2015590-001...
- Page 413 OVERALL LAYOUT (2/2) BLOCK DIAGRAM Revision B 120 Series Maternal/Fetal Monitor 2015590-001...
- Page 415 Main Board MAIN MOTHERBOARD BLOCK DIAGRAM Revision B 120 Series Maternal/Fetal Monitor 2015590-001...
- Page 417 DSP BOARD (1/2) BLOCK DIAGRAM Revision B 120 Series Maternal/Fetal Monitor 2015590-001...
- Page 419 DSP BOARD (2/2) BLOCK DIAGRAM Revision B 120 Series Maternal/Fetal Monitor C-11 2015590-001...
- Page 421 NBP MODULE (Manufactured by CAS Medical Systems, Incorporated) BLOCK DIAGRAM Revision B 120 Series Maternal/Fetal Monitor C-13 2015590-001...
- Page 423 – – NBP MODULE (Manufactured by Corometrics) BLOCK DIAGRAM Revision B 120 Series Maternal/Fetal Monitor C-15 2015590-001...
- Page 425 COMMUNICATIONS BOARD BLOCK DIAGRAM Revision B 120 Series Maternal/Fetal Monitor C-17 2015590-001...
- Page 427 POWER SUPPLY MODULE (Manufactured by Power Controls, Inc.) BLOCK DIAGRAM Revision B 120 Series Maternal/Fetal Monitor C-19 2015590-001...
- Page 429 ELECTROLUMINESCENT DISPLAY (Manufactured by Planar Systems, Inc.) BLOCK DIAGRAM Revision B 120 Series Maternal/Fetal Monitor C-21 2015590-001...
- Page 431 ULTRASOUND BOARD BLOCK DIAGRAM Revision A 120 Series Maternal/Fetal Monitor C-23 2015590-001...
- Page 433 80 dB FECG OUT Inst. Amplifier Isolation Amplifier Amplifier HP Filter 1 Hz LP filter 90 Hz AV=10 AV=100 AV=10 AV=1 HP Filter 90 Amplifier AV=10 FECG OUT FECG Section Block Diagram FECG/UA Board LP Filter 35 Hz HP Filter 0.7 Hz AV=1 AV=1 Control...
- Page 435 MECG BOARD BLOCK DIAGRAM Revision A 120 Series Maternal/Fetal Monitor C-27 2015590-001...
- Page 437 RECORDER BOARD BLOCK DIAGRAM Revision B 120 Series Maternal/Fetal Monitor C-29 2015590-001...
- Page 440 Asia Headquarters World Headquarters GE Medical Systems GE Medical Systems GE Medical Systems Information Technologies GmbH Information Technologies Asia; GE (China) Co., Ltd. Information Technologies, Inc. Munzinger Straße 3-5 24th Floor, Shanghai MAXDO Center, 8200 West Tower Avenue D-79111 Freiburg...