Cisco 8811 User Manual
8800 series
Hide thumbs
Also See for 8811:
- Quick start manual ,
- Administration manual (280 pages) ,
- User manual (170 pages)
Table of Contents

Related Manuals for Cisco 8811


Summary of Contents for Cisco 8811
- Page 1 Cisco IP Phone 8800 Series User Guide First Published: July 13, 2015 Americas Headquarters Cisco Systems, Inc. 170 West Tasman Drive San Jose, CA 95134-1706 http://www.cisco.com Tel: 408 526-4000 800 553-NETS (6387) Fax: 408 527-0883...
- Page 2 Cisco and the Cisco logo are trademarks or registered trademarks of Cisco and/or its affiliates in the U.S. and other countries. To view a list of Cisco trademarks, go to this URL: www.cisco.com/go/trademarks . Third-party trademarks mentioned are the property of their respective owners. The use of the word partner does not imply a partnership relationship between Cisco and any other company.
-
Page 3: Table Of Contents
C H A P T E R 2 Connect Footstand Adjust the Handset Rest Secure the Phone with a Cable Lock Basic Operations C H A P T E R 3 Clean the Phone Display Make Calls Predial a Number Cisco IP Phone 8800 Series User Guide... - Page 4 Remote Hold Set Up Call Back Notification Call Park Park and Retrieve a Call Using Call Park Park a Call Using Assisted Directed Call Park Park a Call Using Manual Directed Call Park Cisco IP Phone 8800 Series User Guide...
- Page 5 Place a Video Call Stop Video Hide or Show Video Adjust the Picture-In-Picture Position Sign In To the Cisco Unified Communications Self Care Portal Contacts C H A P T E R 4 Corporate Directory Search and Dial a Contact...
- Page 6 Place a Call with a Speed-Dial Button Use a Speed-Dial Code On Hook Use a Speed-Dial Code Off Hook Pause in Speed Dial Do Not Disturb Turn DND On and Off Malicious Call Identification Trace a Suspicious Call Cisco IP Phone 8800 Series User Guide...
- Page 7 Dismiss the Barge Alert Prompt Window Call Chaperone Record a Chaperoned Call Uniform Resource Identifier Dialing Intelligent Proximity for Mobile Devices Pair a Mobile Device Switch Connected Mobile Devices Delete a Mobile Device Answer a Mobile Call Cisco IP Phone 8800 Series User Guide...
- Page 8 Phone Features Available for Mobile and Remote Access Through Expressway Sign in with Mobile and Remote Access Through Expressway Cisco Collaboration Problem Reporting Tool Report a Problem with Cisco Collaboration Problem Reporting Tool Cisco IP Phone 8800 Series User Guide viii...
- Page 9 Disconnect a Bluetooth Accessory Delete a Bluetooth Accessory USB Headsets Cisco IP Phone 8800 Key Expansion Module Cisco IP Phone 8800 Key Expansion Module Features Place a Call on the Key Expansion Module Configure KEM Buttons Cisco IP Phone 8800 Series User Guide...
- Page 10 Cannot Access Self Care Portal Security Error Message Report Phone Problems Documentation, Service Requests, and Additional Information Product Safety and Security C H A P T E R 1 3 Safety and Performance Information Cisco IP Phone 8800 Series User Guide...
- Page 11 FCC Part 15.21 Statement FCC RF Radiation Exposure Statement FCC Receivers and Class B Digital Statement Cisco Product Security Overview Warranty C H A P T E R 1 4 Cisco One-Year Limited Hardware Warranty Terms Cisco IP Phone 8800 Series User Guide...
- Page 12 Contents Cisco IP Phone 8800 Series User Guide...
-
Page 13: Getting Started
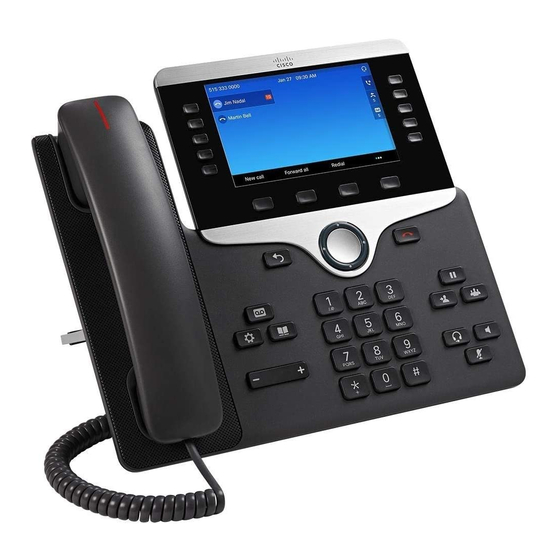
Power Save and Power Save Plus, page 21 • Additional Information, page 22 Accessibility Features Cisco IP Phones provide accessibility features for the vision impaired, the blind, and the hearing and mobility impaired. For detailed information about the accessibility features on these phones, see http://www.cisco.com/c/en/us/ support/collaboration-endpoints/unified-ip-phone-8800-series/products-technical-reference-list.html. - Page 14 AC power wall plug (optional). Handset connection. Network port (10/100/1000 SW) connection. Analog headset connection (optional). IEEE 802.3at power enabled. The Cisco IP Phone 8811 does not support the Cisco IP Phone 8800 Key Expansion Module. Note Cisco IP Phone 8800 Series User Guide...
-
Page 15: Buttons And Hardware
Phone screen Shows information about your phone such as directory number, active call and line status, softkey options, speed dials, placed calls, and phone menu listings. The Cisco IP Phone 8811 screen is grayscale. Cisco IP Phone 8800 Series User Guide... - Page 16 Navigation cluster and The Navigation cluster and Select button allows you to scroll through Select button menus, highlight items, and select the highlighted item. Release Button Ends a connected call or session. Cisco IP Phone 8800 Series User Guide...
- Page 17 Opens or closes the Directories menu. Use the Contacts button to access personal and corporate directories. Applications button Opens or closes the Applications menu. Use the Applications button to access call history, user preferences, phone settings, and phone model information. Cisco IP Phone 8800 Series User Guide...
-
Page 18: Cisco Ip Phone 8841 And 8845
Handset Phone handset. Cisco IP Phone 8841 and 8845 The following sections describe attributes of the Cisco IP Phone 8841 and 8845. Phone Connections Connect your phone to the corporate IP telephony network, using the following diagram. Cisco IP Phone 8800 Series User Guide... -
Page 19: Buttons And Hardware
Cisco IP Phone 8841 and 8845 share the same button and hardware configuration, but the Cisco IP Phone 8845 has a video camera mounted on the top of the phone. The Cisco IP Phone 8841 is shown. Cisco IP Phone 8800 Series User Guide... -
Page 20: Cisco Ip Phone 8800 Series User Guide
Indicates an incoming call (flashing red) or new voice message (steady red). Phone screen Shows information about your phone such as directory number, active call and line status, softkey options, speed dials, placed calls, and phone menu listings. Cisco IP Phone 8800 Series User Guide... -
Page 21: Cisco Ip Phone 8800 Series User Guide
Navigation cluster and The Navigation cluster and Select button allows you to scroll through Select button menus, highlight items and select the highlighted item. Release Button Ends a connected call or session. Cisco IP Phone 8800 Series User Guide... -
Page 22: Cisco Ip Phone 8800 Series User Guide
Opens or closes the Directories menu. Use the Contacts button to access personal and corporate directories. Applications button Opens or closes the Applications menu. Use the Applications button to access call history, user preferences, phone settings, and phone model information. Cisco IP Phone 8800 Series User Guide... -
Page 23: Cisco Ip Phones 8851 And 8851Nr
Cisco IP Phones 8851 and 8851NR The following sections describe attributes of the Cisco IP Phones 8851 and 8851NR. The Cisco IP Phone 8851NR does not support Bluetooth. Other than not supporting Bluetooth, the Cisco Note IP Phone 8851 and Cisco IP Phone 8851NR support the same features. -
Page 24: Cisco Ip Phone 8800 Series User Guide
For example, your phone can support five USB devices (such as two Cisco IP Phone 8800 Key Expansion Modules, one headset, one hub, and one other standard USB device) on the side port. Many third-party USB products count as multiple USB devices, for example, a device containing USB hub and headset can count as two USB devices. -
Page 25: Buttons And Hardware
Indicates an incoming call (flashing red) or new voice message (steady red). Phone screen Shows information about your phone such as directory number, active call and line status, softkey options, speed dials, placed calls, and phone menu listings. Cisco IP Phone 8800 Series User Guide... -
Page 26: Cisco Ip Phone 8800 Series User Guide
Navigation cluster and The Navigation cluster and Select button allows you to scroll through Select button menus, highlight items and select the highlighted item. Release Button Ends a connected call or session. Cisco IP Phone 8800 Series User Guide... -
Page 27: Cisco Ip Phone 8800 Series User Guide
Opens or closes the Directories menu. Use the Contacts button to access personal and corporate directories. Applications button Opens or closes the Applications menu. Use the Applications button to access call history, user preferences, phone settings, and phone model information. Cisco IP Phone 8800 Series User Guide... -
Page 28: Cisco Ip Phone 8861 And 8865
Handset Phone handset. Cisco IP Phone 8861 and 8865 The following sections describe attributes of the Cisco IP Phone 8861 and 8865. Phone Connections Connect your phone to the corporate IP telephony network, using the following diagram. Cisco IP Phone 8800 Series User Guide... -
Page 29: Cisco Ip Phone 8800 Series User Guide
AC-to-DC power supply Handset connection. (optional). AC power wall plug (optional). Analog headset connection (optional). Network port (10/100/1000 SW) USB port connection. IEEE 802.3at power enabled. Access port (10/100/1000 PC) Audio In/Out ports connection. Cisco IP Phone 8800 Series User Guide... -
Page 30: Buttons And Hardware
For example, your phone can support five USB devices (such as three Cisco IP Phone 8800 Key Expansion Modules, one hub, and one other standard USB device) on the side port and five additional standard USB devices on the back port. Many third-party USB products count as multiple USB devices, for example, a device containing USB hub and headset can count as two USB devices. -
Page 31: Cisco Ip Phone 8800 Series User Guide
Navigation cluster and The Navigation cluster and Select button allows you to scroll through Select button menus, highlight items and select the highlighted item. Release Button Ends a connected call or session. Cisco IP Phone 8800 Series User Guide... -
Page 32: Cisco Ip Phone 8800 Series User Guide
Opens or closes the Directories menu. Use the Contacts button to access personal and corporate directories. Applications button Opens or closes the Applications menu. Use the Applications button to access call history, user preferences, phone settings, and phone model information. Cisco IP Phone 8800 Series User Guide... -
Page 33: Power Save And Power Save Plus
To turn on the phone display, press any button or pick up the handset. Power Save Plus Your phone supports the Cisco EnergyWise (EW) program, also known as Power Save Plus. Your system administrator sets up sleep (power down) and wake (power up) times for your phone to save energy. If your phone goes into the Power Save Plus mode, the Select button is lit white. -
Page 34: Additional Information
• Quick reference cards, quick start guides, and end-user guides: http://www.cisco.com/c/en/us/support/collaboration-endpoints/unified-ip-phone-8800-series/ products-user-guide-list.html • Licensing information: http://www.cisco.com/c/en/us/support/collaboration-endpoints/unified-ip-phone-8800-series/ products-licensing-information-listing.html • Cisco international websites: Allows access to international Cisco websites from www.cisco.com by clicking the Worldwide [change] link at the top of the web page. Cisco IP Phone 8800 Series User Guide... -
Page 35: Phone Setup
Adjust the angle by pressing down or pulling up on the footstand. The connectors are made of a flexible material. Adjust the Handset Rest If your phone is wall-mounted, you may need to adjust the handset rest to ensure that the receiver does not slip out of the cradle. Cisco IP Phone 8800 Series User Guide... -
Page 36: Secure The Phone With A Cable Lock
Unlock the cable lock. Note There are two kinds of cable locks: keyed and combination. Depending on the type of lock you have, unlock it by using the key or the correct combination. Cisco IP Phone 8800 Series User Guide... -
Page 37: Cisco Ip Phone 8800 Series User Guide
For keyed locks, turn the key 90 degrees in the clockwise direction and pull the key out of the lock. Note For combination locks, rotate the lock 90 degrees and then scramble the combination. Cisco IP Phone 8800 Series User Guide... -
Page 38: Cisco Ip Phone 8800 Series User Guide
Phone Setup Secure the Phone with a Cable Lock Cisco IP Phone 8800 Series User Guide... -
Page 39: Basic Operations
View Phone Information, page 44 • Video Calls, page 45 • Sign In To the Cisco Unified Communications Self Care Portal, page 47 Clean the Phone Display Phone displays that are not touchscreens can be easily cleaned. Procedure Wipe the screen with a soft, dry cloth. -
Page 40: Make Calls
Your administrator can configure your phone so that the speakerphone is disabled. If the speakerphone is disabled, the softkeys are dimmed or blank. Procedure Step 1 Press Speakerphone Step 2 Enter a number. Cisco IP Phone 8800 Series User Guide... -
Page 41: Place A Call Using A Headset
The plus (+) sign displays as the first digit in the phone number. The corresponding tone stops to indicate that the * has changed to a + sign. You can only hear the tone in off-hook state. Step 2 Dial the number. Cisco IP Phone 8800 Series User Guide... -
Page 42: Redial A Number
Indicators of your line selection include: • The selected line is displayed on the phone screen header. • On phones with color screens, the color of the icon (on the line label) changes to blue. Cisco IP Phone 8800 Series User Guide... -
Page 43: View All Calls On The Phone
Answer allows you to answer the oldest call that is available on all line appearances on your phone, including Hold Reversion and Park Reversion calls that are in an alerting state. Incoming calls always have priority over Held or Park Reversion calls. Cisco IP Phone 8800 Series User Guide... -
Page 44: Answer The Oldest Call First
Allows you to answer a call that is ringing on another phone within your call pickup group. If multiple calls are available for pick up, your phone picks up the oldest call first (the call that has been ringing for the longest time). Cisco IP Phone 8800 Series User Guide... -
Page 45: Answer A Call Using Pickup
Do Not Disturb state, or ringing. Procedure Step 1 Perform one of the following actions: • Press PickUp to transfer a ringing call within your pickup group to your phone. Cisco IP Phone 8800 Series User Guide... -
Page 46: Answer A Call Using Group Pickup And A Phone Number
Group PickUp. Step 2 Enter the group pickup number. If your phone supports autopickup, you are now connected to the call. Step 3 If the call rings, press Answer to connect to the call. Cisco IP Phone 8800 Series User Guide... -
Page 47: Answer A Call Using Other Pickup
• Ensure that the headset button is not illuminated. • Leave the handset in the cradle. When you get a call, the call answers automatically and you interact with the caller using the speakerphone. Cisco IP Phone 8800 Series User Guide... -
Page 48: Respond To A Call Waiting Notification
For more information, contact your system administrator. You can silence the incoming (ringing) call. Press Volume down once, then let the incoming call go to the target number (voicemail or predetermined number set up the system administrator). Cisco IP Phone 8800 Series User Guide... -
Page 49: Transfer A Call To Another Number
This allows you to consult privately with the party on each call before you complete the transfer. Procedure Step 1 Call a new conference participant, but do not add the participant to the conference. Step 2 Press Swap to toggle between the participant and the conference. Cisco IP Phone 8800 Series User Guide... -
Page 50: Monitor And Record Calls
Procedure Step 1 On any idle line from which you want to forward your calls, press Forward All. Step 2 Enter a phone number, or select an entry from the Call History list. Cisco IP Phone 8800 Series User Guide... -
Page 51: Mute Phone
During a video call, video transmission is blocked until you resume the call. Procedure While on an active call, press Hold. Swap Between Active and Held Calls Use the line buttons to swap between held and connected calls. Cisco IP Phone 8800 Series User Guide... -
Page 52: Put A Call On Hold By Answering A New Call
When you place a call on hold while using a shared line, the line button pulses green and the phone displays the Hold icon. When another phone places a call on hold, the line button pulses red and the phone displays the Remote Hold icon. Cisco IP Phone 8800 Series User Guide... -
Page 53: Set Up Call Back Notification
Park Allows you to park an active call that you answered on your phone, and retrieve it using another phone in the Cisco Unified Communications Manager system. Directed Call Park Allows you to park and retrieve an active call in two different ways: •... -
Page 54: Park And Retrieve A Call Using Call Park
Resume to resume the call on your phone. Step 2 From any other Cisco IP Phone in your network, enter the number where the call is parked to retrieve the call. Step 3 If you do not retrieve the call within a certain amount of time (set by your system administrator) you receive an alert tone, at which time you can: •... -
Page 55: Park A Call Using Manual Directed Call Park
Press Transfer again to finish parking the call and then hang up. Step 4 Retrieve the call from any other Cisco IP Phone in your network as follows: a) Enter the park retrieval prefix. b) Dial the Directed Call number. -
Page 56: Place A Dialable Intercom Call
• Press Intercom to switch to connected mode. In connected mode, you can speak to the intercom caller. Step 2 Press Intercom to end the call. View Phone Information Phone Information allows you to view the following information for your phone: • Model Number Cisco IP Phone 8800 Series User Guide... -
Page 57: Video Calls
• Self-view Video—Select Self-view to view your image as it appears on video. The Cisco IP Phone 8845 and 8865 have manual shutters. When you are on an active call, turn the shutter clockwise to open the shutter and transmit video. Turn the shutter counterclockwise to close the shutter and stop the video transmission. -
Page 58: Place A Video Call
Place a Video Call The Cisco IP Phone 8845 and 8865 support video calls. On an audio call, open the shutter on the video camera to create a video call. For a video call, both parties require a phone with a camera. -
Page 59: Adjust The Picture-In-Picture Position
Before you can access any of your options, such as Speed Dial or Personal Address Book, you must sign in. When you are finished using portal, you must sign out. In some cases, you can access the Cisco Unified Communications Self Care Portal without having to sign in. For more information, contact your system administrator. -
Page 60: Cisco Ip Phone 8800 Series User Guide
Basic Operations Sign In To the Cisco Unified Communications Self Care Portal Cisco IP Phone 8800 Series User Guide... -
Page 61: Contacts
• First Name • Last Name Step 4 Enter the search criteria information, press Submit, and select a contact. Step 5 To dial, perform one of these actions: • Press Call. • Press Select. Cisco IP Phone 8800 Series User Guide... -
Page 62: Search And Dial A Contact While On A Call
The personal directory contains a list of your personal contacts. You can assign fast-dial codes to your personal directory entries for fast-dialing. You can set up your personal directory from your phone or from the Cisco Unified Communications Self Care Portal. Use your phone to assign fast-dial codes to the directory entries. For more information, see the Cisco Unified Communications Self Care Portal User Guide, located at http://www.cisco.com/c/en/us/td/docs/... -
Page 63: Sign In And Out Of The Personal Directory
Procedure Step 1 Press Contacts Step 2 Sign in to Personal Directory. Step 3 Select Personal Address Book. Step 4 Select one or all of the following: • Last Name • First Name Cisco IP Phone 8800 Series User Guide... -
Page 64: Dial A Number From The Personal Directory
Select Personal Address Book and search for an entry. Step 4 Press Select. Step 5 Press Edit. Step 6 Modify the entry information. Step 7 Press Phones to modify a phone number. Step 8 Pres Update. Cisco IP Phone 8800 Series User Guide... -
Page 65: Delete A Personal Directory Entry
Select Personal Fast Dials. Step 4 Select a fast-dial code and then press the Dial softkey. Fast-Dial Codes with Personal Directory You manage the fast-dial codes with Personal Directory using the Contacts menu on your phone. Cisco IP Phone 8800 Series User Guide... -
Page 66: Assign A Fast Dial Code To A Personal Directory Entry
Sign in to the Personal Directory. Step 3 Select Personal Fast Dials and search for a fast-dial code. Step 4 Select the required code and press Remove. Step 5 Select the index and press Remove. Cisco IP Phone 8800 Series User Guide... -
Page 67: Cisco Webdialer
Contacts Cisco WebDialer Cisco WebDialer Cisco WebDialer allows you to make calls on your Cisco IP Phone to directory contacts by selecting items in a web browser. For more information, contact your system administrator. Use Cisco WebDialer with Another Online Corporate Directory... -
Page 68: Sign Out Of Cisco Webdialer
If you select Disable auto close, the call window does not automatically close after 15 seconds. Sign Out of Cisco WebDialer Procedure Step 1 Access the Make Call or Hang Up window. Step 2 Select Sign Out. Cisco IP Phone 8800 Series User Guide... -
Page 69: Chapter 5 Call History
For each call record or call group, an icon to the left of the caller ID shows the call type: • Received: • Placed: • Missed: On the Cisco IP Phone 8811, the icon is gray. Note Cisco IP Phone 8800 Series User Guide... - Page 70 Each call history item in the Call History lists displays an icon to identify the state of the line. The following states are available: • Offline • Idle • Busy • DND Cisco IP Phone 8800 Series User Guide...
-
Page 71: View The Call History
To sort calls for a specific line, select the required phone line and view the individual calls. Step 3 To sort by missed calls for a specific line, select the required phone line press Missed Calls. Step 4 Press Exit to return to the Applications screen. Cisco IP Phone 8800 Series User Guide... -
Page 72: Dial From The Call History
Press the Navigation pad right or left to move the Note cursor. Press to delete the character to the left of the cursor. Step 4 Press Call to dial the number. Step 5 Press Return to return to the Call History list. Cisco IP Phone 8800 Series User Guide... -
Page 73: Clear The Call History
Press Delete to delete an individual call record or all calls in a group. A Delete Record alert message appears for verification. Step 4 Press Delete to delete the record. Step 5 Press Exit to return to the Applications screen. Cisco IP Phone 8800 Series User Guide... - Page 74 Call History Delete a Call Record Cisco IP Phone 8800 Series User Guide...
-
Page 75: Voicemail
Messages button. For more information, contact your administrator. For information about the commands that your voicemail service supports, see the voicemail service user documentation. Access Voicemail Procedure Step 1 Press Messages. Step 2 Follow the voice prompts. Cisco IP Phone 8800 Series User Guide... -
Page 76: Check For Voice Messages
If call forwarding is set up on a line that has new voice messages, the Call Forward icon replaces the Message icon on the line label. On the Cisco IP Phone 8811, the Call Forward icon is Note gray. • Listen for a stutter tone (if available) from your handset, headset, or speakerphone when you place a call. -
Page 77: Visual Voicemail
Voicemail Visual Voicemail The Cisco IP Phone 8881 displays a gray box. • Press the line button and then Voicemail Step 2 Follow the prompts to listen to your voice message. Visual Voicemail Visual Voicemail is an alternative to audio voicemail. You use the screen on your phone to work with your messages, rather than respond to audio prompts. - Page 78 Voicemail Visual Voicemail Cisco IP Phone 8800 Series User Guide...
-
Page 79: Advanced Calling Features
If you have multiple phone lines, you can alternately use Conference to combine two calls across two lines. For example, if you have a call on Line 1 and a call on Line 2, you can combine the calls into a conference. Cisco IP Phone 8800 Series User Guide... -
Page 80: Add A Third Party To A Conference
Press the line button for the other (held) call or if the held call is on another line: a) Press Active Calls. b) Choose a call from the list. c) Press Conference. The conference begins. The conference is established on the line that had the active call. Cisco IP Phone 8800 Series User Guide... -
Page 81: Swap Between Calls Before Completing A Conference
The Meet Me conference begins when the host connects. Participants who call the conference before the host has joined hear a busy tone and must dial again. The conference ends when all participants hang up; the conference does not automatically end when the host disconnects. Cisco IP Phone 8800 Series User Guide... -
Page 82: Host A Meet Me Conference
Client Matter Code (CMC), or additional digits (such as a user extension, a meeting access code, or a voicemail password). These numbers usually require you to input pause characters in the digit string. Related Topics Pause in Speed Dial, on page 71 Cisco IP Phone 8800 Series User Guide... -
Page 83: Place A Call With A Speed-Dial Button
To include dialing pauses in the speed dial, include a comma (,) as part of the speed-dial string. This comma specifies a pause of 2 seconds. It also allows you to separate FAC and CMC from the other digits in the speed-dial string. Cisco IP Phone 8800 Series User Guide... -
Page 84: Do Not Disturb
• Automated phone system response, required 4 seconds after the call is connected: 56789# To access this destination, specify the following speed-dial string: 95556543,1234,9876,,56789# Do Not Disturb Do Not Disturb (DND) allows you to turn off one of the following incoming call indicators: Cisco IP Phone 8800 Series User Guide... -
Page 85: Turn Dnd On And Off
When the silent notification message is sent, your phone provides both a visual and audible confirmation. Extension Mobility Cisco Extension Mobility (EM) allows you to configure a different Cisco IP Phone as your own temporarily. After you sign in to EM, the phone adopts your user profile, including your phone lines, features, established services, and web-based settings. -
Page 86: Enable Extension Mobility
Mobile Connect allows you to use your mobile phone to handle calls that are associated with your desk phone number. When using Cisco Mobile Connect, you must add your mobile and other phones that you want to use to make and receive calls using the same directory numbers as your desk phone. These phones are called remote destinations. -
Page 87: Turn Mobile Connect On Or Off For All Remote Destinations From A Desk Phone
Hand Off a Call from a Mobile Phone to the Desk Phone Procedure Step 1 While on your mobile phone, enter the access code for the hand off feature. For more information, contact your system administrator. Cisco IP Phone 8800 Series User Guide... -
Page 88: Line Status
Step 3 Press Answer on your desk phone within 10 seconds and start talking on the desk phone. For more information, contact your system administrator. The Cisco Unified devices that share the same line display a Remote In Use message. -
Page 89: View All Calls On Primary Line
If a filter is turned off, lines under its coverage will not show alert notifications. If this feature has been configured, there are three, selectable, filter types available to you: Cisco IP Phone 8800 Series User Guide... -
Page 90: Add A Line Filter
All available lines are displayed in the list. If you require a line that is not in the list, contact your administrator. Step 7 Click Apply. Step 8 To view the filter, press Back. Cisco IP Phone 8800 Series User Guide... -
Page 91: Select An Active Line Filter
Highlight the duplicated filter and press Edit. Step 5 (Optional) Enter a new name for the filter. Step 6 Add or remove available lines from the filter. Step 7 Click Apply. Step 8 To view the filter, press Back. Cisco IP Phone 8800 Series User Guide... -
Page 92: Edit A Line Filter
Your administrator sets up the Queue Status button so that you can view statistics about the queue for the hunt group. Calls in the group call queue display the same call identification number, no matter which group phone accesses the list. Cisco IP Phone 8800 Series User Guide... -
Page 93: Sign In And Out Of A Hunt Group
On your phone, go to Applications > Settings. Step 2 At the Barge Alert menu item, click On to enable the alert or Off to enable Barge. By default, the barge alert prompt is toggled Off. Cisco IP Phone 8800 Series User Guide... -
Page 94: Add Yourself To A Call On A Shared Line
The chaperone answers a call, creates a conference call, and remains on the conference call to chaperone and record the call. Cisco IP Phones that are set up with the Call Chaperone feature also have a Record button. Cisco IP Phone 8800 Series User Guide... -
Page 95: Record A Chaperoned Call
You can place calls using Uniform Resource Identifier (URI) Dialing, using the alphanumeric URI address as a directory number; for example, bob@cisco.com. You must enter the URI address to select the contact. The phone screen displays the call information for the URI call. The phone stores the URI call information in the Call History and the Details page. -
Page 96: Intelligent Proximity For Mobile Devices
Intelligent Proximity allows you to pair your mobile device to use the mobile line through your Cisco IP Phone. Once the mobile device is paired, you can place and receive calls on the mobile line from your Cisco IP Phone, with either the handset or the speaker. You can also use calling features such as hold and redial with the mobile line. -
Page 97: Pair A Mobile Device
Cisco IP Phone. Switch Connected Mobile Devices If you have more than one paired mobile device in range of your Cisco IP Phone, you can choose which mobile device to connect. Cisco IP Phone 8800 Series User Guide... -
Page 98: Delete A Mobile Device
Select the mobile device in the available devices list. Step 2 Press Delete. Answer a Mobile Call Procedure Select Answer. Decline a Mobile Call Procedure Select Decline. The call ends. Ignore a Mobile Call Procedure Select Ignore. The call ends. Cisco IP Phone 8800 Series User Guide... -
Page 99: Place A Mobile Call
Mobile Contacts can be checked from the Recents menu on the IP phone; Mobile Call History sharing can be found using the New Call softkey. Cisco IP Phone 8811, 8841, and 8851NR do not support Bluetooth or Mobile Contacts and Mobile Call Note History Sharing. -
Page 100: Check Bluetooth Contact Status
Select Phone Book Access. Save Bluetooth Contacts Use this procedure if your Bluetooth Phone Book Access Profile option is set to No. This procedure only applies to Cisco IP Phone 8851 and 8861. Cisco IP Phone 8851NR does not support Note Bluetooth. -
Page 101: Pair A Tablet
After you pair your tablet to your Cisco IP Phone, the phone will automatically connect to the tablet when the tablet is in range, and disconnect from the tablet when the tablet is out of range. - Page 102 To move the audio back to the tablet, hang up the handset or press Release. Step 5 To handle an incoming phone call on the phone, answer the phone. The audio for the active soft client reverts to the tablet automatically. Cisco IP Phone 8800 Series User Guide...
-
Page 103: Advanced Operations
Use the Navigation cluster and Select button to scroll and select Running Applications. The phone displays a list of applications running on the phone including those that are not under the Application menu. Step 3 Press Exit to return to the Applications screen. Cisco IP Phone 8800 Series User Guide... -
Page 104: Switch To Active Applications
For more information, contact your system administrator. Call Functions This section provides information about some of the advanced call functions that are available on Cisco IP Phones. Cisco IP Phone 8800 Series User Guide... -
Page 105: Agent Greeting
When you need to enter a CMC, the phone displays Enter Client Matter Code, the dialed number changes to “********”, and you hear a special tone. Enter the CMC for the call using the keypad. Related Topics Forced Authorization Code, on page 94 Cisco IP Phone 8800 Series User Guide... -
Page 106: Forced Authorization Code
• If your coworker does not have privacy enabled, the shared line button is solid red, the session button is solid red, and the call information (name and number, if available) displays on your phone. Cisco IP Phone 8800 Series User Guide... -
Page 107: Feature Buttons And Softkeys
Barge Displays as Merge Call Back Call Forward All Call Park Call Park Line Status Call Pickup (Pick Up) Call Pickup Line Status Conference Decline Do Not Disturb Group Pickup (Group Pick Up) Cisco IP Phone 8800 Series User Guide... - Page 108 Mobile Connect (Mobility) Mute Other Pickup PLK Support for Queue Status Privacy Queue Status Quality Reporting Tool (QRT) Record Redial Speed Dial Speed Dial Line Status Support for Hold Button on USB Headsets Transfer Cisco IP Phone 8800 Series User Guide...
-
Page 109: Survivable Remote Site Telephony Overview
Survivable Remote Site Telephony Overview Survivable Remote Site Telephony Overview If communication between your phone and the Cisco Unified Communications Server is interrupted, you receive an alert message on your phone. If you are on an active call, the call remains established, and you enter a failover situation. -
Page 110: Hold
Calls appear as Local Hold calls. Meet Me The Meet Me softkey does not display. PickUp The softkey causes no action. Group PickUp The softkey causes no action. Other PickUp The softkey causes no action. Cisco IP Phone 8800 Series User Guide... -
Page 111: Mobile And Remote Access Through Expressway
There is no official Cisco TAC support until the feature is officially released in a future firmware load. For those users who want to provide feedback, send an email to cefeedback@cisco.com. For more information, see the release notes. -
Page 112: Phone Features Available For Mobile And Remote Access Through Expressway
Mobile and Remote Access Through Expressway provides secure VPN-less access to collaboration services for Cisco mobile and remote users. But to preserve network security, it limits access to some phone features. The following list shows the phone features available with Mobile and Remote Access Through Expressway. -
Page 113: Sign In With Mobile And Remote Access Through Expressway
Phone Information screen. Cisco Collaboration Problem Reporting Tool You can use the Cisco Collaboration Problem Report Tool (PRT) to collect and send phone logs - and to report problems to your system administrator. This tool is found on the Phone Information screen. -
Page 114: Report A Problem With Cisco Collaboration Problem Reporting Tool
• If the phone is in the factory default state. The URL is active for 1 hour. After 1 hour, you should try to submit the phone logs again. • If the phone has downloaded a configuration file and the Web Access parameter on Cisco Unified Communications Manager parameter is set to Enabled. -
Page 115: Set Up A Phone For Use With Vpn
Procedure Step 1 Choose Admin settings from the Applications menu. Step 2 Choose Ethernet Setup. Cisco IP Phone 8861 users: Choose Wifi settings or Ethernet Setup. Step 3 Choose IPv4 Setup. Step 4 Navigate to Alternate TFTP and choose On. - Page 116 Advanced Operations Set Up a Phone for Use with VPN Cisco IP Phone 8800 Series User Guide...
-
Page 117: User Preferences
Your system administrator controls if you can change the wallpaper. If you can change the wallpaper, you can set up your phone with wallpapers that are provided with the phone, or with your own custom wallpaper. For more information, contact your system administrator. Cisco IP Phone 8800 Series User Guide... -
Page 118: Change The Ringtone
Step 2 Use the Navigation cluster and Select button to scroll and select Settings>Brightness. Step 3 Perform one of the following: • To increase brightness, press up or right on the Navigation cluster. Cisco IP Phone 8800 Series User Guide... -
Page 119: Adjust Contrast
• To decrease brightness, press down or left on the Navigation cluster. Step 4 Press Save to set the brightness, or press Cancel to exit. Adjust Contrast You can adjust the contrast on the Cisco IP Phone 8811. Procedure Step 1 Press Applications Step 2 Use the Navigation cluster and Select button to scroll and select Settings>Contrast. -
Page 120: Change The Phone Name
Step 5 Press Exit. Adjust the Headset Sidetone If your system administrator has sets the Headset Sidetone Controls feature for your phone, you can specify the volume of your headset from your phone. Cisco IP Phone 8800 Series User Guide... -
Page 121: Phone Services
You can change your line settings using the Cisco Unified Communications Self Care Portal. For information, see the Cisco Unified Communications Self Care Portal User Guide, located at http://www.cisco.com/c/en/... -
Page 122: Adjust The Video Exposure
Use the Navigation pad and Select button to scroll and select Settings > Video > Bandwidth. Step 3 Select one of the pre-determined bandwidth settings, from 2 Mbps to 250 Kbps. Step 4 Press Save to set the bandwidth, or press Cancel to return to the previous screen. Cisco IP Phone 8800 Series User Guide... -
Page 123: Enable Video Through Your Computer
Enable Video through Your Computer During a video call, you can send and receive video over your PC while the audio remains on your Cisco IP Phone. Connect a PC to the PC port of your phone, and login to Cisco Jabber for Windows. The phone must be connected to the first network interface card (NIC1) in the PC. - Page 124 User Preferences Enable Video through Your Computer Cisco IP Phone 8800 Series User Guide...
-
Page 125: C H A P T E
Set Up Wideband for an Analog Headset, page 117 • Bluetooth Headsets, page 117 • USB Headsets, page 120 • Cisco IP Phone 8800 Key Expansion Module, page 121 Accessory List Your phone supports accessories from Cisco and third-party manufacturers. Accessory Type Cisco IP Phone... -
Page 126: View The Accessories List
A list of Bluetooth accessories displays. Step 4 Press Exit to return to the Applications screen. View Accessories Details Procedure Step 1 Press Applications Step 2 Use the Navigation cluster and Select button to scroll and select Accessories. Cisco IP Phone 8800 Series User Guide... -
Page 127: Usb Devices
For more information, contact your system administrator. Mobile Device Charging You can use the USB port on your Cisco IP phone to charge your mobile device if the device has a USB connection. USB charging is supported on the following ports: •... - Page 128 • If you unplug your tablet and immediately plug-in a USB headset to the tablet, there will be a delay of 3 seconds before the phone recognizes the USB headset. • When more than one Cisco IP Phone 8800 Key Expansion Module is attached, the back USB port cannot fast-charge the device.
-
Page 129: Set Up Wideband For An Analog Headset
Accessories screen. Bluetooth Headsets For the Cisco IP Phone 8851 and 8861. The Cisco IP Phone 8851NR does not support Bluetooth. This feature is also supported on the Cisco IP Phone 8845 and 8865. The Cisco IP Phone 8845, 8851, 8861 and 8865 support Bluetooth Class 1 technology when the headsets support Bluetooth. -
Page 130: Add A Bluetooth Accessory
Add a Bluetooth Accessory For the Cisco IP Phone 8845, 8851, 8861 and 8865 only. The Cisco IP Phone 8851NR does not support Bluetooth. -
Page 131: Connect A Bluetooth Accessory
Accessories Connect a Bluetooth Accessory Connect a Bluetooth Accessory For the Cisco IP Phone 8845, 8851, 8861 and 8865 only. The Cisco IP Phone 8851NR does not support Bluetooth. Before You Begin Before you can connect a Bluetooth accessory, it must be already added as an accessory to the phone. -
Page 132: Disconnect A Bluetooth Accessory
Accessories Disconnect a Bluetooth Accessory Disconnect a Bluetooth Accessory For Cisco IP Phone 8845, 8851, 8861 and 8865 only. Cisco IP Phone 8851NR does not support Bluetooth. Procedure Step 1 Press Applications Step 2 Select a Bluetooth accessory and then press Disconnect. -
Page 133: Cisco Ip Phone 8800 Key Expansion Module
2 Expansion Modules with 72 lines or buttons 8861 and 8865 3 Expansion Modules with 108 lines or buttons The Cisco IP Phone 8811, Cisco IP Phone 8841, and 8845 do not support the Cisco IP Phone 8800 Key Note Expansion Module. - Page 134 LCD screen: Displays the phone number, speed-dial number (or name or other text label), phone service, phone feature, or Privacy assigned to each button. Icons indicating line status appear similar to, and function the same as, those on the Cisco IP Phone to which the Key Expansion Module is attached.
- Page 135 Accessories Cisco IP Phone 8800 Key Expansion Module Features Your administrator sets up the Key Expansion Module to display in one-column or two-column mode. One-column mode In one-column mode, each row in the display corresponds to one line, and this line can be accessed by either the button on the left or the button on the right.
-
Page 136: Place A Call On The Key Expansion Module
• username and password After you have this information, you can configure your speed-dial numbers or program buttons to access phone services. Phone services can include, for example, weather, stock quotes, or corporate calendars and directories. Cisco IP Phone 8800 Series User Guide... -
Page 137: Adjust Key Expansion Module Brightness
• To increase brightness, press the right arrow on the Navigation pad. • To decrease brightness, press the left arrow on the Navigation pad. Step 7 Press Save to set the brightness, or press Cancel to exit. Cisco IP Phone 8800 Series User Guide... - Page 138 Accessories Adjust Key Expansion Module Brightness Cisco IP Phone 8800 Series User Guide...
-
Page 139: Why Can't I See All Active Calls On My Phone
What Happens to Video When I Put a Call On Hold?, page 133 Why Can't I See All Active Calls on My Phone? Question Why can't I see all the active calls on my phone? Cisco IP Phone 8800 Series User Guide... -
Page 140: Frequently Asked Questions
• Press the pulsing green session button. • Press the call session on the phone display. • Press Resume. • Highlight the call by using the Navigation cluster and press Select button. • Press Hold. Cisco IP Phone 8800 Series User Guide... -
Page 141: Screen
(oldest first). If you do not have an All Calls button, contact your system administrator to set up this feature. Your administrator can also set up your primary line key to act the same as the All Calls button. Cisco IP Phone 8800 Series User Guide... -
Page 142: What Should I Do If I Accidentally Press A Button While On A Call
3 Select a running application and press Close App to close the application. When prompted, save your changes. 4 Press Exit to end the running application. If you do not exit a running application, it continues to run in the background. Cisco IP Phone 8800 Series User Guide... -
Page 143: How Do I Connect Two Calls And Then Drop From The Line Myself
How Do I Cancel a Conference or Transfer After I Start It? Question Can I cancel a conference or transfer procedure after I have started it? Answer Yes, before completing a conference or transfer, you can press Release or Cancel to cancel it. Cisco IP Phone 8800 Series User Guide... -
Page 144: How Can I Combine Two Calls Into A Single Conference Call
Your phone wakes up at the time your system administrator configured, or you can press Select to wake it up. Contact your system administrator to have the sleep and wake up times changed. Cisco IP Phone 8800 Series User Guide... -
Page 145: Why Can I Not See Video On A Call
What Happens to Video When I Put a Call On Hold? Question What happens to video when I put a call on hold? Answer Video transmission is blocked until you resume the call. Cisco IP Phone 8800 Series User Guide... - Page 146 Frequently Asked Questions What Happens to Video When I Put a Call On Hold? Cisco IP Phone 8800 Series User Guide...
-
Page 147: C H A P T E
Contact your system administrator to enable the Alert Calls feature for you. Missing All Calls Button Issue I would like to use the All Calls button, but it is not on my phone. Cisco IP Phone 8800 Series User Guide... -
Page 148: Missing Mobile And Remote Access Through Expressway Sign-In Window
• You are using your password to sign in, not your personal identification number (PIN). • Your PIN needs to be reset. Solution • Use your PIN, not your password. • Contact your system administrator. Cisco IP Phone 8800 Series User Guide... -
Page 149: Cannot Access Self Care Portal
• Select a general problem from a list of categories and choose reason codes. Procedure Step 1 Press Report Quality. Step 2 Scroll and select the item that closely matches your problem. Step 3 Press the Select softkey. The information is sent to your system administrator. Cisco IP Phone 8800 Series User Guide... -
Page 150: Documentation, Service Requests, And Additional Information
Documentation, Service Requests, and Additional Information For information about how to obtain documentation, submit a service request, and gather additional information, see the monthly What’s New in Cisco Product Documentation, which also lists all new and revised Cisco technical documentation, at http://www.cisco.com/c/en/us/td/docs/general/whatsnew/whatsnew.html. -
Page 151: C H A P T E
Depending on the quality of these devices and their proximity to other devices, such as mobile phones or two-way radios, some audio noise may still occur. In these cases, Cisco recommends that you take one or more of these actions: •... -
Page 152: Bluetooth Wireless Headset Performance
Power Information Connect your Cisco IP phone to your LAN using a CAT 5e Ethernet cable to enable full functionality of your Cisco IP phone. If your Ethernet port is equipped with Power over Ethernet (PoE), your Cisco IP phone can be powered through the LAN port. -
Page 153: Fcc Part 15.21 Statement
This product contains cryptographic features and is subject to United States and local country laws governing import, export, transfer, and use. Delivery of Cisco cryptographic products does not imply third-party authority to import, export, distribute, or use encryption. Importers, exporters, distributors, and users are responsible for compliance with U.S. - Page 154 Product Safety and Security Cisco Product Security Overview Cisco IP Phone 8800 Series User Guide...
-
Page 155: C H A P T E
Special terms apply to your hardware warranty and services that you can use during the warranty period. Your formal Warranty Statement, including the warranties and license agreements applicable to Cisco software, is available on Cisco.com at the following URL: http://www.cisco.com/go/hwwarranty. - Page 156 Warranty Cisco One-Year Limited Hardware Warranty Terms Cisco IP Phone 8800 Series User Guide...