Table of Contents
Advertisement
Quick Links
Advertisement
Table of Contents

Related Manuals for GE DSR-2000e


Summary of Contents for GE DSR-2000e
- Page 1 DSR-2000e...
- Page 2 The information contained in this document is subject to with the instruction manual, may cause change without notice. GE Security in keeping pace with harmful interference to radio technological advances is a company of product communications.
-
Page 3: Table Of Contents
ONTENTS ........... 1-1 EATURES ONNECTIONS ETUP 1.1 Product Description ..................1-1 1.2 Features......................1-1 1.3 Unpacking ......................1-1 1.4 Installation Environment .................1-2 1.5 Passwords......................1-2 1.6 Front Panel Controls ..................1-2 1.7 Front Panel Display ..................1-3 1.8 Back Panel Connections .................1-4 1.9 Accessories I/O Port..................1-6 1.10 Setting the Time and Date................1-8 1.11 Setting the Alarms ...................1-9 ................. - Page 4 5.6 Advanced Menu → Multiplexer Format............5-7 5.7 Advanced Menu → Adjust Picture..............5-7 5.8 Advanced Menu → Front Panel Lock.............5-8 5.9 Advanced Menu → Factory Settings..............5-8 5.10 Advanced Menu → Change Password............5-8 5.11 Advanced Menu → Languages...............5-9 5.12 Advanced Menu → Firmware Upgrade ............5-9 ..................
-
Page 5: Features , Connections , And Setup
ETUP Product Description The DSR-2000e is a Digital Video Recorder designed to be a direct replacement for a Time Lapse VCR. Digital Video Recording allows the user to have continuous recording on a hard disk, without the need for replacing or rewinding of videotapes. The DSR provides menu based search capabilities for recorded events, as well as access to live or recorded data via the Ethernet. -
Page 6: Installation Environment
• The DSR user manual. • WaveReader software with User Manual. • Archiving Addendum. Installation Environment Power: Ensure that the site's AC power is stable and within the rated voltage of the external power supply. If the site's AC power is likely to have spikes or power dips, use power line conditioning or an Uninterruptable Power Supply (UPS). -
Page 7: Front Panel Display
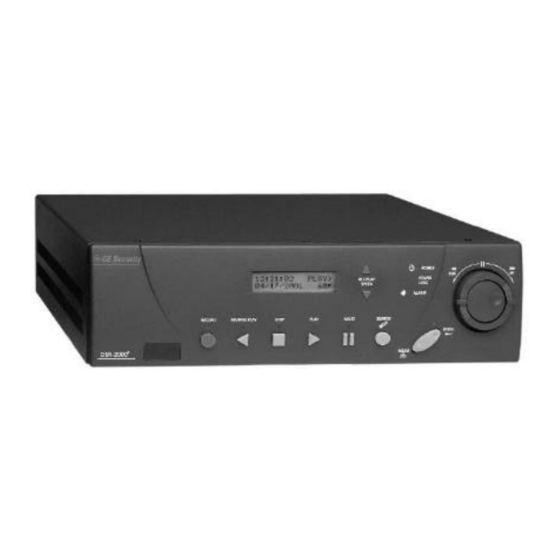
1. Infrared Port: This feature is not yet available. 2. Record button: Press this button to begin recording. 3. Reverse play button: Press this button to playback video in reverse at the normal record speed. 4. Stop button: Press this button to stop Recording or Playback. 5. -
Page 8: Back Panel Connections
Back Panel Connections Figure 1-4 Back Panel 1 ALARM IN 2 ALARM OUT 3 RECORD START IN 4 ALARM RECORD RESET 5 VEXT PULSE OUT 6 ERROR OUT 7 GROUND 8 VIDEOLOSS OUT 9 DISK END OUT VIDEO AUDIO SVHS COMP RS-232 SCSI... -
Page 9: Power Connector
RJ-45 Pin Configuration for Ethernet Port 2 3 4 5 6 7 Not Connected Not Connected Not Connected Not Connected RJ-45 Connector on Back Panel Power Connector Power Supply Input Power Supply Output Voltage: 120 to 240 Volt AC Voltage: 12 Volt DC Tolerance: ±10% Power: 35 Watt Frequency: 50 to 60 Hz... -
Page 10: Accessories I/O Port
Accessories Port. Wire all accessories to the Accessories PCB. Do not attempt to wire accessories directly to the DB-9 connector. If the Accessories PCB is lost or missing, contact GE Security Customer DB-9 Connector on Service for a replacement (Part Number 0900-0127a). As a substitute,... -
Page 11: Alarm Out
Alarm Out The Alarm output is activated when a teletext alarm is detected, Output: Active Low High: 12V or while the Alarm Input is active. The Alarm output is only active for the duration of the alarm event. Low: Ground Current Out: 50mA Max Short Circuit Protected. -
Page 12: Setting The Time And Date
Disk End Out The Disk End Out is activated when there is 5 minutes of Output: Open Collector High: Transistor Off recording space left on the hard disk. It will also be activated if a DAT or AIT tape archiving device is connected, and the tape Low: Transistor On Active When On. -
Page 13: Setting The Alarms
Main Menu → Time/Date → Set Date To set the Date: Date Setup 1. With MM DD YY DAY highlighted, press the Enter button. The MM DD YY DAY highlighting will move to the row of numbers. 12 17 00 SUN 2. -
Page 15: User Operations
PERATIONS Recording To begin recording, press the Record button. RECORD will be indicated for RECORD three seconds, near the upper left hand corner of the primary monitor. The unit always starts recording at the end of the previously recorded data. Recording will continue until: •... -
Page 16: Playback
Alarm Recording When an alarm condition is detected, the unit automatically switches to the ALARM alarm record speed. The alarm condition is indicated in several ways: • With the word ALARM, displayed on the primary monitor, near the Alarm Indicator upper left hand corner of the screen. -
Page 17: Reverse Play
Play Forward To begin normal playback, press the Play Forward button. The unit will begin PLAY playing back data from the beginning of the last recording session. Playback is indicated: • As PLAY near the upper left hand corner of the primary monitor, for three seconds. -
Page 18: The Search Interface
Pause PAUSE During playback, press the Pause button to pause playback, and display a single frame on-screen. Pause is indicated: • As PAUSE near the upper left hand corner of the primary monitor, for Pause button three seconds. • As PAUSE on the LCD. Single Frame Advance &... -
Page 19: Specifying Search Parameters
Searching for All Recorded Events Using the Shuttle to navigate, highlight [START SEARCH], then press the Enter button. The Search Results window will appear. For information about selecting a recorded event, see Selecting from the Search Results, in this section. Specifying Search Parameters Selecting a Start and Stop Date 1. - Page 20 Starting the Search Using the Shuttle to navigate, highlight the [START SEARCH] parameter, then press the Enter button. The Search Results menu will appear. Search Results Start Date Start Time Days HH MM SS 01/01/00 00:07:14 0 00:00:36 01/01/00 23:35:20 0 00:08:11 02/12/00 23:43:30...
-
Page 21: He Enu Ystem
YSTEM This section provides a brief overview of the menu system, for complete information about Operator and Installer programming, see section 4: Operator Programming, or section 5: Installer Programming. How to use this Manual Throughout this manual, there are headings like these. Main Menu →... -
Page 22: Entering The Main Menu
Entering the Main menu Enter the Main menu by pressing the Menu button. The Main menu will ENTER appear on the primary monitor. MENU Menu button The Main Menu The Main menu provides access to all of the operator programmable Time/Date options. - Page 23 Main Menu → Timer Settings This menu allows the user to START STOP SPD(pps) QUALITY ON/OFF program a timed-recorded 16:45 17:05 High event. Use this menu to specify: 07:55 08:10 • MON-FRI 09:56 11:05 The date, or days on which the recording SAT-SUN 14:23 14:50...
- Page 24 Main Menu → Archive Setup Use this menu to: Selective archive Restore from archive • Select data to be archived and begin archiving process. Background archive • Restore data from archive device. Quickwave Setup • Enable background archiving. Archive Overwrite Mode •...
- Page 25 The Advanced Menu For security reasons, a password is provided to limit access to the Disk Overwrite Mode Advanced menu. For instructions about entering the Advanced menu, Disk Maintenance see Main Menu → Advanced Menu, on the previous page. Audio Record Setting The Advanced menu provides access to all of the installer Auto Delete Mode programmable options.
- Page 26 ADM Setting Message ADM will change. Are you sure? Days Advanced Menu → Communications Use thus menu to specify: Baud Rate Ethernet Settings • The data transfer rate for the RS-232 serial port. Modem Settings • The units Ethernet network connection settings. •...
- Page 27 Advanced Menu → Front Panel Lock Use this menu to Lock or Unlock the front panel. Unlock Keyboard Lock Keyboard Advanced Menu → Factory Settings Use this menu to enter the Factory Password, and Password Box restore the unit to the factory defaults. Please enter the Factory Password O--- Advanced Menu →...
- Page 28 A PC connected to the DSR via the serial port with a null modem cable. • The WinFlash program. • The upgrade file. For further information and for obtaining the upgrade files and WinFlash program please contact GE Security Technical Support at 1-800-469-1676.
-
Page 29: Operator Programming
PERATOR PROGRAMMING Main Menu → Time/Date Set Time Format Use this menu to specify: Set Date Format • The time format: 12 or 24 hours. Set Time • The date format: MM/DD/YY, DD/MM/YY, or Set Date YY/MM/DD. Set Region • The time. - Page 30 Main Menu → Time/Date → Set Time To set the Time: Time Setup 1. With HH MM SS highlighted, press the Enter button. The HH MM SS highlighting will move to the row of numbers. 03 05 53 2. Enter the time in Hours, Minutes, and Seconds. Use the Jog to [CANCEL] [OK] change the values.
-
Page 31: Main Menu → Time/Date → Set Region
Main Menu → Time/Date → Set Region Use this menu option to set the region for the Auto Daylight Savings Time feature. Choices are: Regional Settings • OFF: Clock will not be changed automatically. Daylight Saving : • Time Zone GMT+07:00 USA: DST starts at 02:00 on the first Sunday in April. -
Page 32: Main Menu → Alarms
Main Menu → Alarms Alarm Settings Use this menu to specify: • Hardwire Alarm : Enable Whether an alarm condition will be activated when the unit detects a signal on the Alarm In connection. Teletext Alarm : Disable Alarm Buzzer Enable •... -
Page 33: Main Menu → Timer Settings
Main Menu → Timer Settings This menu allows the user to DATE START STOP SPD(pps) QUALITY ON/OFF program a timed-recorded 16:45 17:05 High event. Use this menu to specify: 07:55 08:10 • Mon-Fri 09:56 11:05 The date, or days on which the recording Sat-Sun 14:23... -
Page 34: Main Menu → Record Settings
10. When finished entering the Record Quality, use the Shuttle to navigate to the ON/OFF setting. 11. Use the Jog to Activate, Deactivate, or Delete the recording. 12. When finished, press the Enter button to exit the Edit mode. Use the Jog / Shuttle to navigate to [OK], then press the Enter button to complete the selection. - Page 35 Caution: Do not connect both video inputs at the same time. Main Menu → Record Settings → Color/Mono This menu sets the recorded video to be in Color or Mono. If you select auto, (default), the Auto unit will auto detect color as before. If you select mono, it will force the recording into Mono monochrome.
-
Page 36: Main Menu → Display Settings
Main Menu → Record Settings → Video Quality Use the Jog to select the desired Record Quality. Select High, Record Quality Med, Standard, or Custom. Higher record qualities use lower compression, requiring more Select Quality disk space. Selecting Custom allows you to set a custom file size from 13.0k to 33k. - Page 37 Main Menu → Display Settings → Record Capacity Select ON, to display the amount of time remaining before the hard disk runs out of record space. The data is displayed near the upper left hand corner of the primary monitor. The unit displays the Record Capacity with two measures of time, and switches automatically depending on the amount of time remaining: •...
-
Page 38: Main Menu → Archive Setup
Main Menu → Display Settings → Playback Time / Date To display the time and date the recording was made (during playback) select On. The data is displayed near the upper right hand corner of the screen. Use the Jog to select On or Off. Press the Enter button to confirm the selection and exit the menu. -
Page 39: Searching For Recorded Alarms
Searching for All Recorded Events Using the Shuttle to navigate, highlight [START SEARCH], then press the Enter button. The Archive Search Results window will appear. For information about selecting a recorded event, see Selecting from the Archive Search Results, in this section. Specifying Search Parameters Selecting a Start and Stop Date 1. - Page 40 Archive Search Results Start Date Start Time Size (MB) 11/28/2000 17:52:14 26842 11/29/2000 09:35:20 2062 11/29/2000 10:00:04 11/29/2000 10:03:25 Selected [ 383 ](MB) Available on Target Medium [ 652 ](MB) “ENTER” to play “SEARCH” to archive Selecting from the Archive Search Results 1.
- Page 41 Use this menu to specify: Restore Search Filters • The Start and Stop date of Start Stop the search. DATE: 12/25/00 01/01/01 • The Start and Stop time of (MM/DD/YY) (MM/DD/YY) the search. Start Stop • Which cameras to search TIME: 11:11:21 12:34:34 exclusively.
- Page 42 Searching for Recorded Alarms 1. Using the Shuttle to navigate, highlight the ALARM parameter, then press the Enter button. The unit will enter Edit mode. 2. Use the Jog to activate the alarms search, by placing an [X] in the check box. 3.
-
Page 43: Main Menu → Advanced Menu
Main Menu → Archive Setup → QuickWave Setup This feature provides the option of having the QuickWave software written to any CDs that are created. This allows the CD to be read on any PC without installing software. Select ON to enable, OFF to disable. -
Page 45: Installer Programming
NSTALLER ROGRAMMING For security reasons, a password is provided to limit access to the Advanced menu. For instructions about entering the Advanced menu, see section 4.7 Main Menu → Advanced Menu, on page 4-15. Advanced Menu → Disk Overwrite Mode Use this menu to specify how the unit will handle disk overwrite Disk Overwrite Mode issues once the hard disk becomes full. -
Page 46: Advanced Menu → Disk Maintenance
Advanced Menu → Disk Overwrite Mode → Overwrite Once Functions of Overwrite Once mode: • Recording always starts at end of last recording. New recorded data • The unit overwrites all previously recorded data. • Recording stops before the unit overwrites any of the new recorded data (data from the current record session). -
Page 47: Advanced Menu →Audio Record Setting
Advanced Menu → Disk Maintenance → Delete Disk To begin deleting the disk, use the Jog to select DELETE DISK, then Deleting Disk… press the Enter button. The Deleting Disk menu will appear. The unit will begin deleting the oldest recorded information immediately. [CANCEL] To stop the delete process, select [CANCEL] by pressing the Enter button. -
Page 48: Advanced Menu → Communications
ADM Setting Message ADM will change. Are you sure? Days Advanced Menu → Communications Use thus menu to specify: Baud Rate Ethernet Settings • The data transfer rate for the RS-232 serial port. Modem Settings • The units Ethernet network connection settings. •... - Page 49 IP Address / Subnet Mask / Gateway: Consult with a qualified Network Administrator or an MIS professional to configure these settings if DHCP is not enabled. Primary Name Server / Backup Name Server: The IP addresses of the Primary and Backup Name Servers.
- Page 50 Modem Settings Modem Status : DISABLE Modem Init String : AT&F1&K3M0E1Q0V1S0=0&R2&C1&D0&H1 [Default Modem String] [CANCEL] [OK] 1. With the Modem Init String highlighted, press the Enter button to enter the Edit mode. The character bank will appear in the center of the menu. 2.
-
Page 51: Advanced Menu → Multiplexer Format
Advanced Menu → Multiplexer Format The DSR is compatible with several different brands of multiplexers. Use this menu to specify the Playback format of the multiplexer. If the unit is not connected to a multiplexer, select NONE. Note: The DSR will auto detect the camera type connected (NTSC or PAL) and will only display the supported multiplexers available in that format. -
Page 52: Advanced Menu → Front Panel Lock
3. To Save the changes and Exit the menu: Use the Shuttle to select [OK], then press the Enter button. --OR— 4. To Exit the menu without making changes: Use the Shuttle to select [CANCEL], then press the Enter button. Advanced Menu →... -
Page 53: Advanced Menu → Languages
To upgrade the DSR from this menu requires the following items: • A PC connected to the DSR via the serial port with a null modem cable. • The WinFlash program. • The upgrade file. For further information and for obtaining the upgrade files and WinFlash program please contact GE... -
Page 55: Wave Browser
ROWSER The DSR has an integrated WebBrowser interface. The WaveBrowser option allows the user to view video from any ethernet connected DSRs with software version 2.07 or above. For WaveBrowser to function properly, certain ActiveX controls must be set correctly. To NOTE setup the ActiveX controls: 1. -
Page 56: Wavebrowser Overview And Controls
6.1 WaveBrowser Overview and Controls Button Panel Main Viewing Area Drop Down Volume List The Main program window consists of the following areas: • The Main Viewing Area: The large blue area. • The Button Panel: The left side of the window. •... - Page 57 The Button Panel 1. Play Backward button: Click on this button to playback video in reverse. 2. Stop button: Click on this button to halt all playback operations. The Play Pointer Slider Bar moves to the start of data. 3. Play Forward button: Click on this button to playback video. 4.
-
Page 58: Dsr Wavelink
6.2 DSR WaveLink A new feature with DSR software version 2.07 is the DSR WaveLink. This feature allows putting command codes in the URL when calling WaveBrowser to control actions the WaveBrowser is going to perform. This feature can be used by Web Developers to link various cameras to specific Web content. 6.2.1 Functionality The traditional WaveBrowser URL is http://<IP_Address>/wrcontrollite.ssi. -
Page 59: Upgrading The Dsr With Wavebrowser
To properly upgrade the DSR the following preconditions must exist: The Flash upgrade file and path. This file is obtained by calling GE Security Technical Support at 1-800-469-1676. When calling, please have the following information available: • The model number of the product. - Page 60 Navigate to the upgrade file using the Browse button or type in the correct path and filename. Step 4. Click on the Send File button. Click on the Confirm Button. A progress bar will appear. PLEASE WAIT FOR THE PROGRESS Step 5.
- Page 61 RS-232 R EMOTE ROTOCOL The RS-232 protocol command structure uses “Start of Text” (S ) and “End of Text” (E ) characters to identify the beginning and end of command sequences. The DSR supports the following command sequences: ASCII Command String Command ASCII String Bytes in Hexadecimal...
-
Page 62: Setting The Clock
Setting the Clock The following table shows the command sequence for setting the clock: Command Value Command Value This gray cells in the Value row of this table indicate the correct positions for each byte of data in the command string. Place the hexadecimal value of the desired ASCII character into the command string. - Page 63 Stop Mode Status Request SMS E 02 73 4D 73 03 ASCII Status Response Messages Command ASCII String Model Name Response MLN DSR-2000e E Software Version Number Response SVN 1.18 E Record Mode Status Response RMS 0 E (Not Recording) RMS 1 E...
-
Page 65: Factory Defaults
ACTORY EFAULTS Function Setting Time Format 24 Hour Date Format MM / DD / YY Normal Record Speed 60 pictures per seconds (NTSC) or 50 pps (Pal) Alarm Record Speed 60 pictures per seconds (NTSC) or 50 pps (Pal) Record Quality High Disk Overwrite Mode Continuous Overwrite... - Page 66 Function Setting WINS Disabled Audio Record Setting...
-
Page 67: Echnical Pecifications
ECHNICAL PECIFICATIONS General Power Supply 120-240 Volt AC, Auto-Ranging adapter Input Voltage 12 Volt DC Power consumption 20 Watts Max. Operating Temperature Range Operating: 0 to 40 ºC. Storage: -20 to +60 ºC. Relative Humidity Range (Non-Condensing) Operating: 10% to 80%. Storage: 10% to 95% Dimensions Inches: 13 x 14 x 3.5 mm: 330 x 355 x 89 Weight... -
Page 68: Part Numbers
Accessories PCB 0900-0127 User Manual 0150-0163 Archiving Addendum 0150-0145 WaveReader Software CD 0151-0005 WaveReader Software Manual 0150-0143 All specifications are subject to change without notice. GE Security believes all specifications are correct, but no liability is assumed for omissions or errors. -
Page 69: Warranty And Service
Failure to comply with these instructions will delay service of the unit, and may result in the unit not being accepted by the Repair Center. Factory Address GE Security Attention: Repair Center 3050 Red Hill Ave Costa Mesa, CA. 92626... -
Page 70: Warranty And Return Information
10.2 Warranty and Return Information GE Security warrants all of its equipment for three years from the date of purchase. This warranty covers any defects in materials and workmanship. Equipment failures that are due to improper installation, modification, abuse, or acts of nature will not be covered by this warranty. The repair department will evaluate all equipment returned for repair to determine warranty coverage.