Table of Contents
Advertisement
Quick Links
Advertisement
Table of Contents
Troubleshooting

Related Manuals for GE Digia II


Summary of Contents for GE Digia II
- Page 1 Digia II User Manual...
- Page 2 Software. 1. Definitions. The following definitions apply to this document: a. “GE”, with respect to title to or warranty of the Software, means GE Security Inc., a Dela- ware corporation. b. “Software” means the executable software or firmware programs and accompanying...
- Page 3 Software to a human-perceivable form, nor create derivative works or programs based on the Software. 5. Limited warranty. GE warrants that for one (1) year from the date of delivery of the Licensed Product (Software Warranty Period), the functions contained in the Software will be fit for their intended purpose as described in the applicable Documentation from GE, and will conform in all material respects to the specifications stated in such Documentation.
- Page 4 You further agree that this agreement is the complete and exclusive statement of the agreement between You and GE, and supersedes any proposal or prior agreement, oral or written, and any other communication relating to the subject matter of this agreement.
-
Page 5: Table Of Contents
Digia II features ........ - Page 6 Troubleshooting your Digia II ........
-
Page 7: Preface
Preface This is the GE Digia II User Manual for models Digia 204, Digia 209, and Digia 216. This document includes an overview of the product and detailed instructions explaining: • how to install the unit; and • how to set up the unit. - Page 8 Digia II User Manual...
-
Page 9: Introduction
Chapter 1 Introduction This chapter provides an overview of your Digia II, and describes how to configure and use your Digia II. In this chapter: Product overview ......... . . 2 Firmware . -
Page 10: Product Overview
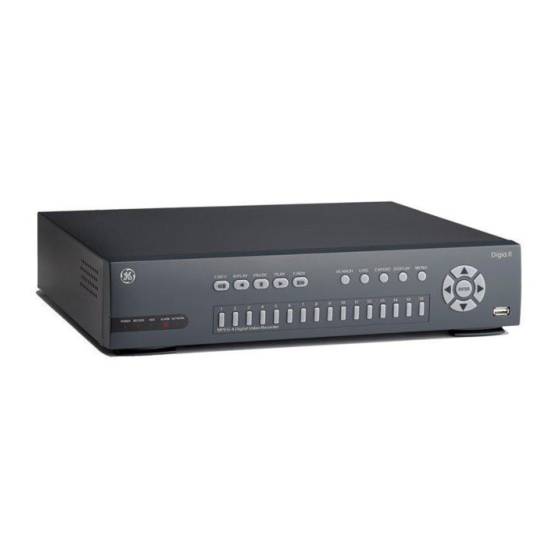
• Operate through easy-to-use VCR style control buttons. Firmware Firmware is the software that is embedded in your Digia II and ensures your unit operates smoothly. You must download the firmware from GE’s website (see Upgrade firmware on page 13.) Front panel The Digia II front panel (Figure 1) lets you monitor and enable Digia II functions. - Page 11 Introduction Front panel buttons The front panel gives you quick access to the more common Digia II functions, and include the following: F/Rev. Fast reverse, starts or increases reverse slow motion. Press this once to rewind or repeatedly for 1/32, 1/16, 1/8, 1/4, and 1/2 slow motion increments. You usually use this after you pause video.
-
Page 12: Back Panel
SVGA connector. VGA connection. Use to connect to a computer monitor. LAN. Ethernet connection. Use to connect your Ethernet cable to the Digia II. Alarm out. NC (normally closed), C (closed), and NO (normally open) connections. Use to connect alarm output devices, for example, a siren. -
Page 13: Monitor Onscreen Display
Chapter 1 Introduction Monitor onscreen display Figure 3 shows the Digia II monitor display in full screen mode, the default view when you first power on your Digia II. You must select your onscreen display (OSD). See Display on page 34. - Page 14 Digia II User Manual Playback/Record status bar. Displays the playback or record video date, the recorded channel, events, and the location of the video on the hard drive. Table 2 lists all onscreen display items that appears on both the playback and recording status bar, including system events and playback icons.
-
Page 15: Monitor Configuration
Chapter 1 Introduction Monitor configuration Your Digia II can display a number of configurations, including the following: • Four channel units, full screen and 2X2 • Nine channel units, full screen, 2X2, and 3X3 • Sixteen channel units, full screen, 2X2, 3X3, and 4X4 Figure 4 shows the channel icon and playback status bar for a 2X2 configuration. -
Page 16: Shuffle Camera Views
Digia II User Manual Shuffle camera views You can reposition the channels to the configuration you want. To shuffle the camera views, do the following: 1. Press Display repeatedly, until you display the configuration you require. 2. Press Enter. Select displays in the upper right (Figure 5). -
Page 17: Freeze Or Zoom Video
Chapter 1 Introduction Freeze or zoom video To freeze live video or zoom in on live video, do the following: 1. Press Display until you are in full screen mode or press the channel button you require. 2. Press Enter to freeze the video. The Freeze message displays (Figure 6). Figure 6. - Page 18 Digia II User Manual...
-
Page 19: Installation
Chapter 2 Installation This chapter provides instructions for hardware and software installation. In this chapter: Hardware installation ........12 Upgrade firmware. -
Page 20: Hardware Installation
Hardware installation You must install your Digia II in an area that is secure and away from water, heat, dust, dirt, and other substances that may damage the unit. To install your Digia II, see Figure 8 and do the following: 1. -
Page 21: Battery Replacement
2. Copy the file to your USB drive. 3. Plug your USB drive into either of the two USB ports on the Digia II unit (Figure 8 on page 12.) 4. Press Menu. 5. Log on to the Main menu, use the default Admin passcode as the primary and the User passcode as the secondary. -
Page 22: Software Installation
User Manual Software installation The DigiaPlayer software lets you view video you recorded from your Digia II. You can also convert files for Windows Media Player for users who do not have the Digia Player. To complete installation and ensure all items work correctly complete all items in this section. -
Page 23: Digia Ii Features
Chapter 3 Digia II features This chapter describes the Digia II features. In this chapter: Features ..........16 Search . -
Page 24: Features
User Manual Features To invoke any of these features use the directional buttons on the Digia II’s front panel (see Figure 1 on page 2). To make a selection use the directional buttons to navigate and press Enter to select the selection highlighted. -
Page 25: Search
Digia II features Search To locate recorded video from your Digia II’s hard drive, see Figure 9 and do the following: 1. Press Search on the front panel. The Search menu displays. 2. Select the search by type, either Time or Filters. -
Page 26: Playback
Digia II User Manual Playback The playback controls are on the Digia II front panel (Figure 1 on page 2). To playback video directly from your unit, do the following: 1. Press Live to open Live video. 2. Press Play. The system begins to play the last five minutes of recorded video. -
Page 27: Export Video To A Usb Device
You can export a recorded video file to a USB device. To export recorded video, do the following: 1. Press Export on the front panel of the Digia II (Figure 1 on page 2). 2. The Export menu displays the video that you can export (Figure 10). -
Page 28: Play Dga Files
Digia II User Manual Play DGA files Once you have a DGA file on your USB drive you can use DigiaPlayer to view those files. To view the files do the following: 1. Insert a compatible USB drive into your computer’s USB port. -
Page 29: Convert Dga Files To Avi
Chapter 3 Digia II features Convert DGA files to AVI To save AVI files, which are compatible with the Windows Media Player, do the following: 1. Download the DivX codec, if you have not done so. See Download the required DivX codec page 14. -
Page 30: Activate A Motion Detection Grid
Digia II User Manual Activate a motion detection grid To define what areas of the camera image set off a motion event, do the following: 1. Set the motion detection to Partial. Note: Enabled cells are shaded green and disabled cells are blank. -
Page 31: User Menus
Chapter 4 User menus This chapter provides a description of your Digia II’s main menu. In this chapter: Passcodes ..........24 Digia II main menu . -
Page 32: Passcodes
Digia II User Manual Passcodes Table 3 indicates the passcodes and what menus and submenus you can access, for your passcode type. Passcode types include the following: Administrative passcode(4444). Gives you access to all the menus. User passcodes (1234). Gives you access to only the Display and Information menus. -
Page 33: Digia Ii Main Menu
Passcodes on page 24. 3. From the Main menu (Figure 14), use the directional buttons on the Digia II’s front panel to navigate through the menus. 4. Press Enter to select a menu option. See Table 3 for a layout of the Main menu submenus. -
Page 34: Camera
Digia II User Manual Camera Use the Camera menu (Figure 15) to configure your camera’s options. Figure 15. Camera Digia II Menu - Camera << Camera 1 >> Title CH01_ _ _ _ _ Recording Continuous Frame Rate Quality Level... -
Page 35: Record
Select DISPLAY to paste settings. If you copied settings from another camera submenu, press Display to paste those settings in the appropriate places on the current submenu. Record Use the Record menu (Figure 16) to set the Digia II recording features. Figure 16. Record Digia II Menu - Record... -
Page 36: Schedule
Use the Schedule menu, including the Time periods and Camera submenus to configure your camera’s scheduling options. Time periods You can set the time period the camera is activated or deactivated in the Time periods submenu (Figure 17). Figure 17. Time periods Digia II Menu - Schedule << Time Periods >> Schedule... - Page 37 12:00p 12:00a Note: The number of cameras for your Digia II may be different from the number of cameras listed here. The menu options include the following: FPS (frames per second). Set between 0 and 30. QL (quality level). Set between 1 and 6.
-
Page 38: Alarms
Digia II User Manual Alarms Use the Alarms menu (Figure 19) to control the alarm triggers for your Digia II. Figure 19. Alarms Digia II Menu - Alarms << Alarm 1 >> Contact Alarm Disable Sensor Type Alarm Frame Rate... -
Page 39: Network
Event buzzer. Check this box if you want to hear a buzzer on motion, alarms, and video loss. Email notification. Check this box if you want the Digia II to send an e-mail to a predetermined e-mail address when the alarm is triggered. - Page 40 DNS server address the same way as you set the IP address. Network e-mail Use the Network email submenu (Figure 21) to configure your network e-mail. Figure 21. Network email Digia II Menu - Network << Network Email >>...
- Page 41 _ _ _ _ _ _ _ _ _ The menu options include the following: DDNS services. Check this box to enable DDNS on the Digia II. DDNS server. Choose between www.tzo.com, www.sitelutions.com, or www.dyndns.org. To set up an account, see those websites for more information.
-
Page 42: Display
User Manual Display Use the Display menu (Figure 23) to enable special features that display during recording and playback in Figure 23. Display menu Digia II Menu - Display Sequence Event Notifications Output Type The menu options include the following: OSD. -
Page 43: System
Time synchronize. Check if you want the Digia II to synchronize its time clock to an external source. Time server. Set the IP address of the external source you want to use as your time synchronizing server. - Page 44 Time update by. Select the time interval you want the system to update its time. Choose between day, week, and month. System admin Use the System admin submenu (Figure 25) to set the system administration options. Figure 25. System admin Digia II Menu - System << System Admin >> Language...
-
Page 45: Information
Chapter 4 User menus Information Use the Information menu (Figure 26) to update your unit information. Figure 26. Information Digia II Menu - Information DVR ID _ _ _ _ _ _ Firmware Version 0.9.28 HDD Size 76 GB IP Address 000.000.000.000... - Page 46 Digia II User Manual...
-
Page 47: Chapter 5 Troubleshooting, Maintenance, Support
This chapter provides information to help you troubleshoot problems and contact technical support in case you need assistance with your GE equipment. In this chapter: Troubleshooting ......... . . 40... -
Page 48: Troubleshooting
• I cannot get my Digia II to recognize my USB device. When you export video, insert the USB device into the USB port just before the last step, so the Digia II has time to recognize the device. Some devices may not be compatible. - Page 49 • The Digia II DVR boots up to a startup screen but does not progress to live mode. The Digia II runs a self-diagnostic test once the unit powers up. If a failure is detected, such as a fan, hard drive, or Ethernet, the unit may not boot completely.
-
Page 50: Contacting Technical Support
After you register and log on, you may search through our online library for the documentation you need. Many GE documents are provided as PDFs (portable document format). To read these documents, you will need Adobe Reader, which can be downloaded free from Adobe’s website at www.adobe.com. -
Page 51: Appendix A. Reference Tables
Appendix A Reference tables This appendix provides all the default settings that came with your Digia II camera and a recording resolution reference table. In this appendix: Main menu default values ........44 Camera menu . -
Page 52: Main Menu Default Values
Digia II User Manual Main menu default values This section provides all the default values for the Digia II submenus, which you can access from the Menu button on the front panel. Camera menu Use Table 5 to reset the default values for the Camera menu. -
Page 53: Alarms Menu
Appendix A Reference tables Alarms menu Use Table 7 to reset the default values for the Alarms menu. Table 7. Alarms menu default value Setting Default value Setting Default value Contact alarm Disabled Motion detection Disabled Sensor type Motion sensitivity Alarm frame rate 10 fps Video loss... -
Page 54: System Menu
Digia II User Manual System menu Use Table 10 to reset the default values for the System menu. Table 10. System menu default values Setting Default value Setting Default value Date format MM/DD/YYYY OSD color White Time format 12 hour... - Page 55 Appendix A Reference tables...
- Page 56 Digia II User Manual...