Honeywell TUXWIFIS Installation And Setup Manual
Tuxedo touch wi-fi
Hide thumbs
Also See for TUXWIFIS:
- Installation and setup manual (48 pages) ,
- Installation manual/user manual (4 pages)

Related Manuals for Honeywell TUXWIFIS


Summary of Contents for Honeywell TUXWIFIS
- Page 1 ® ® ™ Models TUXWIFIS and TUXWIFIW Home Automation System Installation and Setup Guide 800-16571V1 7/14 Rev. A...
- Page 2 TRADEMARKS Honeywell is a registered trademark of Honeywell International Inc. Total Connect is a trademark of Honeywell International Inc. Windows and Windows Vista are trademarks, or registered trademarks of Microsoft Corporation in the United States and other countries. Android™ is a trademark of Google Inc.
-
Page 3: Table Of Contents
Table of Contents About the System ..........................5 Tuxedo Features ..........................5 Control Panel Compatibility ......................7 Programming the Control Panel ..................... 8 Quick Programming (VIP Mode) ..................... 8 Data Entry Keyboard ......................... 9 First Time Setup..........................11 First Time Power Up (Keypad Initialization) ..................11 Set ECP Address/RIS Automation Address .................. - Page 4 Table of Contents (cont’d) User Codes ............................30 Add a User ............................31 NIGHT Setup Function ........................31 Output Setup Function ........................32 Z-Wave Setup ..........................33 Adding Z-Wave Devices ........................33 Abort a Z-Wave Action ........................34 Z-Wave Factory Default ........................34 Z-Wave Device List .........................
-
Page 5: About The System
About the System This guide provides information to install and set-up Honeywell’s Tuxedo Touch™ Wi-Fi ® Home Automation and Security System (herein referred to as Tuxedo). Tuxedo is an Advanced User Interface (AUI) device, which combines wireless home automation and security. Tuxedo connects to a VISTA ®... - Page 6 About the System (cont’d) Feature Description IMPORTANT DO NOT perform panel programming while in the Safe Mode. Performing panel • programming while in Safe Mode may cause the panel and keypad to become out of sync. DO NOT use more than several hardwired motion detectors in high traffic locations. The •...
-
Page 7: Control Panel Compatibility
The table below lists compatible control panels and their software revision levels. NOTE: For SIA installations used with a VISTA-128BPTSIA Control, see the SIA CP-01 Quick Reference Chart, Document # 800-09699 located at: http://www.security.honeywell.com/hsc/resources/MyWebTech Minimum Software Maximum Number of Keypads... -
Page 8: Programming The Control Panel
About the System (cont’d) Programming the Control Panel The keypad is not fully operational unless its address in the control panel has been enabled (set as an alpha console) AUI type device, and assigned to a partition (where applicable). For a list of compatible alarm systems, refer to the “Compatibility Table”... -
Page 9: Data Entry Keyboard
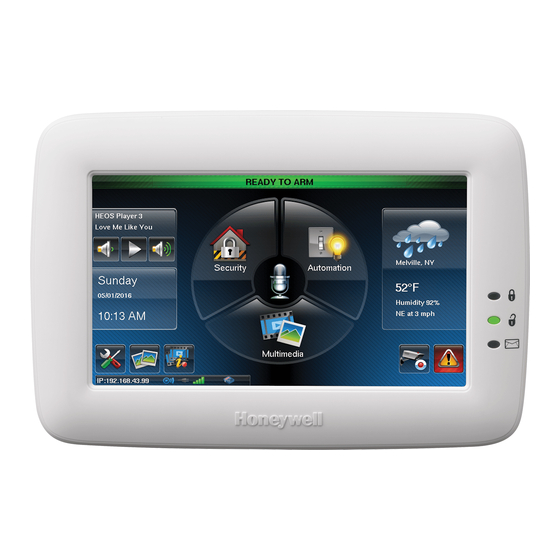
About the System (cont’d) Front Panel LEDs The Tuxedo keypad has three LEDs as follows: SD/SDHC CARD Slot ARMED (RED) LED ON – System is armed. OFF – System is not armed. READY (GREEN) LED ON – System is disarmed and ready to arm. OFF –... - Page 10 About the System (cont’d)
-
Page 11: First Time Setup
First Time Setup First Time Power Up (Keypad Initialization) After first time power up, Tuxedo steps through the following setup prompts. These options can also be set later using the appropriate menus. Installer Note: The Tuxedo touch-screen has been calibrated at the factory. Ignore the “CALIBRATE” button that appears on the “Options”... -
Page 12: Operating Modes
First Time Setup (cont'd) - Verify that the AUI type device is enabled in the control panel, and that the ECP address in Tuxedo matches the address enabled in the control panel. Use a different address for each device. - If powering Tuxedo from a power supply, make sure you have a common ground installed (wiring between Power Supply "gnd"... - Page 13 First Time Setup (cont'd) To change the occupancy delay time, (the amount of time you want to allow for authorized entry or exit without causing an alarm) select a time interval from the Occupancy Delay drop-down list: choose from 15, 30, 60, 120 or 225 seconds. When done, press Apply to save the settings.
-
Page 14: Time/Date Setup
First Time Setup (cont'd) Mode. If you answer with Tuxedo tries to communicate with the panel again. After 3 consecutive “No,” times of receiving no response, Tuxedo enters the Safe Mode automatically. NOTE: Use care when providing the “Yes” or “No” response. Pressing the screen outside the prescribed area may cause the background to come to the front. -
Page 15: Power Mode Setup
First Time Setup (cont'd) Set the “Start DST” time and then the “End DST” time by selecting the appropriate Month, Weekend and Hour that DST starts and ends. When done, press Apply After each selection the window closes automatically and the selection is displayed. Select a 12-hour or 24-hour format for your time display by pressing the circle to the left of the 12 Hour display. -
Page 16: Setup A Wlan (Wi-Fi) Connection
First Time Setup (cont'd) If the IP address is not displayed, change the “Internet Connection Type” to Static and manually enter the IP address from your router onto the keypad. Highlight each field and enter the required information for Subnet Mask, Default Gateway, DNS Server and Port #; press GO. To change the default port number (6280), press the field next to port number and enter a secondary port number between 5000-65534. -
Page 17: Mounting And Wiring
Mounting and Wiring Mounting Tuxedo is for indoor use within the protected area only and should be mounted at a comfortable viewing level. Avoid mounting in areas of high condensation such as bathrooms or in locations where bright light or sunlight shines directly on the screen. Tuxedo can be mounted with or without the mounting plate. -
Page 18: Wiring
Mounting and Wiring (cont’d) Wiring Connect the Tuxedo in parallel with keypads and other peripheral devices using the keypad data (ECP) bus. • If Tuxedo is used as the primary system keypad, maximum wire run length is 150 feet. • If more than one Tuxedo is wired to one run, then the maximum lengths must be divided by the number of keypads on the run. -
Page 19: Setup Menus
Setup Menus Brightness and Volume Control Press the Setup icon. Move the Brightness/Volume slide bar up or down to increase or decrease settings. Yes saves the change. No discards the change. If changes are made, when you exit a pop-up window displays: “Information Settings Saved“... -
Page 20: Adjust The Screen Timeouts
Setup Menus (cont’d) Adjust the Screen Timeouts Settings include: • Backlight Off After X time (turns the backlight Off after the selected time has expired) • Return To Homepage After X time (returns to “Home” screen after the selected time has expired) •... -
Page 21: Multi-Media
Multi-Media Picture Setup Tuxedo can display personal photo(s) on the Home screen as wallpaper or in a slide show format. To set up a slide show of pictures, do the following: 1. Insert your personal media (SD/SDHC) card (with stored picture files). Formats supported are .bmp, png or .jpg files. -
Page 22: Camera Setup
Multi-Media (cont’d) Camera Setup Tuxedo must be Wi-Fi connected to the home router before adding cameras. View the “IP Camera Setup” training video for helpful information to aid in the setup. Tuxedo supports up to 32 cameras and up to four cameras can be viewed at one time. NOTES: QuickTime®... - Page 23 Multi-Media (cont’d) 5. If using Total Connect, press the Total Connect icon to reset the camera for remote viewing and activate a Total Connect account. A pop-up window displays: “For remote camera viewing service, please contact your alarm company and ask for Total Connect service and provide the camera’s MAC ID XX:XX:XX:XX:XX:XX.
-
Page 24: Viewing Cameras
Multi-Media (cont’d) Others: Reset to Defaults: a pop-up window displays: “Do you want to reset the Camera?” Select Yes to reset the camera to factory default settings. Restart Camera: Press to restart the camera. Camera functionality is supplementary only and has not been evaluated by UL. Removing Cameras To delete a camera, highlight the camera name and press the DELETE icon. -
Page 25: Video Setup
Multi-Media (cont’d) Video Setup A Video Converter is required to convert videos for proper playback on Tuxedo. Use an Internet search engine to locate and download a Video Converter, then follow the steps in the Video Converter Instructions (provided in the carton). Press the Product/Training Video icon (located on the Home screen) and view the “SD Card Video Playback”... -
Page 26: Creating A Scene For Camera Recording
Multi-Media (cont’d) Press Save when done. This will return you to the “Camera List” screen. Press the Recording Settings Setup icon and select the camera to use for recording from the drop- down list. Press Save when done. Creating a Scene for Camera Recording To create a scene for camera recording, from the “Home”... - Page 27 Multi-Media (cont’d) Event Viewing To view a cameras’ recorded event: Press the Multimedia and the Event View icons; the list of events appears on the screen. Press the Event View Setup icon and select the Filter by Camera button to view a specific cameras’...
- Page 28 Multi-Media (cont’d)
-
Page 29: Security
Security Screen Security The Screen Security icon displays a list of authority levels and the user level that has been given access to them. To view and/or edit Screen Security, do the following: From the "Home" screen, press the Setup icon and then the System setup icon. -
Page 30: Device Events
Security (cont’d) Device Events Tuxedo has the ability to record events in a history log. Each event is recorded with the time and date of its occurrence. From the "Home" screen, press the Setup icon and then the System setup icon. -
Page 31: Add A User
Security (cont’d) NOTE: The authorized code for deleting, adding, and editing users is dependent upon the alarm panel you are interfacing with. Check your alarm panel Installation and Setup Guide to determine who can delete, add, and edit users. Add a User From the "Home"... -
Page 32: Output Setup Function
Security (cont’d) To set the NIGHT function, do the following: Press the Setup > System setup > Advanced Setup icons. If required, enter your authorized code. Select the arming mode to be activated when NIGHT is selected on the "Arming" screen. accepts the setting. -
Page 33: Z-Wave Setup
Z-Wave Setup Adding Z-Wave Devices Before a Z-Wave device will work in the home control network, it must be added (also called included) into the network. View the “Programming of Z-Wave Devices” training video and follow the instructions below to add and control devices in a home control network. If additional Z-Wave compatible devices are purchased, new devices can be added into the home network at any time. -
Page 34: Abort A Z-Wave Action
Z-Wave Add Device icons; the screen displays a series of messages: 3. On the Honeywell thermostat select Thermostat; set the “Time/Date” and follow the instructions in the thermostat Installation Guide for “Z-Wave enrollment/inclusion.” 4. To complete, press Done. 5. Press Exit to return to normal operation. -
Page 35: Z-Wave Network Update
Z-Wave Setup (cont’d) Z-Wave Network Update After all Z-Wave devices have been successfully enrolled, you can perform a Z-wave network update to individual devices or the whole network. To perform an individual update, do the following: Press the Automation and Z-Wave Setup icons;... - Page 36 Z-Wave Setup (cont’d) Press Automation Scene Setup Press Scene Name; enter a “name” and press OK. Assign the “Condition,” “Trigger,” and “Action” you choose for this Scene. After each selection press Save! Scene Options Set the TIME: In the Trigger/Condition box, press Add. Press the TIME button > Set the occurrence.
-
Page 37: Room Setup
Z-Wave Setup (cont’d) Set the Zones: In the Trigger/Condition box, press Add. Press the ZONES button and select a zone from the drop-down menu. Select Restore, Alarm or Fault. NOTE: Do not use 24 hr silent zone restore/fault in the pre-condition and trigger fields on commercial panels. -
Page 38: Setting A Secondary Tuxedo Controller
Z-Wave Setup (cont’d) Setting a Secondary Tuxedo Controller After all Z-Wave devices have been added into the Primary Tuxedo (#1), if desired, the device information can be downloaded to a Secondary Tuxedo (#2). Keep Tuxedos within 10 feet of each other, apply power to Tuxedo #2 and do the following: 1. -
Page 39: Removing A Secondary Tuxedo
Z-Wave Setup (cont’d) Press the Delete icon to delete the selected device or press Delete All to delete the list of devices. Removing a Secondary Tuxedo To remove the Secondary Tuxedo (Controller), do the following: 1. Press Remove Device on the Primary Tuxedo; press Remove Device on the Secondary Tuxedo. - Page 40 Z-Wave Setup (cont’d)
-
Page 41: Remote Access
Remote Access Tuxedo offers built-in web hosting capability to access your system via any web enabled device. The Tuxedo IP Address is used on a standard web browser to control user functions. Supported Browsers include: ® iPhone Version iOS4, iPad Version iOS4 and iOS5, Galaxy –... -
Page 42: Remote Access Log In Setup (Account Setup)
Remote Access (cont’d) Remote Access Log In Setup (Account Setup) Remote access allows the user to access Tuxedo’s menus directly via the Internet when away from home. The home router must first be configured for port forwarding for both HTTP and HTTPS ports. Refer to the router’s instructions for details on port forwarding. -
Page 43: Remote Services
Remote Services Using Total Connect with Tuxedo (Remote Services) The Tuxedo supports Remote Services for controlling Z-Wave devices and scenes remotely from an associated Total Connect account. The following table summarizes the relationships between Total Connect scenes and Tuxedo scenes: Controlling Scenes created in Total Connect Scenes created in Tuxedo... -
Page 44: Viewing And Controlling Total Connect Scenes From Tuxedo
Remote Services (cont’d) Viewing and Controlling Total Connect Scenes from Tuxedo Use the Scenes icon to display and control scenes that have been created in Total Connect. 1. From the “Home” screen, press the Automation and Scene Setup icons, then press the Remote button. -
Page 45: Software Updates
Software Updates System Information To view the current software version installed on your system, and verify connectivity, do the following: Press the Setup and System Info icons. The Interface Name, Host Name, MAC Address, CRC, IP Address, Broadcast Address, and NetMask are also displayed Manual Software Upgrades Go to the Toolkit site located at: to download the latest... - Page 46 Software Updates (cont’d)
-
Page 47: Keypad Diagnostics And Calibration Tests
Keypad Diagnostics and Calibration Tests Keypad Tests Keypad Test lets you verify correct operation of the Tuxedo and its connections to the security system. There are a total of five diagnostic tests; LCD Display Test • Audio Test • LED Test •... -
Page 48: Calibration
Keypad Diagnostics and Calibration Tests (cont’d) Calibration Press the icon for Calibration and using a stylus, follow the screen directions by pressing a series of crosshairs (+) and boxes (J J J J ) on the screen until done. If the test was successful, press OK; the screen returns to the Keypad Test screen. A pop-up message displays: Touch screen calibration…... -
Page 49: Keypad Reset
NOTE: This test may cause lights and thermostat settings to change. Assign Router: Do not use unless instructed by your dealer or a Honeywell representative. Select this Z-Wave Route test to assign the path for the Z-Wave devices in the network. - Page 50 Keypad Diagnostics and Calibration Tests (cont’d)
-
Page 51: Notes And Compatible Devices
Notes and Compatible Devices For additional troubleshooting procedures, refer to the Control Panel Installation Guide. General Notes • You may check to see whether the Chime Mode is ON or OFF by viewing the keypad Operating Modes screen as described in “Operating Modes” in Section 5 of the keypad Installation Guide. •... - Page 52 IMPORTANT: Honeywell is not responsible for property damages due to improper setting of the thermostat modes. Effects of Home Construction on Wireless Range between Z-Wave Enabled Devices Note: The distances shown in the table below are typical examples. Actual performance in your home will vary.
-
Page 53: Supported Camera List
Notes and Compatible Devices (cont’d) Supported Camera List Refer to the below camera list for supported Honeywell cameras for remote viewing. Live streaming on Single PC, tablets view, and smart 4 quad phones using Configuration Company Camera Model live Discovery... -
Page 54: Z-Wave Compatible Devices
Yale Real Living Touchscreen Deadbolt Lock Schalge Link Deadbolt Lock Schlage Link Lever Lock Kwikset Smartcode Lever lock Kwikset Smartcode Deadbolt Lock Thermostats Honeywell ECC Wayne Dalton Zwave Thermostat Trane Zwave Thermostat Appliance HomeManageable Appliance Module Wayne Dalton Small Appliance Module... -
Page 55: Panel Fault Displays
Notes and Compatible Devices (cont’d) Panel Fault Displays The “Security” screen displays the following Icon(s) if a panel fault(s) occurs. ICON MEANING AC Loss – The system is not receiving AC power. Bell Failure – The system bell or siren has a problem. NOTE: This Icon is displayed when interfacing with residential panels only. -
Page 56: Navigation Icons
Notes and Compatible Devices (cont’d) Navigation Icons To aid in the navigation through the Tuxedo touch-screens, a set of user-friendly icons has been provided. The appearance and function are described below. ICON ICON TITLE FUNCTION “Product/Training Accesses the “Product Introduction and Training Videos.” Videos”... - Page 57 Notes and Compatible Devices (cont’d)
- Page 58 Notes and Compatible Devices (cont’d)
- Page 59 Notes and Compatible Devices (cont’d)
- Page 60 Notes and Compatible Devices (cont’d)
- Page 61 Notes and Compatible Devices (cont’d)
- Page 63 Mise en Garde Exposition aux Fréquences Radio: L'antenne (s) utilisée pour cet émetteur doit être installée à une distance de séparation d'au moins 7,8 pouces (20 cm) de toutes les personnes. For the latest warranty information, please go to: www.honeywell.com/security/hsc/resources/wa...
- Page 64 2 Corporate Center Drive, Suite 100 P.O. Box 9040 Melville, NY 11747 Copyright © 2014 Honeywell International Inc. www.honeywell.com/security Ê800-16571V1HŠ For Online Support visit: http://www.security.honeywell.com/hsc/resources/MyWebTech 800-16571V1 7/14 Rev. A...