
Related Manuals for NETGEAR D6300


Summary of Contents for NETGEAR D6300
- Page 1 D6300 WiFi DSL Modem Router User M anua l 350 East Plumeria Drive San Jose, CA 95134 November 2012 202-11039-01 v1.0...
- Page 2 NETGEAR, the NETGEAR logo, and Connect with Innovation are trademarks and/or registered trademarks of NETGEAR, Inc. and/or its subsidiaries in the United States and/or other countries. Information is subject to change without notice. Other brand and product names are registered trademarks or trademarks of their respective...
-
Page 3: Table Of Contents
NETGEAR genie Setup ........ - Page 4 NETGEAR genie App......... 42 NETGEAR genie Mobile App ....... . . 43 Chapter 4 NETGEAR genie ADVANCED Home Setup Wizard .
- Page 5 D6300 WiFi DSL Modem Router Chapter 8 Administration Upgrade the WiFi DSL Modem Router Firmware ....85 View WiFi DSL Modem Router Status ......86 Router Information .
- Page 6 D6300 WiFi DSL Modem Router Troubleshoot with the LEDs ........122 Power LED Is Off or Blinking .
-
Page 7: Chapter 1 Hardware Setup
• Secured connection. Push 'N' Connect ensures a quick and secure network connection. • NETGEAR green features. Use Power and WiFi On/Off buttons, and schedule WiFi to turn on and off to save energy when not in use. • Compatibility. Compatible with all major ADSL Internet service providers (ISPs). - Page 8 D6300 WiFi DSL Modem Router Product Specifications Package Contents • D6300 WiFi DSL Modem Router • Ethernet cable • Phone cable and filter • Power adapter, localized to country of sale Warranty • Localized to country of sale System Requirements •...
- Page 9 D6300 WiFi DSL Modem Router • Double firewall protection (SPI and NAT firewall) • Denial of service (DoS) attack prevention Ease of Use • Easy installation. Connect to computer and open your browser to install • Push 'N' Connect using Wi-Fi Protected Setup® (WPS) Physical Specifications •...
- Page 10 D6300 WiFi DSL Modem Router • ADSL Microfilters • Cable Your D6300 WiFi DSL Modem Router • Verify the Cabling Hardware Setup...
-
Page 11: Unpack Your New Router
• Installation guide with cabling and router setup instructions If any of the parts are incorrect, missing, or damaged, contact your NETGEAR dealer. Keep the carton, including the original packing materials, in case you need to return the product for repair. -
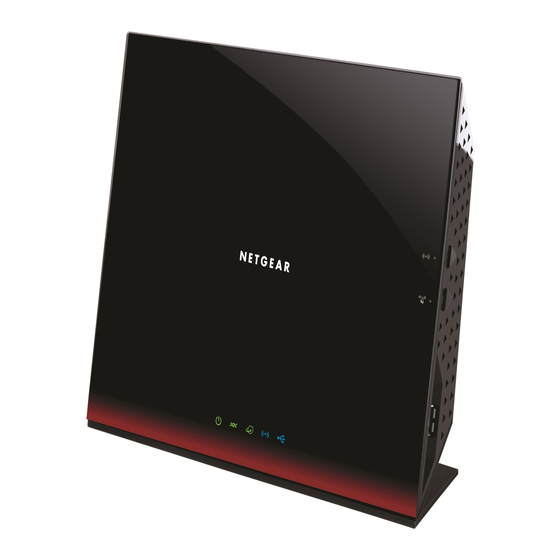
Page 12: Hardware Features
D6300 WiFi DSL Modem Router Hardware Features Before you cable your router, take a moment to become familiar with the label and the front and back panels. Pay particular attention to the LEDs on the front panel. Label The label on the bottom of the WiFi modem router shows the router’s WiFi network name (SSID) and network key (password). -
Page 13: Back Panel
D6300 WiFi DSL Modem Router Back Panel The back panel has the Power On/Off button and port connections shown in the figure: 1. USB port 3. Gigabit Ethernet 7. Power LAN ports On/Off button 2. ADSL line 6. AC power 4. -
Page 14: Front Panel
D6300 WiFi DSL Modem Router Power On/Off button AC power adapter input Front Panel The WiFi modem router front panel has the 5 status LEDs, icons, and ports shown in the figure. Power Internet Wireless Figure 4. Front panel LEDs The following tables describe the LEDs and icons on the front panel from left to right. - Page 15 D6300 WiFi DSL Modem Router Table 1. Power On/Off LED Icon LED Activity Description Solid green Power is supplied to the router. Solid red POST (power-on self-test) failure or a device malfunction has occurred. Power is not supplied to the router.
- Page 16 D6300 WiFi DSL Modem Router Table 4. Wireless LED Icon LED Activity Description Solid blue There is wireless connectivity. Blinking blue Data is being transmitted or received over a wireless link or a WPS-capable device is connecting to the device.
-
Page 17: Side Panel
D6300 WiFi DSL Modem Router Side Panel The WiFi modem router side panel has the port and buttons shown in the figure. Wireless On/Off button WPS On/Off button USB port Figure 5. Side panel buttons and port The following tables describe the buttons and port on the side panel from top to bottom. -
Page 18: Position Your Wireless Router
Note: The D6300 should be put in a vertical position only. Also be aware that when you use multiple access points, it is better if adjacent access points use different radio frequency channels to reduce interference. The recommended channel spacing between adjacent access points is five channels (for example, use Channels 1 and 6, or 6 and 11). -
Page 19: One-Line Adsl Microfilter (Not Included)
D6300 WiFi DSL Modem Router connects to a telephone line that provides ADSL service needs an ADSL microfilter to filter out the ADSL interference. Example devices are telephones, fax machines, answering machines, and caller ID displays. Not every phone line in your home necessarily carries ADSL service. -
Page 20: Summary
Two-line ADSL microfilter with built-in splitter (included). Use to share an outlet with a phone and the WiFi modem router. Cable Your D6300 WiFi DSL Modem Router WARNING: DO not stack equipment, or place equipment in tight spaces, or in drawers. -
Page 21: Verify The Cabling
D6300 WiFi DSL Modem Router CAUTION: Incorrectly connecting a filter to your WiFi modem router blocks your ADSL connection. Verify the Cabling Verify that your router is cabled correctly by checking the WiFi modem router LEDs. Turn on the wireless router by pressing the Power On/Off button on the back. -
Page 22: Chapter 2 Get Started With Netgear Genie
Con n e ct to the Wi Fi m o d em router This chapter explains how to use NETGEAR genie to set up your WiFi modem router after you complete cabling as described in the installation guide and in the previous chapter in this book. -
Page 23: Prepare To Set Up The Wifi Dsl Modem Router
Prepare to Set Up the WiFi DSL Modem Router You can set up your WiFi modem router with the NETGEAR genie automatically, or you can use the genie menus and screens to set up your WiFi modem router manually. However,... -
Page 24: Netgear Genie Setup
NETGEAR genie Setup NETGEAR genie runs on any device with a web browser. It is the easiest way to set up the WiFi modem router because it automates many of the steps and verifies that those steps have been successfully completed. -
Page 25: Use Netgear Genie After Installation
When you first set up your WiFi modem router, NETGEAR genie automatically starts when you launch an Internet browser on a computer that is connected to the WiFi modem router. You can use NETGEAR genie again if you want to view or change settings for the WiFi modem router. -
Page 26: Wifi Dsl Modem Router Dashboard (Basic Home Screen)
D6300 WiFi DSL Modem Router CAUTION: Do not try to go online, turn off the WiFi modem router, shut down the computer, or do anything else to the WiFi modem router until the WiFi modem router finishes restarting and the Power LED has stopped blinking for several seconds. -
Page 27: Add Wireless Devices Or Computers To Your Network
Settings. Using this tab requires a solid understanding of networking concepts. • Help & Support. Go to the NETGEAR support site to get information, help, and product documentation. These links work once you have an Internet connection. Add Wireless Devices or Computers to Your Network Choose either the manual or the WPS method to add wireless devices and other equipment to your wireless network. - Page 28 D6300 WiFi DSL Modem Router Within 2 minutes, press the WPS button on your wireless device, or follow the WPS instructions that came with the device. The device is now connected to your WiFi modem router. Repeat steps 1–2 to add other WPS wireless devices.
-
Page 29: Chapter 3 Netgear Genie Basic Settings
NETGEAR genie BASIC Settings You r I nternet c on n e ct ion a nd n et work This chapter explains the features available from the NETGEAR genie BASIC Home screen, shown in the following figure: This chapter contains the following sections: •... -
Page 30: Internet Basic Settings
Enter the settings for the IP address and DNS server. The default settings usually work fine. If you have problems with your connection, check the ISP settings. Click Apply to save your settings. Click Test to test your Internet connection. If the NETGEAR website does not display within 1 minute, see Chapter 10, Troubleshooting. - Page 31 D6300 WiFi DSL Modem Router • Domain Name (If required). Enter the domain name provided by your ISP. These fields display when your ISP requires a login: • Internet Service Provider Encapsulation. ISP types. The choices are PPPoE or PPPoA.
-
Page 32: Attached Devices
D6300 WiFi DSL Modem Router Attached Devices You can view all computers or devices that are currently connected to your network here. From the BASIC Home screen, select Attached Devices to display the following screen: Wired devices are connected to the WiFi modem router with Ethernet cables. Wireless devices have joined the wireless network. -
Page 33: Parental Controls
D6300 WiFi DSL Modem Router Parental Controls The first time you select Parental Controls from the BASIC Home screen, you are automatically directed to the Internet, where you can learn more about Live Parental Controls or download the application. The following screen displays:... -
Page 34: Readyshare Usb Storage And Printer
D6300 WiFi DSL Modem Router ReadySHARE USB Storage and Printer You can view information about a USB storage device that is connected to the WiFi modem router’s USB port here. USB Storage (Basic Settings) From the BASIC Home screen, select ReadySHARE to display the USB Storage (Basic... -
Page 35: Readyshare Cloud
You need a ReadySHARE Cloud account. If you do not have one, click the link provided in this screen to go to NETGEAR ReadySHARE Cloud page to create an account. Enter a valid email address that is used to recover your user name and password. -
Page 36: Readyshare Printer
You can also register the router with another account after unregistering the router from previous account. Log in to http://readyshare.netgear.com with your account. You should see the USB device that is connected to your router. By default, all contents of the USB device are accessible. -
Page 37: Basic Wireless Settings
Note: The preset SSID and password are uniquely generated for every device to protect and maximize your wireless security. NETGEAR recommends that you do not change your preset security settings. If you do decide to change your preset security settings, make a note of the new settings and store it in a safe place where you can easily find it. -
Page 38: Wireless Settings Screen Fields
(maximum) name in this field. This field is case-sensitive. The default SSID is randomly generated, and NETGEAR strongly recommends that you do not change this. Channel. This setting is the wireless channel used by the gateway. Enter a value from 1 through 13. -
Page 39: Change Wpa Security Option And Passphrase
The Security Options section of the Wireless Setup screen lets you change the security option and passphrase. NETGEAR recommends that you do not change the security option or passphrase, but if you want to change these settings, this section explains how. -
Page 40: Guest Networks
D6300 WiFi DSL Modem Router Guest Networks Adding a guest network allows visitors at your home to use the Internet without using your wireless security key. You can add a guest network to each wireless network: 2.4 GHz b/g/n and 5.0 GHz a/n. -
Page 41: Guest Network Wireless Security Options
It is also possible to set up a guest network without wireless security. NETGEAR does not recommend using no security on a wireless network. Wi-Fi Protected Access (WPA) encryption is built into all hardware that has the Wi-Fi-certified seal. -
Page 42: Netgear Genie App
ReadySHARE Number of devices 16 Click here Click here Visit the NETGEAR genie web page at www.netgear.com/genie. From the genie app, you can select the following: • Internet. Monitor and repair Internet connectivity issues, for both wired and wireless connections. -
Page 43: Netgear Genie Mobile App
To install the genie mobile app: Using your mobile device, navigate to the Apple AppStore or Google Play for Android, and search for NETGEAR genie. You can use the following QR codes to speed up this process: iPad app... -
Page 44: Chapter 4 Netgear Genie Advanced Home
Sp e cif y custom set t ings The ADVANCED screens are for advanced users who want to specify custom settings. This chapter explains the features available from the NETGEAR genie ADVANCED Home screen, shown in the following figure: This screen is also displayed through the Administration menu. -
Page 45: Setup Wizard
Settings. Setup Wizard The NETGEAR genie installation process is launched the first time you set up the WiFi modem router. After setting up the WiFi modem router the first time, if you want to perform this task again, you can run Setup Wizard from the Advanced tab of the genie. - Page 46 D6300 WiFi DSL Modem Router The Setup Wizard searches your Internet connection for servers and protocols to determine your ISP configuration. The following screen displays: NETGEAR genie ADVANCED Home...
-
Page 47: Wps Wizard
D6300 WiFi DSL Modem Router WPS Wizard The WPS Wizard helps you add a WPS-capable client device (a wireless device or computer) to your network. On the client device, you have to either press its WPS button or locate its WPS PIN. -
Page 48: Setup Menu
D6300 WiFi DSL Modem Router • To use the PIN method, select the PIN Number radio button, enter the client security PIN, and click Next. Within 2 minutes, go to the client device and use its WPS software to join the network without entering a password. -
Page 49: Adsl Setup
D6300 WiFi DSL Modem Router ADSL Setup The ADSL Settings screen lets you configure the multiplexing method and virtual circuit of your ADSL connection. The default parameters should be correct to match the system used by your ISP. Select ADVANCED > Setup > ADSL Settings to view the following screen: •... -
Page 50: Wan Setup
D6300 WiFi DSL Modem Router WAN Setup The WAN Setup screen lets you configure a DMZ (demilitarized zone) server, change the maximum transmit unit (MTU) size, and enable the WiFi modem router to respond to a ping on the WAN (Internet) port. Select ADVANCED > Setup > WAN Setup to view the following screen: •... -
Page 51: Default Dmz Server
D6300 WiFi DSL Modem Router • Disable IGMP Proxying. The IGMP Proxying function lets a LAN computer receive the multicast traffic it is interested in from the Internet. Click this check box to disable the function if you do not need it. - Page 52 “fragmented” to accommodate the device with the smallest MTU. The best MTU setting for NETGEAR equipment is often just the default value, and changing the value might fix one problem but cause another. Leave MTU unchanged unless one of these situations occurs: •...
-
Page 53: Lan Setup
D6300 WiFi DSL Modem Router To change the MTU size: Select ADVANCED > Setup > WAN Setup. In the MTU Size field, enter a new size from 64 through 1500. Click Apply to save the settings. LAN Setup The LAN Setup screen allows configuration of LAN IP services such as Dynamic Host Configuration Protocol (DHCP) and Routing Information Protocol (RIP). -
Page 54: Lan Setup Screen Settings
D6300 WiFi DSL Modem Router Enter the settings that you want to customize. These settings are described in the following section, LAN Setup Screen Settings. Click Apply to save your changes. LAN Setup Screen Settings LAN TCP/IP Setup • IP Address. The LAN IP address of the WiFi modem router. -
Page 55: Address Reservation
D6300 WiFi DSL Modem Router router’s LAN. The assigned default gateway address is the LAN address of the WiFi modem router. The WiFi modem router assigns IP addresses to the attached computers from a pool of addresses specified in this screen. Each pool address is tested before it is assigned to avoid duplicate addresses on the LAN. -
Page 56: Quality Of Service Setup
D6300 WiFi DSL Modem Router Type the MAC address of the computer or server. Tip: If the computer is already on your network, you can copy its MAC address from the Attached Devices screen and paste it here. Click Apply to enter the reserved address into the table. - Page 57 D6300 WiFi DSL Modem Router QoS are assigned to the best effort category, which receives a lower priority than voice and video. WMM QoS is enabled by default. You can disable it in the QoS Setup screen by clearing the Enable WMM check box and clicking Apply.
- Page 58 D6300 WiFi DSL Modem Router To add a priority rule, scroll down to the bottom of the QoS Setup screen and click Add Priority Rule to display the following screen: In the QoS Policy for field, type the name of the application or game.
- Page 59 D6300 WiFi DSL Modem Router From the Priority list, select the priority that this traffic should receive relative to other applications and traffic when accessing the Internet. The options are Low, Normal, High, and Highest. Click Apply to save this rule to the QoS Policy list and return to the QoS Setup screen.
- Page 60 D6300 WiFi DSL Modem Router Click Apply. Edit or Delete an Existing QoS Policy To edit or delete a QoS policy: Select ADVANCED > QoS Setup to display the QoS Setup screen. Select the radio button next to the QoS policy to be edited or deleted, and do one of the following: •...
-
Page 61: Chapter 5 Usb Storage
USB Storage Ac c es s a nd c on figu re a USB storage d rive This chapter describes how to access and configure a USB storage drive attached to your WiFi modem router. The USB port on the WiFi modem router can connect only to USB storage devices like flash drives or hard drives. -
Page 62: Usb Drive Requirements
D6300 WiFi DSL Modem Router USB Drive Requirements The WiFi modem router works with 1.0 and 1.1 (USB Full Speed) and 2.0 (USB High Speed) standards. The approximate USB bus speeds are shown in the following table. Actual bus speeds can vary, depending on the CPU speed, memory, speed of the network, and other variables. -
Page 63: File-Sharing Scenarios
D6300 WiFi DSL Modem Router File-Sharing Scenarios You can share files on the USB drive for a wide variety of business and recreational purposes. The files can be any Windows, Mac, or Linux file type including text, Word, PowerPoint, Excel, and MP3 files, pictures, and multimedia. USB drive applications include: •... -
Page 64: Usb Storage Basic Settings
D6300 WiFi DSL Modem Router Share Large Files over the Internet Sending files that are larger than 5 MB can pose a problem for many email systems. The WiFi modem router allows you to share large files such as PowerPoint presentations or .zip files over the Internet. - Page 65 D6300 WiFi DSL Modem Router You can access this feature by selecting BASIC > ReadySHARE, or ADVANCED > USB Storage > ReadySHARE. The USB Storage (Basic Settings) screen displays: By default, the USB storage device is available to all computers on your local area network (LAN).
-
Page 66: Add Or Edit A Network Folder
D6300 WiFi DSL Modem Router Add or Edit a Network Folder You can access this feature by selecting BASIC > ReadyShare > Edit, or ADVANCED > USB Storage > Advanced Settings. Specify the changes that you want to make: •... -
Page 67: Usb Storage Advanced Settings
D6300 WiFi DSL Modem Router USB Storage Advanced Settings You can set up the device name, workgroups, and network folders for your USB device. On the Advanced tab, select USB Storage > Advanced Settings to display the following screen: You can use this screen to specify access to the USB storage device. -
Page 68: Safely Remove A Usb Drive
D6300 WiFi DSL Modem Router Available Network Folders You might need to scroll down to view this section of the screen. • Share Name. If only one device is connected, the default share name is USB_Storage. You can click the name shown, or you can type it in the address field of your web browser. -
Page 69: Media Server Settings
D6300 WiFi DSL Modem Router Media Server Settings By default, the WiFi modem router is set up to act as a Ready DLNA Media server, which lets you view movies and photos on DLNA/UPnP AV–compliant media players, such as Xbox360, Playstation, and NETGEAR’s Digital Entertainer Live. -
Page 70: Specify Approved Usb Devices
D6300 WiFi DSL Modem Router Specify Approved USB Devices For more security, you can set up the WiFi modem router to share approved USB devices only. You can access this feature from the Advanced Setup menu on the Advanced tab. -
Page 71: Connect To The Usb Drive From A Remote Computer
D6300 WiFi DSL Modem Router To add an approved USB device, select it from the Available USB Devices list, and then click Add. Select the Allow only approved devices check box. Click Apply so that your change takes effect. If you want to work with another USB device, you have to click the Safely Remove USB Device button for the currently connected USB device. -
Page 72: Chapter 6 Usb Printer Control
The USB Control Center utility allows you to control a shared USB device such as a printer from your computer that is connected to the USB port on your router. The utility has to be installed on each computer on your network from which you want to control the device. You can download this utility at www.netgear.com/landing/en-us/readyshare.aspx. - Page 73 D6300 WiFi DSL Modem Router When you launch the USB Control Center utility, a screen similar to the following displays: This screen is the main screen, which shows a device icon, the description for this USB device, and its status.
-
Page 74: Control Center Configuration
D6300 WiFi DSL Modem Router Control Center Configuration Select Tools > Configuration to display the following screen: Automatically execute when logging on Windows. Select this check box to have the utility start automatically when you are logged in to Windows. -
Page 75: Scan With A Multifunction Printer
D6300 WiFi DSL Modem Router Once the printer shows Available status, the grayed out Paused state no longer displays in the Windows Printers and Faxes window. This USB printer is ready. The utility does not need to always hold the connection of this USB printer. -
Page 76: Chapter 7 Security
Security Ke ep u nwa nted c ontent out of you r net work This chapter explains how to use the basic firewall features of the WiFi modem router to prevent objectionable content from reaching the computers and other devices connected to your network. -
Page 77: Keyword Blocking Of Http Traffic
D6300 WiFi DSL Modem Router Keyword Blocking of HTTP Traffic Use keyword blocking to prevent certain types of HTTP traffic from accessing your network. The blocking can be always or according to a schedule. Select ADVANCED > Security > Block Sites to display the following screen: Select one of the keyword blocking options: •... -
Page 78: Firewall Rules
D6300 WiFi DSL Modem Router Firewall Rules Services are functions performed by server computers at the request of client computers. For example, web servers serve web pages, time servers serve time and date information, and game hosts serve data about other players’ moves. When a computer on the Internet sends a request for service to a server computer, the requested service is identified by a service or port number. - Page 79 D6300 WiFi DSL Modem Router The Firewall Rules screen lists all firewall rules that have been changed from their default settings. The default rules allow all outgoing traffic and block all incoming traffic. • To change the firewall rules for outbound traffic, you need to edit them from the...
-
Page 80: Add Custom Services To Allow Or Block
D6300 WiFi DSL Modem Router • ALLOW by schedule, otherwise Block. Block the traffic covered by this rule, unless it is blocked according to the schedule specified on the Schedule screen in Schedule for Firewall Rules on page 82. ALLOW rules are useful only when the traffic is already covered by a BLOCK rule. - Page 81 D6300 WiFi DSL Modem Router To add a custom service: Click Add Custom Service to add a service. The Add Service screen displays: The Add Service screen allows you to specify or edit your own custom service definition. You can then use the custom service when creating firewall rules.
-
Page 82: Schedule For Firewall Rules
D6300 WiFi DSL Modem Router Schedule for Firewall Rules You can specify the days and time that you want to block Internet access. To specify the firewall rule schedule: Select ADVANCED > Security > Schedule to display the following screen: Set up the schedule for blocking keywords and services. -
Page 83: Security Event Email Notifications
D6300 WiFi DSL Modem Router Security Event Email Notifications To receive logs and alerts by email, provide your email information in the E-mail screen and specify which alerts you want to receive and how often. To set up email notifications: Select ADVANCED >... -
Page 84: Chapter 8 Administration
Administration M a nage your net work This chapter describes the settings for administering and maintaining your WiFi modem router and home network. See also Remote Management on page 115 for information about upgrading or checking the status of your WiFi modem router over the Internet, and Traffic Meter page 118 for information about monitoring the volume of Internet traffic passing through your WiFi modem router’s Internet port. -
Page 85: Upgrade The Wifi Dsl Modem Router Firmware
D6300 WiFi DSL Modem Router Upgrade the WiFi DSL Modem Router Firmware The WiFi modem router firmware (routing software) is stored in flash memory. You can update the firmware from the Administration menu on the Advanced tab. You might see a message at the top of the genie screens when new firmware is available for your product. -
Page 86: View Wifi Dsl Modem Router Status
D6300 WiFi DSL Modem Router View WiFi DSL Modem Router Status To view WiFi modem router status and usage information, select ADVANCED Home, or select Administration > Router Status to display the following screen: Router Information Hardware Version. The WiFi modem router model. - Page 87 IP Subnet Mask. The IP subnet mask being used by the Internet (WAN) port of the WiFi modem router. Domain Name Server. The Domain Name Server addresses being used by the WiFi modem router. A Domain Name Server translates human-language URLs such as www.netgear.com into IP addresses. Show Statistics Button...
-
Page 88: Wireless Settings (2.4 Ghz And 5 Ghz)
D6300 WiFi DSL Modem Router To stop the polling entirely, click Stop. Connection Status Button On the Router Status screen in the Internet Port pane, click the Connection Status button to view connection status information. Figure 11. View connection status information The Release button returns the status of all items to 0. -
Page 89: Guest Network (2.4 Ghz And 5 Ghz)
D6300 WiFi DSL Modem Router Mode. Indicates the wireless communication mode: Up to 54 Mbps, Up to 130 Mbps (default), and Up to 300 Mbps. Wireless AP. Indicates whether the radio feature of the WiFi modem router is enabled. If this feature is not enabled, the Wireless LED on the front panel is off. -
Page 90: Attached Devices
D6300 WiFi DSL Modem Router Select ADVANCED > Administration > Logs. The Logs screen displays. The Logs screen shows the following information: • Date and time. The date and time the log entry was recorded. • Source IP. The IP address of the initiating device for this log entry. -
Page 91: Back Up Settings
D6300 WiFi DSL Modem Router Back Up Settings To back up the WiFi modem router’s configuration settings: Select ADVANCED > Administration > Backup Settings to display the following screen: Click Backup Settings to save a copy of the current settings. -
Page 92: Set Password
Click Apply so that your changes take effect. Password Recovery NETGEAR recommends that you enable password recovery if you change the password for the router’s user name of admin. Then you have an easy way to recover the password if it is forgotten. -
Page 93: Diagnostics
Perform a DNS Lookup. A DNS (Domain Name Server) converts the Internet name (for example, www.netgear.com) to an IP address. If you need the IP address of a web, FTP, mail, or other server on the Internet, do a DNS lookup to find the IP address. - Page 94 D6300 WiFi DSL Modem Router • Reboot the Router. Click this button to perform a remote restart of the router. Use this operation if the router seems to have become unstable or is not operating normally. Note: Rebooting breaks any existing connections either to the router (such as this one) or through the router (for example, LAN users accessing the Internet).
-
Page 95: Chapter 9 Advanced Settings
Advanced Settings Fine -tuning your net work This chapter describes the advanced features of your WiFi modem router. The information is for users with a solid understanding of networking concepts who want to set the WiFi modem router up for unique situations such as when remote access from the Internet by IP or domain name is needed. -
Page 96: Advanced Wireless Settings
D6300 WiFi DSL Modem Router Advanced Wireless Settings Select ADVANCED > Advanced Setup > Wireless Settings to display the Advanced Wireless Settings screen: The following settings are available in this screen: • Enable Wireless Router Radio. You can completely turn off the wireless portion of the WiFi modem router by clearing this check box. - Page 97 • WPS Settings. You can add WPS devices to your network. • AP Mode. You can make the D6300 function as an access point. • Wireless Card Access List. From the Advanced Wireless Settings screen, click the Set Up Access List button to display the Wireless Card Access List screen.
- Page 98 D6300 WiFi DSL Modem Router From the Wireless Card Access List screen, click Add to display the Wireless Card Access Setup screen. On this screen, you can restrict access to your network to specific devices based on their MAC address.
-
Page 99: Wireless Repeating Function (Wds)
D6300 WiFi DSL Modem Router Wireless Repeating Function (WDS) You can set the WiFi DSL Modem Router up to be used as a wireless access point (AP). Doing this setup enables the WiFi modem router to act as a wireless repeater. A wireless repeater connects to another wireless WiFi modem router as a client where the network to which it connects becomes the ISP service. -
Page 100: Wireless Repeating Function
To configure this mode, you have to know the MAC address of the remote parent access point. The D6300 WiFi modem router is always in dual-band concurrent mode, unless you turn off one radio. If you enable the wireless repeater in either radio band, the wireless base station or wireless repeater cannot be enabled in the other radio band. -
Page 101: Set Up The Base Station
D6300 WiFi DSL Modem Router If you want all client traffic to go through the other access point (repeater with wireless client association), leave this check box cleared. • Wireless MAC of this router. This field displays the MAC address for your WiFi modem router for your reference. -
Page 102: Port Forwarding And Triggering
D6300 WiFi DSL Modem Router Note: If you are using the D6300 base station with a non-NETGEAR WiFi modem router as the repeater, you might need to change additional configuration settings. In particular, you should disable the DHCP server function on the wireless repeater AP. - Page 103 D6300 WiFi DSL Modem Router You open a browser, and your operating system assigns port number 5678 to this browser session. You type http://www.example.com into the URL field, and your computer creates a web page request message with the following address and port information. The request message is sent to your WiFi modem router.
-
Page 104: Port Triggering To Open Incoming Ports
D6300 WiFi DSL Modem Router Destination port number. 5678, which is the browser session that made the initial request. When you finish your browser session, your WiFi modem router eventually detects a period of inactivity in the communications. Your WiFi modem router then removes the session information from its session table, and incoming traffic is no longer accepted on port number 33333. -
Page 105: Port Forwarding To Permit External Host Communications
D6300 WiFi DSL Modem Router Upon receiving the incoming message to destination port 113, your WiFi modem router checks its session table and learns that there is an active session for port 113 associated with your computer. The WiFi modem router replaces the message’s destination IP address with your computer’s IP address and forwards the message to your computer. -
Page 106: How Port Forwarding Differs From Port Triggering
D6300 WiFi DSL Modem Router Therefore, your WiFi modem router modifies the destination information in the request message: The destination address is replaced with 192.168.1.123. Your WiFi modem router then sends this request message to your local network. Your web server at 192.168.1.123 receives the request and composes a return message with the requested web page data. - Page 107 D6300 WiFi DSL Modem Router To set up port forwarding: Tip: To ensure that your server computer always has the same IP address, use the reserved IP address feature of your WiFi DSL Modem Router. Select ADVANCED > Advanced Setup > Port Forwarding/Port Triggering to display the following screen: Port Forwarding is selected as the service type.
-
Page 108: Add A Custom Service
D6300 WiFi DSL Modem Router In the Send to LAN Server field, enter the last digit of the IP address of your local computer that provides this service. Click Apply. The service appears in the list in the screen. Add a Custom Service To define a service, game, or application that does not appear in the Service Name list, you have to first determine which port number or range of numbers is used by the application. -
Page 109: Set Up Port Triggering
D6300 WiFi DSL Modem Router Click Edit Service or Delete Service. Application Example: Making a Local Web Server Public If you host a web server on your local network, you can use port forwarding to allow web requests from anyone on the Internet to reach your web server. - Page 110 D6300 WiFi DSL Modem Router ports. You can usually determine this information by contacting the publisher of the application or user groups or newsgroups. To set up port triggering: Select ADVANCED > Advanced Setup > Port Forwarding/Port Triggering. Select the Port Triggering radio button to display the port triggering information.
-
Page 111: Dynamic Dns
D6300 WiFi DSL Modem Router Click Add Service to display the following screen: In the Service Name field, type a descriptive service name. In the Service User list, select Any (the default) to allow this service to be used by any computer on the Internet. -
Page 112: Static Routes
D6300 WiFi DSL Modem Router your host name is hostname, for example, you can reach your WiFi modem router at http://hostname.dyndns.org. On the Advanced tab, select Advanced Setup > Dynamic DNS to display the following screen: To set up Dynamic DNS: Register for an account with one of the Dynamic DNS service providers whose addresses appear in the Service Provider list. - Page 113 D6300 WiFi DSL Modem Router • Your primary Internet access is through a cable modem to an ISP. • You have an ISDN WiFi modem router on your home network for connecting to the company where you are employed. This WiFi modem router’s address on your LAN is 192.168.1.100.
- Page 114 D6300 WiFi DSL Modem Router Click Add to display the following screen: In the Route Name field, type a name for this static route (for identification purposes only). Select the Private check box if you want to limit access to the LAN only. If Private is selected, the static route is not reported in RIP.
-
Page 115: Remote Management
D6300 WiFi DSL Modem Router Remote Management The remote management feature lets you upgrade or check the status of your WiFi DSL Modem Router over the Internet. To set up remote management: Select ADVANCED > Advanced Setup > Remote Management. -
Page 116: Universal Plug And Play
D6300 WiFi DSL Modem Router Normal web browser access uses the standard HTTP service port 80. For greater security, enter a custom port number for the remote web management interface. Choose a number from 1024 through 65535, but do not use the number of any common service port. - Page 117 D6300 WiFi DSL Modem Router Turn UPnP On. UPnP can be enabled or disabled for automatic device configuration. The default setting for UPnP is disabled. If this check box is not selected, the WiFi modem router does not allow any device to automatically control the resources, such as port forwarding (mapping) of the WiFi modem router.
-
Page 118: Ipv6
D6300 WiFi DSL Modem Router IPv6 You can use this feature to set up an IPv6 Internet connection type if NETGEAR genie does not detect it automatically. To set up an IPv6 Internet connection type: Select ADVANCED > Advanced Setup > IPv6 to display the following screen: Select the IPv6 connection type from the list. -
Page 119: Usb Settings
D6300 WiFi DSL Modem Router To monitor Internet traffic: Click ADVANCED > Advanced Setup > Traffic Meter to display the following screen: To enable the traffic meter, select the Enable Traffic Meter check box. If you would like to record and restrict the volume of Internet traffic, select the Traffic volume control by radio button. -
Page 120: Chapter 10 Troubleshooting
Diagnose and solve problem s This chapter provides information to help you diagnose and solve problems you might have with your WiFi modem router. If you do not find the solution here, check the NETGEAR support site at http://support.netgear.com/general/contact/default.aspx for product and contact information. -
Page 121: Quick Tips
D6300 WiFi DSL Modem Router Quick Tips This section describes tips for troubleshooting some common problems. Sequence to Restart Your Network Be sure to restart your network in this sequence: Turn off and unplug the modem. Turn off the WiFi modem router and computers. -
Page 122: Troubleshoot With The Leds
Make sure that the power cord is securely connected to your WiFi modem router and that the power adapter is securely connected to a functioning power outlet. • Check that you are using the 12V DC, 5A power adapter that NETGEAR supplied for this product. •... -
Page 123: Internet Or Ethernet Port Leds Are Off
D6300 WiFi DSL Modem Router If all LEDs are still lit 1 minute after power-up: • Cycle the power to see if the WiFi modem router recovers. • Press and hold the Restore Factory Settings button to return the WiFi modem router to its factory settings. -
Page 124: Cannot Log In To The Router
• If you are attempting to set up your NETGEAR WiFi modem router as an additional router behind an existing router in your network, consider replacing the existing router instead. NETGEAR does not support such a configuration. - Page 125 D6300 WiFi DSL Modem Router Access the WiFi modem router interface at http://www.routerlogin.net. Select Administration > Router Status. Check that an IP address is shown for the Internet port. If 0.0.0.0 is shown, your WiFi modem router has not obtained an IP address from your ISP.
-
Page 126: Troubleshoot Pppoe
D6300 WiFi DSL Modem Router Troubleshoot PPPoE If you are using PPPoE, try troubleshooting your Internet connection. To troubleshoot a PPPoE connection: Log in to the WiFi modem router. Select Administration > Router Status. Click Connection Status. If all of the steps indicate OK, then your PPPoE connection is up and working. -
Page 127: Changes Not Saved
D6300 WiFi DSL Modem Router • When entering configuration settings, be sure to click Apply before moving to another screen or tab, or your changes could be lost. • Click Refresh or Reload in the web browser. The changes might have occurred, but the web browser might be caching the old configuration. -
Page 128: Wireless Signal Strength
D6300 WiFi DSL Modem Router • If you want to view the wireless settings for the WiFi modem router, use an Ethernet cable to connect a computer to a LAN port on the WiFi modem router. Then log in to the WiFi modem router and select Setup >... -
Page 129: Test The Path From Your Computer To A Remote Device
D6300 WiFi DSL Modem Router To ping the WiFi modem router from a computer running Windows: From the Windows toolbar, click Start, and then select Run. In the field provided, type ping followed by the IP address of the WiFi modem router, as in this example: ping www.routerlogin.net... - Page 130 D6300 WiFi DSL Modem Router If you do not receive replies: • Check that your computer has the IP address of your WiFi modem router listed as the default gateway. If the IP configuration of your computer is assigned by DHCP, this information is not visible in your computer’s Network Control Panel.
-
Page 131: Appendix A Supplemental Information
Supplemental Information Factor y set t i n gs a nd te ch n ic a l s p e ci ficat ion s This appendix provides factory default settings and technical specifications for the D6300 WiFi DSL Modem Router. - Page 132 D6300 WiFi DSL Modem Router Table 11. Factory default settings (continued) Feature Default Behavior Local network Disabled (LAN) continued Time zone GMT for WW except NA and GR, GMT+1 for GR, GMT-8 for NA Time zone adjusted for daylight Disabled...
-
Page 133: Technical Specifications
D6300 WiFi DSL Modem Router Technical Specifications Table 12. D6300 Router specifications Feature Description Data and routing protocols TCP/IP, RIP-1, RIP-2, DHCP, PPPoE, Dynamic DNS, UPnP, and SMB Power adapter • North America: 120V, 60 Hz, input • UK, Australia: 240V, 50 Hz, input •... -
Page 134: Appendix B Notification Of Compliance
EDOC in Languages of the European Community Language Statement Cesky [Czech] NETGEAR Inc. tímto prohlašuje, že tento Radiolan je ve shode se základními požadavky a dalšími príslušnými ustanoveními smernice 1999/5/ES. Dansk [Danish] Undertegnede NETGEAR Inc. erklærer herved, at følgende udstyr Radiolan overholder de væsentlige krav og øvrige relevante krav i direktiv 1999/5/EF. - Page 135 D6300 WiFi DSL Modem Router Español [Spanish] Por medio de la presente NETGEAR Inc. declara que el Radiolan cumple con los requisitos esenciales y cualesquiera otras disposiciones aplicables o exigibles de la Directiva 1999/5/CE. Ελληνική [Greek] ΜΕ ΤΗΝ ΠΑΡΟΥΣΑ NETGEAR Inc. ∆ΗΛΩΝΕΙ ΟΤΙ Radiolan ΣΥΜΜΟΡΦΩΝΕΤΑΙ ΠΡΟΣ...
-
Page 136: Fcc Declaration Of Conformity
We, NETGEAR, Inc., 350 East Plumeria Drive, San Jose, CA 95134, declare under our sole responsibility that the D6300 WiFi DSL Modem Router complies with Part 15 Subpart B of FCC CFR47 Rules. Operation is subject to the following two conditions: •... -
Page 137: Canadian Department Of Communications Radio Interference Regulations
Canadian Department of Communications Radio Interference Regulations This digital apparatus (D6300 WiFi DSL Modem Router) does not exceed the Class B limits for radio-noise emissions from digital apparatus as set out in the Radio Interference Regulations of the Canadian Department of Communications. - Page 138 D6300 WiFi DSL Modem Router Interference Reduction Table The following table shows the recommended minimum distance between NETGEAR equipment and household appliances to reduce interference (in feet and meters). Household Appliance Recommended Minimum Distance (in feet and meters) Microwave ovens...
-
Page 139: Index
Index connecting wirelessly country setting AC power adapter input crossover cable access CTS/RTS Threshold remote custom service (port forwarding) viewing logs access points accessing remote computer adding dashboard custom services data packets, fragmented guest network date and time priority rules daylight savings time QoS policy wireless devices... - Page 140 D6300 WiFi DSL Modem Router firewall settings firmware version LAN port firmware, upgrading QoS for fragmentation length settings fragmented data packets LAN ports front panel LAN setup language setting large files, sharing lease, DHCP games, online, QoS for LEDs gateway IP address...
- Page 141 D6300 WiFi DSL Modem Router reserved IP adresses restarting network On/Off button restoring On/Off LED configuration file one-line ADSL microfilter default factory settings outgoing mail server router interface, described router status, viewing packets, fragmented Parental Controls scheduling keyword and service blocking...
- Page 142 D6300 WiFi DSL Modem Router upgrading firmware wrong date or time advanced configuration advanced settings basic storage settings drive requirements file sharing ReadySHARE access remote computer connection specifying approved devices unmounting a USB drive USB devices, approved USB port USB port LED...