
Related Manuals for Black & Decker PR100

Summary of Contents for Black & Decker PR100
- Page 1 OLL A DE P R ES IÓ N DE 6 CUA RTOS 6 Q UA RT P R ESS URE COOKER u se a nd ca re m anual m anu a l de uso y cuid ad o P R 1 00, P R 1 0 0 S D, P R1 0 0 B...
-
Page 2: Table Of Contents
Por favor lea este instructivo antes ¡ B IEN V ENI D O ! de usar el producto. ¡Felicitaciones por su compra de la olla de INSTRUCCIONES coccion lenta de 6 Cuartos Black+Decker™! Hemos desarrollado este manual para asegurar IMPORTANTES rendimiento óptimo y su satisfacción total . - Page 3 cocine directamente en la base de cocción. Cocine • No abra la olla de presión hasta que se haya enfriado y solamente en la olla de cocción provista. toda la presión interna haya salido. Si se dificulta abrir la tapa, esto es una indicación de que la unidad aún •...
-
Page 4: Cocción Lenta Eléctrica
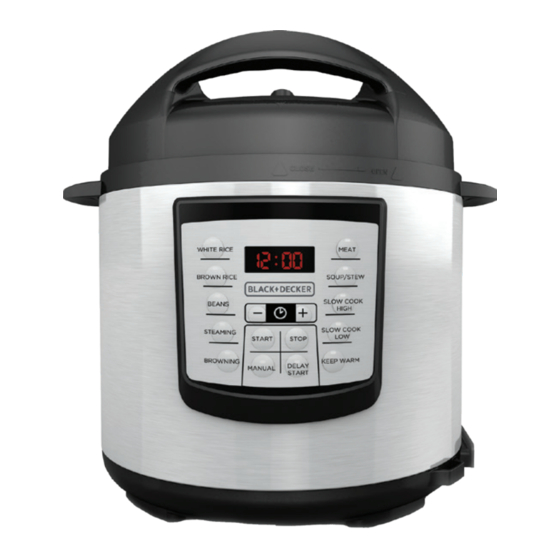
CONOZCA SU OLLA DE COCCIÓN LENTA ELÉCTRICA Olla de cocción (Pieza no . PR100-07) 11 . Aro sellador de goma (pieza no . PR100-04) 2 . Interior 12 . Tapa antibloqueo 3 . Panel de control (pieza no . PR100-06) 4 . -
Page 5: Preparación Para Utilizar Su
PA N EL D E CONT ROL M o de l o no . PR100S D M o d e l o no . P R 1 00 P RE PAR ACI ÓN PAR A • No coloque la olla de cocción en un horno o directamente sobre una estufa . -
Page 6: Instrucciones De Uso
válvulas mientras se cocina la comida . El Coloque la válvula de emisión de presión vapor caliente puede quemar . en la tapa . La válvula caerá en su lugar, pero quedará floja para que el vapor • Utilice una cuchara de madera o de plástico pueda escapar adecuadamente . - Page 7 Para cerrar la tapa: Sujete el mango de la aparecerá en la pantalla digital . Si es tapa y gire la tapa hacia la derecha hasta necesario ajustar el tiempo, presione los botones + o – para seleccionar el tiempo que la marca “...
- Page 8 de Cocción Preprogramadas para obtener Nota: Nunca intente abrir la tapa durante el consejos útiles sobre los métodos de cocción ciclo de cocción a presión . Si es necesario abrir recomendados . En cualquier momento durante la tapa durante la cocción a presión, presione el el proceso de emisión de presión natural, usted botón de detener (STOP) puede cambiar los métodos a la opción de...
-
Page 9: Funciones De Cocción Preprogramadas
10 . Para abrir la tapa: Proteja su muñeca 12 . Alce ligeramente la tapa y luego del vapor con un guante de seco seco . cuidadosamente incline hacia arriba el Párese a la derecha de la olla de presión y borde en el otro extremo de la tapa para sujete firmemente el mango de la tapa que el vapor escape de la olla en dirección... - Page 10 Si la olla de cocción no está colocada en la base de cocción, colóquela en la base y siga el proceso de cocción descrito en la sección de Instrucciones de Uso . Utilice el método de Emisión de Presión Natural para obtener los mejores resultados . Si va a cocinar arroz pegajoso, utilice el método de Emisión de Presión Rápida .
- Page 11 FRIJOLES Escoja los frijoles y elimine todas las piedras o frijoles que no luzcan bien . Enjuague los frijoles secos bajo agua fría y escurra . Añada los frijoles a la olla de cocción . Nota: No es necesario remojar los frijoles antes de cocinarlos a presión . La tabla de cocción muestra ambos tiempos de cocción, sin remojar y remojados .
- Page 12 COCCIÓN AL VAPOR Cuando vaya a cocinar al vapor utilice el trébede incluido para obtener resultados más uniformes . Coloque el trébede en el fondo de la olla de cocción antes de añadir los ingredientes . Añada aproximadamente 1 taza de agua a la olla de cocción mientras cocina al vapor los vegetales .
- Page 13 CARNE Corte las carnes de res/ave en tamaños iguales para asegurar una cocción uniforme . Consejo: Dore las carnes antes de cocinarlas a presión, utilizando la función preprogramada de Dorar (Browning) , descrita en esta sección . Añada los líquidos y otros ingredientes a la olla de cocción según la receta, junto con la carne . Si la olla de cocción no está...
- Page 14 Presione el botón de Iniciar (START) SOPA/GUISO y deje que la mantequilla o el aceite se Nota: El tiempo preprogramado para está caliente por aproximadamente 1 minuto . función es 30 minutos, pero puede ser ajustado Una vez que el aceite o la mantequilla esté al tiempo de cocción deseado .
-
Page 15: Cuidado Y Limpieza
Presione el botón de Cocción Lenta Alta Una vez que haya seleccionado una Alta o Cocción Lenta Baja . Una función (consulte “Funciones de Cocción luz roja comenzará a parpadear encima Preprogramadas”), una luz roja parpadeará de la función seleccionada y la pantalla encima de la función seleccionada y el digital parapadeará... - Page 16 Tire de la válvula de emisión de presión Lave las piezas de la tapa en agua caliente y para retirarla . líquido de fregar, y séquelas bien . Retire la válvula . 10 . Lave y seque la tapa . Tire de la tapa antibloqueo .
-
Page 17: Consejos Y Pistas Útiles
• Si va a cocinar solo cortes de carne, siempre CONS EJOS Y asegúrese de permitir un período de P I STAS ÚT IL ES “descanso” sacando la carne de la olla de • Siempre asegúrese de que la válvula de presión . -
Page 18: Resolución De Problemas
RE S O LU C IÓ N D E P RO B LEMAS PROBLEMA CAUSA POSIBLE SOLUCIÓN Dificultad para cerrar El aro sellador de goma no está Verifique la posición del instalado adecuadamente . aro sellador de goma . la tapa La válvula flotante roja está... - Page 19 PROBLEMA CAUSA POSIBLE SOLUCIÓN La pantalla parpadea 3 La presión La válvula de Verifique que la válvula de function- emisión de de emisión de presión guiones parpadeando amiento no presión no está esté girada a la posición pero el reloj automático es alcanzada en la posición de sellado .
- Page 20 PROBLEMA CAUSA POSIBLE SOLUCIÓN El arroz está medio No hay suficiente agua . Ajuste la proporción de arroz crudo y agua de cocinado o muy duro acuerdo a la receta . La tapa fue abierta antes de Después de que termine tiempo .
- Page 21 ¿ N E C ESITA AY UDA? Garantía limitada de dos años (Solamente aplica en los Estados Unidos y el Canadá) . Para servicio, reparaciones o cualquier pregunta sobre su electrodoméstico, por favor llame a nuestra Línea de Servicio al Cliente al 1-800-465-6070 . Por favor, NO devuelva el producto al lugar donde lo compró...
- Page 22 P ÓLIZA D E G AR A N TÍA (Válida sólo para México) Duración Spectrum Brands de México, SA de CV garantiza este producto por 2 años a partir de la fecha original de compra. ¿Qué cubre esta garantía? • Esta Garantía cubre cualquier defecto que presenten las piezas, componentes y la mano de obra contenidas en este producto.
- Page 23 ¿ NE CE SI TA AYUDA? Para servicio, reparaciones o preguntas relacionadas al producto, por favor llame al número del centro de servicio que se indica para el país donde usted compró su producto. NO devuélva el producto al fabricante. Llame o lleve el producto a un centro de servicio autorizado.
- Page 24 Please Read and Save this Use and Care Book. W ELCOME ! IMPORTANT Congratulations on your purchase of the Black+Decker™ 6 Quart Pressure Cooker! SAFEGUARDS We have developed this guide to ensure optimal product performance for your When using electrical appliances, basic safety complete satisfaction .
- Page 25 and should not be opened: do not force it open. • Children should be supervised to ensure that they Any pressure in the cooker can be hazardous. do not play with the appliance. See Operating Instructions. • Do not operate pressure cooker while it is covered •...
-
Page 26: Getting To Know
G ET T I N G TO KNOW YOUR E LE C T R I C P RE SSURE COO KER 1 . Cooking bowl (Part # PR100-07) 10 . Red Float Valve (Part # PR100-02) 2 . Interior 11 . Rubber Gasket (Part # PR100-04) 3 . -
Page 27: Getting Started
CON T R OL PAN E L M o d el # P R10 0S D M o de l # P R1 00 IMPORTANT INFORMATION G E TT IN G STAR T E D This appliance is intended for household ABOUT YOUR ELECTRIC use only . -
Page 28: Operating Instructions
Ensure that the rubber gasket is clean OP E R AT I N G and securely fitted around the metal INSTR U CT IO NS ring inside of the lid . Your BLACK+DECKER™ Electric Pressure Cooker has been specially designed to safely control the steam pressure and temperature during cooking . - Page 29 Once the START button has been Note: If you press START but the lid is not pressed, the red light above the correctly closed, the main screen will blink selected function will turn solid and OPEN . The unit will not heat on the pressure the pressure cooker will begin to settings unless the lid is properly closed .
- Page 30 and, using a kitchen utensil, push the Note: The amount of time for the pressure pressure release valve to the right or the to drop depends on the amount of food/ left to allow steam to escape . liquid inside the cooking bowl . Quick Pressure Release: after cook Release Positions time is complete, use tongs or a kitchen...
- Page 31 10 . To open the lid: Protect your wrist 12 . Lift slightly then carefully tilt up the from steam with a dry oven mitt . far edge of the lid up so that the Stand to the right of the pressure steam escapes from the pot away cooker and grasp the handle with from you .
-
Page 32: Preset Cooking Functions
P RE S ET CO O KING F UN C TIO NS There are 11 preset functions to aid in making the cooking process as easy as possible . Below are approximate cooking times to use as general guidelines . Times will vary depending on amounts of food cooked . - Page 33 BROWN RICE Measure out the desired amount of rice with the provided measure cup, add to the cooking bowl . Then add the corresponding amount of water indicated in the chart below . Add 1–2 tablespoons of butter or oil to the rice to minimize frothing . Note: Do not fill the cooking bowl more than half full, as the rice will expand during cooking .
- Page 34 Food COOKING TIME COOKING TIME Recommended (soaked (unsoaked) Pressure Release Method overnight) Preset at 40 minutes Lentils N .A . 8–10 minutes Natural Release Pinto Beans 20–24 minutes 30–35 minutes Natural Release Navy Beans 22–25 minutes 30–35 minutes Natural Release Red Beans 22–25 minutes 30–35 minutes...
- Page 35 MEAT Cut meats/poultry into equal sizes to ensure even cooking . Tip: Brown the meats before pressure cooking using the Browning preset function within this section . Add liquids and other ingredients to the bowl according to the recipe along with meat . If the bowl is not already in the cooking base, add the bowl to the base and follow the cooking process outlined in the “Operating Instructions”...
- Page 36 SOUP/STEW Press the START button and allow the butter or oil to heat for about 1 Note: The preset time for this function is 30 minute . Add the food using caution minutes, but can be adjusted up and down once the oil or butter is hot, as it could to desired cook time .
-
Page 37: Care And Cleaning
adjusted, press the + or – buttons to Press either the Slow Cook High select the correct time . or the Slow Cook Low button . A red light will begin flashing above the Press the Delay Start (Iniciar Despues) selected function, and the LED display button, a red light will flash above the will flash with 6 hour default for HIGH... - Page 38 damage the surfaces . Wash lid parts in warm water with dish soap and dry completely . Pull off the pressure release valve . Remove gasket . 10 . Wash and dry lid . Pull off the anti-block cap . It is held with tension clips (not threaded) .
-
Page 39: Helpful Hints And Tips
• If cooking cuts of meat on their own, HELPFUL HINTS AND TIPS always make sure to allow a “rest” period • Always make sure the pressure release by taking the meat out of the pressure valve is in the “seal” position, cooker . -
Page 40: Troubleshooting
TR O U B LE SHO OTIN G PROBLEM POSSIBLE CAUSE SOLUTION Difficult to close the lid Rubber gasket not installed Check the position of the properly rubber gasket Red float valve in the popped-up Press the red float valve position downward lightly Difficult to open the lid... - Page 41 PROBLEM POSSIBLE CAUSE SOLUTION Display flashes 3 Check if pressure release Working Pressure release pressure valve is not value is turned to the seal blinking bars but timer isn’t reached in the seal position doesn’t start inside during position preheating Rubber gasket Install the rubber gasket cycle...
- Page 42 PROBLEM POSSIBLE CAUSE SOLUTION Intermittent beeping Indication of overheating . Possible starch deposits Pressure cooker has reduced the at the bottom of the after pressure cooker heating temperature and may cooking bowl have has been cooking for a not reach cooking pressure clogged the heat while dissipation .
-
Page 43: Warranty And Customer Service
WA R R AN TY AN D C USTO MER SERV ICE IN FOR MATI O N Two-Year Limited Warranty (Applies only in the United States and Canada) For service, repair or any questions regarding your appliance, call the appropriate 800 number listed within this section. - Page 44 N OTAS / N OT E S...
- Page 45 N OTAS / NOTE S...
- Page 46 Por favor llame al número correspondiente que aparece en la lista a continuación para solicitar que se haga efectiva la garantía y donde Ud. puede solicitar servicio, reparaciones o partes en el país donde el producto fué comprado. comercial Novicentro, Argentina Local 37 - Ciudad Atención al consumidor...
- Page 47 Sello del Distribuidor: Fecha de compra: Código de fecha / Date Code / Le code de date: Modelo: 1000W 120V~ 60Hz Achachicala La Paz, Bolivia. COMERCIALIZADO POR: Teléfono (591)2- 2305353 Spectrum Brands de México, NIT 1020647023, SA de C.V Avenida 1° de Mayo No. 120 Resolución Ministerial 0661-12.
- Page 48 www.BlackAndDeckerHome.com T22-5003140 12/2020...