Baratza Vario+ Quick Start Manual
Hide thumbs
Also See for Vario+:
- User manual ,
- Operation manual (13 pages) ,
- Quick start manual (2 pages)
Table of Contents
Advertisement
Available languages
Available languages
Quick Links
®
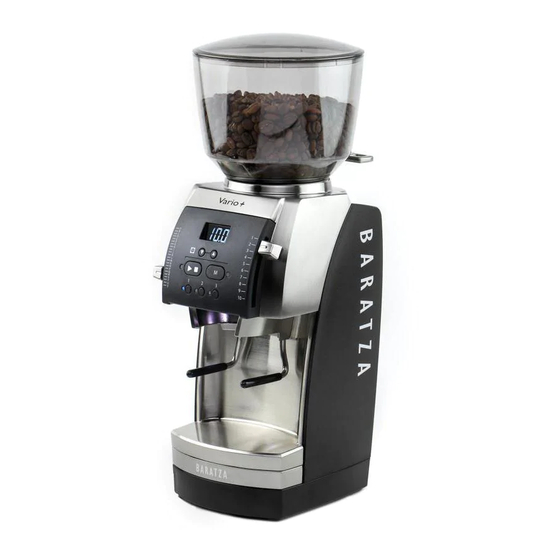
Vario+
Thank you for choosing the
Baratza Vario+ for your home
grinding needs!
This is just a quick start guide. If you would like more detailed instructions,
please skip ahead to the full manual, found online at
baratza.com/documentation/
SETUP:
1.
Remove everything from the packaging and hand wash the lid (1),
hopper
(2)
and grounds bin
2.
Position the shut-off knob
downward force, and feel for the hopper to insert into place. Once
inserted, firmly rotate the hopper clockwise to center the shut-off
knob and lock the hopper into place.
3.
If using the grounds bin, remove the PortaHolder
firmly out, then insert the grounds bin.
If using the PortaHolder and you find it needs adjustment to fit your
portafilter: remove the PortaHolder, loosen screws on the back, adjust
the arms' position, then tighten screws gently.
4.
Plug in the grinder.
5.
Reference the Grind Settings Chart below and set the grind size.
6.
When adjusting finer, the grinder must be running or completely
empty of beans to prevent the adjustment system from binding on
beans that are between the burrs.
7.
Add beans to the hopper.
8.
Select grind time preset
(9)
to grind.
9.
Presets 1, 2 and 3 set the grinder to run for a designated time and
can be adjusted with the up/down arrows
by pressing and holding that preset button. Manual (M) mode runs
the grinder until the Stop button is pressed or 90 seconds max.
PARTS IDENTIFICATION
1.
Hopper lid
2.
Bean hopper
3.
Bean shut-off knob
4.
Grind time preset
adjustment buttons
5.
Micro adjustment lever knob
6.
Macro adjustment lever knob
7.
Start/Stop button
QUICK START GUIDE
(13)
with warm soapy water. Let air dry.
(3)
near the rear left of the grinder, apply
(10)
by pulling
or manual mode
(8)
then press start
(4)
and saved to a preset
8.
Manual mode button
9.
Grind time presets
10.
PortaHolder
11.
Burr calibration tool
(see manual)
12.
Burr removal tool
(see manual)
13.
Grounds bin
4
5
7
9
10
5
7
(7)
1
2
9
13
Rev 1/5/2021 (v1.0)
EN
3
6
8
6
4
8
11
12
Advertisement
Table of Contents

Related Manuals for Baratza Vario+


Summary of Contents for Baratza Vario+
- Page 1 QUICK START GUIDE Vario+ Thank you for choosing the Baratza Vario+ for your home grinding needs! This is just a quick start guide. If you would like more detailed instructions, please skip ahead to the full manual, found online at baratza.com/documentation/...
-
Page 2: Safety Information
Baratza will not accept any liability for damage, injury, or warranty if the Cleaning and user maintenance shall not be made by children without grinder is used other than for its intended purpose (i.e. - Page 3 ® SNELSTARTGIDS Vario+ Bedankt dat u kiest voor de Baratza Vario+ voor uw maalbehoeften thuis Dit is slechts een snelstartgids. Als u meer gedetailleerde instructies wilt, ga dan door met de complete handleiding die u kunt vinden op baratza.com/documentation/ INSTELLEN:...
- Page 4 Baratza aanvaardt geen enkele aansprakelijkheid voor schade, letsel of apparaat en de betrokken gevaren begrijpen. garantie als de molen anders wordt gebruikt dan waarvoor het bedoeld is (d.w.z.
-
Page 5: Guide De Démarrage Rapide
® GUIDE DE DÉMARRAGE RAPIDE Vario+ Merci d’avoir choisi le Baratza Vario+ pour vos envies de moutures faites maison ! Ce n’est qu’un guide de démarrage. Si vous voulez obtenir des instructions plus détaillées, veuillez vous rendre sur le manuel complet que vous trouverez en ligne sur baratza.com/documentation/... -
Page 6: Identification Des Pièces
à propos de l’utilisation du produit et des Baratza n’acceptera aucune responsabilité pour des dégâts, des dangers liés. blessures ou garantie si le moulin est utilisé à des fins autres que sa fin prévue (à... - Page 7 ® 快速入门指南 Vario+ 感谢您选择了Baratza Vario+ 来满足您的家庭咖啡研磨需求! 这只是一个快速入门指南。 如果您需要更详细的说明, 请跳至在线 baratza.com/documentation/ 的完整手册, 网址为: 设置 从包装中取出所有物品, 然后用温肥皂水清洗豆槽盖 咖啡豆槽 以 及咖啡粉槽 (13) 。 放置在空气中晾干。 将研磨机左后方附近的开关旋钮 向下用力, 使咖啡豆槽插入到位。 然 后顺时针转动咖啡豆槽, 使开关旋钮居中, 并将咖啡豆槽锁定到位。 如需使用咖啡粉槽, 则用力拉动便携支架 (10) , 然后插入咖啡粉槽。 . 在使用便携支架时, 如果您发现需要调整过滤器: 拆下便携支架, 松开背 面的螺钉, 调整支架的位置, 然后再轻轻拧紧螺钉。...
- Page 8 只能使用交流电和正确的电压。 请参阅研磨机底座上的标签以确定正确 8岁以上的儿童以及身体、 感觉或精神能力较差或者缺乏经验和知识的 的电压。 人, 如果他们已被给予安全使用设备的监督或指示, 并了解所涉及的危险 后, 可以使用该设备。 只能用干燥或微湿的布清洁研磨机外壳。 请勿将研磨机, 插头或电线浸入 水中或任何其他液体中。 未经监督的儿童不得进行清洁和维护。 如果研磨机不是用于其预期目的 (即研磨焙烧的咖啡豆) , 或不正确地操 在组装, 拆卸或清洁研磨机之前, 请务必拔掉电源线。 拔掉插头时, 请抓住 作或修理, Baratza公司将不承担任何损害, 伤害或保修的责任。 插头并从插座上拔下。 切勿拉绳。 请勿使用损坏的电源线或插头操作研磨机。 如果电源线损坏, 必须由制造 注意: 在清洁研磨机之前, 请务必拔下电源线 商, 其服务代理商或类似的合格人员更换, 以避免危险。 Rev 1/5/2021 (v1.0)
- Page 9 快速入門指南 ® Vario+ 感謝您選擇了Baratza Vario+ 來滿足您的家庭咖啡研磨需求! 這只是壹個快速入門指南。 如果您需要更詳細的說明,請跳至在線 的完整手冊,網址為:baratza.com/documentation/ 設置: 從包裝中取出所有物品,然後用溫肥皂水清洗豆槽蓋 (1),咖啡豆槽 以 及咖啡粉槽 (13) 。放置在空氣中晾幹。 將研磨機左後方附近的開關旋鈕 向下用力, 使咖啡豆槽插入到位。然 後順時針轉動咖啡豆槽,使開關旋鈕居中, 並將咖啡豆槽鎖定到位。 如需使用咖啡粉槽,則用力拉動便攜支架 (10) ,然後插入咖啡粉槽。. 在 使用便攜支架時,如果您發現需要調整過濾器:拆下便攜支架,松開背面 的螺釘 ,調整支架的位置 ,然後再輕輕擰緊螺釘 。 插入研磨毛刺。 參考下面的研磨設置表並設置研磨尺寸。 進行細調時,研磨機必須處於運轉狀態或已完全 清空咖啡豆 ,以防止調整 系統卡在毛刺之間的咖啡豆上。 把咖啡豆加到咖啡豆槽裏。 8. 選擇壹個預設的研磨時間(9) 或者手動模式...
- Page 10 研磨時間預設調整按鈕 研磨時間預設按鈕 微調桿旋鈕 便攜支架 研磨設置表 : 下表中顯示的設置可作為開始的壹般準則。您可以根據您的口味或沖泡風格進行更細或更粗的調整 濃縮咖啡 愛樂壓 手沖滴濾咖啡 自動沖泡 Chemex手沖 法壓壺 如果您需要進壹步的支持 : 在美國和加拿大境內的用戶請聯系: 如果您認為您的研磨機工作不正常, 請訪問我們的故障排除指南 Support@baratza.com baratza.com/troubleshooting 或者致電425-641-1245 在北美以外, 保修由您購買產品的公司提供。 如需維修, 請聯系最近 或者免費電話 877-701-2021 baratza.com/international-importers-and-retailers 的進口商: 安全信息 : 請將本產品及其電源線放在8歲以下兒童接觸不到的地方。 請仔細閱讀以下信息。它包含此設備的重要安全信息。請保留這些說 明以備將來參考 啟動咖啡研磨機時,請不要離開。 只能使用交流電和正確的電壓。請參閱研磨機底座上的標簽以確定正確 8歲以上的兒童以及身體、感覺或精神能力較差或者缺乏經驗和知識的 的電壓。 人 ,如果他們已被給予安全使用設備的監督或指示, 並了解所涉及的危險...
- Page 11 ® SCHNELLSTARTER Vario+ Vielen Dank, dass Sie sich für die Baratza Vario+ für Ihren Bedarf an Homegrinding entschieden haben! Dies ist nur eine Schnellstartanleitung. Wenn Sie eine detailliertere Anleitung wünschen, fahren Sie bitte mit dem vollständigen Handbuch fort, das Sie online unter baratza.com/documentation/...
-
Page 12: Bezeichnung Der Teile
Kabel nicht in Wasser oder eine andere Flüssigkeit. wenn sie beaufsichtigt oder bezüglich des sicheren Gebrauchs des Geräts unterwiesen wurden und die daraus resultierenden Gefahren Baratza übernimmt keine Haftung für Schäden, Verletzungen oder verstehen. Garantieleistungen, wenn die Kaffeemühle zweckentfremdet (z. B. zum Mahlen von gerösteten ganzen Kaffeebohnen) oder unsachgemäß... -
Page 13: Guía De Inicio Rápido
® GUÍA DE INICIO RÁPIDO Vario+ ¡Gracias por elegir Baratza Vario+ para las necesidades de molienda de su hogar! Esta es solo una guía de inicio rápido. Si desea instrucciones más detalladas, por favor diríjase al manual completo, que se encuentra en línea baratza.com/documentation/... -
Page 14: Identificación De Piezas
Baratza no se hará responsable por daños, lesiones o garantía si el molinillo se utiliza de forma diferente al propósito previsto (es decir, La limpieza y el mantenimiento del usuario no deben ser realizados por moler granos de café... -
Page 15: Guia De Início Rápido
® GUIA DE INÍCIO RÁPIDO Vario+ Obrigado por escolher Baratza Vario+ como sua solução de moagem caseira! Este e apenas um guia de início rápido. Se você gostaria de instruções mais detalhadas, por favor passe direto para o manual completo, encontrado online no endereço... -
Page 16: Identificação Das Partes
A Baratza não aceita qualquer responsabilidade por danos, ferimentos ou garantia se o moedor for utilizado para outros fins que não o que Limpeza e manutenção não devem ser feitos por crianças sem... -
Page 17: Hurtig Start Guide
HURTIG START GUIDE Vario+ Mange tak fordi du valgte Baratza Vario+ til dit hjemme kværn behov! Dette er blot en quick start guide. Hvis du vil have mere detaljerede instruktioner, kan du springe videre til den fulde manual, som findes online på... - Page 18 Baratza vil ikke acceptere noget ansvar for skader, hvis kværnen bruges til andet end dens tilsigtede formål (dvs. brug til at kværne hele ristede Rengøring og vedligehold skal aldrig foretages af børn uden opsyn.
-
Page 19: Skrócona Instrukcja Obsługi
® SKRÓCONA INSTRUKCJA OBSŁUGI Vario+ Dziękujemy za wybór Baratza Vario+ dla twoich domowych potrzeb mielenia! To tylko skrócona instrukcja. Jeśli chcesz uzyskać bardziej szczegółowe instrukcje, przejdź do pełnej instrukcji, dostępnej na stronie internetowej baratza.com/documentation/ USTAWIENIA: Wyjmij wszystko z opakowania i umyj ręcznie pokrywę (1), zbiornik... -
Page 20: Informacje Dotyczące Bezpieczeństwa
Baratza nie ponosi żadnej odpowiedzialności za uszkodzenia, tym zagrożenia. obrażenia lub gwarancje, jeśli młynek jest używany niezgodnie z jego przeznaczeniem (tj. mielenie palonych całych ziaren kawy) lub jest Dzieci nie mogą... - Page 21 ® КРАТКОЕ РУКОВОДСТВО Vario+ Благодарим за выбор кофемолки Baratza Vario+ для домашнего приготовления кофе Это краткое руководство. Если вам нужна подробная инструкция, вы ее найдете на сайте baratza.com/documentation/ НАСТРОЙКА: Достаньте все из упаковки. Вымойте вручную крышку (1), загрузочную воронку и контейнер для молотого кофе...
- Page 22 другую жидкость. безопасного использования прибора и их понимания опасности, связанной с его нарушением. Baratza не несет никакой ответственности или гарантийных обязательств за ущерб или травмы, полученные в результате Без присмотра дети не должны производить чистку и использования кофемолки не по ее прямому назначению...
- Page 23 دليل التشغيل السريع ® Vario+ شك ر ً ا الختيارك ماكينة Baratza Vario+ أنت تقرأ دليل التشغيل الرسيع. إذا كنت ترغب يف الحصول عىل تعليامت أكرث تفصيل ً ، يرجى ق ر اءة الدليل :الكامل املوجود عىل ال ر ابط www.baratza.com/documentation :الرتكيب...
- Page 24 خارج منطقة أمريكا الشاملية، يتم تقديم الضامن مبعرفة محل ال رش اء. للخدمات، قم بإيجاد أقرب مستورد ال تقم بتشغيل الجهاز يف حال وجود عطب بالكابل أو املقبس. ويف حال وجود أية أعطال بالقابس يجب تبديله من قبل :من خاللbaratza.com/international-importers-and-retailers .ا مل ُصنع، أو مركز الخدمة، أو شخص مؤهل لتفادي الخطر...