Table of Contents
Advertisement
Quick Links
Owner's Manual
1U Rackmount Console
with 19" Display
(for KVM Switch or Server)
Model #: B021-000-19
Tripp Lite World Headquarters
1111 West 35th Street, Chicago, IL 60609 USA
(773) 869-1234, www.tripplite.com
Note: Follow these instructions and operating procedures to ensure correct performance and to prevent damage
to this unit or to its connected devices.
Copyright © 2007 Tripp Lite. All rights reserved. All trademarks are the property of their respective owners.
The policy of Tripp Lite is one of continuous improvement. Specifications are subject to change without notice.
Advertisement
Table of Contents

Related Manuals for Tripp Lite B021-000-19


Summary of Contents for Tripp Lite B021-000-19
- Page 1 Copyright © 2007 Tripp Lite. All rights reserved. All trademarks are the property of their respective owners. The policy of Tripp Lite is one of continuous improvement. Specifications are subject to change without notice.
-
Page 2: Table Of Contents
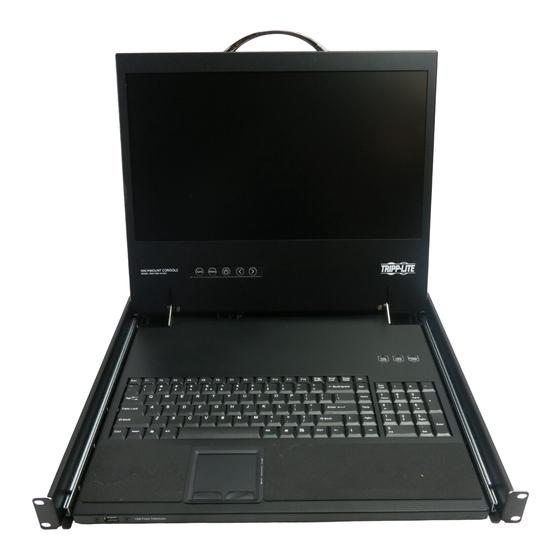
Warranty Registration ...8 Overview The B021-000-19 1U Rackmount Console features an integrated LCD panel, full keyboard and touch pad in a 1U rackmountable housing. These consoles are designed for use with a server or a KVM switch with PS/2 or USB console port connectors. -
Page 3: System Requirements
System Requirements • Supports most servers and KVM switches that have PS/2 or USB console port connectors Introduction Front View 1. Hide-Away Handle: Pull to slide the module out; push to slide the module in. 2. LCD Monitor: After sliding the module out, flip up the cover to access the LCD monitor, keyboard and touch pad. -
Page 4: Installation
KVM switch. The cable kit includes a PS/2 adapter to accommodate both USB and PS/2 connections. 3. Plug the power cord into the B021-000-19’s power socket and into an AC power source. 4. Power up your server or KVM installation. -
Page 5: Lcd Osd (On-Screen Display) Configuration
LCD OSD Configuration Power LED Power Down Menu/Selection Left Right Exit OSD Menu Controls Function Power "ON/OFF" LED Green = OSD menu "ON" Orange = OSD menu "OFF" (power saving mode) Press this to turn the monitor on or off. Press this to bring up the configuration menu. - Page 6 LCD OSD Configuration (continue) BRIGHTNESS / CONTRAST Brightness: Adjusts background black level of the screen image. Contrast: Adjusts the difference between the image background (black level) and the foreground (white level). AUTO ADJUST Auto Adjust: Fine-tunes the video signal to eliminate distortion. An "Adjusting" message is displayed during the process.
-
Page 7: Rackmounting
4. Screw the metal tabs to the rear flanges. 5. Secure the unit to the rack with the front flanges and rear tabs. The B021-000-19 can also be mounted in a 2- post rack installation using the optional 2-Post Rackmount Kit (model #: B019-000). The mounting hardware allows for the consoles to be opened with the drawer in any position. -
Page 8: Specifications
1-YEAR LIMITED WARRANTY TRIPP LITE warrants its products to be free from defects in materials and workmanship for a period of one (1) year from the date of initial purchase. TRIPP LITE's obligation under this warranty is limited to repairing or replacing (at its sole option) any such defective products.