Table of Contents
Advertisement
Advertisement
Table of Contents

Related Manuals for Honeywell Galaxy TouchCenter Plus


Summary of Contents for Honeywell Galaxy TouchCenter Plus
- Page 1 Galaxy TouchCenter Plus Installer Manual 800-18271 8/15 Rev. A1...
-
Page 3: Table Of Contents
Table of Contents About the System ........................... 5 Compatibility ..............................5 System Information ............................5 Mounting ................................. 6 Wiring ................................7 Specifications ..............................8 SD/SDHC Card Slot and Reset Button ......................8 Navigation Icons .............................. 9 Panel Fault Displays ............................9 Initial Setup ........................... - Page 4 Table of Contents (cont’d) Audio Test ..............................25 LED Test ............................... 25 Calibration Test ............................. 25 Keypad Reset ..............................26 Notes .............................. 27...
-
Page 5: About The System
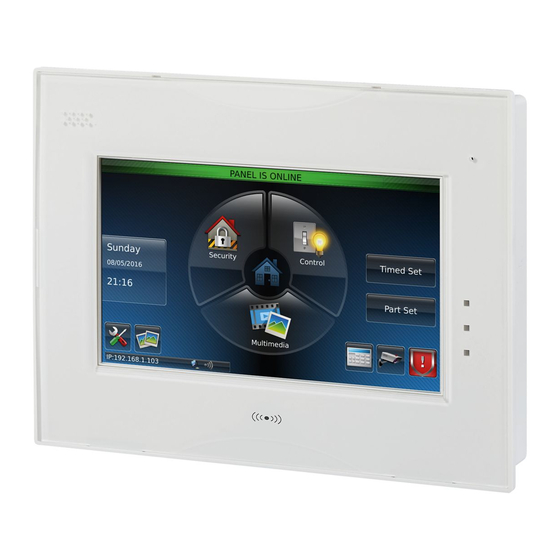
About the System This guide provides information on how to install and configure Honeywell’s Galaxy TouchCenter Plus graphical touch-screen keypads, which are Advanced User Interface (AUI) devices. Your system will comprise one of the following keypads and the wall mount plastics: ... -
Page 6: Mounting
About the System (cont’d) Mounting This keypad is for indoor use within the protected area only and should be mounted at a comfortable viewing level. Avoid mounting in areas of high condensation such as bathrooms or in locations where bright light or sunlight shines directly on the screen. -
Page 7: Wiring
About the System (cont’d) Wiring Connect the Galaxy TouchCenter Plus to the panel’s RS485 terminals. For maximum wire runs and wire sizes, refer to your panel’s installation manual. The keypad draws up to 340mA at 9.6VDC, 260mA at 12VDC and 250mA at 13.8VDC. -
Page 8: Specifications
SD/SDHC Card Slot and Reset Button The Galaxy TouchCenter Plus has a media card slot and reset button located behind the panel as shown below. Note: If you need to insert a media card or access the reset button remember to do so before securing the keypad in place. -
Page 9: Navigation Icons
About the System (cont’d) Navigation Icons To aid in the navigation through the Galaxy TouchCenter Plus screens a set of user-friendly icons has been provided. The appearance and function are described below. ICON ICON TITLE FUNCTION Accesses the Security screen... -
Page 10: Initial Setup
TouchCenter Plus ACTION NOTES Note: The Galaxy TouchCenter Plus has been calibrated at 1. Apply power to the panel, which also powers the factory. If the screen requires recalibration, the end user the Galaxy TouchCenter Plus. -
Page 11: Ip Setup And Network Connections
Initial Setup (cont’d) IP Setup and Network Connections IP Address Setup In most cases, IP addresses are assigned automatically (the setting). However, you may require a Obtain address auto static (fixed) IP address that can be found by accessing your router. Refer to your router instructions. Setup a LAN Connection On the IP Setup... - Page 12 Initial Setup (cont’d) Setup a WIFI (WLAN) Connection On the screen, add a WIFI network connection as follows: IP Setup ICON ACTION NOTES 1. On the Home screen, press the Setup icon, and then enter an authorised code. 2. Press the icon.
-
Page 13: Setup
To Homepage After Auto Slideshow After , and Clean Screen Language Selection (if applicable) The Galaxy TouchCenter Plus can display ten different languages. To change the language: ICON ACTION NOTES After step 4, the following message is 1. On the... -
Page 14: Adjust The Screen Timeouts
Setup (cont’d) Adjust the Screen Timeouts When the keypad is left idle, it automatically: Turns the backlight off after the selected backlight off time has expired (unless the Never option is selected). Returns to the Home screen after the selected To Homepage After time has expired (unless Never... -
Page 15: Multi-Media
Multi-Media The multi-media options allow you to display personal photos in a slide show format and video (audio) files. Important: The feature will only work if you fitted a personal media (SD/SDHC) card with stored photos and /or video (audio) files prior to installing the keypad. Video (Audio) Setup This feature allows you to display videos and can be accessed from the screen by pressing the... -
Page 16: Picture Setup
Multi-Media (cont’d) Picture Setup This feature allows the user to display up to 1000 personal photos on the touch screen and can be accessed from the screen by pressing the icon. To access this function: Home Multimedia ICON ACTION NOTES Photo files can be viewed from the (SD/SDHC) 1. -
Page 17: Camera Setup
Multi-Media (cont’d) Camera Setup The Camera feature allows you to enrol cameras and view up to eight cameras at one time. If using existing (mounted) cameras, go to Step 4 below. If this is a first time setup, you will need to Discover/Configure the cameras prior to mounting and then follow the steps below. - Page 18 Multi-Media (cont’d) ICON ACTION NOTES 1. Connect a Cat5/6 cable to your camera (LAN) and connect the opposite end to an Ethernet connection on your router. 2. Apply power to the Camera. It may take a few seconds for initial power-up of camera. 3.
-
Page 19: System Setup
System Setup This section describes how to change system settings. Console Mode displays an alpha/numeric keypad on the screen that can be used to make changes on the panel. Console Mode To access the Console Mode ICON ACTION NOTES On the screen, press the Home... -
Page 20: Screen Security
System Setup (cont’d) Screen Security The Screen Security screen displays a list of keypad information and setup screens and the authority levels assigned to each. To view and/or edit the authority levels, do the following: ICON ACTION NOTES 1. On the Home screen, press the Setup... -
Page 21: User System Setup
User System Setup This section describes how to setup users and user functions. User PIN Setup Each user must be assigned a name with a corresponding 4 to 6 digit User PIN in order to gain access to various features and functions. Users of the system are programmed in a central user setup location in the control panel that provides options to enable various user details. -
Page 22: How To Add A User
User System Setup (cont’d) How to Add a User To add a user: ICON ACTION NOTES Use the data entry keyboard to enter all required 1. On the Home screen, press the Setup icon, information. and then enter an authorised code. User names can have up to 6 characters, including 2. -
Page 23: How To Edit A User
User System Setup (cont’d) How to Edit a User To edit a user: ICON ACTION NOTES 1. On the Home screen, press the Setup icon, and then enter an authorised code. 2. Press the System Setup icon. 3. Press the icon. -
Page 24: Setting Summer Time
User System Setup (cont’d) Setting Summer Time Note: This option is only available on Dimension and Flex panels with software versions up to 3.15. To set summer time start and finish dates: ICON ACTION NOTES When you press Apply the settings are also 1. -
Page 25: Audio Test
User System Setup (cont’d) Audio Test Perform the audio test as follows: ICON ACTION NOTES If you press Yes, Passed is displayed on the 1. On the Home screen, press the Setup icon, and test screen. then enter an authorised code. If you press No, Failed is displayed in the test 2. -
Page 26: Keypad Reset
User System Setup (cont’d) Keypad Reset To reset the keypad do the following: ICON ACTION NOTES When the Keypad Reset icon is pressed, the 1. On the Home screen, press the Setup icon, and message is displayed: then enter an authorised code. Confirmation 2. -
Page 27: Notes
Notes... - Page 29 NFa2p Type: 3 Graphical Symbols used on the products CE compliance (CP045-00) WEEE disposal logo. Cannot be thrown into a domestic dustbin. CE and exclamation mark which indicates an RF feature not EU harmonized (CP046-00) EN50131-x compliance (Honeywell is the commercial name)
- Page 30 Honeywell Security and Fire (UK07) Newhouse Industrial Estate, Motherwell Lanarkshire, ML1 5SB, UK Copyright © 2015 Honeywell International Inc. www.security.honeywell.com/uk/ 800-18271 9/15 Rev. A1...