Toro EVOLUTION Series Quick Start Manual
Hide thumbs
Also See for EVOLUTION Series:
- Manual (96 pages) ,
- User manual (30 pages) ,
- Quick start manual (8 pages)

Related Manuals for Toro EVOLUTION Series


Summary of Contents for Toro EVOLUTION Series
- Page 1 EVOLUTION Series Controller ® Quick Start Guide For Complete User Guide, Videos and Information, EPA WaterSense Certified ® Certified by Visit Toro.com/Evolution when used with Smart Connect ICC-ES...
-
Page 2: Table Of Contents
Table of Contents Controller Introduction Timing Mechanism Internal Components Home Screen Messages Setup Screen Installation Power Supply Installation Zone Expansion Module Installation Battery Installation Valve, Pump Relay and Sensor Installation Schedule Setup Water Days Schedule Start Setup Zone Runtimes Setup Water Now Manually Activate a Schedule Manually Activate a Specific Zone(s) - Page 3 Set Display Contrast Set Clock Format Set Date Format Set the Beginning of the Week Setting the Remote and PIN Number Specifications EPA Water Sense Qualification Criteria Toro Contact Information Electronic Compatibility Back Cover Australian Consumer Warranty Statement Back Cover...
-
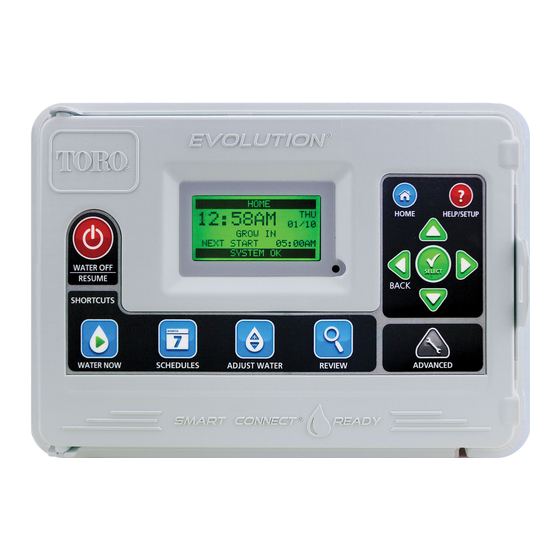
Page 4: Controller Introduction
– Help/Setup Button. Use to access and clear alerts, set the controller’s time and date, locate Toro contact information and local service information, as well as modify controller preferences such as the display language and time and date format. Use Setup also to save or load a schedule to or from your USB thumb drive. -
Page 5: Internal Components
Internal Components – Zones and Sensor Terminals VALVE TEST – Use this terminal to test a valve for proper function. 24VAC – 24 VAC Power Source GND – Power Source Ground SENSOR – Sensor Terminals MV PUMP – Master Valve Terminal COM –... -
Page 6: Home Screen Messages
Home Screen Messages HOME Title Bar HOME 01:09PM 01/08 The battery icon indicates that the controller’s VAC power is off and the timer is running under battery power. Note: The 9-volt battery is used to allow programming when the VAC power supply is off, but it will not activate NEXT START 06:00AM ALERT: PRESS HELP any zones. Main Display TUES 01:09PM Displays the current time, day of the week and date. 01/08 Indicates which schedule (A, B or C) or auxiliary is associated with the displayed status. If only Schedule A is active, SCHEDULE A/B/C OR AUX EVOLUTION will not display the Schedule “A”, “B”... -
Page 7: Setup Screen
The scroll down arrow indicates that additional information are available. Use the Down arrow to reveal the NEXT START 06:00AM additional message(s). Indicates that the measured temperature from the rain/freeze sensor or weather station is the same of less than the set FREEZE HOLD value in the FREEZE OFF menu parameter. - Page 8 Set Date Format Step 1 – Use the Down arrow to select DATE FORMAT. Press the Right arrow or SELECT Step 2 – Use the Up or Down arrows to select MM/DD/YY (Month/Day/Year) (default) or DD/MM/YY (Day/Month/Year). Press SELECT Step 3 – Navigate to the next item or press the HOME button to return to the main screen if setup is complete.
-
Page 9: Power Supply Installation
Set the Beginning of the Week Step 1 – Use the Down arrow to select BEGIN WEEK. Press the Right arrow or SELECT Step 2 – Use the Up or Down arrows to select SUNDAY (default) or MONDAY as the beginning of the weekly schedule. Press SELECT when finished. Step 3 – Navigate to the next item or press the HOME button to return to the main screen if setup is complete. -
Page 10: Zone Expansion Module Installation
Figure 8 220 VAC (Outside US and Canada) Outdoor Models Step 1 – Route power and ground wires from a power source through a conduit and into the EVOLUTION cabinet. ® Step 2 – Open the EVOLUTION controller and access the internal components. ® Step 3 – Remove the power compartment cover to access the transformer terminals. Brown Green/Yellow Blue... -
Page 11: Battery Installation
Battery Installation Figure 12 The EVOLUTION controller uses a 9 VDC battery for arm chair programming. ® Step 1 – Open the EVOLUTION controller door and control panel to access the ® internal components. Step 2 – Locate the battery compartment at the back of the control panel. Step 3 – Align the polarity (– and +) of the battery then slide it into the battery compartment as shown in Figure 12. -
Page 12: Schedule Setup
Use the Up or Down arrows to select the Schedule you want to edit. Press SELECT Note: The Schedule and Zone names can be customized using the EVOLUTION Software which can be accessed at www.toro.com/ ® evolution. WEEKDAY Step 3 – Use the Up or Down arrows to navigate to WATER DAYS. -
Page 13: Schedule Start Setup
SCHEDULED ZONES Note: The Schedule name can be customized using the EVOLUTION Software which can be accessed at www. ® toro.com/evolution. Step 3 – Use the Up or Down arrows to navigate to SCHEDULE STARTS. Press SELECT Step 4 – Use the Left or Right arrows to navigate to the start time’s Hours, Minutes and AM/PM. -
Page 14: Zone Runtimes Setup
Step 3. Note: The Schedule and Zone names can be customized using the EVOLUTION Software which can be accessed at ® www.toro.com/evolution. Step 3 – Use the Up or Down arrows to navigate to ZONE RUNTIMES. Press SELECT... -
Page 15: Water Now
Step 2 – Use the Up or Down arrows to navigate to ZONES. Press SELECT Note: The Zone name can be customized using the EVOLUTION Software which can be accessed at www.toro.com/evolution. ® Step 3 – Use the Up or Down arrows to select the specific zone to activate. Press the Right... -
Page 16: Manually Activate All Zones Test
Manually Activate All Zone Test Step 1 – Press the WATER NOW button. WATER NOW SCHEDULE Step 2 – Use the Up or Down arrows to navigate to ALL ZONE TEST. Press the Right arrow or SELECT ZONES ALL ZONE TEST 02:00 Step 3 –... -
Page 17: Firmware Firmware Update
CONTROLLER 01.09 Firmware Update Figure 14 The EVOLUTION controller’s firmware can easily be updated by downloading the latest software from ® www.toro.com/evolution/. A USB flash drive is needed for this procedure. For further help, look for the firmware update video demonstration in the website. Step 1 – Connect USB to the controller. See Figure 14 . Step 2 – Click the ADVANCED button. Use the Up or Down arrows to select FIRMWARE. -
Page 18: Factory Reset
Factory Reset Select this function to reset the controller to the factory default parameters. Schedule B, C and Auxiliary will be disabled and all FACTORY RESET and all of their parameters will be cleared or set to OFF. Schedule A will be set with a WEEKDAY schedule with all 7 days active. RESET TO FACTORY It will have one start time set to OFF and all zone runtimes set to OFF. -
Page 19: Contact Toro
This option is available only when your local distributor or dealer has programmed the local contact information in the controller. Contact Toro CONTACT TORO Access Contact Toro to get the latest contact information. US +1(800)367-8676 TORO.COM/EVOLUTION Step 1 – Press HELP/SETUP. -
Page 20: Load From Usb
USB port located at the back of the control panel. See Figure 2 on page 2. ® HELP/SETUP Step 2 – Press the HELP/SETUP button. ALERTS CONTACT TORO Step 3 – Use the Up or Down arrows to navigate to LOAD FROM USB. Press SELECT SET TIME/DATE LOAD FROM USB The EVOLUTION controller will list all available schedule files. Use the Up... -
Page 21: Preferences
SAVE TO USB Step 4 – Use the Up or Down arrow to select YES from the confirmation window. ARE YOU SURE? The EVOLUTION controller will automatically save the schedules in the USB drive under the name format ® “EVOLUTIONMMDDHHMM.evo” (MM = Month, DD = Day, HH = Hour and MM = Minute). Step 5 – After the controller states Success, press the BACK arrow to return to the previous menu or HOME to return to the main screen. -
Page 22: Set Date Format
Setting the Remote and PIN Number In order for the Evolution controller to communicate with Toro Gateway, a Smart Connect must be installed into the controller. To communicate with Gateway, the Evolution controller utilize a 4 digit PIN to identify itself and the Gateway it wants to communicate. All Evolution control lers are set with 0000 PIN at the factory. It is necessary to set a different PIN in order distinguish your device from other Evolution in the vicinity. -
Page 23: Specifications
Accessories: • Smart Connect (Model No. EVO-SC) • Smart Connect Weather Sensor (Model No. EVO-WS) Toro Contact Information For U.S.A. support, call 1 877 345 8676. For global support, send email to evolution@toro.com. Visit the EVOLUTION website for the latest news and information at www.toro.com/evolution. ®... -
Page 24: Electronic Compatibility
All costs associated with the return of the product are the purchasers’ responsibility. To process the warranty, the retailer must contact Toro Australia via their representative or the phone number listed below.