Toro EVOLUTION Series Manual
Wireless et weather sensor
Hide thumbs
Also See for EVOLUTION Series:
- Manual (96 pages) ,
- User manual (30 pages) ,
- Quick start manual (24 pages)
Table of Contents
Advertisement
Quick Links
Download this manual
See also:
User Manual
Introduction
Thank you for purchasing Toro's Wireless ET Weather Sensor for
your EVOLUTION® Series Controller. With the Weather Sensor,
you will quickly realize savings in both time and money while
keeping your landscape healthy and beautiful.
The Weather Sensor system is designed exclusively for your Toro
EVOLUTION Series Controller to continuously monitor on-site
weather and make automatic adjustments to the watering schedule
based on current conditions.
The sensor detects current sunlight level, temperature and
rainfall and transmits this information wirelessly to the
required Smart Connect (EVO-SC, sold separately) device
plugged into the EVOLUTION Series Controller. The controller
then adjusts the schedule runtimes to provide the optimum
amount of water required for the next watering day.
Specifications
•
Dimensions:
2.75" (7 cm) W x 7" (17,8 cm) H (over 2" [5 cm] anten-
na) x 6.25" (15,9 cm) D (over 4" [10,2 cm] mounting
bracket)
•
9V Alkaline battery (included)
EVOLUTION
Wireless ET Weather Sensor (EVO-WS)
Series Add-On:
®
To familiarize yourself with
Wireless ET Weather Sensor system,
please take a few moments to read
through this guide in its entirety.
LISTED
FCC-ID: OF7WS9
IC: 3575A-WS9
•
RF reception range:
1000' (305 m) LOS (line of sight)
•
Operating temperature range:
14° – 140° F ( -10°– 60°C)
1
Advertisement
Table of Contents

Related Manuals for Toro EVOLUTION Series


Summary of Contents for Toro EVOLUTION Series
-
Page 1: Specifications
Series Add-On: ® Wireless ET Weather Sensor (EVO-WS) Introduction Thank you for purchasing Toro's Wireless ET Weather Sensor for To familiarize yourself with your EVOLUTION® Series Controller. With the Weather Sensor, Wireless ET Weather Sensor system, you will quickly realize savings in both time and money while please take a few moments to read keeping your landscape healthy and beautiful. -
Page 2: Table Of Contents
Adjusting the Rain Sensor Threshold Battery Level Weather Sensor Battery Replacement Review Basic Operation Resetting to Factory Defaults Menu Navigation Getting to the Sensors Menu Wireless Communication Problems Weather Sensor Menu Toro Warranty and Support Current Adjust Temperature Installation Notes Rain Status... -
Page 3: Weather Sensor Overview
Weather Sensor Overview 1. Rain Sensor Test Pin Pressing the test pin simulates operation of the Rain Sensor by transmitting a signal to the Smart Connect. 2. Rain Sensor Adjustment Cap The Rain Sensor sensitivity is adjustable to suspend watering after 1/8”, 1/4”, 1/2” or 3/4” (3 mm, 6 mm, 12 mm and 19 mm) of accumulated rainfall. -
Page 4: Installation
Installation ® SD Card Explained EVOLUTION Smart Connect® The supplied SD card contains forty years of weather data for all latitudes, longitudes, and zip codes in North America. When the weather sensor's location is entered in the controller (page 6), historical weather data is loaded into the controller. In the event your controller loses connectivity to the weather sensor, the controller will use the the historical weather data to determine the irrigation run time until connectivity is restored. - Page 5 To activate the sensor: to WEATHER. to ADD. to confirm. For new sensors, press and hold the Test Pin for 10-15 seconds. A red LED, viewable from the lower vent area, ADD/REMOVE DEVICE will illuminate twice after 10 seconds (if not already WEATHER active).
- Page 6 6. The controller should detect the sensor. Confirm that the 7. The next step is to enter the location information. It is device ID detected matches the sensor’s actual ID. possible to enter either by zip code or Latitude and Longitude coordinates (available from Google Maps®).
-
Page 7: Adjusting The Rain Sensor Threshold
Adjusting the Rain Sensor Threshold The Weather Sensor The Weather Sensor is preset to suspend watering at 1/4” (6 Important: The Weather Sensor must have full exposure mm) of accumulated rainfall. Three alternate settings of 1/8” (3 to sun, wind and rain, and must not be installed inside a rain mm), 1/2”... - Page 8 2. (A) For solid structure installation: Remove the thumbscrew and secure the bracket using the provided stainless screws. (B) For rain gutter installation: Back the QuickClip's thumbscrew out to clear the rain gutter's edge. Holding the Weather Sensor in position, tighten the thumbscrew to the point the sensor is securely mounted.
-
Page 9: Basic Operation
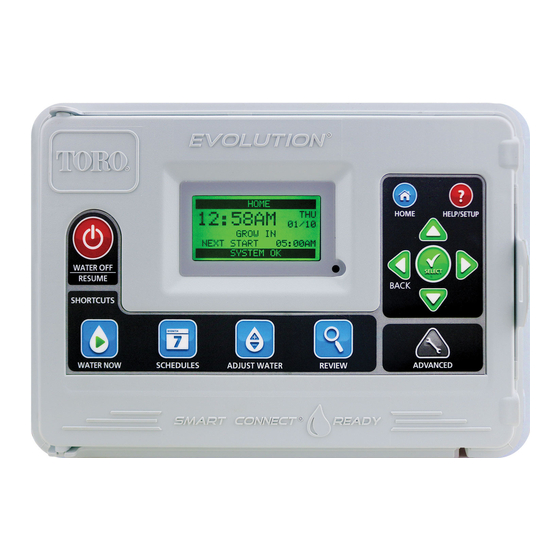
Basic Operation Menu Navigation 3. To add a sensor to a schedule: • to navigate the menu commands. Press to select the desired Schedule (A, B, or C). • To change a value, press to move to the desired Press to make the sensor active for the field, then press to adjust the value. -
Page 10: Weather Sensor Menu
Weather Sensor Menu Freeze Off The temperature at which irrigation will be turned off due to cold temperatures. Selections range from 29°- 45°F in 2 degree SENSORS increments. This feature can also be toggled to "OFF". CURRENT ADJUST 1. Press to raise or lower the temperature value, TEMPERATURE °... -
Page 11: Update Time
Average % Days 1. Press to increase or decrease the percentage This is the previous number of days from which the sensor of irrigation runtime. will use to generate an average runtime value. This is done to 2. Press to input the value. minimize the impact of unseasonably cold or hot days. -
Page 12: Battery Replacement
Battery to switch between number fields. Under normal operating conditions, the Weather Sensor battery 3. When done, move to CONTINUE. Press can last up to five years; however, it is recommended that the After a moment, the screen should display SUCCESS. battery be changed every three years to help ensure a consistent signal. - Page 13 To replace the battery: To clear a weak battery alert condition 1. The battery is stored in the upper half of the sensor At the controller, press housing. To access the battery, release and remove the On ALERTS, press upper housing by twisting it clockwise and lifting the upper housing off of the lower half..
-
Page 14: Review
Review Screen Resetting to Factory Defaults The Review screen allows you to review settings for the various Resetting to Factory Defaults clears ALL SENSOR sensors added to the controller. SETTINGS and ALL ADDED IDs. 1. Press the Review button. 1. Go to the Sensors screen (page 10) and scroll down to to the WEATHER SENSOR. -
Page 15: Toro Warranty And Support
Toro Australia via their representative or the phone number listed below. we have provided the Toro Helpline to assist you with any questions or problems that may arise. If for some reason you are not satisfied with your purchase or have questions, Our goods come with guarantees that cannot be excluded under the Australian please contact us toll free at 1-877-345-8676. -
Page 16: Installation Notes
Declaration of Conformity Installation Notes ©2018 The Toro Company, Irrigation Division • www.toro.com • 1-877-345-8676 (US and Canada) Form Number 373-0806 Rev. D evolution@toro.com (international)