Cisco 7960 User Manual
Residential telephone
Hide thumbs
Also See for 7960:
- Administrator's manual (212 pages) ,
- User manual (186 pages) ,
- Administration manual (150 pages)

Related Manuals for Cisco 7960


Summary of Contents for Cisco 7960
- Page 1 Cisco 7960/7940 Residential Telephone User Guide 620-05600230A Software Release 5.6...
- Page 2 Tekelec, Inc. 3001 E. President George Bush Highway, Suite 150 Richardson, TX 75082 © 2000-2003 Tekelec, Inc. All rights reserved. Tekelec has used its best efforts in preparing this manual and the procedures contained in it. However, this manual may include technical or typographical errors despite the publisher's best efforts. Information in this manual is subject to change with these changes to be incorporated in new editions of the manual.
-
Page 4: Table Of Contents
Accessing Phone Features................ 1 In This Manual ................... 1 Telephone Descriptions ..............1 Cisco 7940/7960 Features Table ............. 2 Identifying Your 7960 Telephone Type .......... 4 Moving Your Telephone ..............5 2 Basic Phone Features Adjusting the Display Contrast............7 Adjusting the Volume .............. - Page 5 Company Directory Lookup ............... 12 Voice Mail ....................12 Incoming voice mail ................13 Saved voice mail ................13 Call Management ..................14 Call Screening ................... 14 Call Forwarding ................. 14 Web Services ..................14 Stock quote..................15 Weather ..................... 15 Using the Call Directory ..............
- Page 6 …using the Phone ................26 …using Star Codes ................26 Disabling Call Forward (All) ..............27 …using the Phone ................28 …using Star Codes ................28 Call Forward (Busy) ............... 28 Enabling Call Forward (Busy)..............28 Disabling Call Forward (Busy) ..............29 Call Forward (No Answer) .............
- Page 7 IMute....................39 On-hook Dialing ................40 Permanent Caller ID Block Release..........40 Priority Call ..................41 Enabling/Disabling Priority Call ............... 41 Adding Members to the Priority Call List ..........41 Listing Priority Call Members..............42 Deleting Priority Call Members ..............42 Privacy Guard.................
- Page 8 Star Codes ..................54 4 Voice Mail Features (Default Menu) Menus and Commands..............57 Accessing Your Voice Mail ............60 …from your phone................... 60 …from any outside touchtone phone............61 …from the email program on your PC............. 61 Using Controls While Playing Messages........62 Rewind/Fast Forward ................
- Page 9 Adding a Member to the Group ............71 Deleting a Group Member ..............71 Playing the Group Name ..............72 Changing the Group Name..............72 Deleting a Group ..................72 Listening to a List of Distribution Groups..........72 Exiting the Voice Mail System ............73 5 Voice Mail Features (Option A Menu) Menus and Commands..............
- Page 10 Receiving Pager Notification ............88 What You Receive on Your Pager/Cell Phone ........88 Managing Distribution Groups ............. 89 Creating a New Group................89 Editing or Modifying a Group ..............89 List All Group Members ..............90 Add a Member to the Group .............. 90 Delete Group Member ...............
- Page 11 Replying to a Message ..............102 Dialing Back a Caller..............103 Sending a Message Directly to Another Number ...... 103 Recording Personalized Mailbox Greetings .......... 103 Listening to Your Greetings ..............104 Receiving Pager Notification ............104 What You Receive on Your Pager/Cell Phone ........105 Managing Distribution Groups ...........
-
Page 12: Your Cisco Telephone
The user is alerted to these text differences by an icon which is shown at left. The icon appears in the left margin next to where the text occurs. For how to identify your phone model, see “Identifying Your 7960 Telephone Type” on page 4. -
Page 13: Cisco 7940/7960 Features Table
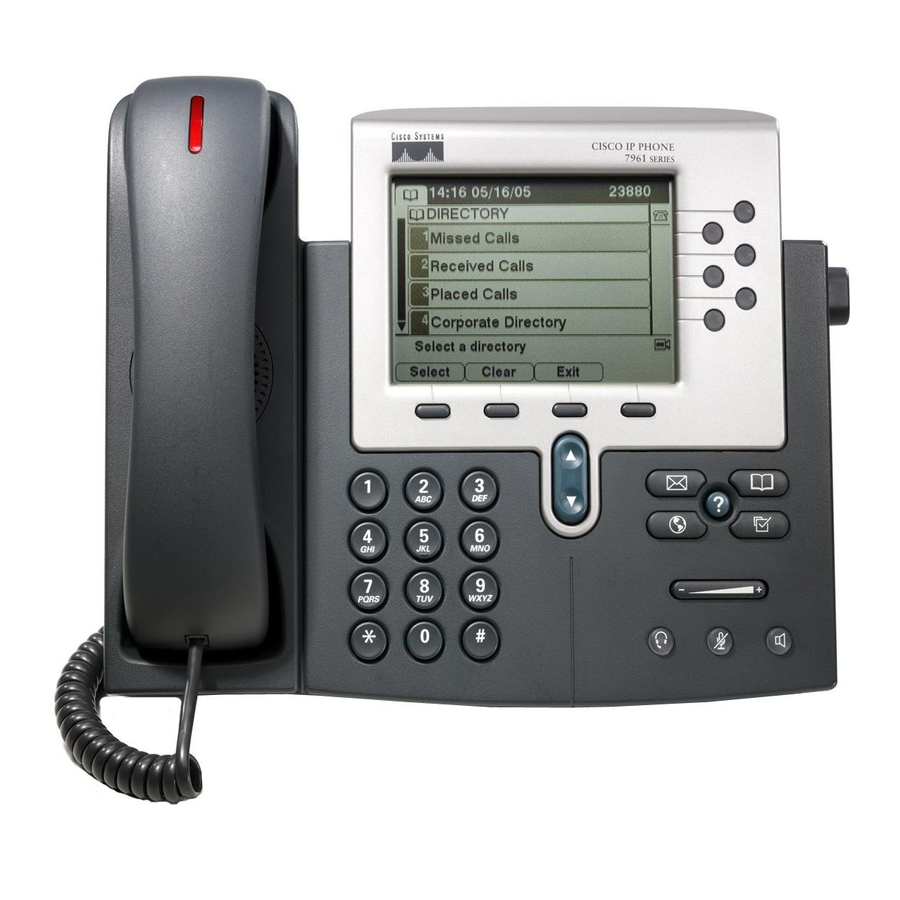
The Cisco IP 7960 or 7940 telephones have several key components, which are shown in the following figure. Handset LCD Speed Dial or... - Page 14 MUTE button This button toggles the microphone function on and off. Works with the speakerphone, handset, or headset microphone. HEADSET button This button toggles the headset function on and off. Cisco 7960/7940 Telephone User Guide Your Cisco Telephone 620-05600230...
-
Page 15: Identifying Your 7960 Telephone Type
SCCP, and SIP. The telephone features and how to use them can vary depending on the telephone’s configured protocol. You can tell which version of 7960 you have by looking at what is displayed on the LCD screen and comparing what you see to the following figures. -
Page 16: Moving Your Telephone
Figure 3: Cisco 7960 SCCP Telephone LCD Screen Moving Your Telephone Before moving your telephone, you should check with your system administrator to make sure that there is power for the telephone at the new location. You need a power adapter for your phone at the new location as well. - Page 17 Your Cisco Telephone Cisco 7960/7940 Telephone User Guide 620-05600230...
-
Page 18: Basic Phone Features
Contrast, or press 1 on your keypad. b. On the 7960 SCCP with an expansion module, do one of the following: • Use the up and down arrow scroll keys to highlight Base Phone, or press 1 on your keypad. -
Page 19: Adjusting The Volume
On the 7960 MGCP, press the Save soft key. • On the 7960 SIP, hang up. The new setting is saved automatically. Adjusting the Ringer Volume To adjust the ringer volume press the volume (arrow up and down) buttons while the phone is on hook to adjust the ringer volume as desired. -
Page 20: Using The Answer Soft Key
On the 7960 MGCP, press the line button (if using the speakerphone). Line Button Indicators The line button indicators on the 7960 SIP phone appear on the LCD display next to the line buttons. There is one indicator per line. The indicator provides a visual indication of the line’s state, which can be registered, unregistered, number mode,... -
Page 21: Making A Call
Making a Call Using the 7960 MGCP Initiate the call. NOTE: On the 7960 MGCP, this step can be skipped if making a call on the speakerphone. Starting with step 2 will turn on the speakerphone. a. Do one of the following •... -
Page 22: Services Feature
On the 7960 SCCP, press the Save soft key. Services Feature The Cisco IP phone offers you several services, including Directory, Voice Mail, Call Management, and Web Services features. You can use these features to help make and manage your phone calls, and to retrieve specific information off of the internet. -
Page 23: Company Directory Listing
Press the Select softkey to place the call. Voice Mail The Cisco IP phone can access your voice mail messages using the services button. This feature is basically the same as the voice mail feature accessed by pressing the messages button. -
Page 24: Incoming Voice Mail
(Number), name of caller leaving the message (Name), date and time received (Date), and length of message (Duration). Use the scroll key to select any of the message fields. Cisco 7960/7940 Telephone User Guide Basic Phone Features 620-05600230... -
Page 25: Call Management
Call Management The Cisco IP phone can help you manage the calls you receive with Call Management tools. Press the services button. -
Page 26: Stock Quote
(UV) index, wind conditions, dewpoint, and relative humidity. When finished with the screen, you can: • Press the Update softkey to refresh the information. • Press the Exit softkey to return to the web services menu. Cisco 7960/7940 Telephone User Guide Basic Phone Features 620-05600230... -
Page 27: Using The Call Directory
Viewing or Dialing Received and Placed Calls The Cisco IP Phone keeps a history of all calls you make and receive, including the caller ID, time, and date of the call. You can use this information to redial a party. -
Page 28: Using Features Without Replacing The Handset
• Press the Answer soft key. • On the 7960 MGCP and 7960 SCCP, press the NewCall soft key (if you are already on a call). To activate or deactivate the speakerphone anytime during a call, press the SPEAKER button on your phone. -
Page 29: Speakerphone Troubleshooting
Move closer to the microphone and face the microphone when speaking. The caller’s voice echoes. Decrease the speaker volume. Basic Phone Features Cisco 7960/7940 Telephone User Guide 620-05600230... -
Page 30: System Telephone Features
If you do not have a feature listed in this chapter and would like to have it on your phone, contact your system administrator for help. NOTE: This chapter may cover more than one version of Cisco 7960 phone (SCCP or MGCP). Although the chapter applies to all types, some information may apply only to a certain phone configuration. -
Page 31: Using An Abbreviated Dial Code
Using an Abbreviated Dial Code Press *3 then the desired Abbreviated Dial code (00-99). NOTE: On the 7960 MGCP phone, you may skip the next step. Press the Dial soft key, or line or SPEAKER button, or pickup the handset. -
Page 32: Deleting An Abbreviated Dial Code
Deleting an Abbreviated Dial Code Press 75*. NOTE: On the 7960 MGCP phone, you may skip the next step. Press the Dial soft key, or line or SPEAKER button, or pickup the handset. NOTE: A voice prompt will lead you through the remaining steps. -
Page 33: Enabling Anonymous Call Rejection
Enabling Anonymous Call Rejection Press *77 on the telephone keypad. NOTE: On the 7960 MGCP phone, you may skip the next step. Press the Dial soft key, or line or SPEAKER button, or pickup the handset. Hang up. On any subsequent incoming call that provides no caller ID, the calling party gets a message that the party they are calling does not accept anonymous calls. -
Page 34: Enabling/Disabling Call Block
Press *60 or *80 on the telephone keypad. NOTE: On the 7960 MGCP phone, you may skip the next step. Press the Dial soft key, or line or SPEAKER button, or pickup the handset. -
Page 35: Adding Numbers To Call Block List
Adding Numbers to Call Block List Press *60 or *80 on the telephone keypad. NOTE: On the 7960 MGCP phone, you may skip the next step. Press the Dial soft key, or line or SPEAKER button, or pickup the handset. - Page 36 The voice prompt announces that all phone numbers have been removed from the list and you are returned to the Call Block menu. 16. Select a menu item or hang up. Cisco 7960/7940 Telephone User Guide System Telephone Features 620-05600230...
-
Page 37: Call Forward (All Calls)
If you have only one extension on your phone, skip to step 2. Otherwise, press the button for the extension you want to forward. The SPEAKER lamp lights and the display shows “Enter number” on the 7960 MGCP phone. Press the Forward softkey. The speaker phone turns on (SPEAKER lamp lights) and the display shows: •... -
Page 38: Disabling Call Forward (All)
NOTE: On the 7960 SIP, disabling Call Forward (All) can only be done using star codes. Check with your system administrator for the star code to be used. If star codes are not used, then the 7960 SIP is unable to support Call Forward (All). -
Page 39: Using The Phone
Press 73* on the telephone keypad. On the 7960 MGCP, call forwarding is disabled and the phone hangs up. On the 7960 SCCP, press the Dial soft key, or line or SPEAKER button, or pickup the handset. Call forwarding is disabled and the phone hangs up. -
Page 40: Disabling Call Forward (Busy)
• On the 7960 SCCP phone, press 77* on the telephone keypad. On the 7960 SCCP phone, press the Dial soft key, or line or SPEAKER button, or pickup the handset. Call forwarding (busy) is disabled and the phone hangs up. -
Page 41: Call Forward (No Answer)
If you have only one extension on your phone, skip to step 2. Otherwise, press the button for the extension you want to forward. Press 78* on the telephone keypad. On the 7960 SCCP, press the Dial soft key. • If you do not have a previously configured forward number, you will be instructed to enter a forwarding number and press #. -
Page 42: Disabling Call Forward (No Answer)
• On the 7960 SCCP phone, press 79* on the telephone keypad. On the 7960 SCCP phone, press the Dial soft key, or line or SPEAKER button, or pickup the handset. Call forward (no answer) is disabled and the phone hangs up. -
Page 43: Enabling Call Forward (Out Of Service)
If you have only one extension on your phone, skip to step 2. Otherwise, press the button for the extension you want to forward. Press 70* on the telephone keypad. On the 7960 SCCP, press the Dial soft key. After dialing, you will be prompted to continue: •... -
Page 44: Disabling Call Forward (Out Of Service)
Press 71* on the telephone keypad. On the 7960 MGCP, call forwarding is disabled and the phone hangs up. On the 7960 SCCP, press the Dial soft key, or line or SPEAKER button, or pickup the handset. Call forwarding is disabled and the phone hangs up. -
Page 45: Call Waiting
On the 7960 SCCP, press the Resume soft key. • On the 7960 MGCP, press the line button for the waiting call to re-connect to it. NOTE: On the 7960 SCCP, to switch between calls after the first time, press Resume. -
Page 46: Call Waiting With Id Manager
Caller ID information is provided. Press *67 on the telephone keypad. NOTE: On the 7960 MGCP phone, you may skip the next step. Press the Dial soft key, or line or SPEAKER button, or pickup the handset. -
Page 47: Conference Call Tips
There are four types of ringers – all are answered the same way: • One Ring – Internal (Extension-to-Extension) Calls and when the system has called your extension to remind you or to notify you about something. • Two Rings – External Calls System Telephone Features Cisco 7960/7940 Telephone User Guide 620-05600230... -
Page 48: Direct Extension Assignment
Once you have programmed another phone with your old phone’s extension, you must reconfigure your old phone before using it. Your old phone displays the message “Pickup handset to configure”. Pickup the handset and perform the following steps: Cisco 7960/7940 Telephone User Guide System Telephone Features 620-05600230... -
Page 49: Do Not Disturb
Press *04 on the telephone keypad. NOTE: On the 7960 MGCP phone, you may skip the next step. Press the Dial soft key, or line or SPEAKER button, or pickup the handset. -
Page 50: End Call
This is to remind you that you have a call on hold. NOTE: Starting one minute after the party is on hold, and occurring each minute after that, one ring sounds from the phone speaker on the 7960 MGCP phone. On the 7960 SCCP phone one long-short-long ring sounds from the phone speaker. -
Page 51: On-Hook Dialing
To allow your caller ID to be displayed on the phone you are calling: Press *82. NOTE: On the 7960 MGCP phone, you may skip the next step. Press the Dial soft key, or line or SPEAKER button, or pickup the handset. -
Page 52: Priority Call
Press *61. NOTE: On the 7960 MGCP phone, you may skip the next step. Press the Dial soft key, or line or SPEAKER button, or pickup the handset. A voice prompt tells you whether Priority Call is enabled or disabled and then gives the menu choices. -
Page 53: Listing Priority Call Members
Listing Priority Call Members Press *61. NOTE: On the 7960 MGCP phone, you may skip the next step. Press the Dial soft key, or line or SPEAKER button, or pickup the handset. A voice prompt tells you whether Priority Call is enabled or disabled and then gives the menu choices. - Page 54 The voice prompt announces that all phone numbers have been removed from the list and you are returned to the Priority Call menu. 15. Select a menu item or hang up. Cisco 7960/7940 Telephone User Guide System Telephone Features 620-05600230...
-
Page 55: Privacy Guard
If they enter anything other than the menu options, they will be prompted two more times to enter a valid menu option. If they do not select a valid option in the allowed time, the call is dropped. System Telephone Features Cisco 7960/7940 Telephone User Guide 620-05600230... -
Page 56: Entering An Access Code
• Press 4 to deliver a message that you do not accept sales or soliciation calls and you are not to be called again. Cisco 7960/7940 Telephone User Guide System Telephone Features 620-05600230... -
Page 57: Enabling/Disabling Privacy Guard
Press *88 on the telephone keypad. NOTE: On the 7960 MGCP phone, you may skip the next step. Press the Dial soft key, or line or SPEAKER button, or pickup the handset. A voice prompt tells you whether Privacy Guard is enabled or disabled and then gives the menu choices. -
Page 58: Listening To Access Code
Listening to Access Code Press *88 on the telephone keypad. NOTE: On the 7960 MGCP phone, you may skip the next step. Press the Dial soft key, or line or SPEAKER button, or pickup the handset. A voice prompt tells you whether Privacy Guard is enabled or disabled and then gives the menu choices. -
Page 59: Deleting From The List
Deleting from the List Press *88 on the telephone keypad. NOTE: On the 7960 MGCP phone, you may skip the next step. Press the Dial soft key, or line or SPEAKER button, or pickup the handset. A voice prompt tells you whether Privacy Guard is enabled or disabled and then gives the menu choices. -
Page 60: Redial
Speak to the called party. …using Star Codes Dial *07. NOTE: On the 7960 MGCP phone, you may skip the next step. Press the Dial soft key, or line or SPEAKER button, or pickup the handset. Speak to the called party. -
Page 61: Enabling/Disabling Selective Call Forward
Press *63 or *83. NOTE: On the 7960 MGCP phone, you may skip the next step. Press the Dial soft key, or line or SPEAKER button, or pickup the handset. A voice prompt tells you whether Selective Call Forward is enabled or disabled and then gives the menu choices. -
Page 62: Adding Forwarded Phone Numbers
Adding Forwarded Phone Numbers Press *63 or *83. NOTE: On the 7960 MGCP phone, you may skip the next step. Press the Dial soft key, or line or SPEAKER button, or pickup the handset. A voice prompt tells you whether Selective Call Forward is enabled or disabled and then gives the menu choices. -
Page 63: Deleting Forwarded Phone Numbers
Deleting Forwarded Phone Numbers Press *63 or *83. NOTE: On the 7960 MGCP phone, you may skip the next step. Press the Dial soft key, or line or SPEAKER button, or pickup the handset. A voice prompt tells you whether Selective Call Forward is enabled or disabled and then gives the menu choices. -
Page 64: Speaker
NOTE: A voice prompt leads you through the remaining steps. On the 7960 MGCP phone, you may skip the next step. Press the Dial soft key, or line or SPEAKER button, or pickup the handset. Press the speed dial button on the telephone you wish to program. -
Page 65: Identifying The Number Assigned To A Speed Dial Button
Table 1: Feature Matrix Feature Name Enable Disable Abbreviated Dial - Program Abbreviated Dial - Enable *3+code System Telephone Features Cisco 7960/7940 Telephone User Guide 620-05600230... - Page 66 Permanent Per Call Block *82+number Priority Call *61+menu *61+menu Privacy Guard *88+menu *88+menu Redial Selective Call Forward *63+menu *83+menu Selective Call Rejection *60+menu *80+menu (Call Block) Speed Dial 74*+menu Voice Mail Cisco 7960/7940 Telephone User Guide System Telephone Features 620-05600230...
- Page 67 System Telephone Features Cisco 7960/7940 Telephone User Guide 620-05600230...
-
Page 68: Voice Mail Features (Default Menu)
Greeting List” on page 58) Record personal greetings (for options see “Voice Mail Personal Greeting List” on page 58) Access personal distribution groups (for options see “Voice Mail Distribution List” on page 59) Cisco 7960/7940 Telephone User Guide Voice Mail Features (Default Menu) 620-05600230... -
Page 69: Replay Message
NOTE: If you are listening to the introductory message and you press *, you will exit from voice mail. Table 4: Voice Mail Personal Greeting List Access Code Function No Answer greeting Do Not Disturb greeting Busy greeting Name greeting Voice Mail Features (Default Menu) Cisco 7960/7940 Telephone User Guide 620-05600230... - Page 70 Change message (re-record) Review message (listen to recorded message) Set message options (for options see “Voice Mail Message Options List” on page 60) (star) Return to main voice mail menu Cisco 7960/7940 Telephone User Guide Voice Mail Features (Default Menu) 620-05600230...
-
Page 71: Accessing Your Voice Mail
Press the messages button or dial *09 to access your voice mail system. If you dialed *09, press the Dial soft key or line or speaker button or pickup the handset. Enter your password (if required). Voice Mail Features (Default Menu) Cisco 7960/7940 Telephone User Guide 620-05600230... -
Page 72: From Any Outside Touchtone Phone
Your default media player will open. • If you get an error message, the voice mail has not been recorded in a compatible file format and cannot be played. Cisco 7960/7940 Telephone User Guide Voice Mail Features (Default Menu) 620-05600230... -
Page 73: Using Controls While Playing Messages
If you want to forward to the end of a message: • Press 99. Pause Play of a Message To pause play of a message or to resume play of a paused message: • Press 8. Voice Mail Features (Default Menu) Cisco 7960/7940 Telephone User Guide 620-05600230... -
Page 74: Composing Messages Before Sending
If you pressed any key from 1 -4, you are returned to the Compose Message menu (step 6). 10. Repeat steps 6 - 8 until you press 1 to send or * to return to the voice mail main menu or hang up. Cisco 7960/7940 Telephone User Guide Voice Mail Features (Default Menu) 620-05600230... -
Page 75: Marking A Message As Urgent
NOTE: This feature is not supported for stand-alone mailboxes. To hear or change where pressing zero (0) goes, follow these steps: Access the voice mail system. Press 8 to hear or change your custom operator selection. Voice Mail Features (Default Menu) Cisco 7960/7940 Telephone User Guide 620-05600230... -
Page 76: Replaying A Message
To skip to the next voice mail message, press 8 while.listening to the message header or message handling options. During the message, press # to skip to the next message. Cisco 7960/7940 Telephone User Guide Voice Mail Features (Default Menu) 620-05600230... -
Page 77: Deleting A Message
Replying to a Message To reply to a message you receive: Press 2 to reply to the message. You hear a prompt to record your reply. Voice Mail Features (Default Menu) Cisco 7960/7940 Telephone User Guide 620-05600230... -
Page 78: Dialing Back A Caller
• when you have activated the Do Not Disturb feature (if this feature is provided on your telephone) • when you are talking on the phone (the “Busy” greeting) Cisco 7960/7940 Telephone User Guide Voice Mail Features (Default Menu) 620-05600230... -
Page 79: Recording Personalized Mailbox Greetings
The VoIP system provides the ability for you to be alerted on your mobile phone or pager that you have received a voice message. You must set this service up with your system administrator. Voice Mail Features (Default Menu) Cisco 7960/7940 Telephone User Guide 620-05600230... -
Page 80: What You Receive On Your Pager/Cell Phone
Up to 20 voice messaging distribution groups can be created that will allow you to send voice messages to multiple people at one time. The following options are available when you access the distribution groups menu item: • List all distribution groups Cisco 7960/7940 Telephone User Guide Voice Mail Features (Default Menu) 620-05600230... -
Page 81: Creating A New Group
• Add a member - press 2 • Delete a member - press 3 • Play the group name - press 4 • Change the name - press 5 Voice Mail Features (Default Menu) Cisco 7960/7940 Telephone User Guide 620-05600230... -
Page 82: Listing All Group Members
• If you press # and the member does not exist, you will hear “The member does not exist in this group, please try again.” Cisco 7960/7940 Telephone User Guide Voice Mail Features (Default Menu) 620-05600230... -
Page 83: Playing The Group Name
Listening to a List of Distribution Groups Access the voice mail system. Press 6 for distribution groups. Press 1 to list all your groups. Listen to the playback of your groups as follows Voice Mail Features (Default Menu) Cisco 7960/7940 Telephone User Guide 620-05600230... -
Page 84: Exiting The Voice Mail System
NOTE: To list all group (corporate or company) distribution lists, you must be in the mailbox for your company's main number. Exiting the Voice Mail System To exit the voice mail system, simply hang up. Cisco 7960/7940 Telephone User Guide Voice Mail Features (Default Menu) 620-05600230... - Page 85 Voice Mail Features (Default Menu) Cisco 7960/7940 Telephone User Guide 620-05600230...
-
Page 86: Voice Mail Features (Option A Menu)
Record personal greetings (for options see “Voice Mail Personal Greeting List” on page 77) Access personal distribution groups (for options see “Voice Mail Distribution List” on page 78) Change password Cisco 7960/7940 Telephone User Guide Voice Mail Features (Option A Menu) 620-05600230... -
Page 87: Forward
Replay message Forward Delete Reply Save Call originator Table 10: Voicemail Message Handling Controls Feature Before Mail After Mail During Mail Message Message Message Rewind Rewind to beginning Voice Mail Features (Option A Menu) Cisco 7960/7940 Telephone User Guide 620-05600230... - Page 88 Fast Forward to the end 33 or # Replay message Forward Delete Reply Save Call originator Table 12: Voice Mail Personal Greeting List Access Code Function No Answer greeting Cisco 7960/7940 Telephone User Guide Voice Mail Features (Option A Menu) 620-05600230...
-
Page 89: Access Code Function
Change message (re-record) Review message (listen to recorded message) Set message options (for options see “Voice Mail Message Options List” on page 79) (star) Return to main voice mail menu Voice Mail Features (Option A Menu) Cisco 7960/7940 Telephone User Guide 620-05600230... -
Page 90: Accessing Your Voice Mail
Press the messages button or dial *09 to access your voice mail system. If you dialed *09, press the Dial soft key or line or speaker button or pickup the handset. Enter your password (if required). Cisco 7960/7940 Telephone User Guide Voice Mail Features (Option A Menu) 620-05600230... -
Page 91: From Any Outside Touchtone Phone
Your default media player will open. • If you get an error message, the voice mail has not been recorded in a compatible file format and cannot be played. Voice Mail Features (Option A Menu) Cisco 7960/7940 Telephone User Guide 620-05600230... -
Page 92: Using Controls While Playing Messages
If you want to forward to the end of a message: • Press 33. Pause Play of a Message To pause play of a message or to resume play of a paused message: • Press 2. Cisco 7960/7940 Telephone User Guide Voice Mail Features (Option A Menu) 620-05600230... -
Page 93: Composing Messages Before Sending
(step 6). 10. Repeat steps 6 - 8 until you press 1 to send or * to return to the voice mail main menu or hang up. Voice Mail Features (Option A Menu) Cisco 7960/7940 Telephone User Guide 620-05600230... -
Page 94: Marking A Message As Urgent
NOTE: This feature is not supported for stand-alone mailboxes. To hear or change where pressing zero (0) goes, follow these steps: Access the voice mail system. Press 8 to hear or change your custom operator selection. Cisco 7960/7940 Telephone User Guide Voice Mail Features (Option A Menu) 620-05600230... -
Page 95: Replaying A Message
Skipping to the Next Message To skip to the next voice mail message: • Press ### while.listening to the message header • Press ## while.listening to the message. Voice Mail Features (Option A Menu) Cisco 7960/7940 Telephone User Guide 620-05600230... -
Page 96: Deleting A Message
NOTE: Press * at anytime to cancel the forward. If you press *, you must reenter the extension(s) and any desired introduction. Replying to a Message To reply to a message you receive: Cisco 7960/7940 Telephone User Guide Voice Mail Features (Option A Menu) 620-05600230... -
Page 97: Dialing Back A Caller
You can record a different voice mail greeting for each of the conditions that transfers a caller to your voice mailbox: • when your phone rings and you don’t answer it (the “No Answer” greeting) Voice Mail Features (Option A Menu) Cisco 7960/7940 Telephone User Guide 620-05600230... -
Page 98: Recording Personalized Mailbox Greetings
Press 2 to play the Do Not Disturb greeting. • Press 3 to play the Busy greeting. • Press 4 to play your name. • Press * to return to the main menu. Cisco 7960/7940 Telephone User Guide Voice Mail Features (Option A Menu) 620-05600230... -
Page 99: Receiving Pager Notification
Body: the text entered by the system administrator (i.e. Please call me! I need to talk to you.) NOTE: If the system administrator left the body text empty, you get as the body: calling party called you on “date” at “time”. Voice Mail Features (Option A Menu) Cisco 7960/7940 Telephone User Guide 620-05600230... -
Page 100: Managing Distribution Groups
Editing or Modifying a Group Access the voice mail system. Press 6 for distribution groups. Press 2 to edit a group. Cisco 7960/7940 Telephone User Guide Voice Mail Features (Option A Menu) 620-05600230... -
Page 101: List All Group Members
Delete Group Member If you pressed 3 to delete a distribution group member, do the following: After the prompt, enter the extension number of the member you wish to delete. Voice Mail Features (Option A Menu) Cisco 7960/7940 Telephone User Guide 620-05600230... -
Page 102: Play The Group Name
If you entered the wrong group number and pressed *, you will be prompted for the number of the group to delete. Enter a different group number or press * again to return to the distribution group menu. Cisco 7960/7940 Telephone User Guide Voice Mail Features (Option A Menu) 620-05600230... -
Page 103: Listening To A List Of Distribution Groups
NOTE: To list all group (corporate or company) distribution lists, you must be in the mailbox for your company's main number. Exiting the Voice Mail System To exit the voice mail system, simply hang up. Voice Mail Features (Option A Menu) Cisco 7960/7940 Telephone User Guide 620-05600230... -
Page 104: Voice Mail Features (Option B Menu)
Compose a message (for options see “Voice Mail Compose List” on page 95) Mailbox Options (for options see “Voice Mail Malbox Options List” on page 96) Exit the voice mail system Cisco 7960/7940 Telephone User Guide Voice Mail Features (Option B Menu) 620-05600230... -
Page 105: No Answer Greeting
Return to main voice mail menu (star) Return to main voice mail menu Table 20: Voice Mail Distribution List Access Code Function Hear a list of all distribution groups Voice Mail Features (Option B Menu) Cisco 7960/7940 Telephone User Guide 620-05600230... - Page 106 NOTE: Selecting any of the numbered options immediately returns to the Voice Mail Compose List. This is also true for callers leaving voice mail who select options after leaving their voice mail. Cisco 7960/7940 Telephone User Guide Voice Mail Features (Option B Menu) 620-05600230...
-
Page 107: Accessing Your Voice Mail
Press the corresponding digit on your phone to select the desired voice mail function. Voice Mail Features (Option B Menu) Cisco 7960/7940 Telephone User Guide 620-05600230... -
Page 108: From Any Outside Touchtone Phone
Also remember to check the volume level on your speakers before playing any voice mail messages. Close the media player when you are finished listing to voice mails. Cisco 7960/7940 Telephone User Guide Voice Mail Features (Option B Menu) 620-05600230... -
Page 109: Using Controls While Playing Messages
# key. When you are finished, press # again to complete your mailing list. Record your message after the tone and press # when finished. Voice Mail Features (Option B Menu) Cisco 7960/7940 Telephone User Guide 620-05600230... -
Page 110: Marking A Message As Urgent
Access the voice mail system. Press 16 to access the Mailbox Options menu. Press 2 to change your password. Enter your new password by pressing numbers on the keypad followed by #. Cisco 7960/7940 Telephone User Guide Voice Mail Features (Option B Menu) 620-05600230... -
Page 111: Skipping The Mail Menu To Hear Messages
If you pressed 1, enter your custom operator number, press # and listen to the confirmation announcement. If you pressed 2, listen to the announcement that your default custom operator has been restored. 100 Voice Mail Features (Option B Menu) Cisco 7960/7940 Telephone User Guide 620-05600230... -
Page 112: Replaying A Message
NOTE: You hear a prompt to enter the number of the person(s) to whom you want to forward the message. Enter the phone number and then either: Cisco 7960/7940 Telephone User Guide Voice Mail Features (Option B Menu) 101 620-05600230... -
Page 113: Replying To A Message
Press 3 to review reply. • Press 9 to mark urgent and reply. • Press * to cancel the reply and re-record. You hear the message options again. 102 Voice Mail Features (Option B Menu) Cisco 7960/7940 Telephone User Guide 620-05600230... -
Page 114: Dialing Back A Caller
(0) to reach either the automated attendant or the person you have programmed to answer “zero out” calls. Recording Personalized Mailbox Greetings To record a personalized greeting: Access the voice mail system. Cisco 7960/7940 Telephone User Guide Voice Mail Features (Option B Menu) 103 620-05600230... -
Page 115: Listening To Your Greetings
Basic numeric pages accept only keypad phone digits (1-0, * and #). • Cell phones support voice streaming. • Some cell phone models can receive text-only e-mails. • E-mail pagers can accept text-only e-mail messages. 104 Voice Mail Features (Option B Menu) Cisco 7960/7940 Telephone User Guide 620-05600230... -
Page 116: What You Receive On Your Pager/Cell Phone
The following options are available when you access the distribution groups menu item: • List all distribution groups • Create a group • Edit a group • Delete a group • Return to the main menu Cisco 7960/7940 Telephone User Guide Voice Mail Features (Option B Menu) 105 620-05600230... -
Page 117: Creating A New Group
Add a member - press 2 • Delete a member - press 3 • Play the group name - press 4 • Change the name - press 5 106 Voice Mail Features (Option B Menu) Cisco 7960/7940 Telephone User Guide 620-05600230... -
Page 118: Listing Members Of A Group
• If you press # and the member does not exist, you will hear “The member does not exist in this group, please try again.” Cisco 7960/7940 Telephone User Guide Voice Mail Features (Option B Menu) 107 620-05600230... -
Page 119: Play The Group Name
Listening to a List of Distribution Groups: Access the voice mail system. Press 16 for Mailbox Options. Press 6 for distribution groups. 108 Voice Mail Features (Option B Menu) Cisco 7960/7940 Telephone User Guide 620-05600230... -
Page 120: Exiting The Voice Mail System
NOTE: To list all group (corporate or company) distribution lists, you must be in the mailbox for your company's main number. Exiting the Voice Mail System To exit the voice mail system, simply hang up. Cisco 7960/7940 Telephone User Guide Voice Mail Features (Option B Menu) 109 620-05600230... - Page 121 Voice Mail Features (Option B Menu) Cisco 7960/7940 Telephone User Guide 620-05600230...
-
Page 122: Set Up Outlook For Tapi
Start Outlook (if not already running). Click the Contacts icon to switch to the Contacts listing. Right click on the contact you wish to call to bring up the Actions pop-up menu. Cisco 7960/7940 Telephone User Guide Set Up Outlook for TAPI 620-05600230... - Page 123 The speaker on your telephone should be activated and you should hear ringing or a busy signal as the call is connected to the dialed number. Set Up Outlook for TAPI Cisco 7960/7940 Telephone User Guide 620-05600230...
-
Page 124: Installing The Tapi Support Software
Select a method for the installation and click OK. This procedure uses the Save this program to disk option so that the install is available if needed again. Cisco 7960/7940 Telephone User Guide Set Up Outlook for TAPI 620-05600230... - Page 125 Find the TAPI.EXE file (shown here on the PC desktop) and double-click it to run the install program. Set Up Outlook for TAPI Cisco 7960/7940 Telephone User Guide 620-05600230...
- Page 126 Depending on the PC’s operating system and security settings, a security warning window may be displayed as part of the install. Click Run to install or Cancel to not install TAPI. Cisco 7960/7940 Telephone User Guide Set Up Outlook for TAPI 620-05600230...
- Page 127 Click Next in the Welcome dialog box to install the TAPI program. 10. Click Next to start the installation. Set Up Outlook for TAPI Cisco 7960/7940 Telephone User Guide 620-05600230...
- Page 128 Click Add to add your telephone number (the one that will be used with the TAPI-enabled program [such as Outlook]). 13. Enter your telephone number and password and click OK. Cisco 7960/7940 Telephone User Guide Set Up Outlook for TAPI 620-05600230...
-
Page 129: Configuring Windows For Tapi
Use the following steps to set up TAPI 2.1-compliant Service Provider in Windows. These steps are from Windows XP. Other Windows versions should be similar. Click Start and Control Panel to open the Control panel window. Set Up Outlook for TAPI Cisco 7960/7940 Telephone User Guide 620-05600230... - Page 130 Double click Phone and Modem Options (circled). Click Edit (circled) in the Phone and Modem Options dialog box. Cisco 7960/7940 Telephone User Guide Set Up Outlook for TAPI 620-05600230...
- Page 131 (see arrows). c. Set the outside access digits in the Dialing Rules section to the digit that must be dialed to make an outside call (circled). 120 Set Up Outlook for TAPI Cisco 7960/7940 Telephone User Guide 620-05600230...
- Page 132 Click Apply. Cisco 7960/7940 Telephone User Guide Set Up Outlook for TAPI 121 620-05600230...
- Page 133 NOTE: Depending on whether you clicked New or Edit, the dialog box will say either New Area Code Rule or Edit Area Code Rule. If you clicked Edit, the area code you highlighted will be displayed in the Area Code field. 122 Set Up Outlook for TAPI Cisco 7960/7940 Telephone User Guide 620-05600230...
- Page 134 Location dialog box, click OK to accept the dialing properties, and close the dialog box and return to the Phone and Modem Options dialog box. 10. Click the Advanced tab to see the list of available telephone providers. Cisco 7960/7940 Telephone User Guide Set Up Outlook for TAPI 123 620-05600230...
- Page 135 12. If you did not complete the T6000 setup as part of the TAPI install from Web Portal, click Add to open the Add Provider dialog box. 13. Select Tekelec T6000 Telephony Service Provider and click Add. 124 Set Up Outlook for TAPI Cisco 7960/7940 Telephone User Guide 620-05600230...
- Page 136 15. Enter your telephone number and password and click OK. 16. Click OK to return to the Phone and Modem Options dialog box. 17. Click Close in the Phone and Modem Options dialog box. Cisco 7960/7940 Telephone User Guide Set Up Outlook for TAPI 125 620-05600230...
-
Page 137: Configuring Outlook To Use Tapi
If not already running, start Outlook (or the TAPI-enabled application). Click the Contacts icon to switch to the Contacts listing. Right click any contact to bring up the Actions pop-up menu. 126 Set Up Outlook for TAPI Cisco 7960/7940 Telephone User Guide 620-05600230... - Page 138 Click on the drop-down menu in the Connect using line field and scroll down any entries until you find your telephone number (circled). Select your telephone number and click OK to return to the New Call dialog box. Cisco 7960/7940 Telephone User Guide Set Up Outlook for TAPI 127 620-05600230...
- Page 139 You may call this contact or close the New Call dialog box. Outlook (or your TAPI-enabled application) is now configured to place calls using your telephone number. 128 Set Up Outlook for TAPI Cisco 7960/7940 Telephone User Guide 620-05600230...
- Page 140 Hanging Up 9 Option A Menu 80 Making Internal Calls 10 Option B Menu 97 Using the 7960 MGCP or 7960 SIP 10 From the Email Program on your PC Using the 7960 SCCP 10 Default Menu 61 Ringer Patterns 36...
- Page 141 Default Menu 72 Calling Option A Menu 91 Internal 10 Option B Menu 108 Using the 7960 MGCP or 7960 SIP 10 Dial Tones 36 Using the 7960 SCCP 10 Dialing Back a Caller Change Voice Mail Distribution Group Name...
- Page 142 Company Directory Lookup 12 Personal Directory 11 Editing Voice Mail Distribution Group Disable Call Forward (All Calls) 27 Add Members Phone Feature Buttons 28 Default Menu 71 Star Codes 28 Option A Menu 90 Display Option B Menu 107 Adjust Display Contrast 7 Change Name Distinctive Ring 37 Default Menu 72...
- Page 143 Installing TAPI 113 Option A Menu 81 Internal Calls 10 Option B Menu 98 Using the 7960 MGCP or 7960 SIP 10 Rewind to the Beginning of a Message Using the 7960 SCCP 10 Default Menu 62 Internal Dial Tone 36...
- Page 144 Play Name Privacy Guard 44 Default Menu 72 Access Codes 44 Option A Menu 91 Answering Call 45 Option B Menu 108 Caller Actions 44 Moving Your Telephone 5 Entering Access Codes 45 Mute 39 Recording Name 45 Disabling 46 Enabling 46 Number/URL Mode Managing Access 46...
- Page 145 Add Forwarded Numbers 51 Call Block (Selective Call Rejection) 22 Delete Forwarded Numbers 52 Call Forward (All Calls) 26 Disable 50 Call Forward (Busy) 28 Enable 50 Call Forward (No Answer) 30 Enter Forward Number 50 Call Forward (Out of Service) 31 Identify Forwarding Destination Number 50 Call Return 33 List Forwarded Numbers 51...
- Page 146 Mute 39 Hanging Up 9 On-hook Dialing 40 Making Internal Calls 10 Permanent Caller ID Block Release 40 Using the 7960 MGCP or 7960 SIP 10 Priority Call 41 Using the 7960 SCCP 10 Add Members 41 Moving Your Telephone 5...
- Page 147 Default Menu 63 Option A Menu 82 Urgent Pager Notification Option B Menu 98 Default Menu 68 Steps (Default Menu) 63 Option A Menu 88 Steps (Option A Menu) 82 Option B Menu 104 Steps (Option B Menu) 98 Use Phone Without Replacing the Handset 17 Creating New Voice Mail Distribution Group After a Call 17 Default Menu 70...
- Page 148 Default Menu 70 Option A Menu 87 Option A Menu 89 Option B Menu 103 Option B Menu 106 Volume Pager Notification Adjusting the Volume 8 Information Received (Default Menu) 69 Ringer 8 Information Received (Option A Menu) 88 Information Received (Option B Menu) 105 Personal Greetings Web Services 14 Default Menu 67...
-
Page 149: I-10 Index
I-10 Index...