
Related Manuals for Makita GRU04


Summary of Contents for Makita GRU04
- Page 1 INSTRUCTION MANUAL MANUAL DE INSTRUCCIONES Cordless Grass Trimmer Cortador Inalámbrico de Pasto GRU04 IMPORTANT: Read Before Using. IMPORTANTE: Lea antes de usar.
- Page 2 ENGLISH (Original instructions) SPECIFICATIONS Model: GRU04 Handle type Loop handle No load speed 3: 0 - 6,000 /min (at each rotation speed level) 2: 0 - 4,600 /min 1: 0 - 4,000 /min Overall length 1,803 mm (71″) (without cutting tool and battery) Nylon cord diameter 2.0 mm (0.08″)
- Page 3 Never operate the string trimmer when tired, Always wear a helmet where there is a risk of feeling ill or under the influence of alcohol or falling objects. The protective helmet is to be drugs. checked at regular intervals for damage and is to be replaced at least every five years.
- Page 4 Do not use a cutting tool which is not recom- mended by Makita. 21. If the battery cartridge gets wet, drain the water inside and then wipe it with a dry cloth.
- Page 5 Never climb up into trees to perform cutting 26. Only use the cutting tool that are marked with operation with the tool. a speed equal or higher than the speed marked on the tool. Never work on unstable surfaces. 27. Do not touch the gear case during and imme- Remove sand, stones, nails etc.
- Page 6 Use only the manufacturer's recommended Symbols replacement parts and accessories. Inspect and maintain the tool regularly, espe- The followings show the symbols used for tool. cially before/after use. Have the tool repaired only by our authorized service center. volts Keep handles dry, clean and free from oil and grease.
- Page 7 Use of non-genuine Makita batteries, or batteries that have been altered, may result in the battery bursting causing fires, personal injury and damage. It will also void the Makita warranty for the Makita tool and charger. Tips for maintaining maximum...
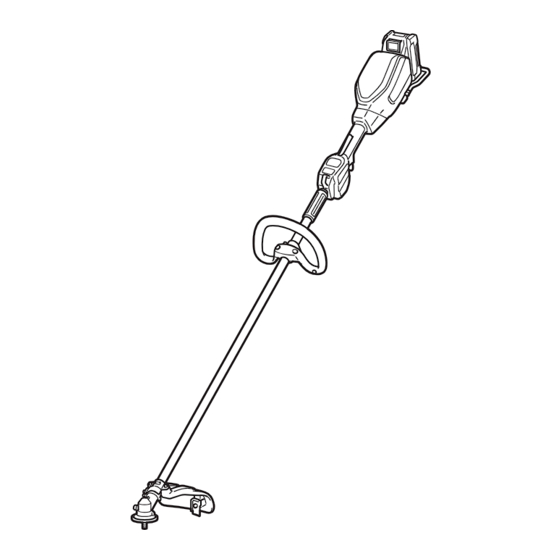
- Page 8 PARTS DESCRIPTION Speed indicator ADT indicator Caution lamp Main power button (ADT = Automatic Torque Drive Technology) Reverse button Battery cartridge Lock-off lever Switch trigger Hanger Handle Protector Shoulder harness 8 ENGLISH...
- Page 9 Tool / battery protection system FUNCTIONAL DESCRIPTION The tool is equipped with a tool/battery protection system. This system automatically cuts off power to WARNING: Always be sure that the tool is the motor to extend tool and battery life. The tool will switched off and the battery cartridge is removed automatically stop during operation if the tool is placed before adjusting or checking function on the tool.
- Page 10 Indicating the remaining battery Main power switch capacity Tap the main power button to turn on the tool. To turn off the tool, press and hold the main power Press the check button on the battery cartridge to indi- button until the speed indicator goes off. cate the remaining battery capacity.
- Page 11 To prevent the switch trigger from being accidentally Automatic Torque Drive Technology pulled, a lock-off lever is provided. To start the tool, depress the lock-off lever and pull the switch trigger. When you turn on the Automatic Torque Drive The tool speed increases by increasing pressure on the Technology (ADT), the tool runs at optimum rotation switch trigger.
- Page 12 Hex wrench storage NOTE: During the reverse rotation, the tool operates only for a short period of time and then automatically stops. NOTE: Once the tool is stopped, the rotation returns CAUTION: Be careful not to leave the hex to regular direction when you start the tool again. wrench inserted in the tool head.
- Page 13 Nylon cutting head Clasp the hook on the shoulder harness to tool's ring and hanger. NOTICE: Be sure to use genuine Makita nylon cutting head. ► 1. Nylon cutting head 2. Spindle 3. Hex wrench 4. Loosen 5. Tighten ► 1. Ring 2. Hook 3. Hanger Insert the hex wrench through the hole in the gear case to lock the spindle.
- Page 14 Use of a damaged cutting tool may result in serious be performed by Makita Authorized or Factory Service personal injury. Centers, always using Makita replacement parts.
- Page 15 Cleaning the tool Clean the tool by wiping off dust, dirt, or cut off grass with a dry cloth or one dipped in soapy water and wrung out. To avoid overheating of the tool, be sure to remove the cut off grass or debris adhered to the vent of the tool.
- Page 16 96-M10L 4 m (13 ft) 100 mm (3-15/16″) 16 ENGLISH...
- Page 17 Before asking for repairs, conduct your own inspection first. If you find a problem that is not explained in the manual, do not attempt to dismantle the tool. Instead, ask Makita Authorized Service Centers, always using Makita replace- ment parts for repairs.
- Page 18 ESPAÑOL (Instrucciones originales) ESPECIFICACIONES Modelo: GRU04 Tipo de mango Mango redondo Velocidad sin carga 3: 0 r/min - 6 000 r/min (en cada nivel de la velocidad de rotación) 2: 0 r/min - 4 600 r/min 1: 0 r/min - 4 000 r/min Longitud total 1 803 mm (71″)
- Page 19 Use la desbrozadora con extremo cuidado y atención. Opere la desbrozadora sólo si se encuentra en buena condición física. Realice todo el trabajo tranquila y cuidadosamente. Use el sentido común y tenga en cuenta que el operador o usuario es responsable de los accidentes o peligros que le ocurran a otras personas o a su propiedad.
- Page 20 Evite una puesta en marcha accidental. 14. No abra ni dañe la(s) batería(s). Los electrolitos Asegúrese de que el interruptor esté en liberados son corrosivos y pueden ocasionar la posición apagada antes de conectar el daños en los ojos o la piel. Éstos pueden ser paquete de baterías, levantar la herramienta o tóxicos si se llegan a tragar.
- Page 21 No utilice una herramienta de corte que no sea 18. No utilice las herramientas eléctricas en recomendada por Makita. atmósferas explosivas, tal como en la presen- No utilice la herramienta cuando haya mal cia de líquidos, gases o polvo inflamables.
- Page 22 26. Utilice únicamente la herramienta de corte Revise si hay sujetadores que estén sueltos o marcada con una velocidad igual o mayor a la piezas dañadas, tal como grietas en el cabezal velocidad marcada en la herramienta. de corte de nailon. 27.
- Page 23 No guarde ni utilice la herramienta y el cartucho lesiones personales y daños. Asimismo, esto inva- de batería en lugares donde la temperatura lidará la garantía de Makita para la herramienta y el pueda alcanzar o exceder los 50 °C (122 °F). cargador Makita.
- Page 24 Consejos para alargar al máximo Cargue el cartucho de batería a una tempera- tura ambiente de 10 °C - 40 °C (50 °F - 104 °F). la vida útil de la batería Si un cartucho de batería está caliente, déjelo enfriar antes de cargarlo.
- Page 25 DESCRIPCIÓN DEL PRECAUCIÓN: Introduzca siempre com- pletamente el cartucho de batería hasta que FUNCIONAMIENTO el indicador rojo no pueda verse. Si no, podría accidentalmente salirse de la herramienta y caer al suelo causando una lesión a usted o alguien a su ADVERTENCIA: Asegúrese siempre de que alrededor.
- Page 26 Protección en caso de Interruptor de alimentación principal sobredescarga Pulse el botón de encendido principal para encender la Cuando la capacidad de la batería se reduzca, la herra- herramienta. mienta se detendrá automáticamente y la luz indicadora Para apagar la herramienta, mantenga oprimido el de precaución empezará...
- Page 27 Se proporciona una palanca de desbloqueo para evitar Tecnología de accionamiento que el gatillo interruptor sea jalado accidentalmente. automático de torsión Para arrancar la herramienta, presione la palanca de desbloqueo y jale el gatillo interruptor. La velocidad de Cuando enciende la tecnología de accionamiento auto- la herramienta aumenta al incrementar la presión en mático de torsión (ADT), la herramienta funciona a una el gatillo interruptor.
- Page 28 Para invertir la rotación, pulse el botón de inversión y MONTAJE jale el gatillo interruptor mientras oprime la palanca de desbloqueo cuando la herramienta de corte se haya detenido. Los indicadores de velocidad y el indicador de ADVERTENCIA: Asegúrese siempre de que ADT comenzarán a parpadear y la herramienta de corte la herramienta esté...
- Page 29 Cabezal de corte de nailon herramienta de corte y el protector AVISO: Asegúrese de utilizar un cabezal de corte de nailon original de Makita. PRECAUCIÓN: Utilice siempre la combina- ción correcta de herramienta de corte y el protec- tor. Una combinación incorrecta podría no protegerlo de la herramienta de corte, los residuos que salgan proyectados y las piedras.
- Page 30 Makita. Si coloca el arnés para hombros incluido en el paquete de la herramienta y el arnés para hombros de la fuente de alimentación tipo mochila al mismo...
- Page 31 Para mantener la SEGURIDAD y FIABILIDAD del pro- ducto, las reparaciones, y cualquier otra tarea de man- tenimiento o ajuste deberán ser realizadas en centros de servicio autorizados o de fábrica Makita, empleando siempre repuestos Makita. Limpieza de la herramienta Limpie la herramienta quitando el polvo, la tierra o los residuos de pasto con un paño seco o un paño...
- Page 32 96-M10L 4 m (13 ft) 100 mm (3-15/16″) 32 ESPAÑOL...
- Page 33 Antes de solicitar alguna reparación, primero realice una inspección por su cuenta. Si detecta algún problema que no esté explicado en el manual, no intente desensamblar la herramienta. En vez de esto, solicite la reparación a un centro de servicio autorizado de Makita, usando siempre piezas de repuesto Makita. Estado de la anomalía Causa probable (avería)
- Page 36 Makita Corporation 3-11-8, Sumiyoshi-cho, 885904-942 Anjo, Aichi 446-8502 Japan GRU04-1 EN, ESMX www.makita.com 20210421...