
Related Manuals for Makita GRU02


Summary of Contents for Makita GRU02
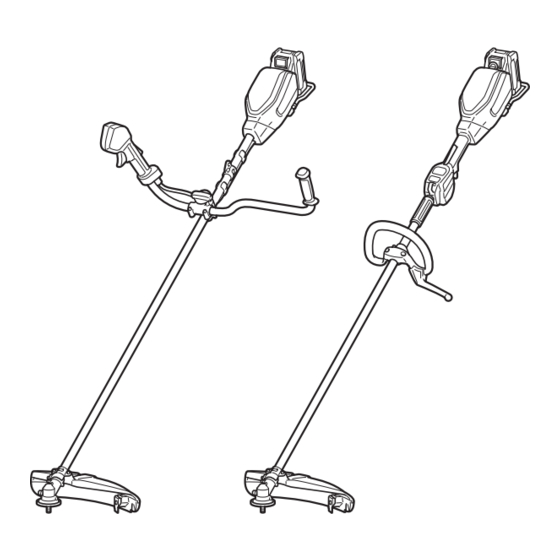
- Page 1 INSTRUCTION MANUAL MANUAL DE INSTRUCCIONES Cordless Grass Trimmer Cortador Inalámbrico de Pasto GRU02 GRU03 IMPORTANT: Read Before Using. IMPORTANTE: Lea antes de usar.
-
Page 2: Specifications
ENGLISH (Original instructions) SPECIFICATIONS Model: GRU02 GRU03 Handle type Bike handle Loop handle No load speed 3: 0 - 7,000 /min (at each rotation speed level) 2: 0 - 5,500 /min 1: 0 - 4,600 /min Overall length 1,815 mm (71-1/2″) - Page 3 Use the tool with the utmost care and attention. Always wear a helmet where there is a risk of falling objects. The protective helmet is to be Operate the tool only if you are in good physical checked at regular intervals for damage and condition.
- Page 4 Do not use a cutting tool which is not recom- the battery and store it in a dry place. mended by Makita. 21. If the battery cartridge gets wet, drain the Do not operate the tool in bad weather or if water inside and then wipe it with a dry cloth.
- Page 5 Never work on unstable surfaces. 26. Always keep your hands, face, and clothes away from the cutting tool when it is rotating. Remove sand, stones, nails etc. found within Failure to do so may cause personal injury. the working range. Foreign particles may dam- age the cutting tool.
- Page 6 Never apply the segment between 12 and 2 o’clock. 10. Do not wash the tool with high pressure water. Never apply the segment between 11 and 12 When washing the tool, do not let water enter o’clock and between 2 and 5 o’clock, unless the electrical mechanism such as battery, the operator is well trained and experienced motor, and terminals.
- Page 7 It will Do not expose battery cartridge to water also void the Makita warranty for the Makita tool and or rain. charger. A battery short can cause a large current...
-
Page 8: Parts Description
PARTS DESCRIPTION GRU03 GRU02 Speed indicator ADT indicator Caution lamp Main power button (ADT = Automatic Torque Drive Technology) Reverse button Battery cartridge Lock-off lever Switch trigger Hanger Handle Barrier (country specific) Protector Protector extension (for Shoulder harness nylon cutting head) -
Page 9: Functional Description
Tool / battery protection system FUNCTIONAL DESCRIPTION The tool is equipped with a tool/battery protection system. This system automatically cuts off power to WARNING: Always be sure that the tool is the motor to extend tool and battery life. The tool will switched off and the battery cartridge is removed automatically stop during operation if the tool is placed before adjusting or checking function on the tool. -
Page 10: Main Power Switch
Indicating the remaining battery Main power switch capacity Tap the main power button to turn on the tool. To turn off the tool, press and hold the main power Press the check button on the battery cartridge to indi- button until the speed indicator goes off. cate the remaining battery capacity. - Page 11 To start the tool, depress the lock-off lever and pull the switch trigger. The tool speed increases by increasing pressure on the switch trigger. Release the switch trigger to stop. GRU02 ► 1. Speed indicator 2. Main power button Speed indicator Mode...
-
Page 12: Electronic Function
Installing the handle For GRU02 Insert the shaft of the handle into the grip. Align the screw hole in the grip with the one in the shaft. - Page 13 It may cause injury and/or damage to the tool. When not in use, store the hex wrench as illustrated to keep it from being lost. GRU02 ► 1. Knob For GRU03 Attach the upper and lower clamps on the damper.
- Page 14 GRU03 Installing the protector WARNING: Never use the tool without the guard or with the guard improperly installed. Failure to do so can cause serious personal injury. NOTE: The type of the protector supplied as the stan- dard accessory varies depending on the countries. For cutter blade Attach the protector to the clamp using bolts.
-
Page 15: Cutter Blade
To remove the protector extension from the protec- Put the blade cover on the cutter blade. tor, unclasp the clips by inserting the hex wrench as 2-tooth blade illustrated. ► 1. Hex wrench 2. Clip Installing the cutting tool 3-tooth blade CAUTION: Always use the supplied wrenches to remove or to install the cutting tool. -
Page 16: Nylon Cutting Head
To remove the cutter blade, follow the installation proce- dures in reverse. Nylon cutting head NOTICE: Be sure to use genuine Makita nylon cutting head. ► 1. Nut 2. Cup 3. Clamp washer 4. Cutter blade 5. Spindle 6. Receive washer 7. Hex wrench ►... - Page 17 Makita. If you put on the shoulder harness included in the tool package and the shoulder harness of the back-...
- Page 18 Also, arrange a person to observe the distance between operators. If someone or an animal enters the For GRU02 only working area, immediately stop the operation. For more comfortable handling of the tool, you can change the hanger position.
-
Page 19: Maintenance
Discoloration, deformation or cracks may result. To maintain product SAFETY and RELIABILITY, repairs, any other maintenance or adjustment should be performed by Makita Authorized or Factory Service Centers, always using Makita replacement parts. GRU03 Cleaning the tool... - Page 20 96-M10L 4 m (13 ft) 100 mm (3-15/16″) 20 ENGLISH...
-
Page 21: Troubleshooting
Before asking for repairs, conduct your own inspection first. If you find a problem that is not explained in the manual, do not attempt to dismantle the tool. Instead, ask Makita Authorized Service Centers, always using Makita replace- ment parts for repairs. -
Page 22: Especificaciones
ESPAÑOL (Instrucciones originales) ESPECIFICACIONES Modelo: GRU02 GRU03 Tipo de mango Mango tipo bicicleta Mango redondo Velocidad sin carga 3: 0 r/min - 7 000 r/min (en cada nivel de la velocidad de rotación) 2: 0 r/min - 5 500 r/min... -
Page 23: Advertencias De Seguridad
10. Manténgase alerta - Preste atención a lo que ADVERTENCIAS DE está haciendo. Utilice el sentido común. No utilice el aparato cuando esté cansado. SEGURIDAD Almacene los aparatos que no use en interiores. Instrucciones importantes de 12. Mantenga los dedos alejados del gatillo inte- rruptor cuando no opere la herramienta y seguridad cuando pase de una posición de operación a... - Page 24 En condiciones de mal uso, podría escapar líquido de la batería; evite el contacto. Si toca el líquido accidentalmente, enjuague con agua. Si hay contacto del líquido con los ojos, soli- cite atención médica. El líquido expulsado de la batería puede causar irritación o quemaduras. No utilice un paquete de baterías o una herra- mienta que esté...
- Page 25 Las No utilice una herramienta de corte que no sea herramientas eléctricas crean chispas que pueden recomendada por Makita. prender fuego al polvo o los humos. 25 ESPAÑOL...
- Page 26 19. Tome un descanso para evitar la pérdida de Retroceso brusco (propulsión de la cuchilla) control a causa de la fatiga. Recomendamos El retroceso brusco (propulsión de la cuchilla) tomar de 10 minutos a 20 minutos de descanso puede ocurrir cuando la cuchilla al estar girando cada hora.
- Page 27 Nunca utilice las cuchillas de corte cerca de 14. Después de utilizar la herramienta, quite la objetos duros tales como cercas, paredes, suciedad adherida y séquela completamente troncos de árboles y piedras. antes de guardarla. Dependiendo de la estación o de la zona, existe el riesgo de un mal funciona- Nunca utilice las cuchillas de corte vertical- miento por congelación.
- Page 28 Asimismo, esto inva- ya no sirva en absoluto. El cartucho de batería lidará la garantía de Makita para la herramienta y el puede explotar si se tira al fuego. cargador Makita.
-
Page 29: Descripción De Las Piezas
DESCRIPCIÓN DE LAS PIEZAS GRU03 GRU02 Indicador de velocidad Indicador de ADT Luz indicadora de Botón de encendido (ADT = Automatic precaución principal Torque Drive Technology (Tecnología de acciona- miento automático de torsión)) Botón de inversión Cartucho de batería Palanca de desbloqueo... -
Page 30: Descripción Del Funcionamiento
DESCRIPCIÓN DEL PRECAUCIÓN: Introduzca siempre com- pletamente el cartucho de batería hasta que FUNCIONAMIENTO el indicador rojo no pueda verse. Si no, podría accidentalmente salirse de la herramienta y caer al suelo causando una lesión a usted o alguien a su ADVERTENCIA: Asegúrese siempre de que alrededor. - Page 31 Protección en caso de Interruptor de alimentación principal sobredescarga Pulse el botón de encendido principal para encender la Cuando la capacidad de la batería se reduzca, la herra- herramienta. mienta se detendrá automáticamente y la luz indicadora Para apagar la herramienta, mantenga oprimido el de precaución empezará...
-
Page 32: Ajuste De Velocidad
Para detenerla, suelte el gatillo cidad cambiará. interruptor. GRU02 ► 1. Indicador de velocidad 2. Botón de encendido principal ► 1. Palanca de desbloqueo 2. Gatillo interruptor... -
Page 33: Montaje
NOTA: Durante la rotación inversa, la herramienta sólo funcionará durante un breve lapso de tiempo y luego se detendrá automáticamente. NOTA: Una vez que se haya detenido la herramienta, la rotación regresará a la dirección normal cuando ponga nuevamente en marcha la herramienta. NOTA: Si pulsa el botón de inversión mientras la herramienta de corte está... -
Page 34: Instalación Del Mango
Instalación del mango Coloque las abrazaderas superior e inferior en el amortiguador. Para el modelo GRU02 Ponga el mango en la abrazadera superior y ase- Inserte el eje del mango en la empuñadura. Alinee gúrelo con el perno de cabeza hueca hexagonal, como el orificio del tornillo en la empuñadura con el del eje. -
Page 35: Instalación Del Protector
Combinación correcta de la lugar tal como se muestra en la ilustración para evitar herramienta de corte y el protector que se pierda. GRU02 PRECAUCIÓN: Utilice siempre la combina- ción correcta de herramienta de corte y el protec- tor. Una combinación incorrecta podría no protegerlo de la herramienta de corte, los residuos que salgan proyectados y las piedras. -
Page 36: Cuchilla De Corte
Para el cabezal de corte de nailon NOTA: El tipo de herramienta(s) de corte suminis- trado como el aditamento estándar varía depen- PRECAUCIÓN: Tenga cuidado de no las- diendo de cada país. La herramienta de corte no se timarse con la cortadora al cortar el cordón de incluye en algunos países. - Page 37 Cabezal de corte de nailon AVISO: Asegúrese de utilizar un cabezal de corte de nailon original de Makita. ► 1. Tuerca 2. Cono 3. Arandela de la abrazadera 4. Cuchilla de corte 5. Eje 6. Arandela receptora 7. Llave hexagonal...
-
Page 38: Operación
Makita. Si coloca el arnés para hombros incluido en el paquete de la herramienta y el arnés para hombros de la fuente de alimentación tipo mochila al mismo... - Page 39 Ajuste de la posición del colgador Abroche el gancho del arnés para hombro en el anillo y el colgador de la herramienta. Para el modelo GRU02 solamente Para una manipulación más cómoda de la herramienta, puede cambiar la posición del colgador.
-
Page 40: Mantenimiento
AVISO: La alimentación por golpe no funcionará correctamente si el cabezal de corte de nailon no GRU02 se encuentra girando. NOTA: Si la alimentación del cordón de nailon no ocurre al golpear ligeramente el cabezal, rebobine/ reemplace el cordón de nailon siguiendo los procedi- mientos en la sección para mantenimiento. -
Page 41: Limpieza De La Herramienta
Para mantener la SEGURIDAD y FIABILIDAD del pro- ducto, las reparaciones, y cualquier otra tarea de man- tenimiento o ajuste deberán ser realizadas en centros de servicio autorizados o de fábrica Makita, empleando siempre repuestos Makita. Limpieza de la herramienta Limpie la herramienta quitando el polvo, la tierra o los residuos de pasto con un paño seco o un paño... - Page 42 96-M10L 4 m (13 ft) 100 mm (3-15/16″) 42 ESPAÑOL...
-
Page 43: Resolución De Problemas
Antes de solicitar alguna reparación, primero realice una inspección por su cuenta. Si detecta algún problema que no esté explicado en el manual, no intente desensamblar la herramienta. En vez de esto, solicite la reparación a un centro de servicio autorizado de Makita, usando siempre piezas de repuesto Makita. Estado de la anomalía Causa probable (avería) - Page 44 Makita Corporation 3-11-8, Sumiyoshi-cho, 885901-948 Anjo, Aichi 446-8502 Japan GRU02-1 EN, ESMX www.makita.com 20210421...