Advertisement
Package contents

NOTE: You can power up the WAX630E by connecting it to a PoE++ switch or power adapter. Model WAX630EP includes a power adapter, or you can purchase one separately.
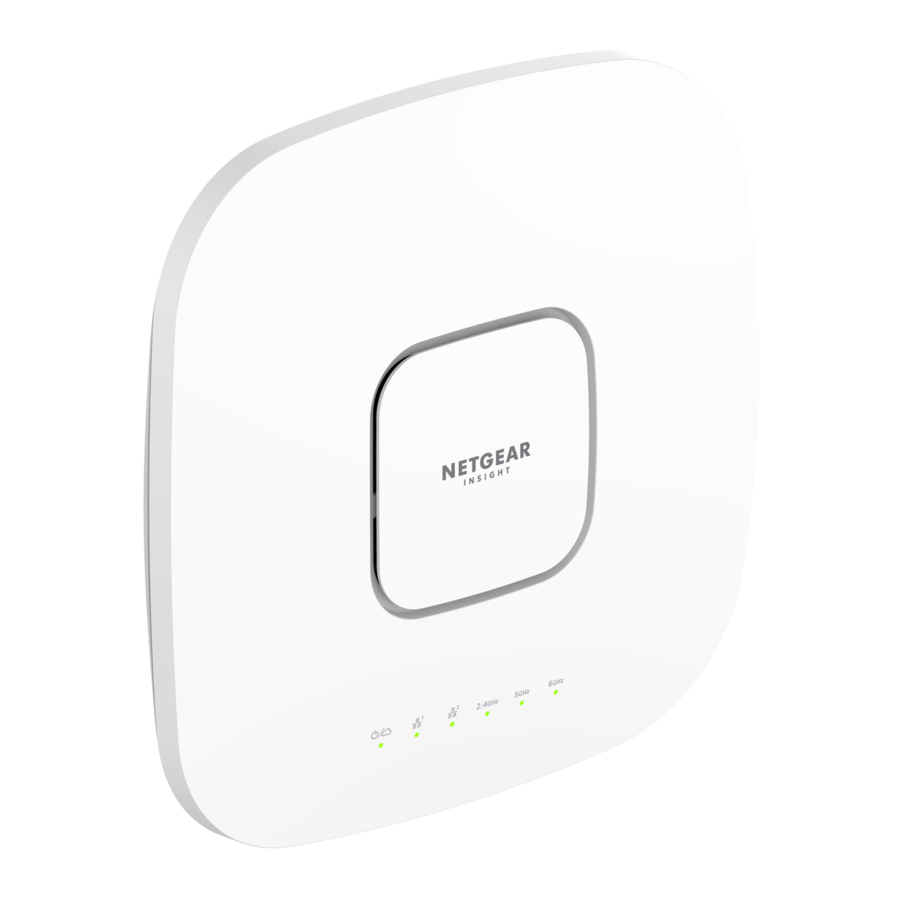
Overview

- Power/Cloud LED
- LAN 1 LED
- LAN 2 LED
- 2.4 GHz WLAN LED
- 5 GHz WLAN LED
- 6 GHz WLAN LED
- LAN 2 port
- LAN 1/PoE++ port
- Reset button
- DC power connector

Terms of Use
This device must be professionally installed. It is the installer's responsibility to follow local country regulations including operations within legal frequency channels, output power and DFS requirements. Vendor or Reseller or Distributor is not responsible for illegal wireless operations. Please see Device's Terms and Conditions for more details.
Connect to power and Internet
Power up the WAX630E access point (AP) by attaching a power adapter, or by connecting the LAN 1/PoE++ port to a PoE++ switch that supplies 802.3bt power (60W PoE++ per port).
Make sure that the AP has Internet connectivity:
- If you connect the AP to a switch, make sure that the switch has Internet connectivity.
- If you use a power adapter to provide power, use an Ethernet cable to connect the LAN 1/PoE++ port on the AP to a router or other network device on a network with Internet connectivity.
Sample connections for a NETGEAR Insight setup

Sample connections for a standalone setup

If connected to 2.5 Gbps equipment, the WAX630E LAN 1/PoE++ port supports Ethernet speeds up to 2.5 Gbps within your LAN. The preceding figures show a NETGEAR MS510TXUP switch, which supports speeds of 2.5 Gbps and higher, as well as PoE++. If your Internet connection, modem, router, and switch support a speed of 2.5 Gbps, the AP's Internet connection also functions at 2.5 Gbps. Otherwise, the Internet connection functions at 1 Gbps, which is a common speed.
![]() NOTE: The AP receives an IP address from a DHCP server (or a router that functions as a DHCP server) in your network. If your network does not include a DHCP server, the AP uses its default IP address: 192.168.0.100.
NOTE: The AP receives an IP address from a DHCP server (or a router that functions as a DHCP server) in your network. If your network does not include a DHCP server, the AP uses its default IP address: 192.168.0.100.
After starting up and during setup, the AP's LEDs can light in these colors:
| Power/Cloud |  | Slow blinking amber: The AP is starting, the firmware is being upgraded, or the AP is trying to get an IP address. |
 | Solid green: The AP started up, and functions either as a standalone AP or as an Insight‑discovered AP that is not currently connected to the Insight cloud. | |
 | Solid blue: The AP functions in Insight mode and is connected to the Insight cloud. | |
| LAN 1 (one of two speed options) |  | Solid green: The LAN 1 port detects a speed of 2.5 Gbps. |
 | Solid amber: The LAN 1 port detects a speed of less than 2.5 Gbps, such as 1 Gbps (which is a common speed). | |
| LAN 2 (one of two speed options) | | Solid green: The LAN 2 port detects a speed of 1 Gbps. |
 | Solid amber: The LAN 2 port detects a speed of 100 or 10 Mbps. | |
| 2.4 GHz WLAN 5 GHz WLAN 6 GHz WLAN |  | Solid green: The radio is operating without clients. |
 | Solid blue: The radio has at least one connected client. | |
 | Blinking blue: The radio is processing traffic. |
For more information about the LEDs, see the user manual, which you can download by visiting netgear.com/support/download.
Configure and manage the AP
To configure and manage the AP, use one of the methods described in the following table.
| A. | Remotely | Cloud/remote mode | NETGEAR Insight Cloud Portal See Configure the AP with the NETGEAR Insight Cloud Portal |
| B. | Remotely | Cloud/remote mode | NETGEAR Insight app See Configure the AP with the NETGEAR Insight app |
| C. | Locally | Standalone mode | Web browser See Configure the AP as standalone in a web browser |
Insight remote management offers additional features and add‑on services that are not available in standalone mode. Your new Insight‑manageable device comes with Insight included. For more information, visit the following pages:
- https://www.netgear.com/business/services/insight/subscription/
- https://kb.netgear.com/000061848/How-do-I-use-NETGEAR-s-one-year-of-Insight-included-subscription
Configure the AP with the NETGEAR Insight Cloud Portal
- Make sure that the AP is connected to the Internet.
- On a computer or tablet, visit https://insight.netgear.com/.
- Enter the email address and password for your NETGEAR account and click the NETGEAR Sign In button.
If you do not already have a NETGEAR account, you can create an account now. - If you are an Insight Pro user, select the organization to which you want to add the AP.
- Click the + (Add Device) button at the top right of the page, and from the pop‑up menu, select Add Single Device.
NOTE: You can also add multiple devices by uploading a device list as a CSV file. If you are an Insight Pro user, all APs will be added to the organization that you selected in the previous step. - In the Add New Device pop‑up page, select the Insight network location to which the AP must be added, enter the AP's serial number, and then click Go.
- After Insight verifies that the AP is a valid product, you can optionally change the device name of the AP, and then click Next.
After the AP is successfully added to the portal and detected over the Internet, a page displays a confirmation that setup is in progress.
NOTE: If the AP is online but Insight does not detect the AP, the firewall at the physical location where the AP is located might prevent communication with the Insight cloud. In that situation, add port and DNS entries for outbound access to the firewall. For more information, see https://kb.netgear.com/000062467/Ports‑and‑DNS‑records‑for‑connection‑to‑Insight‑cloud.
The AP automatically updates to the latest Insight firmware and Insight location configuration. This might take up to 10 minutes, during which time the AP will restart.
The AP is now an Insight‑managed device that is connected to the Insight cloud‑based management platform. If the Power/Cloud LED was solid green, it now lights solid blue.
- Use the Insight Cloud portal or Insight app to configure and manage the AP.
Configure the AP with the NETGEAR Insight app
- Connect your mobile device to the AP's setup SSID (WiFi network name).
The setup SSID is on the AP label on the bottom of the AP and is shown in the format NETGEARxxxxxx‑SETUP, where xxxxxx are the last six digits of the AP's MAC address. The default WiFi passphrase is sharedsecret. - Open the NETGEAR Insight app.
If you do not already have a NETGEAR account, you can create an account now. - Enter the email address and password for your account and tap LOG IN.
- Select an existing network location, or, to create a new network location, tap the Next button, and then tap OK.
The device admin password that you entered for the new network location replaces the existing admin password on all devices that you add to the network location.
In most situations, Insight detects the AP automatically, which can take several minutes. - To add the AP to your network location, do one of the following:
- If the AP is automatically detected and listed in the Insight Manageable Devices section, tap the AP icon, and then tap the ADD DEVICE button.
- If the AP is not automatically detected, or you prefer to use another method to add the AP, tap the + icon in the top bar, and do one of the following:
- Tap the SCAN BARCODE OR QR CODE button, and then scan the AP's code.
- Tap the Enter Serial Number link, and then manually enter the AP's serial number.
- If prompted, name the AP and tap the Next button.
The AP automatically updates to the latest Insight firmware and Insight location configuration. This might take up to 10 minutes, during which time the AP will restart.
The AP is now an Insight‑managed device that is connected to the Insight cloud‑based management platform. If the Power/Cloud LED was solid green, it now lights solid blue. - Use the Insight app or Insight Cloud portal to configure and manage the AP.
Configure the AP as standalone in a web browser
Use this method if you want to operate the AP in standalone mode.
- Connect your computer or mobile device to the AP's setup SSID (WiFi network name).
The setup SSID is on the AP label on the bottom of the AP and is shown in the format NETGEARxxxxxx‑SETUP, where xxxxxx are the last six digits of the AP's MAC address. The default WiFi passphrase is sharedsecret. - On your computer, launch a web browser and, in the address bar, enter aplogin.net.
Your browser might display a security warning because of the self-signed certificate on the AP, which is expected behavior. You can proceed, or add an exception for the security warning. For more information, see https://kb.netgear.com/000062980/. - Enter the AP user name and default password. The user name is admin. The default password is password. The user name and password are case‑sensitive.
- Select the Web-browser (Local) radio button.
The Day Zero Easy Setup page displays. - Follow the instructions on the Day Zero Easy Setup page, and then click the Apply button.
We recommend that you make a note of the new admin password, SSID (WiFi network name), WiFi passphrase, and IP address to keep in a safe place.
A message displays to indicate that your settings are being applied. - If the WiFi connection of your computer or mobile is terminated, reconnect to the AP using the new SSID and WiFi passphrase that you set on the Day Zero Easy Setup page.
- When the login page displays, you can log in to the AP using your new admin password to configure the AP.
For information about configuring the AP, see the user manual, which you can download by visiting netgear.com/support/download.
We recommend that you register your AP with Netgear. - To register your AP with NETGEAR:
- From a computer or mobile device that is connected to the Internet, visit my.netgear.com.
- Log in to your NETGEAR account.
If you do not already have a NETGEAR account, you can create an account now.
The My Products page displays. - From the menu on the left, select Register a Product.
- In the Serial Number field, type the serial number of your AP.
The serial number is 13 digits long. It is printed on the AP label. - From the Date of Purchase menu, select the date that you purchased the AP.
- Click the REGISTER button.
Your AP is registered to your NETGEAR account.
A confirmation email is sent to your NETGEAR account email address.
Mounting options
You can mount the AP to a wall or to a ceiling with either a 15/16 in. (24 mm) or 9/16 in. (15 mm) T-bar, or you can install the AP freestanding on a flat surface.
We recommend that you use a flat Ethernet cable so that the cable fits in the narrow space between the AP and the surface on which it is mounted or placed.
Before you mount the AP, first set up and test the AP to verify WiFi network connectivity.
Mount the AP on a wall
Make sure that the wall is not damaged. For example, water damage can destroy a drywall.

- Place the mounting plate on the wall.
- Mark the wall where the mounting holes are.
- Using a 3/16 in. (4.7mm) drill bit, drill holes in the wall.
- Tap each anchor into the wall with a soft mallet until the anchors are flush with the wall.
- Use the screws to attach the mounting plate to the wall.
NOTE: Do not insert the screws into the wall without anchors.
- Connect any cables.
- Attach the AP to the mounting plate.

- Twist the AP clockwise to lock it onto the mounting plate.


Mounting the AP to a T-bar

- Slide the T‑bar partially into the metal bracket.
- Attach the metal bracket to the ceiling bar.
- Push the T‑bar over the ceiling bar.
- Use the lock screw to lock the metal bracket into place.
- Use the four short screws to attach the mounting plate to the T‑bar.
- Connect a PoE cable or power adapter to the AP before mounting.
The AP is designed to be unobtrusive, so it sits flat on the ceiling surface when it is mounted. - Hold the AP upside down and attach it to the mounting plate.


- Twist the access point clockwise to lock it onto the mounting plate.


Unmount the AP
Make sure you hold the AP so that it does not drop when you release it from the mounting plate.
- To find the locking latch, place your thumb on the center of the LEDs, and your finger on the other side of the device, directly opposite the thumb.
- Press and hold the latch down to release the lock and keep the lock open.


- Turn the AP counterclockwise until the AP releases from the mounting plate.
The mounting plate remains attached to the T‑bar or the wall.


Support and Community
Visit netgear.com/support to get your questions answered and access the latest downloads.
You can also check out our NETGEAR Community for helpful advice at community.netgear.com.
Regulatory and Legal
(If this product is sold in Canada, you can access this document in Canadian French at https://www.netgear.com/support/download/.)
For regulatory compliance information including the EU Declaration of Conformity, visit https://www.netgear.com/about/regulatory/.
See the regulatory compliance document before connecting the power supply.
For NETGEAR's Privacy Policy, visit https://www.netgear.com/about/privacy‑policy.
By using this device, you are agreeing to NETGEAR's Terms and Conditions at https://www.netgear.com/about/terms‑and‑conditions. If you do not agree, return the device to your place of purchase within your return period.
Do not use this device outdoors. The PoE source is intended for intra building connection only.
Applicable to 6 GHz devices only: Only use the device indoors. The operation of 6 GHz devices is prohibited on oil platforms, cars, trains, boats, and aircraft, except that operation of this device is permitted in large aircraft while flying above 10,000 feet. Operation of transmitters in the 5.925‑7.125 GHz band is prohibited for control of or communications with unmanned aircraft systems.

Documents / Resources
References
Which domains and ports should I open on my firewall for my Insight Managed devices? | Answer | NETGEAR Support
Download Center | Downloads and Documentation | NETGEAR
NETGEAR Insight Subscription | NETGEAR
How do I use NETGEAR's one year of Insight included subscription? | Answer | NETGEAR Support
Insight Cloud Portal
Access Point Login
What do I do if I my browser displays a security message? | Answer | NETGEAR Support
![my.netgear.com]() NETGEAR - Common Account Management
NETGEAR - Common Account ManagementNETGEAR Support | NETGEAR
English - NETGEAR Communities
Download Center | Downloads and Documentation | NETGEAR
Regulatory | NETGEAR
Download manual
Here you can download full pdf version of manual, it may contain additional safety instructions, warranty information, FCC rules, etc.
Advertisement
Thank you! Your question has been received!


Need Assistance?
Do you have a question about the WAX630E that isn't answered in the manual? Leave your question here.