
Related Manuals for Makita XCV17


Summary of Contents for Makita XCV17
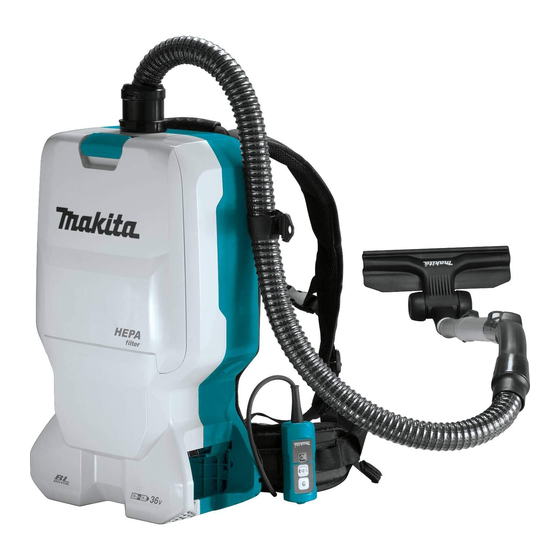
- Page 1 INSTRUCTION MANUAL MANUAL DE INSTRUCCIONES Cordless Backpack Vacuum Cleaner Aspiradora de mochila a batería XCV17 Read before use. Lea antes de usar.
-
Page 2: Specifications
ENGLISH (Original instructions) SPECIFICATIONS Model: XCV17 Capacity Filter bag 6.0 L (1.6 gal.) Dust bag 5.5 L (1.5 gal.) Maximum air volume With hose ø28 mm (1-1/8″) x 2.0 m /min (70.6 cu.ft/min) 1.0 m (39-3/8″) With hose ø32 mm (1-1/4″) x 2.2 m... - Page 3 Do not handle appliance with wet When battery pack is not in use, hands. keep it away from other metal objects, like paper clips, coins, Do not put any object into open- keys, nails, screws or other small ings. Do not use with any opening metal objects, that can make a blocked;...
-
Page 4: Additional Safety Rules
ADDITIONAL NOTE: Read the OSHA regulation on silica dust to understand the requirements needed to reduce SAFETY RULES exposure to silica dust at the job- site. Specific rules apply to the drill- Read this instruction manual and ing, demolition cutting and grinding the charger instruction manual care- materials that contain silica. - Page 5 Under abusive conditions, liquid Important safety may be ejected from the battery; avoid contact. If contact acciden- instructions for tally occurs, flush with water. If liq- uid contacts eyes, additionally seek battery cartridge medical help. Liquid ejected from the battery may cause irritation or burns. Before using battery cartridge, read Do not use a battery pack or appli- all instructions and cautionary mark-...
-
Page 6: Functional Description
Use of non-genuine Makita batteries, or batteries that have been altered, may result in the battery bursting causing fires, personal injury and damage. It will also void the Makita warranty for the Makita tool and charger. ► 1. Red indicator 2. Button 3. Battery cartridge... -
Page 7: Overload Protection
Press the check button on the battery cartridge to indi- Appliance / battery protection system cate the remaining battery capacity. The indicator lamps light up for a few seconds. The appliance is equipped with a appliance / battery protec- tion system. This system automatically cuts off power to the Indicator lamps Remaining motor to extend appliance and battery life. -
Page 8: Adjusting Belts
Adjusting belts Carrying hook The tightness of the shoulder belts, upper and lower Always grab the carrying hook when handling the vac- belts can be adjusted. Put your arms through the shoul- uum cleaner body. der belts first then fasten the lower and upper belts. To tighten, pull the end of the strap as illustrated. -
Page 9: Led Light
The loop on the lower belt can be used for carrying LED light nozzles as illustrated. LED light is installed in the head of the switch box to ease the operations in dark places. Press button to turn the light on. To turn off, press button again. - Page 10 Dust beating system Assembling nozzle and wand Dust goes down when you pull the lever or walk with Optional accessory wearing the cleaner. This system helps the cleaner NOTE: The type of the nozzle and wand included in maintaining the suction power. the product varies depending on countries.
- Page 11 Follow the procedures below, depending on the For the ring-type extension wand type of the extension wand : Shoulder the vacuum cleaner body then twist and insert the extension wand into the bent pipe assembly. To NOTE: The slide-type extension wand and the ring- disconnect, twist and extract it.
-
Page 12: Connecting The Tool
For the aluminum bending pipe / aluminum straight Connecting the tool pipe (Only for the model with ø38 mm hose and front cuff 38) NOTE: If the bent pipe assembly is attached to the Shoulder the vacuum cleaner body then twist and insert hose, remove it beforehand. - Page 13 When using ø38 mm hose with front cuff 38 Twist and insert the joint or the front cuff to the inlet part on the hose, depending on the tool that you are going to connect. Connect the front cuff to the tool's extraction outlet.
- Page 14 ► 1. Hose 2. Bent pipe assembly 3. Sleeve Installing filter bag / dust bag Optional accessory CAUTION: Do not use a damaged filter bag. Always use the vacuum cleaner with the filter bag properly installed. Otherwise the vacuumed dust or particles may be exhausted from the cleaner and they may cause respiratory disease to the operator.
-
Page 15: Operation
Insert the filter bag into the slit on the upper side of Align the hole of the filter bag with the hose cuff the room as illustrated. and push the cardboard portion to the end. Make sure that the rubber ring on the filter bag goes over the rim on the hose cuff. - Page 16 Shoulder the vacuum cleaner body and fas- Replace the filter bag when it becomes full. Open ten upper and lower belts. Adjust the tightness as the lid and take out the filter bag. Pull the strip on the necessary. side of the opening to shut the filter bag and dispose of the filter bag in whole.
-
Page 17: Maintenance
Discoloration, deformation or cracks may result. To maintain product SAFETY and RELIABILITY, repairs, any other maintenance or adjustment should be performed by Makita Authorized or Factory Service Centers, always using Makita replacement parts. Cleaning the HEPA filter CAUTION:... -
Page 18: Removing The Board
Cleaning the room for filter bag/ NOTICE: Wet dust bag lowers the vacuuming per- formance as well as the life of the motor. dust bag Cleaning the clog When cleaning the room for filter bag/dust bag, remove and wipe the board inside. When cleaning the clog, remove the hose or the exten- sion wand, or the bent pipe assembly to check inside. -
Page 19: Optional Accessories
ACCESSORIES CAUTION: These accessories or attachments are recommended for use with your Makita prod- uct specified in this manual. The use of any other accessories or attachments might present a risk of injury to persons. Only use accessory or attachment for its stated purpose. -
Page 20: Especificaciones
ESPAÑOL (Instrucciones originales) ESPECIFICACIONES Modelo: XCV17 Capacidad Bolsa del filtro 6,0 L (1,6 gal.) Bolsa recolectora de polvo 5,5 L (1,5 gal.) Volumen de aire máximo Con manguera con ø28 mm 2,0 m /min (70,6 cu.ft/min) (1-1/8″) x 1,0 m (39-3/8″) Con manguera con ø32 mm... - Page 21 No lo utilice con una batería dañada. Si Use los aparatos únicamente con el aparato no está funcionando como los paquetes de baterías designa- debiera, se ha dejado caer, se ha dañado, dos específicamente para ellos. El se ha dejado a la intemperie o ha caído uso de otros paquetes de baterías sobre agua, llévelo a un centro de servicio.
-
Page 22: Reglas De Seguridad Adicionales
No modifique ni intente reparar el Sustancias que causan sínto- • aparato ni el paquete de baterías mas tóxicos salvo como se indique en las ins- Productos químicos agresivos • trucciones para el uso y cuidado. (ácidos, lixiviados, etc.) Basura líquida o húmeda, inclu- GUARDE ESTAS •... - Page 23 Los niños deben supervisarse para No utilice un paquete de baterías asegurar que ellos no empleen los o aparato que esté dañado o haya aparatos como juguete. sido modificado. Las baterías daña- das o modificadas podrían com- Uso y cuidado de la herramienta portarse de manera impredecible a batería causando un incendio, explosión o...
- Page 24 PRECAUCIÓN: Utilice únicamente baterías ori- No exponga el cartucho de bate- ginales de Makita. El uso de baterías no originales de ría al agua o la lluvia. Makita, o de baterías alteradas, puede ocasionar que las baterías exploten causando un incendio, lesiones perso- Un cortocircuito en la batería puede...
-
Page 25: Descripción Del Funcionamiento
Sistema de protección del aparato/ DESCRIPCIÓN DEL batería FUNCIONAMIENTO El aparato está equipado con un sistema de protección del aparato/batería. Este sistema corta automática- PRECAUCIÓN: Asegúrese siempre de que mente la alimentación al motor para prolongar la vida el aparato esté apagado y que el cartucho de la del aparato y la batería. - Page 26 Indicación de la capacidad restante Posición de la caja del interruptor de la batería La caja del interruptor puede engancharse en cual- quiera de los lados de la correa inferior. Coloque el Únicamente para cartuchos de batería con el cable de manera que la caja del interruptor quede del indicador lado que desee.
- Page 27 Correas para hombro Accionamiento del interruptor La potencia de succión puede cambiarse a tres niveles: normal (1), alto (2) y máximo (3). Para comenzar a aspirar, oprima el botón una vez. Para cambiar la potencia de succión, pulse el botón mientras la aspiradora está...
-
Page 28: Montaje
Abrazadera de la manguera Sistema para sacudir polvo La abrazadera de la manguera puede utilizarse para El polvo baja cuando tira de la palanca o camina mien- sujetar la manguera o la boquilla amplia. tras lleva puesta la aspiradora. Este sistema ayuda a la Para fijar la manguera al cuerpo de la aspiradora, pase aspiradora a mantener la potencia de succión. - Page 29 Siga los procedimientos a continuación depen- Ensamble de la manguera diendo del tipo de tubo de extensión: NOTA: El tubo de extensión de tipo corredera y el Inserte la boca de la manguera en el cuerpo de la aspi- tubo de extensión de tipo anillo no son compatibles radora y gírela en el sentido de las manecillas del reloj.
- Page 30 Para el tubo de extensión de tipo anillo Para el tubo curvo/recto de aluminio Cárguese al hombro el cuerpo de la aspiradora y a (Solo para el modelo con manguera de ø38 mm y boca continuación inserte girando el tubo de extensión en el delantera 38) conjunto de tubo curvo.
-
Page 31: Conexión De La Herramienta
Conexión de la herramienta NOTA: Si el conjunto de tubo curvo está acoplado a la manguera, extráigalo primero. Para conectar una herramienta a la aspiradora, hacen falta la manguera especificada y/o accesorios adiciona- les. Dependiendo del modelo de aspiradora, necesitará reemplazar la manguera y/o preparar los accesorios adicionales. - Page 32 Al utilizar manguera de ø38 mm con boca delantera 38 Inserte girando la junta o la boca delantera a la pieza de entrada de la manguera, dependiendo de la herramienta que se vaya a conectar. Conecte la boca delantera a la salida de extrac- ción de la herramienta.
- Page 33 Inserte la bolsa del filtro en la hendidura en la parte superior del compartimiento tal como se ilustra. ► 1. Hendidura 2. Bolsa del filtro Desbloquee la aldabilla levantando la parte infe- Cuando utilice la bolsa recolectora de polvo, inserte su rior.
-
Page 34: Operación
Alinee el orificio de la bolsa del filtro con la boca Cargue en su hombro el cuerpo de la aspiradora de la manguera y empuje la parte de cartón hasta el y fije las correas superior e inferior. Ajuste lo apretado tope. -
Page 35: Limpieza Del Filtro Hepa
Makita, empleando siempre repuestos Makita. Limpieza del filtro HEPA PRECAUCIÓN:... - Page 36 Para instalar el filtro, inserte el lado sin los gan- Reparar un atascamiento chos en la ranura y luego empuje el filtro hacia adentro hasta que los ganchos queden asegurados con un clic. Para reparar los atascamientos, extraiga la manguera o el tubo de extensión o el conjunto de tubo curvo para comprobar su interior.
- Page 37 El tablero está sostenido mediante tres resortes. Limpieza del espacio interior de la bolsa Si los resortes se desprendieron del tablero o de la del filtro/bolsa recolectora de polvo palanca, vuelva a colocarlos como se muestra en la ilustración. Cuando limpie el espacio interior de la bolsa del filtro/ bolsa recolectora de polvo, extraiga y limpie el tablero del interior.
-
Page 38: Accesorios Opcionales
PRECAUCIÓN: Estos accesorios o aditamen- tos están recomendados para utilizarse con su producto de Makita especificado en este manual. El uso de cualquier otro accesorio o aditamento puede ocasionar riesgo de lesiones personales. Use los accesorios o aditamentos sólo para los propósitos para los que fueron diseñados. - Page 40 Para reducir la exposición a estos productos químicos: trabaje en un área bien ventilada y póngase el equipo de seguridad indicado, tal como las máscaras contra polvo que están especialmente diseñadas para filtrar partículas microscópicas. Makita Corporation 3-11-8, Sumiyoshi-cho, Anjo, Aichi 446-8502 Japan 885745-946...