
Related Manuals for Makita XCV11


Summary of Contents for Makita XCV11
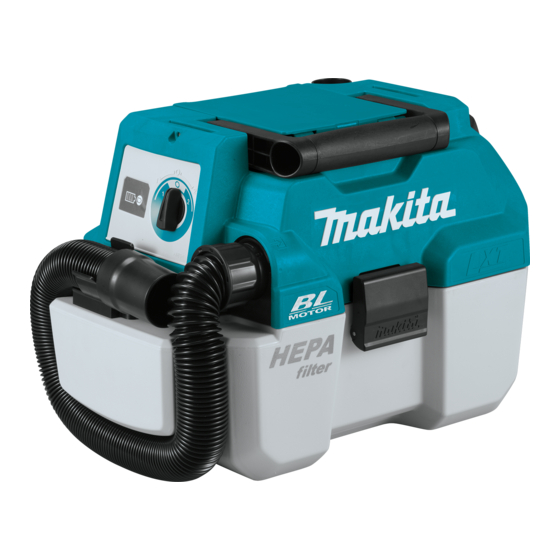
- Page 1 INSTRUCTION MANUAL MANUAL DE INSTRUCCIONES Cordless Portable Vacuum Cleaner Aspiradora Inalámbrica Portátil XCV11 IMPORTANT: Read Before Using. IMPORTANTE: Lea antes de usar.
-
Page 2: Specifications
ENGLISH (Original instructions) SPECIFICATIONS Model: XCV11 Maximum air volume Normal (1) 1.3 m /min (46 cu.ft/min) High (2) 1.6 m /min (57 cu.ft/min) Vacuum Normal (1) 42 hPa High (2) 67 hPa Recoverable capacity Dust 7.5 L (2.0 gal.) Water 4.5 L (1.2 gal.) - Page 3 Do not put any object into openings. Dehumidifier • Do not use with any opening blocked; Large amount of powder (flour, • keep free of dust, lint, hair, and any- fire extinguisher powder, etc.) thing that may reduce air flow. Substances that cause toxic •...
- Page 4 Use appliances only with specifi- Symbols cally designated battery packs. Use of any other battery packs may create The followings show the symbols used for tool. a risk of injury and fire. When battery pack is not in use, volts keep it away from other metal objects, like paper clips, coins, direct current...
-
Page 5: Functional Description
It will ► 1. Battery cover also void the Makita warranty for the Makita tool and charger. NOTE: The battery cover is locked when you open it up to the upright position. -
Page 6: Overload Protection
Indicator lamps Remaining capacity Lighted Blinking 75% to 100% 50% to 75% 25% to 50% 0% to 25% Charge the battery. The battery may have malfunctioned. NOTE: Depending on the conditions of use and the ambient temperature, the indication may differ slightly from the actual capacity. - Page 7 To start the cleaner, set the switch lever to "1" or "2" side. Indicating the remaining battery To turn off the cleaner, set the switch lever to "O" side. capacity ► 1. Switch lever ► 1. Battery indicator 2. Check button Auto-suction stop during wet Press the check button to indicate the remaining battery suction operation...
-
Page 8: Parts Description
For vacuum cleaning PARTS DESCRIPTION Insert the hose into the suction inlet and turn it clock- wise until it clicks. ► 1. Suction inlet For blowing Insert the hose to blower outlet and turn it clockwise until it clicks. ► 1. Tank cover 2. HEPA filter 3. Damper 4. Prefilter 5. -
Page 9: Connecting The Tool
Connecting the nozzle Storage of hose and nozzles Attach the wide nozzle, sash nozzle, or other nozzles The hose and nozzles can be stored on the tool as supplied as optional accessories depending on your illustrated. purpose. To attach the nozzle, twist and insert it to the end of the hose. -
Page 10: Operation
If foreign objects are blown into eyes, it repairs, any other maintenance or adjustment should may result in personal injury. be performed by Makita Authorized or Factory Service CAUTION: Always use protective goggles, a Centers, always using Makita replacement parts. - Page 11 Unhook and lift up the tank cover. To remove dust adhering to the HEPA filter, shake Shake off the dust from the HEPA filter and then dis- the frame bottom quickly several times. pose of the dust from the tank. Occasionally wash the HEPA filter in water, rinse and dry thoroughly in the shade before use.
-
Page 12: Optional Accessories
OPTIONAL ACCESSORIES CAUTION: These accessories or attachments are recommended for use with your Makita tool specified in this manual. The use of any other accessories or attachments might present a risk of injury to persons. Only use accessory or attachment for its stated purpose. -
Page 13: Especificaciones
ESPAÑOL (Instrucciones originales) ESPECIFICACIONES Modelo: XCV11 Volumen de aire máximo Normal (1) 1,3 m /min (46 cu.ft/min) Alta (2) 1,6 m /min (57 cu.ft/min) Vacío Normal (1) 42 hPa Alta (2) 67 hPa Capacidad recuperable Polvo 7,5 L (2,0 gal) - Page 14 No manipule la batería ni el aparato Espumas, como limpiadores de • con las manos mojadas. alfombras, etc. (pueden causar explosiones o incendios) No introduzca ningún objeto en las aberturas. No lo utilice con ninguna Sustancias explosivas o pirofó- • abertura bloqueada;...
- Page 15 Este aparato no se destina para utili- En condiciones de mal uso, podría zarse por personas (incluyendo niños) escapar líquido de la batería; evite cuyas capacidades físicas, sensoria- tocarlo. Si lo toca accidentalmente, les o mentales sean diferentes o estén enjuague con agua.
- Page 16 Asimismo, esto inva- corriente, sobrecalentamiento, lidará la garantía de Makita para la herramienta y el posibles quemaduras e incluso una cargador Makita. descompostura.
-
Page 17: Descripción Del Funcionamiento
Consejos para alargar al máximo NOTA: La cubierta de la batería se inmoviliza cuando se abre en la posición vertical. la vida útil de la batería Cargue el cartucho de batería antes de que se Alinee la lengüeta en el cartucho de batería con la ranura en la carcasa y deslícelo en su lugar. -
Page 18: Protección Contra Sobrecarga
Protección contra sobrecarga Indicación de la capacidad restante de la batería Cuando la herramienta se está utilizando de manera que causa que consuma una cantidad de corriente inusualmente alta, la herramienta se detiene auto- Únicamente para cartuchos de batería con el máticamente sin que haya indicación alguna. -
Page 19: Mango De Transporte
Accionamiento del interruptor Mango de transporte Cuando transporte la aspiradora, sosténgala del mango PRECAUCIÓN: Antes de instalar el cartu- ubicado en la cabeza. El mango en la cabeza es retrác- cho de batería en la herramienta, compruebe til para guardarse cuando no se utilice. siempre que el interruptor deslizable se accione debidamente y que regrese a la posición de apa- gado al presionar la parte trasera del interruptor... -
Page 20: Montaje
Para soplar MONTAJE Inserte la manguera en la salida del soplador y gírela en el sentido de las manecillas del reloj hasta escuchar PRECAUCIÓN: Asegúrese siempre de que la un clic. herramienta esté apagada y el cartucho de batería haya sido extraído antes de realizar cualquier trabajo en la misma. -
Page 21: Operación
Al guardar la manguera, enróllela a la herramienta y Conexión de la herramienta sujétela con el gancho, tal y como se ilustra en la figura. Accesorio opcional Para conectar la herramienta, conecte el extremo de la manguera con la salida de extracción de la herra- mienta. -
Page 22: Mantenimiento
Para mantener la SEGURIDAD y FIABILIDAD del pro- ducto, las reparaciones, y cualquier otra tarea de man- Uso como soplador tenimiento o ajuste deberán ser realizadas en centros de servicio autorizados o de fábrica Makita, empleando siempre repuestos Makita. PRECAUCIÓN: No sople agua con partículas,... -
Page 23: Limpieza Del Filtro Hepa
Para instalar el filtro HEPA, colóquelo girándolo en la Limpieza del filtro HEPA dirección de las manecillas del reloj de tal manera que el reborde de fijación quede firmemente asegurado en la cubierta del tanque. AVISO: No frote ni raye el filtro HEPA con objetos duros tales como un cepillo o una pala. -
Page 24: Accesorios Opcionales
PRECAUCIÓN: Estos accesorios o aditamen- tos están recomendados para utilizarse con su herramienta Makita especificada en este manual. El empleo de cualquier otro accesorio o aditamento puede conllevar el riesgo de lesiones personales. Utilice los accesorios o aditamentos solamente para su fin establecido. - Page 28 Para reducir la exposición a estos productos químicos: trabaje en un área bien ventilada y póngase el equipo de seguridad indicado, tal como las máscaras contra polvo que están especialmente diseñadas para filtrar partículas microscópicas. Makita Corporation 3-11-8, Sumiyoshi-cho, Anjo, Aichi 446-8502 Japan 885666A942...