Table of Contents
Advertisement
Available languages
Available languages
Quick Links
Advertisement
Table of Contents

Related Manuals for Makita XCV13 Series


Summary of Contents for Makita XCV13 Series
- Page 1 INSTRUCTION MANUAL MANUAL DE INSTRUCCIONES Corded and Cordless Vacuum Cleaner Aspiradora Alámbrica / Inalámbrica XCV12 XCV13 DOUBLE INSULATION DOBLE AISLAMIENTO IMPORTANT: Read Before Using. IMPORTANTE: Lea antes de usar.
-
Page 2: Important Safety Instructions
ENGLISH (Original instructions) SPECIFICATIONS Model: XCV12 XCV13 Standard filter type Cloth filter (for dry and wet dust) Powder filter (for dry dust) Volume flow (air) DC operation (with BL1850B, 2.1 m /min (74 cu.ft./min) ø38 mm (1-1/2") x 2.5 m (98- 1/2") hose) AC operation (with ø38 mm 3.6 m... - Page 3 WARNING Do not use without filters in place. Replace a damaged filter immediately. To reduce the risk of fire, electric shock Do not charge the battery outdoors. or injury: (For the powder filter models.) Do not Do not leave appliance when plugged use on wet surfaces.
- Page 4 Such action may cause fire, injury Under abusive conditions, liquid and/or property damage. may be ejected from the battery; To reduce your exposure to these avoid contact. If contact acciden- chemicals, always wear approved tally occurs, flush with water. If liq- respiratory protection such as dust uid contacts eyes, additionally seek masks that are specially designed...
-
Page 5: Polarization Instructions
Polarization instructions To reduce the risk of disconnec- tion of the appliance cord from the To reduce the risk of electric shock, extension cord during operating, this appliance has a polarized plug make a knot as shown in the Figure. (one blade is wider than the other) and will require the use of a polar- ized extension cord. - Page 6 It will also void the Makita warranty for the Makita tool and charger. seek medical attention right away. It may result in loss of your eyesight.
-
Page 7: Functional Description
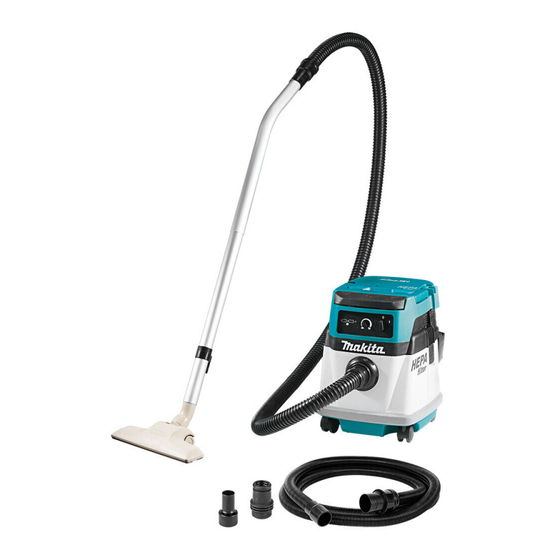
Charge the battery cartridge if you do not use FUNCTIONAL it for a long period (more than six months). DESCRIPTION PARTS DESCRIPTION Use with AC power: Model XCV12 WARNING: Before plugging the cleaner, (Cloth filter (for dry and wet dust) model) always make sure that the cleaner is switched off. -
Page 8: Installing Or Removing Battery Cartridge
Installing or removing battery CAUTION: Always install the battery cartridge cartridge fully until the red indicator cannot be seen. If not, it may accidentally fall out of the cleaner, causing injury to you or someone around you. CAUTION: Always switch off the tool before CAUTION: Do not install the battery cartridge installing or removing of the battery cartridge. -
Page 9: Overload Protection
Indicating the remaining battery Tool / battery protection system capacity The tool is equipped with a tool/battery protection sys- tem. This system automatically cuts off power to the motor to extend tool and battery life. The tool will auto- matically stop during operation if the tool or battery is placed under one of the following conditions: Overload protection When the tool is operated in a manner that causes it to... - Page 10 Carriage handle NOTICE: Always set the stand-by switch to the "O" side when not using the cleaner for long time. The cleaner consumes power during stand-by state. When carrying the cleaner, carry it by holding the han- dle on the head. The handle is retractable at the head Auto-suction stop during wet when not in use.
-
Page 11: Installing The Water Filter
Mount the damper on the powder filter and then To pick up water or wet dust only, the water filter is more place them in the prefilter with aligning the mounting suitable than the cloth filter. position markings. When installing the water filter, align its mounting posi- tion mark with the one on the tank. - Page 12 Extend the paper pack. Spread the bag around the top of the tank so that the cloth filter / prefilter edge can catch and hold the bag Align the paper pack opening with the dust suction securely. opening of the cleaner. Insert the cardboard of the paper pack onto the holder so that it is positioned at the end beyond the detent protrusion.
-
Page 13: Installing The Tool Box
The tool box is convenient for carrying batteries, exten- repairs, any other maintenance or adjustment should sion code, pipe, or cuffs. be performed by Makita Authorized or Factory Service Centers, always using Makita replacement parts. Storage of power supply cord You can wind up the power supply cord around the tool box. -
Page 14: Storage Of Accessories
Storage of accessories Cleaning of cloth filter The pipes can be placed into the pipe holder when not Only for the cloth filter model using the cleaner for a short time. Clogged cloth filter causes poor suction performance. Clean out the cloth filter from time to time. To remove dust or particles adhering to the cloth filter, shake the frame bottom quickly several times. -
Page 15: Optional Accessories
OPTIONAL ACCESSORIES CAUTION: These accessories or attachments are recommended for use with your Makita tool specified in this manual. The use of any other accessories or attachments might present a risk of injury to persons. Only use accessory or attachment for its stated purpose. -
Page 16: Especificaciones
ESPAÑOL (Instrucciones originales) ESPECIFICACIONES Modelo: XCV12 XCV13 Especificaciones eléctricas en México 120 V 9,2 A 50/60 Hz Tipo de filtro estándar Filtro de tela Filtro de polvo (para polvo seco y húmedo) (para polvo seco) Caudal de volumen (aire) Funcionamiento con C.C. 2,1 m /min (74 cu.ft/min) (con BL1850B, manguera de ø38 mm... -
Page 17: Instrucciones Importantes De Seguridad
No desenchufe el aparato tirándolo ADVERTENCIAS DE del cable. Para desenchufar, sujete SEGURIDAD la clavija, no el cable. No manipule la clavija ni el aparato INSTRUCCIONES con las manos mojadas. No introduzca ningún objeto en las IMPORTANTES DE aberturas. No lo utilice con ninguna abertura bloqueada;... - Page 18 No utilice la aspiradora como banco Para reducir la exposición a estas o mesa de trabajo. La máquina sustancias químicas, utilice un podría caerse y ocasionar una equipo de protección respiratoria lesión personal. aprobado, tal como las máscaras contra polvo que están especial- No aspire los siguientes elementos: mente diseñadas para filtrar partí- Líquidos inflamables (quero-...
-
Page 19: Instrucciones De Polarización
Recargue sólo con el cargador Pida que el servicio lo realice un especificado por el fabricante. Un técnico en reparaciones calificado cargador que es adecuado para un y que utilice únicamente piezas de solo tipo de batería puede generar repuesto idénticas a las originales. riesgo de incendio al ser utilizado con Esto garantizará... - Page 20 Esta clavija encajará en la toma de corriente de pared polarizada sola- mente de una manera. Si la clavija no encaja totalmente en la toma de pared, invierta la clavija. Si la clavija sigue sin encajar, pida a un electricista calificado que le instale una toma de corriente de pared ade- cuada.
- Page 21 Símbolos Evite cortocircuitar el cartucho de batería: No toque las terminales con nin- A continuación se muestran los símbolos gún material conductor. utilizados para la herramienta. Evite guardar el cartucho de batería en un cajón junto con volts o voltios otros objetos metálicos, tales como clavos, monedas, etc.
- Page 22 Makita, o de baterías alteradas, puede ocasio- nar que las baterías exploten causando un incendio, lesiones personales y daños. Asimismo, esto inva- lidará la garantía de Makita para la herramienta y el cargador Makita. Consejos para alargar al máximo la vida útil de la batería...
-
Page 23: Descripción Del Funcionamiento
Uso con la batería: DESCRIPCIÓN DEL FUNCIONAMIENTO PRECAUCIÓN: Asegúrese siempre de que la aspiradora esté apagada, desenchufada y que el cartucho de batería haya sido extraído antes de Uso con energía de C.A.: realizar cualquier ajuste o revisión del funciona- miento de la aspiradora. - Page 24 Para quitar el cartucho de batería, sáquelo de la herra- NOTA: Dependiendo de las condiciones de uso y mienta mientras desliza el botón enfrente del cartucho. la temperatura ambiente, la indicación podrá diferir ligeramente de la capacidad real. PRECAUCIÓN: Siempre introduzca comple- tamente el cartucho de batería hasta que el indi- Indicación de capacidad restante de cador rojo no pueda verse.
-
Page 25: Protección Contra Sobrecarga
Para arrancar la aspiradora: Sistema de protección para la Ajuste el interruptor de modo en espera en el lado herramienta/batería “I”. La aspiradora se pondrá en el estado de modo en espera. La herramienta está equipada con un sistema de pro- Oprima el botón de encendido/apagado. -
Page 26: Mango De Transporte
Es conveniente bloquear la rueda para almacenar la Para usar el filtro de polvo: aspiradora, detener el trabajo momentáneamente y Extraiga la caja del flotador y el flotador retirando mantener la aspiradora inmóvil. los pernos. Para usar el tope, muévalo manualmente. Para bloquear la rueda con el tope, baje la palanca del tope y la rueda ya no podrá... -
Page 27: Instalación Del Filtro De Agua
Instalación del filtro de agua PRECAUCIÓN: (Para el modelo con filtro de tela) Accesorio opcional para el modelo con filtro de tela Nunca aspire agua ni otros líquidos o polvo • húmedo cuando utilice la bolsa de papel PRECAUCIÓN: Nunca aspire agua ni polvo para polvo. - Page 28 Instalación de la bolsa de polietileno Vaciado de la bolsa de polietileno La aspiradora también se puede utilizar sin la bolsa ADVERTENCIA: Asegúrese siempre de que de polietileno. Sin embargo, con el uso de la bolsa de la aspiradora esté apagada, desenchufada y que polietileno resulta más fácil vaciar el tanque sin ensu- el cartucho de batería haya sido extraído antes de ciarse las manos.
-
Page 29: Mantenimiento
Para mantener la SEGURIDAD y FIABILIDAD del pro- ducto, las reparaciones, y cualquier otra tarea de man- tenimiento o ajuste deberán ser realizadas en centros de servicio autorizados o de fábrica Makita, empleando La caja de herramientas resulta conveniente para guar- siempre repuestos Makita. -
Page 30: Accesorios Opcionales
PRECAUCIÓN: Estos accesorios o aditamen- tos están recomendados para utilizarse con su herramienta Makita especificada en este manual. El empleo de cualquier otro accesorio o aditamento puede conllevar el riesgo de lesiones personales. Utilice los accesorios o aditamentos solamente para su fin establecido. - Page 31 Filtro de agua (opcional para el modelo con filtro de tela) • Batería y cargador originales de Makita NOTA: Algunos de los artículos en la lista pueden incluirse en el paquete de la herramienta como acce- sorios estándar. Éstos pueden variar de país a país.
- Page 32 Para reducir la exposición a estos productos químicos: trabaje en un área bien ventilada y póngase el equipo de seguridad indicado, tal como las máscaras contra polvo que están especialmente diseñadas para filtrar partículas microscópicas. Makita Corporation 3-11-8, Sumiyoshi-cho, Anjo, Aichi 446-8502 Japan 885717-941...