HIKVISION DS-1004KI User Manual
Hide thumbs
Also See for DS-1004KI:
- User manual (21 pages) ,
- Quick start manual (2 pages) ,
- Manual (2 pages)
Table of Contents
Advertisement
Quick Links
Advertisement
Table of Contents

Related Manuals for HIKVISION DS-1004KI


Summary of Contents for HIKVISION DS-1004KI
- Page 1 User Manual of DS-1004KI Keyboard V1.1.0...
- Page 2 User Manual of the DS-1004K keyboard Preventive and Cautionary Tips Before connecting and operating your keyboard, please be advised of the following tips: Ensure unit is placed in a well-ventilated, dust-free environment. Keep all liquids away from the keyboard. ...
-
Page 3: Table Of Contents
User Manual of the DS-1004K keyboard Contents Chapter 1 Product Overview ................................. 3 Chapter 2 Device Appearance ............................... 5 Rear Panel Description ..............................5 Front Panel Description ..............................6 Joystick Function ................................7 Typical Wiring Methods ............................... 8 Chapter 3 Keyboard Operation .............................. -
Page 4: Chapter 1 Product Overview
Controlling modes determine the devices controlled by the keyboard; e.g. if you choose the control mode as DVR, all the commands and the controlling signal will be applied to the DVR. The controlling mode of the DS-1004KI keyboard can be shifted by pressing the MODE button on the panel. - Page 5 Protocols There are 63 protocols of the PTZ control of dome camera, and the main protocols are HIKVISION, PELCO-P, PELCO-D, SAMSUNG, YAAN-1, SONY, SIEMENS, DRAGON, NAIJIE, KALATEL, VICON and etc.. The control protocols for the analog matrix are ZT-1.0, ZT-2.0, EXTRON, and CREATOR.
-
Page 6: Chapter 2 Device Appearance
User Manual of the DS-1004K keyboard Chapter 2 Device Appearance 2.1 Rear Panel Description Figure 2-1 The Rear Panel of DS-1004KI Keyboard Notes : The green end with a G identifier on the rear panel is for grounding. Number Physical Interfaces... -
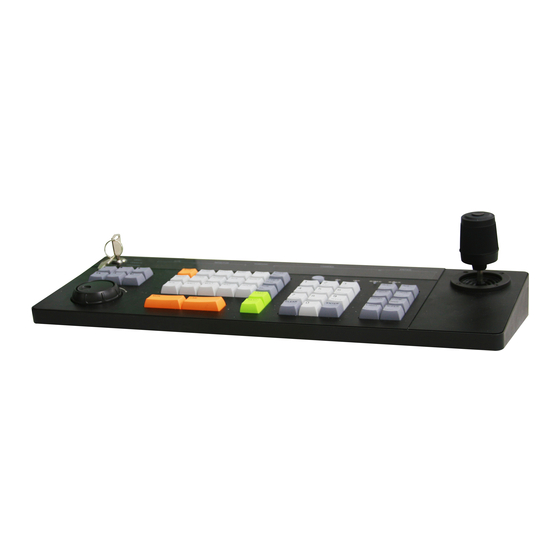
Page 7: Front Panel Description
User Manual of the DS-1004K keyboard 2.2 Front Panel Description Figure 2-2 Top View on DS-1004KI Keyboard Note: Buttons on the keyboard have different functions in different controlling modes. For example, the IRIS+/EDIT button realizes the IRIS+ in PTZ control mode and in the DVR control mode, it is the EDIT button, when pressing, you can edit the combox field. -
Page 8: Joystick Function
User Manual of the DS-1004K keyboard Button Description DVR control mode: change the tab menu The next item, can be a channel or menu setting field. NEXT LAST The previous item, can be a channel or menu setting field. When controlling the VMS or analog matrix, press this button to choose the monitor. When controlling the VMS or analog matrix, press this button to choose the camera. -
Page 9: Typical Wiring Methods
User Manual of the DS-1004K keyboard 2.4 Typical Wiring Methods Figure 2-3 Connection between the keyboards, the keyboards and the dome camera, the keyboard and the DVRs ① shows the connection of the auxiliary keyboard and the main keyboard. You can connect many auxiliary keyboards to the ②... - Page 10 User Manual of the DS-1004K keyboard Figure 2-4 Connection between the main and auxiliary keyboards, and the keyboards and the dome camera ① shows the connection of the auxiliary keyboard and the main keyboard. You can connect many auxiliary keyboards to the ②...
- Page 11 User Manual of the DS-1004K keyboard Figure 2-5 Connection between the paralleled keyboards, the keyboards and the dome camera, the keyboard and the DVRs ① shows the connection of keyboard when they are connected to each other to control the dome camera. PTZ-CON interface: TA ③...
- Page 12 User Manual of the DS-1004K keyboard Figure 2-6 Connection between the keyboard and the analog matrix The RS-232 interface of the DS-1004KI keyboard uses the DB9 interface. And the definition of pins of DB9 interface is written in the table below.
- Page 13 User Manual of the DS-1004K keyboard Figure 2-7 Connection between the keyboard and the VMS The DS-1004KI keyboard controls the VMS, and to control it, you need to configure the VMS with the cascading configuration tool. Please refer to the manual of the VMS.
-
Page 14: Chapter 3 Keyboard Operation
User Manual of the DS-1004K keyboard Chapter 3 Keyboard Operation 3.1 Controlling DVR by Keyboard Setting the Keyboard Parameters to Control DVR Once the keyboard is connected to the DVR, it can be used just as the front panel of the DVR. The joystick can move the cursor. Before you start: Check the connection between the DVR and the Keyboard. -
Page 15: Operating Dvr By Keyboard
User Manual of the DS-1004K keyboard Figure 3-3 Choose MODE as DVR Press the numeric button and press SITE to connect the DVR. Note: The keyboard identifies the DVR by SITE value, and the SITE value must be exactly the same with the device number. - Page 16 User Manual of the DS-1004K keyboard To call the preset/patrol/pattern: Steps: Press IRIS-/PTZ button to enter the PTZ control interface of the DVR Press the PRESET/PATROL/PATTERN button. Press the numeric button. Press ENTER button.
-
Page 17: Controlling Dome Cameras By Keyboard
User Manual of the DS-1004K keyboard 3.2 Controlling Dome Cameras by Keyboard Setting the Keyboard Parameters to Control Dome Camera Before you start: Check the connection between the keyboard and dome camera. The TA and TB interfaces of CON of keyboard should be connected to the RA and RB interfaces of the dome camera respectively. -
Page 18: Dome Camera Control Operation
User Manual of the DS-1004K keyboard The parameters include the protocol, baud rate, data bit, stop bit, and parity. When the LED screen shows COPYALL, you can choose YES or NO. When you choose YES, the parameters you just set will be copied to other dome cameras connected. Press Enter button to confirm your settings. -
Page 19: Controlling The Vms By Keyboard
Note: When using DS-1004KI to control the VMS, the parameters of the keyboard should be consistent to that of the VMS software and the VMS should be configured by the cascade configuration tools. For the detailed information of the configuration, refer to the user manual of the VMS. - Page 20 User Manual of the DS-1004K keyboard Steps: Press numeric button 1 and press MON. Press numeric button 2 and press CAM-G button. Press HOLD button. Press RUN button. Press LAST button. To set the preset, turn the key to the PROGRAM mode, press the numeric button and press CAM button to choose camera. Press numeric button and press preset button the set preset.
-
Page 21: Controlling The Analog Matrix By Keyboard
Setting the Keyboard Parameters to Control Analog Matrix The RS-232 communication is used when the DS-1004KI keyboard is controlling the analog matrix system. And the following parameters must be correctly configured for the RS-232 port: protocol, baud rate, data bit, stop bit and parity. ZT-1.0, ZT-2.0, EXTRON and CREATOR protocols are supported by the keyboard. -
Page 22: Appendix 1 : Specification
User Manual of the DS-1004K keyboard Appendix 1 Specification : Model DS-1004KI Joystick Four-Axis Serial Port RS485 and RS232 Working Temperature -10℃- +55℃ Working Humidity 10%-90% Power Supply 12VDC Power Consumption ≤10W Dimension 434×163×43mm (W×D×H) Weight ≤1.25Kg...