HIKVISION DS-1200KI User Manual
Hide thumbs
Also See for DS-1200KI:
- User manual (38 pages) ,
- Quick start manual (75 pages) ,
- User manual (44 pages)
Table of Contents
Advertisement
Advertisement
Table of Contents

Related Manuals for HIKVISION DS-1200KI


Summary of Contents for HIKVISION DS-1200KI
- Page 1 DS-1200KI/DS-1006KI Keyboard User Manual UD03129N...
- Page 2 DS-6900UDI Decoder User Manual About this Manual This Manual is applicable to DS-1200KI/1006KI Keyboard. The Manual includes instructions for using and managing the product. Pictures, charts, images and all other information hereinafter are for description and explanation only. The information contained in the Manual is subject to change, without notice, due to firmware updates or other reasons.
-
Page 3: Regulatory Information
DS-1200KI/1006KI Keyboard User Manual DS-6900UDI Decoder User Manual Regulatory Information FCC information compliance: This equipment has been tested and found to comply with the limits for a digital device, pursuant to part 15 of the FCC Rules. These limits are designed to provide reasonable protection against harmful interference when the equipment is operated in a commercial environment. -
Page 4: Safety Instructions
DS-1200KI/1006KI Keyboard User Manual DS-6900UDI Decoder User Manual Safety Instructions Proper configuration of all passwords and other security settings is the responsibility of the installer and/or end-user. In the use of the product, you must be in strict compliance with the electrical safety regulations of the nation and region. - Page 5 DS-1200KI/1006KI Keyboard User Manual DS-6900UDI Decoder User Manual Symbol Conventions The symbols that may be found in this document are defined as follows. Symbol Description Provides additional information to emphasize or supplement important points of the main text. Indicates a potentially hazardous situation, which if not avoided, could result in equipment damage, data loss, performance degradation, or unexpected results.
-
Page 6: Table Of Contents
DS-1200KI/1006KI Keyboard User Manual DS-6900UDI Decoder User Manual Table of Contents Chapter 1 Overview .......................... 1 Features ..........................1 Appearance ........................2 Interfaces and Joystick ....................... 2 Functional Buttons ......................4 Chapter 2 Getting Started ........................ 7 Activating Your Device ......................7 Logging in ........................... - Page 7 DS-1200KI/1006KI Keyboard User Manual DS-6900UDI Decoder User Manual Maintenance ........................28 Chapter 6 Specifications ......................... 29...
-
Page 8: Chapter 1 Overview
System upgrade and import / export of configuration files by USB-flash disk Captured pictures(FAT32) can be stored in U-flash disk DS-1200KI keyboard: network access and configuration by Web browser support; and up to 1000 devices can be managed in the keyboard operation mode... -
Page 9: Appearance
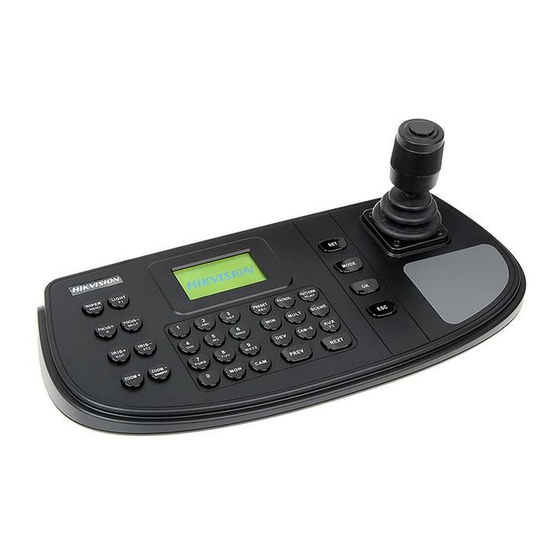
DS-1200KI/1006KI Keyboard User Manual DS-6900UDI Decoder User Manual Appearance Refer to Figure 1-1 for the appearance of the keyboard. Figure 1-1 Keyboard Appearance Interfaces and Joystick Refer to Figure 1-2 for the interfaces and joystick of the keyboard. Figure 1-2 Interfaces... - Page 10 DS-1200KI/1006KI Keyboard User Manual DS-6900UDI Decoder User Manual Table 1-1 Description of Rear Panel Item Description In menu mode, 4-axis joystick Move to up/down to select the menu for confguration Move to left/right to select items in menu.
-
Page 11: Functional Buttons
DS-1200KI/1006KI Keyboard User Manual DS-6900UDI Decoder User Manual Functional Buttons Figure 1-3 Functional Buttons Table 1-2 Description of Rear Panel Item Button Description Enter the main menu of the system. MODE Enter the 6 operation modes interface. Common Buttons Confirm the selection and operation. - Page 12 DS-1200KI/1006KI Keyboard User Manual DS-6900UDI Decoder User Manual PATROL/PLAY Use with the numeric buttons to call the patrol. Start playing the video files in DVR operation mode. In the shortcut operation mode, use with the numeric buttons to select window of video wall.
- Page 13 DS-1200KI/1006KI Keyboard User Manual DS-6900UDI Decoder User Manual FOCUS-/MULT In PTZ control mode, operate the focus near. In DVR operation mode, the same with the MULT button on the DVR panel. IRIS+/EDIT In PTZ control mode, operate the iris open.
-
Page 14: Chapter 2 Getting Started
DS-1200KI/1006KI Keyboard User Manual DS-6900UDI Decoder User Manual Chapter 2 Getting Started Activating Your Device Purpose: For the first-time access, you need to activate the device by setting an admin password. No operation is allowed before activation. You can also activate the device via SADP as well. - Page 15 DS-1200KI/1006KI Keyboard User Manual DS-6900UDI Decoder User Manual Local Login Step 1 In the Login interface, enter the user name in the User Name field. Step 2 Enter the password in the Password field. Figure 2-2 Login Interface Step 3 Press the OK button to log in to the device.
-
Page 16: System Menu
DS-1200KI/1006KI Keyboard User Manual DS-6900UDI Decoder User Manual System Menu After login, you enter the system menu for configuration and operation. Version Change Pswd Network Add User User Edit User RS-485 Delete User System RS-422 Hardware Upgrade Time Import... -
Page 17: Chapter 3 Basic Configuration
If the product does not work properly, contact with your dealer or the nearest service center. The network connection is provided by the DS-1200KI keyboard only. Step 1 On the keyboard, enter the network settings menu System>Network... - Page 18 DS-1200KI/1006KI Keyboard User Manual DS-6900UDI Decoder User Manual Figure 3-1 Device Management Interface Step 2 On the Device Management > Device List page, select a device type (IPC/IP Dome, DVR/NVR or Decoder) and click Add to add the devices.
-
Page 19: Managing Input/Output Channels
DS-1200KI/1006KI Keyboard User Manual DS-6900UDI Decoder User Manual You can also click the Add SADP to add the online devices in the same network segment. 3.2.2 Managing Input/Output Channels Purpose: You can manage the import and export of input channels in batch, input group and output channels via Web browser. -
Page 20: User And User-Related Device Management
DS-1200KI/1006KI Keyboard User Manual DS-6900UDI Decoder User Manual Up to 16 input groups can be added. Figure 3-5 Manage Input Group Step 4 You can modify the group information or delete the group by Modify Group and Delete Group access. - Page 21 DS-1200KI/1006KI Keyboard User Manual DS-6900UDI Decoder User Manual Figure 3-6 Add User Step 2 Edit the user name, enter password (strong password is highly recommended), and confirm the password. STRONG PASSWORD RECOMMENDED–We highly recommend that you create a strong password of your own choosing (using a minimum of 8 characters, including upper case letters, lower case letters, numbers, and special characters) in order to increase the security of your product.
-
Page 22: Chapter 4 Keyboard Operation
DS-1200KI/1006KI Keyboard User Manual DS-6900UDI Decoder User Manual Chapter 4 Keyboard Operation Step 1 On the login interface, enter the user name and password to log in to the device. Figure 4-1 Menu Step 2 Press the MODE button on the panel to enter the operation for different device. -
Page 23: Keyboard Operation
DS-1200KI/1006KI Keyboard User Manual DS-6900UDI Decoder User Manual Dome The keyboard can connect with the analog dome or PTZ unit RS-485 via RS-485 serial port, and realize PTZ control. Step 3 Use the joystick to select an operation mode and press OK button to enter the operation. -
Page 24: Preset/Patrol/Pattern Calling
DS-1200KI/1006KI Keyboard User Manual DS-6900UDI Decoder User Manual Step 5 Press the Num + CAM/CAM-G buttons to select the input channel or input channel group. You can press the PREV/NEXT buttons to switch to the previous or next camera / camera group ID. -
Page 25: Scene Calling
DS-1200KI/1006KI Keyboard User Manual DS-6900UDI Decoder User Manual Figure 4-4 Preset Calling The preset/patrol/pattern must be pre-configured. 4.1.3 Scene Calling Purpose: For the MVC, video wall controller, and decoder added to the keyboard, you can configure the scene via the iVMS 4200 client first and follow the steps below to switch the scene. -
Page 26: Picture Capture
DS-1200KI/1006KI Keyboard User Manual DS-6900UDI Decoder User Manual Step 2 Log in to keyboard via Web browser (https://ip address), and enter the Aux key settings page (System Management>Aux Key Settings). Step 3 Set the Aux key function to Screen Jointing. -
Page 27: Mag By Ip
DS-1200KI/1006KI Keyboard User Manual DS-6900UDI Decoder User Manual 2) Press the Num + MON buttons to select the display window for the output channel. 3) Press the Num + CAM buttons to select the input channel. Step 5 Press the AUX/F2 button on the keyboard panel to capture the picture. The picture is saved in the U-flash disk in FAT32 format. -
Page 28: Dvr By Ip
DS-1200KI/1006KI Keyboard User Manual DS-6900UDI Decoder User Manual Figure 4-9 MAG by IP For the initial use of MAG/MVC, you must use the configuration kits software to configure the input/output channel ID of the MAG/MVC. Please refer to the user manual of MVC for details. The input/output channel ID is used for switching on the video wall or PTZ control during keyboard operation. -
Page 29: Mag By Rs-422
DS-1200KI/1006KI Keyboard User Manual DS-6900UDI Decoder User Manual Figure 4-11 DVR by IP Step 5 Operate the buttons on the keyboard panel to realize the corresponding functions. Please refer to Chapter 1.4 Functional Buttons to check the description of the DVR control buttons. -
Page 30: Dvr By Rs-485
DS-1200KI/1006KI Keyboard User Manual DS-6900UDI Decoder User Manual Figure 4-13 Network Cable Step 1 Enter the MAG by RS-422 operation mode on the keyboard. Step 2 Press the Num + MON buttons to select the display window for the output channel. -
Page 31: Dome By Rs-485
DS-1200KI/1006KI Keyboard User Manual DS-6900UDI Decoder User Manual Before you start: Check the connection between the DVR/NVR and the Keyboard. The T+ ad T- terminals of the keyboard’s RS-485 serial port must be connected with the D+ and D- terminals of the KB port on the DVR rear panel respectively. -
Page 32: Shortcut Operation
DS-1200KI/1006KI Keyboard User Manual DS-6900UDI Decoder User Manual Step 1 Enter the Dome by RS-485 operation mode on the keyboard. Step 2 Press the Num + CAM buttons to select the dome site. Step 3 Use the joystick and operate the buttons on the keyboard panel to realize the corresponding functions. -
Page 33: Chapter 5 System Menu Configuration
DS-1200KI/1006KI Keyboard User Manual DS-6900UDI Decoder User Manual Chapter 5 System Menu Configuration On the main menu after login, you can select System to check the version, and configure the system configuration, including network, user, RS-485, RS-422, hardware, time and maintenance. -
Page 34: Rs-485/Rs-422 Settings
(RS-485 only), baud rate, data bit, protocol (PROT: PELCO-P, PELCO-D, VICON, KALATEL, HIKVISION selectable), stop bit, parity, and copy all settings. When you set the Copy All to Yes for RS-485 serial port, the current settings will be copied to the connection of all other RS-485 devices. -
Page 35: Time Settings
DS-1200KI/1006KI Keyboard User Manual DS-6900UDI Decoder User Manual Time Settings Select Time to enter the system time settings interface. You can set the value of year, month, date, time format, hour, minute and second. Click OK button or the central button of joystick to save the settings. -
Page 36: Specifications
DS-1200KI/1006KI Keyboard User Manual DS-6900UDI Decoder User Manual Chapter 6 Specifications Table 6-1 Specification of DS-1200KI Model DS-1200KI LCD screen 128 x 64 pixel screen System Joystick 4-axis joystick Control mode Network, RS-232, RS-422, RS-485 1; 10 M/100 Mbps self-adaptive Ethernet... - Page 37 DS-1200KI/1006KI Keyboard User Manual DS-6900UDI Decoder User Manual...