
Related Manuals for Makita GPH01Z


Summary of Contents for Makita GPH01Z
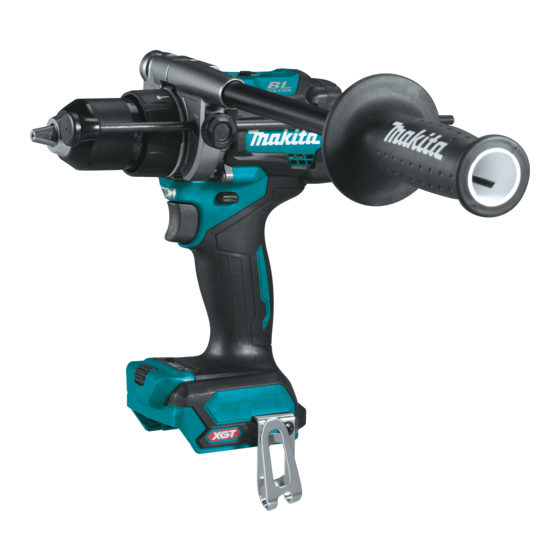
- Page 1 INSTRUCTION MANUAL MANUAL DE INSTRUCCIONES Cordless Hammer Driver Drill Rotomartillo Atornillador Inalámbrico GPH01 IMPORTANT: Read Before Using. IMPORTANTE: Lea antes de usar.
-
Page 2: Specifications
ENGLISH (Original instructions) SPECIFICATIONS Model: GPH01 Drilling capacities Masonry 20 mm (13/16") Steel 20 mm (13/16") Wood Auger bit: 50 mm (2") Self-feed bit: 76 mm (3”) Hole saw: 152 mm (6”) Fastening capacities Wood screw 10 mm x 90 mm (3/8" x 3-1/2") Machine screw M6 (1/4") No load speed (RPM) - Page 3 If operating a power tool in a damp location is Disconnect the plug from the power source unavoidable, use a ground fault circuit inter- and/or remove the battery pack, if detachable, rupter (GFCI) protected supply. Use of a GFCI from the power tool before making any adjust- reduces the risk of electric shock.
- Page 4 Service WARNING: DO NOT let comfort or familiarity Have your power tool serviced by a qualified with product (gained from repeated use) replace repair person using only identical replacement strict adherence to safety rules for the subject parts. This will ensure that the safety of the power product.
-
Page 5: Tips For Maintaining Maximum Battery Life
It will with a little click. If you can see the red indicator on the also void the Makita warranty for the Makita tool and upper side of the button, it is not locked completely. -
Page 6: Overdischarge Protection
This tool is equipped with an electric brake. If the tool consistently fails to quickly stop after the switch trigger is The battery released, have the tool serviced at a Makita service center. may have malfunctioned. Lighting up the front lamp... -
Page 7: Reversing Switch Action
NOTE: When the tool is overheated, the tool stops CAUTION: Always set the speed change lever automatically and the lamp starts flashing. In this fully to the correct position. If you operate the case, release the switch trigger. The lamp turns off in tool with the speed change lever positioned halfway one minute. -
Page 8: Adjusting The Fastening Torque
Adjusting the fastening torque CAUTION: Make sure that the dial is clean. Depending on the work environment, foreign objects such as iron scraps or chips may adhere to the dial and cause the personal injury. ► 1. Dial 2. Indicator 3. Button 4. Green light The fastening torque can be adjusted in 41 levels in low speed and 21 levels in high speed. -
Page 9: Electronic Function
If any malfunction occurred with the Optional accessory electronic function, the light blinks for 3 seconds, and then, turns off. In that case, contact with Makita Authorized or Factory Service Centers to repair. NOTE: This function does not work if the acceleration does not reach the predetermined one when the tool is swung. -
Page 10: Operation
The hook is convenient for temporarily hanging the tool. Installing side grip (auxiliary handle) This can be installed on either side of the tool. To install the hook, insert it into a groove in the tool housing on either side and then secure it with a screw. To remove, loosen the screw and then take it out. -
Page 11: Screwdriving Operation
Blow-out bulb Optional accessory ► 1. Vent Screwdriving operation ► 1. Blow-out bulb NOTICE: Adjust the dial to the proper torque level After drilling the hole, use the blow-out bulb to clean the for your work. dust out of the hole. NOTICE: Make sure that the driver bit is inserted Drilling operation... -
Page 12: Maintenance
Discoloration, deformation or cracks may result. To maintain product SAFETY and RELIABILITY, repairs, any other maintenance or adjustment should be performed by Makita Authorized or Factory Service Centers, always using Makita replacement parts. OPTIONAL ACCESSORIES CAUTION:... -
Page 13: Especificaciones
ESPAÑOL (Instrucciones originales) ESPECIFICACIONES Modelo: GPH01 Capacidades de taladrado Mampostería 20 mm (13/16") Acero 20 mm (13/16") Madera Broca de barrena: 50 mm (2″) Broca de autoalimentación: 76 mm (3″) Sierra perforadora: 152 mm (6″) Capacidades de fijación Tornillo para madera 10 mm x 90 mm (3/8"... - Page 14 Evite tocar con el cuerpo superficies conecta- Use una vestimenta apropiada. No use ropa suelta das a tierra o puestas a tierra tales como tubos, ni alhajas. Mantenga el cabello, la ropa y los guan- radiadores, cocinas y refrigeradores. Si su cuerpo tes alejados de las piezas móviles.
- Page 15 Mantenga los mangos y superficies de asi- Advertencias de seguridad para el miento secos, limpios y libres de aceite o rotomartillo atornillador inalámbrico grasa. Los mangos y superficies de asimiento resbalosos no permiten una manipulación segura Instrucciones de seguridad para todas las ni el control de la herramienta en situaciones operaciones inesperadas.
- Page 16 Asimismo, esto inva- No guarde la herramienta ni el cartucho de lidará la garantía de Makita para la herramienta y el batería en lugares donde la temperatura pueda cargador Makita. alcanzar o exceder los 50°C (122°F).
-
Page 17: Descripción Del Funcionamiento
Consejos para alargar al máximo Para colocar el cartucho de batería, alinee la lengüeta sobre el cartucho de batería con la ranura en la carcasa la vida útil de la batería y deslice en su lugar. Inserte por completo hasta que se fije en su lugar con un pequeño clic. -
Page 18: Protección Contra Sobrecarga
Este sistema corta nimiento a un centro de servicio Makita. en forma automática el suministro de energía al motor para prolongar la vida útil de la herramienta y la batería. -
Page 19: Cambio De Velocidad
Selección del modo de PRECAUCIÓN: Confirme siempre la direc- accionamiento ción de rotación antes de la operación. PRECAUCIÓN: Utilice el conmutador de AVISO: Ponga siempre el anillo correctamente en la inversión solamente después de que la herra- marca del modo que desee. Si utiliza la herramienta mienta haya parado completamente. - Page 20 Ajuste de la torsión de apriete PRECAUCIÓN: Asegúrese de que el selector esté limpio. Dependiendo del entorno de trabajo, los objetos extraños como restos de hierro o astillas pueden adherirse al selector y causar lesiones personales. ► 1. Selector 2. Indicador 3. Botón 4. Luz verde La torsión de apriete se puede ajustar en 41 niveles para baja velocidad y en 21 niveles para alta velocidad.
-
Page 21: Montaje
En ese caso, póngase en contacto con un centro de servicio autorizado o de fábrica Makita para que se lo repare. NOTA: Esta función no servirá si la aceleración no alcanza la predeterminada al girar la herramienta. - Page 22 Instalación de la empuñadura lateral Instalación del gancho (mango auxiliar) PRECAUCIÓN: Cuando instale el gancho, siempre asegúrelo firmemente con el tornillo. De lo contrario, el gancho podría desprenderse de la herramienta y ocasionar lesiones personales. ► 1. Empuñadura lateral de mango 2. Protuberancia 3.
-
Page 23: Operación
OPERACIÓN NOTA: Cuando atornille en madera, taladre primero un orificio de 2/3 del diámetro del tornillo. Esto facilita la operación y evita que la pieza de trabajo se rompa Sujete firmemente la herramienta con una mano en la en dos. empuñadura y otra en el mango para controlar la acción NOTA: En un ambiente frío, la herramienta podrá... -
Page 24: Accesorios Opcionales
Para mantener la SEGURIDAD y FIABILIDAD del pro- ducto, las reparaciones, y cualquier otra tarea de man- tenimiento o ajuste deberán ser realizadas en centros de servicio autorizados o de fábrica Makita, empleando siempre repuestos Makita. 24 ESPAÑOL... - Page 28 Para reducir la exposición a estos productos químicos: trabaje en un área bien ventilada y póngase el equipo de seguridad indicado, tal como las máscaras contra polvo que están especialmente diseñadas para filtrar partículas microscópicas. Makita Corporation 3-11-8, Sumiyoshi-cho, Anjo, Aichi 446-8502 Japan 885765-940...