Advertisement
Quick Links
IMPORTANT INSTRUCTIONS
AND OPERATING MANUAL
Français p.
Español p.
LP GAS GRILL
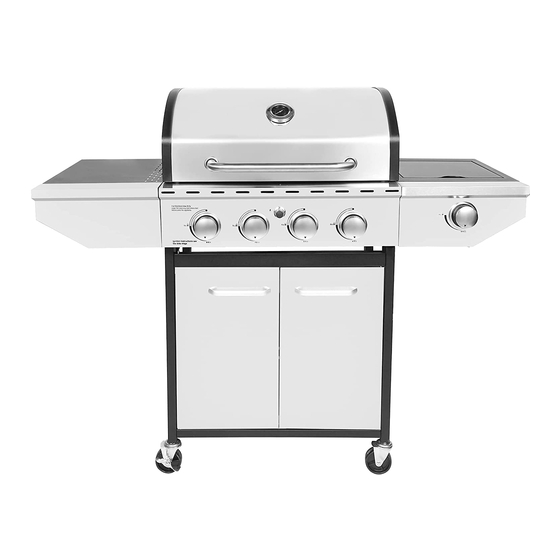
Model: G410
Thank you for choosing our product! If you have any issue about the product, please
contact us via
, our customer service team will
customerservice@honeydrillshop.com
assist you with order, shipping status, assembly and operation.
1
Advertisement

Related Manuals for Honeywell G410

Summary of Contents for Honeywell G410
- Page 1 IMPORTANT INSTRUCTIONS AND OPERATING MANUAL Français p. Español p. LP GAS GRILL Model: G410 Thank you for choosing our product! If you have any issue about the product, please contact us via , our customer service team will customerservice@honeydrillshop.com assist you with order, shipping status, assembly and operation.
-
Page 2: Table Of Contents
TABLE OF CONTENTS Safety Information ........................Package Contents ........................Hardware Contents ........................Preparation ..........................Assembly Instructions ........................ Operation Instructions ......................... 13 Care and Maintenance ......................... 17 Troubleshooting ........................... 20 Assembler/Installer: This manual contains important information that is necessary for the proper assembly and safe use of this appliance. -
Page 3: Safety Information
SAFETY INFORMATION Thank you for choosing our product! If you have any issue about the product, please contact us via Amazon Message, our customer service team will assist you with order, shipping status, assembly and operation. DANGER • Do not use in an explosive atmosphere. Keep grill area clear and free from combustible CALIFORNIA PROPOSITION 65 mbustion of such fuels contain chemicals, including Benzene, known to the State of California to cause cancer, birth defects or... - Page 4 SAFETY INFORMATION WARNING • Do not place the grill under overhead combustible construction or awnings. Minimum clearance from sides and back of unit to combustible construction, 36 inches (915.0mm) from sides and back. NOTE: The installation must conform with local codes or, in the absence of local codes, with either the National Fuel Gas Code, ANSI Z223.1/NFPA 54, Natural Gas and Propane Installation Code, CSA...
-
Page 5: Package Contents
PACKAGE CONTENTS... -
Page 6: Preparation
PREPARATION Before beginning assembly of product, make sure all parts are present. Compare parts with package contents list on previous page and hardware contents above. If any part is missing or damaged, do not attempt to assemble the product. Contact customer service for replacement parts. Estimated Assembly Time: 50 minutes with 2 people. - Page 7 ASSEMBLY INSTRUCTIONS First assemble the Door post (CC) to the Bottom plate, Then assemble magnet base (13) to the Bottom plate using M5x10mm bolts (BB) 。 First assemble the Handle (4) and match holder (26) to the right door (15) using M4x5mm bolts (EE) and washer (FF),Then assemble the right door to the Bottom plate (10) and cart frame (8) using door axle...
- Page 8 ASSEMBLY INSTRUCTIONS First Assemble the M6x12mm to the body ,Reserve distance of 5mm,Then fix the left side table to the body using M6x12mm bolts (AA) 。 Assemble the M6x12mm to the the left front panel,Reserve a distance of 5mm,Then fix the left front panel (3) to the body using M5x10 bolts (BB) First Assemble the M6x12mm bolts (AA) to the body ,Reserve a distance of 5mm。Then fix the side burner table (20) to the body using M6x12mm bolts (AA)
- Page 9 ASSEMBLY INSTRUCTIONS First Assemble the M6x12mm bolt (AA) to the right front panel (21) ,Keep a distance of 5mm。 Then assemble the rigth front panel (21) to the control panel and side burner table using M5x10 mm bolts (BB) Assemble the side valve and knob base (22) to the right front panel using M4x8mm bolts (GG)。...
- Page 10 ASSEMBLY INSTRUCTIONS Attach the grease box (25) to the grease tray Model:G410 Finish...
- Page 11 ASSEMBLY INSTRUCTIONS Open the left door assembly and the right door assembly , insert the hose/regulator assembly into the cart assembly through the clearance above the cart right side panel assembly . Place LP gas cylinder (sold separately) into the nesting hole located in the cart bottom shelf .
- Page 12 OPERATION INSTRUCTIONS CHECKING FOR LEAKS gs on the LP gas tank valve, gas hose and regulator for leaks with a water and soap solution. • Always perform leak test prior to lighting the grill. • Do not smoke while testing for a leak. •...
-
Page 13: Operation Instructions
OPERATION INSTRUCTIONS CONNECTING GAS CYLINDER The propane gas supply cylinder to be used must be constructed and marked in accordance with the Standard of Canada, CAN/CSA-B339, Cylinders, Spheres and Tubes for Transportation of Dangerous Goods; and Commission, as applicable; and provided with a liste Use only 20-pound cylinders (height: 18.11 inches, tank diameter: 9.84 inches, foot diameter: 8.03 inches) equipped with a cylinder connection device compatible with the connection for outdoor cooking appliances. - Page 14 OPERATION INSTRUCTIONS NOTE: Other cylinders may be acceptable for use with this appliance If they are compatible with the app- -liance nesting hole and retention means. Refer to Page11 of the Assembly Instructions for corr- e ct cylinder to cylinder holder connection. WARNING ALL INSTRUCTIONS AND SAFEGUARDS ON THIS PAGE MUST BE FOLLOWED TO PREVENT FIRE, DAMAGE AND/OR INJURY.
- Page 15 OPERATION INSTRUCTIONS Lighting The Grill Remove all hangings or plastic straps, if present. Before you cook on your new gas grill, it is important to clean your grill with heat. To do this, operate the grill for approximately 15 minutes with the lid closed and the control knob in the highest position.
- Page 16 OPERATION INSTRUCTIONS LIGHTING THE GRILL WITH A MATCH 1. Open the lid. 2. Insert a match in the end of the match holder that is installed on the right door assembly. 3. Light the match. 4. Immediately place the lit match through the spaces in the grill gates near the ports of the burner between the heat tents as shown.
-
Page 17: Care And Maintenance
CARE AND MAINTENANCE Cooking Grates The best time to ‘burn-off’ the cooking grates is after every use (approx. 15 minutes). The grill is already hot from cooking thus requiring less fuel to obtain necessary temperature for ‘burn-off’. To ‘burn off’ or heat clean your grill, turn the burners to highest position and run for 15 minutes with the lid closed. - Page 18 CARE AND MAINTENANCE Burner Assembly Warming Rack Removing The Burner Assembly Cooking Grates 1. Make sure all control knobs are in the OFF Heat Tents position, gas supply valve is closed, and the gas hose is disconnected from the gas supply. 2.
- Page 19 CARE AND MAINTENANCE Cleaning the Burner Assembly – Make sure the grill is cool 1. Turn gas off at the control knobs and LP gas cylinder. 2. Disconnect LP gas cylinder from regulator and hose. 3. Remove warming rack, cooking grates and heat tents. 4.
-
Page 20: Troubleshooting
CARE AND MAINTENANCE The electronic ignition requires 1 “AA” alkaline battery, which is included. WARNING DO NOT mix old and new batteries. DO NOT mix alkaline, standard (Carbon-Zinc), or rechargeable (Nickel-Cadmium) batteries. TROUBLESHOOTING If you have any questions regarding the product, please call customer service at 213-4467172 PROBLEM POSSIBLE CAUSE CORRECTIVE ACTION... - Page 21 Item Name: 4-Burner LP Gas Grill With Side Burner Model #: G410 Main Burner Total rated BTU: 32,000 BTU/Hr Side Burner rated BTU: 10,000 BTU/Hr...
- Page 22 Thank you for choosing our product! If you have any issue about the product, please contact us , our customer service team will assist you with order, customerservice@honeydrillshop.com shipping status, assembly and operation. IMPORTANT Do NOT return the product direct to the store. Contact us via customerservice@honeydrillshop.com and our customer service team will assist you for any issue.