Cisco SPA 303 Manual
Hide thumbs
Also See for SPA 303:
- Quick start manual (21 pages) ,
- Package contents manual (7 pages) ,
- Admin manual (6 pages)
Table of Contents
Advertisement
Quick Links
Advertisement
Table of Contents

Related Manuals for Cisco SPA 303


Summary of Contents for Cisco SPA 303
- Page 1 Cisco SPA 303 Phone Owner’s Manual V.3...
-
Page 2: Table Of Contents
Using Your Hosted PBX phone system ......................7 System Description ............................. 7 Getting Started ............................7 Introduction to your Cisco Desk Phone ...................... 7 Before You Use Your Phone ......................... 7 Soft key Buttons your Cisco Phone ......................8 Information Screen ........................... 10 Main Menu Screen: ........................... - Page 3 Retrieving messages from your Desk Phone .................... 24 Retrieving messages when you are away from the office................ 25 Returning a Call ............................25 Change your Voicemail PIN ........................25 Record a Personal Greeting via the Phone ....................25 Forward Voicemail Messages via the Phone .................... 26 Logging into your Voicemail Box via the Web ..................
- Page 4 Radio Interference ............................ 51 RF Radiation Exposure ..........................52 Modifications............................. 52...
-
Page 5: Introduction
Introduction Congratulations on purchasing the Intermedia Hosted PBX phone system and service. You will now be able to share your phone connection between fixed & wireless handsets and across multiple locations using the latest in ‘Voice over IP’ services. This User Guide will show you how to setup and use your new PBX phone system and service. -
Page 6: Basic Requirements
Basic Requirements The Hosted PBX phone system is designed to use your existing broadband data connection as well as the existing data wiring in your office. Where you don’t have data wiring, you may use the optional Wireless Transmitter and Wireless Adapters to connect Desk Phones wirelessly. -
Page 7: Using Your Hosted Pbx Phone System
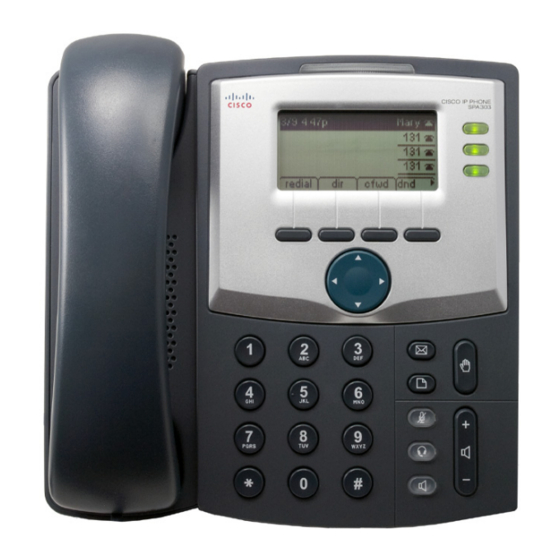
It also explains how to program system settings for your Desk Phones. Introduction to your Cisco Desk Phone The Cisco SPA 303 Desk Phone provides a powerful, yet flexible IP communications solution, delivering excellent voice quality. The high- resolution graphic display supplies content for call information, directory access, and system status. - Page 8 Soft key action shown on the label of the IP phone Buttons screen. Note: The Cisco SPA 303 has the following four buttons: Redial - Dials the last number called. Dir - Accesses the Directory. Cfwd – Forwards all calls.
- Page 9 Navigation button Press an arrow key to scroll left, right, up, or down through items shown on the IP phone screen Messages button Press to access voice mail. Hold Button Press to place call on hold. Press to access a menu to configure features and preferences (such as your Setup button directory, status, and speed dials), access...
-
Page 10: Soft Key Buttons Your Cisco Phone
Soft key Buttons your Cisco Phone This section contains information on the terms used when interacting with your new Cisco SPA 303 Desk Phone. The soft key buttons on your phone display might vary depending on your phone model and the phone system setup. Press the Right Arrow or Left Arrow keys on the navigation button to view additional soft key buttons. - Page 11 Clears Do Not Disturb. -dnd edit Opens an items so that you can edit numbers or letters, or enable or disable a feature. ignore Ignores an incoming call. Dials the last call received. miss Shows the Missed Calls list. park Puts a call on hold at a designated “park”...
-
Page 12: Information Screen
Information Screen The display screen of your phone provides you with a host of important information elements. This screen is also referred to as the idle screen. The screen displays: • Popup text • Do Not Disturb text • Missed call text or second incoming caller display •... -
Page 13: Main Menu Screen
Main Menu Screen: This screen is the first point for more menu selections. You can reach this menu at any time by pressing Adjusting the Volume To adjust the volume of the handset or speaker, lift the handset or press the Speaker button. -
Page 14: Desk Phone- Basic Call Features
Desk Phone– Basic Call Features Placing Calls You can place a call in many ways using your Desk Phone: • using the handset • using the speakerphone • using the headset You can also dial the number first—called “hot dialing”— and then choose the method you will use to speak to the other party. -
Page 15: Placing A Second Call
Press Dial the desired number using the dial pad. Placing a second call While on a call, you may place that call on hold and make a second call. There are two ways to place another call: Method 1 Pressing a line button on the right of the display, will place the first call on hold AND at the same time give a dial tone to make a second call Dial the 10-digit phone number or 3-digit extension number... -
Page 16: Answering Calls
Answering Calls There are a few methods to answer a call, similar to those of placing a call. • using the handset • using the speakerphone • using the headset To answer a call using the handset: Pick up the handset. To answer a call using Hands-Free Speakerphone mode: Press OR press the answer soft key and speak into the phone. -
Page 17: Ending Calls
Ending Calls To end a call: Do one of the following: •If you are using the handset, Press the Line key to right of the display or replace the handset. •If you are using a headset, press •If you are using the speakerphone, press Forwarding Calls You can configure your phone so that all incoming calls are forwarded to another party (refer to Static Forwarding). - Page 18 From the idle display, press the –cfwd soft key on the display. The idle display returns, and the date and time are displayed. Dynamic Forwarding This Feature Is snot supported by the Cisco SPA 303 Enabling Do Not Disturb Do Not Disturb prevents the phone from ringing and sends callers directly to your voicemail box.
-
Page 19: Call Management Features
Call Management Features Call Hold To place a call on hold. During a call, press the hold soft key or . The Holding will display. The caller will hear the standard hold music or your custom hold music/message. Press resume soft key to return to the caller. Multiple Calls on Hold If calls are on hold, you can view the details of the calls on your phone by using the up and down arrows to toggle the active call list. -
Page 20: Splitting Conference Calls
call on hold by pressing confLx on the display. The confLx function is only available if you have only two calls on your phone. To join two calls with yourself: Have one call on hold while talking to another Press > on the arrow pad and then press c onf Lx . You will then be connected to both callers. -
Page 21: Transferring Calls
From the Active Conference page, press or hang up. **NOTE: For the other parties to remain connected you must press the join soft key and then hang up otherwise the other callers will remain connected. Transferring Calls Call Transfer allows you to send an active call to another phone number or extension. -
Page 22: Call Transfer To Voicemail
Press the dial soft key At this point, the call is connected to the number to which you are transferring them. Call Transfer to Voicemail You may transfer any caller to a specific voicemail box belonging to any other user on the system. Receive or place a call on your Desk Phone Press xfer soft key Dial *99 followed by the extension number of the desired person... -
Page 23: Paging (Intercom)
Call Park Groups. To Park a Call: While on a call, press the park soft key. The phone will respond with a voice prompt such as “Call Parked o n 9001”. The caller will hear hold music. To pick up the parked call, anyone on any phone may dial the park number (9001 in this example) to be connected with the caller. -
Page 24: Mute
Mute The mute feature allows you to hear the other party, but they cannot hear you. During a call, press . The button turns red and a microphone on the screen indicates that the other party (or parties) cannot hear you. Microphone Mute applies to all modes: Handset, Headset, and Hands-free Speakerphone. -
Page 25: Call Recording
Call Recording The Call Recording feature allows you to record calls whenever you wish via the *80 command. Intermedia Call Recording comes in two flavors; Automatic and On Demand. Only On Demand recording may be initiated from the desk phone. On Demand Call Recording On Demand call recording allows you to turn the recording of a conversation on and off at any time during a phone call. -
Page 26: Managing Incoming Calls
Managing Incoming Calls You can distinguish incoming calls by setting distinctive rings for contacts in your contact directory, sending particular calls directly to your voice mail, or transferring particular calls to another party. Rejecting Calls You can customize your phone so that incoming calls from a particular party are immediately sent to your voice mail. -
Page 27: Using Voicemail
Using Voicemail Each phone receives a Voicemail box which can record up to 90 minutes of messaging with a maximum of 5 minutes per message. Each user can record his or her personal greeting for the voicemail box. Voicemail is automatically saved for 90 days. -
Page 28: Retrieving Messages When You Are Away From The Office
Retrieving messages when you are away from the office Dial your Desk Phone and allow it to ring When your voicemail greeting begins to play, enter your PIN over your greeting. Returning a Call While listening to a message or after listening to a message, press 9* to call that person back You may return to your voicemail box WITHOUT calling back in by pressing ## after talking to the person you called back... -
Page 29: Forward Voicemail Messages Via The Phone
Forward Voicemail Messages via the Phone A user can forward a voicemail from his or her voicemail box to another voicemail box or group of voicemail boxes. Once logged in to your voicemail box, press 1 to listen to your message(s) Press 6 at any time while listening to the message to for after the message... -
Page 30: Forward Voicemail Messages Via The Web
Forward Voicemail Messages via the Web A user can forward a voicemail message from his or her voicemail box to another voicemail once logged into the personal website. Voicemail messages may be forwarded via email to anyone or forwarded directly into another person’s voicemail box (providing they are in your company and have an Intermedia phone) Once logged in click the Forward button associated with the... - Page 31 If you have entered email address, fill in your email address, the subject line and any message you wish to include Select the delivery method: Send a link to the voicemail message or sent the voicemail message as an attachment Click the Send button when finished...
-
Page 32: Voicemail Notification Via Email
Voicemail Notification via Email You may setup your voicemail box to send you an email alert whenever someone leaves you a voicemail message. Go to https://www.intermedia.net/accesslinelogin/index.asp Enter your Desk Phone Number and PIN Click Login Select the Personal Info Tab at the top of the web page Select the Notification button Enter your email address in the space provided (you may enter multiple email addresses) -
Page 33: To Create A Voicemail Group
To Create a Voicemail Group A Voicemail Group allows you to quickly forward a voicemail message to multiple other people without entering each person individually. Voicemail groups are created through your personal website. Once logged in, select the Personal Info Tab Select the Group Manager button Click the Create Group button Assign a Group Number- used when forwarding to a group... -
Page 34: Change The Number Of Rings Before Voicemail Picks Up
Change the Number of Rings Before Voicemail Picks Up Your Voicemail box is programmed to take messages when you can’t answer your phone. If you want the phone to ring more or less times, you may change this setting: Press the Select or Press # 6 Call Forward Select or Press # 4 CFWD No Ans Delay Change the number of seconds you would like the phone to Ring... -
Page 35: Call Lists And Directories
Call Lists and Directories Managing Call Lists Your phone maintains local lists of missed, received, and placed calls. Each list contains 100 entries. Press the , Press option 3 Call History to obtain a list of all the record types you can clear at once using the delAll soft key. You can manage each of the call lists by doing the following: Using the arrow pad or # associated to the List you want to manage. -
Page 36: Managing Contacts
Managing Contacts You can store 99 contacts in your phone’s directory. You can add, edit, delete, dial, or search for a contact in this directory. You can dial or search for a contact in this directory. You may be able to add, edit, and delete contacts. -
Page 37: Adding Contacts From Call Lists
7. (Optional.) Change the Ring Type by pressing the option soft key, Using the Arrow pad select the desired Ring by using the select soft key 8. Once you are done press the save soft key. Adding Contacts From Call Lists To add a contact to the local contact directory from a call list: 1. -
Page 38: Deleting Contacts
Deleting Contacts To edit a contact in the local contact directory: 1. Press the dir soft key Using the Arrow Pad locate the contact you would like to edit Press the delete soft key You MUST press the ok soft key... -
Page 39: Placing Calls To Contacts
Placing Calls to Contacts To place a call to a contact in the local contact directory use one of the two methods below: Press the dir soft key Using the Arrow Pad select the contact you want to dial Then Press the dial soft key From the idle screen press the Select # 1 Directory by pressing the select soft key 3.Using the Arrow Pad select the contact you want to dial... -
Page 40: Customizing Your Phone
Customizing your Phone You can customize your Cisco SPA 303 Desk Phone by adjusting the setting for time and date, and ring type, for example. You can add contacts to the phone’s directory manually or from call lists. You can handle incoming calls from different contacts in different ways. -
Page 41: To Adjust The Display Contrast
To Adjust the Display contrast: 1. Press 2. Select #16 LCD Contrast using the Arrow Pad and select soft key 3. Use the Arrow Pad to adjust the contrast to the desired level 4. Press the save soft key 5. The cancel soft key will return you to the idle screen The following figure shows the Clock Time Selecting the Ring Type You can select different ring types to distinguish your phone from your... -
Page 42: Changing The Language
Changing the Language Many languages are supported by the Desk Phone. To change the language: Press Select # 17, Language using the select soft key Select the Language want and press the save soft key Background, screen saver and the advanced settings options are not currently supported on this model. -
Page 43: Installation Overview
Installation Overview Before you Begin Your Installation The Hosted PBX phone system is designed to use your existing broadband data connection as well as the existing data wiring in your office. Where you don’t have data wiring, you may use the optional Wireless Transmitter and Wireless Adapters to connect Desk Phones wirelessly. - Page 44 This diagram depicts your setup options. By purchasing the optional Wireless Transmitter and Wireless Adapters you may also connect Desk Phones wirelessly. The following setup options ARE NOT supported: 1. Connecting one phone to another 2. Connecting a phone to the base unit then connecting a PC 3.
-
Page 45: Assigning Extension Numbers And Phone Numbers To Phones
Assigning Extension Numbers and Phone Numbers to Phones Each phone is assigned an extension and a phone number. Packing list includes a list of your phones and their associated phone numbers and extension. You should have also received and email from Intermedia with the phone numbers and extensions associated with each enhanced services such as an Auto Attendant or WebFax. -
Page 46: Installing Your Hosted Pbx Phone
Installing your Hosted PBX Phone Installing Desk Phones Desk Phones can be installed in the following ways • You may connect Desk Phones Wirelessly to the Optional Wireless Transmitter and the Optional Wireless Adapters • You may connect Desk Phones to your existing router •... -
Page 47: Option 2: Connect Desk Phones Using Your Existing Data Network Then Connect The Phones To Your Computer
Use the included LAN cable; connect one end into the port on the back of the phone labeled SW and connect the other end into any data port on your network (router, switch or wall jack). Option 2: Connect Desk phones using your existing data network then connect the phones to your computer If you already have a computer using a wall data jack or router/switch port, unplug the computer from the network, then connect the phone using the... -
Page 48: Connecting Wired And Wireless Headsets
Connecting Wired and Wireless Headsets The Cisco SPA 303 supports headsets from different manufacturers. Additional information can be found at the manufacturer’s websites: http://www.plantronics.com http://www.jabra.com Each brand and type of headset may require different steps for connection. Consult the documentation for your particular headset for more information. -
Page 49: Installing The Desk Phone Wirelessly
Installing the Desk Phone Wirelessly The wireless adapter allows a desk phone to be used without a cord connecting it to the Wireless Transmitter. The range of the Wireless Adapter is 40 feet from the base unit. Step 1) Installing the Wireless Transmitter Plug the Wireless Transmitter into a free port on your router or switch. - Page 50 Before you can make or receive calls, you need to activate your phone line(s). This also activates the billing for your phone line(s). To activate your phone line(s): 1. Go to https://exchange.intermedia.net and enter your Administrator Portal login name and password 2.
-
Page 51: Conformance
IMPORTANT SAFETY CONFORMANCE INFORMATION FOR IP PBX BASE UNIT AND DESKPHONES Conformance This equipment is designed for use in the United States. This equipment complies with the following standards: FCC Part 15, Subparts B, C, D FCC Part 68 UL60950 Analog extension ports: TNV3 CO port: TNV3 ADSL port: TNV3... - Page 52 dangerous voltages or other risks. Incorrect re-assembly can cause electric shock when the product is subsequently used. • Unplug this product from the wall outlet and refer servicing to qualified service personnel under the following conditions: - When the power supply cord or plug is damaged or frayed. - If liquid has been spilled into the product.
-
Page 53: Fcc Information
FCC Information This equipment complies with Part 68 of the FCC rules and the requirements adopted by ACTA. A FCC compliant telephone cord and modular plug is provided with this equipment. This equipment is designed to be connected to the telephone network or premises wiring using a compatible modular jack that is Part 68 compliant. -
Page 54: Automatic Dialers
Port USOC Line 1 02LS2 9.0Y RJ11C 0.1B Line 2 02LS2 9.0Y RJ11C 0.1B Line 3 02LS2 9.0Y RJ11C 0.1B Phone 02LS2 9.0Y RJ11C 0.1B Automatic Dialers WHEN PROGRAMMING EMERGENCY NUMBERS AND (OR) MAKING TEST CALLS TO EMERGENCY NUMBERS: 1. Remain on the line and briefly explain to the dispatcher the reason for the call. - Page 55 • Connect the equipment into an outlet on a circuit different from that to which the receiver is connected. • Consult the dealer or an experienced radio/TV technician for help. RF Radiation Exposure This equipment complies with FCC radiation exposure limits set forth for an uncontrolled environment.