Table of Contents
Advertisement
S e n d d o c u m e n t c o m m e n t s t o u c s - d o c f e e d b a c k @ c i s c o . c o m
Cisco UCS B200 Blade Server Installation and
Service Note
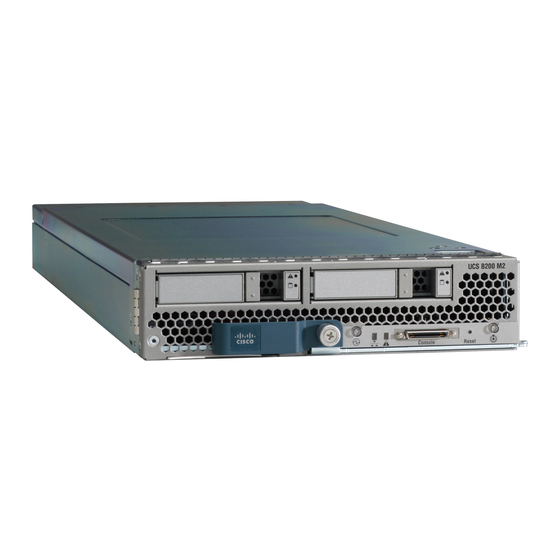
The UCS B200 blade server (shown in
is no longer sold as of 1/21/2011). The procedures in this document apply to both versions. The Cisco
UCS B200 is a half-width blade with 12 DIMM slots; it supports one adapter. You may install up to eight
UCS B200 Blade Servers to a UCS chassis.
Figure 1
1
Asset tab
2
Blade ejector handle
3
Ejector captive screw
4
Hard drive bay 1
5
Hard drive bay 2
6
Power button and LED
Each server has a blank plastic tag that pulls out of the front panel, provided so you can add your
1.
own asset tracking label without interfering with the intended air flow.
Americas Headquarters:
Cisco Systems, Inc., 170 West Tasman Drive, San Jose, CA 95134-1706 USA
Figure
Cisco UCS B200 Front Panel
4
1
2
1
1) is now only available in the M2 version (the M1 version
5
3
6
7
8
7
Network link status LED
8
Blade health LED
9
Console connector
10 Reset button access
11 Beaconing LED and button
9
10
11
Advertisement
Table of Contents

Related Manuals for Cisco UCS B200


Summary of Contents for Cisco UCS B200
- Page 1 1/21/2011). The procedures in this document apply to both versions. The Cisco UCS B200 is a half-width blade with 12 DIMM slots; it supports one adapter. You may install up to eight UCS B200 Blade Servers to a UCS chassis.
- Page 2 If the desired power state for a service profile associated with a blade server or an integrated rack-mount server is set to "off", using the power button or Cisco UCS Manager to reset the server will cause the desired power state of the server to become out of sync with the actual power state and the server may unexpected shutdown at a later time.
- Page 3 The KVM cable (N20-BKVM shown in Figure 2) provides a connection into a Cisco UCS blade server, providing a DB9 serial connector, a VGA connector for a monitor, and dual USB ports for a keyboard and mouse. With this cable you can create a direct connection to the operating system and the BIOS running on a blade server.
- Page 4 üblichen Verfahren zur Vorbeugung vor Unfällen vertraut. Suchen Sie mit der am Ende jeder Warnung angegebenen Anweisungsnummer nach der jeweiligen Übersetzung in den übersetzten Sicherheitshinweisen, die zusammen mit diesem Gerät ausgeliefert wurden. BEWAHREN SIE DIESE HINWEISE GUT AUF. Cisco UCS B200 Blade Server Installation and Service Note OL-22473-02...
- Page 5 Använd det nummer som finns i slutet av varje varning för att hitta dess översättning i de översatta säkerhetsvarningar som medföljer denna anordning. SPARA DESSA ANVISNINGAR Cisco UCS B200 Blade Server Installation and Service Note OL-22473-02...
- Page 6 S e n d d o c u m e n t c o m m e n t s t o u c s - d o c f e e d b a c k @ c i s c o . c o m Cisco UCS B200 Blade Server Installation and Service Note...
- Page 7 Brug erklæringsnummeret efter hver advarsel for at finde oversættelsen i de oversatte advarsler, der fulgte med denne enhed. GEM DISSE ANVISNINGER Cisco UCS B200 Blade Server Installation and Service Note OL-22473-02...
- Page 8 S e n d d o c u m e n t c o m m e n t s t o u c s - d o c f e e d b a c k @ c i s c o . c o m Cisco UCS B200 Blade Server Installation and Service Note...
-
Page 9: Installing And Removing A Blade Server Hard Drive
UCS Manager. If the drive being replaced was part of a RAID array we recommend using a newly ordered drive of identical size, model, and manufacturer to replace the failed drive. Cisco recommends following industry standard practice of using drives of the same capacity when creating RAID volumes. -
Page 10: Removing A Blade Server Hard Drive
To remove a hard drive from a blade server, follow these steps: Push the button to release the ejector, and then pull the hard drive from its slot. Step 1 Cisco UCS B200 Blade Server Installation and Service Note OL-22473-02... -
Page 11: Installing A Blade Server Hard Drive
Step 1 Figure 4 Installing a Hard Drive in a Blade Server Gently slide the hard drive into the opening in the blade server until it seats into place. Step 2 Cisco UCS B200 Blade Server Installation and Service Note OL-22473-02... -
Page 12: Removing And Installing A Ucs B200 Blade Server
You can invoke a graceful shutdown or an emergency shutdown (hard shutdown) by using either of the following methods: Use the UCS Manager. See either the Cisco UCS Manager GUI Configuration Guide or the Cisco • UCS Manager CLI Configuration Guide. -
Page 13: Removing A Cisco Ucs B200 Blade Server
To install a blade server, follow these steps: Grasp the front of the blade server and place your other hand under the blade to support it. See Figure Step 1 Cisco UCS B200 Blade Server Installation and Service Note OL-22473-02... -
Page 14: Removing A Blade Server Cover
Replacing the cover is the reverse of removing the cover. To open a blade server: Step 1 Press and hold the button down as shown in Figure 6 Step 2 While holding the back end of the cover, pull the cover up and back. Cisco UCS B200 Blade Server Installation and Service Note OL-22473-02... -
Page 15: Air Baffles
M2 models, they direct and improve air flow for the server components. No tools are necessary to install them, just place them over the DIMMs as shown. Figure 7 Cisco UCS B200 Air Baffles Left Baffle Right Baffle Cisco UCS B200 Blade Server Installation and Service Note OL-22473-02... -
Page 16: Internal Components
HDD status LEDs are on the front face of the HDD. Faults on the CPU, DIMMs, or adapter cards will also cause the server health LED to light solid Amber for minor error conditions or blinking Amber for critical error conditions. Cisco UCS B200 Blade Server Installation and Service Note OL-22473-02... -
Page 17: Installing A Motherboard Cmos Battery
Ensure that the retaining clip clicks over the top of the battery. Replace the top cover. Replace the server in the chassis and power on the blade by pressing the Power button. Cisco UCS B200 Blade Server Installation and Service Note OL-22473-02... -
Page 18: Cpu Replacement
2.26 GHz 1066 N20-X00004 / Xeon L5520 2.26 GHz 1066 N20-X00006 / Xeon X5550 95 W 2.66 GHz 1333 8 MB N20-X00009 / Xeon E5504 80 W 2.00 GHz 8 MB Cisco UCS B200 Blade Server Installation and Service Note OL-22473-02... -
Page 19: Removing A Cpu And Heat Sink
10, callout 2. Remove the old Step 2 thermal compound from the bottom of the heat sink using the cleaning kit (UCSX-HSCK= ) available from Cisco. Follow the instructions on the two bottles of cleaning solvent. Unhook the socket latch. See Figure 10, callout 3. -
Page 20: Installing A Cpu And Heat Sink
To install a CPU and heat sink, follow these steps: Step 1 Place the CPU on the base with the notches aligned to the pins on the base. See Figure 11, callout 1. Cisco UCS B200 Blade Server Installation and Service Note OL-22473-02... -
Page 21: Installing Memory
Secure the heat sink to the motherboard by tightening the four captive screws. See Figure 11, callout 6. Step 6 Installing Memory To install a DIMM into the B200 blade server, follow these steps: Open both DIMM connector latches. Step 1 Cisco UCS B200 Blade Server Installation and Service Note OL-22473-02... -
Page 22: Supported Dimms
Press the DIMM connector latches inward slightly to seat them fully. Step 3 Supported DIMMs The following tables list the type of DIMMs that Cisco Systems makes available for use with this blade server: Table 5 Cisco Systems Supported DIMMs for M1 Servers... -
Page 23: Low-Voltage Dimm Considerations
2. Low voltage DIMMs require Cisco UCS Manager version 1.2(1) or later, and the related BIOS package. 3. 16 GB DIMMs require Cisco UCS Manager version 1.4(1) and UCS capability catalog version 1.0.16 or later, and the related BIOS package. -
Page 24: Memory Arrangement
CPU, while the DIMM slots in the lower left are associated with the left CPU. Figure 14 Physical Representation of DIMMs and Channels Battery Cisco UCS B200 Blade Server Installation and Service Note OL-22473-02... -
Page 25: Memory Performance
DIMMs per Channel (2DPC) configuration. Each CPU in a Cisco UCS B200 blade server supports 3 channels of 2 memory slots each. In a 1 DPC configuration, DIMMs are in slot 1 only. In a 2 DPC configuration, DIMMs are in both slot 1 and slot 2. -
Page 26: Bandwidth And Performance
Use Intel Xeon X5570 or X5550 processors (PIDs N20-X00001 and N20-X00006). • Use only Cisco certified single or dual rank DIMMs that support 1333 MHz speeds (see Table DIMMs do not have to be identical in type or capacity, but beware of the caveats listed in the section below regarding performance degradation. -
Page 27: Installing An Adapter Card
Position the adapter board connector above the mother board connector and align the three adapter Step 1 captive screws to the posts on the motherboard. Firmly press the adapter connector into the motherboard connector. Step 2 Tighten the three captive screws. Step 3 Cisco UCS B200 Blade Server Installation and Service Note OL-22473-02... -
Page 28: Server Troubleshooting
UCS servers are intended to be configured and managed using UCS Manager. Refer to the UCS Manager Configuration Guide appropriate for your UCS Manager version Server Specifications Table 9 Physical Specifications for the Cisco UCS B200 Blade Server Specification Value Height 1.95 inches (50 mm) Width 8.00 inches (203 mm) -
Page 29: Related Documentation
RSS feeds are a free service. Cisco and the Cisco logo are trademarks or registered trademarks of Cisco and/or its affiliates in the U.S. and other countries. To view a list of Cisco trademarks, go to this URL: www.cisco.com/go/trademarks. Third-party trademarks mentioned are the property of their respective owners. The use of the word partner does not imply a partnership relationship between Cisco and any other company. - Page 30 S e n d d o c u m e n t c o m m e n t s t o u c s - d o c f e e d b a c k @ c i s c o . c o m © 2009–2012 Cisco Systems, Inc. All rights reserved. Cisco UCS B200 Blade Server Installation and Service Note OL-22473-02...