Advertisement
Table of Contents
- 1 Table of Contents
- 2 Introduction
- 3 Safety Precautions
- 4 Assembly and Commissioning Instructions
- 5 Step
- 6 Standard Control Box & Hand Control
- 7 Smart Monitor & Hand Control
- 8 Operating Instructions
- 9 Point Bari Loop Spreader Bar System
- 10 Charging Instructions
- 11 Maintenance Schedule and Daily Check List
- 12 Lifter Maintenance Checklist
- 13 Specifications
- 14 Warranty
- Download this manual
Advertisement
Table of Contents

Related Manuals for Joerns Healthcare Hoyer HPL700


Summary of Contents for Joerns Healthcare Hoyer HPL700
- Page 1 User Instruction Manual Hoyer HPL700 ® To avoid injury, read user manual prior to use.
-
Page 2: Table Of Contents
Hoyer ® English HPL700 Contents 1. Introduction ........................3 2. Safety Precautions ......................4 3. Assembly and Commissioning Instructions ..............6 4. Standard Control Box & Hand Control ................10 5. Smart Monitor & Hand Control ..................11 6. Operating Instructions ....................15 7. -
Page 3: Introduction
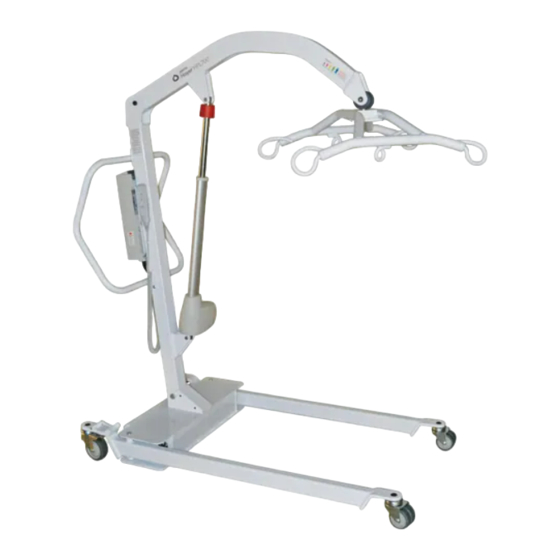
The Hoyer HPL700 lift incorporates a 6-point Bari loop spreader bar, as standard and is designed to be used in conjunction with the Hoyer range of slings. The examples of slings suitable for use with this device are listed as follows: •... -
Page 4: Safety Precautions
Following these few basic safety precautions will make lifting operations easy and trouble free. READ AND UNDERSTAND THE USER INSTRUCTION MANUAL BEFORE USING THE HOYER HPL700 LIFT WARNING: Important safety information for hazards that might cause serious injury. CAUTION: Information for preventing damage to the product. - Page 5 Hoyer ® English HPL700 • NEVER force an operating/safety control. All controls are easy to use and do not require excessive force. • DO NOT park a loaded lift on ANY sloping surface. • DO NOT use electric lifts in a shower. •...
-
Page 6: Assembly And Commissioning Instructions
® HPL700 is heavy and will need to be lifted with care. You may need assistance to lift the Hoyer HPL700 from the carton. Carton Contents Place the carton in a clear working area and open carefully. The carton contains: Ÿ... -
Page 7: Step
Hoyer ® English HPL700 Step 4 Step 5 Figure 3 Step 6 3. Lift the mast assembly from the base. The assembly needs to be rotated and positioned close to vertical so the handle is to the rear of the lift (Figure 3). WARNING Do not damage the cord that runs from the mast to the base. - Page 8 Hoyer ® English HPL700 Step 7 Steps 8, 9 Figure 5 Figure 4 Step 7 7. Attach the front and rear covers (Figures 4 and 5), using the screws provided. 8. Remove the key ring fastener from the boom actuator mounting bracket. Remove the pin (Figure 5).
- Page 9 Hoyer ® English HPL700 Always Check the Following Before Operation • The mast is securely bolted into place per Steps 5 and 6. • The red emergency stop is located on the front of the control box. Twist clockwise for normal lift operation (on).
-
Page 10: Standard Control Box & Hand Control
Hoyer ® English HPL700 4. Standard Control Box & Hand Control Detachable Battery Pack Raise & Lower Buttons Legs Open / Emergency Stop Button Close Buttons Hand Control Emergency Raise & Lower Redundant Controls Actuator Hand Control Actuator Information Connection Connection Screen Socket... -
Page 11: Smart Monitor & Hand Control
Hoyer ® English HPL700 5. Smart Monitor & Hand Control Detachable Battery Pack Emergency Stop Button Smart Monitor Raise & Lower Buttons Emergency Raise & Lower Redundant Controls Legs Open / Close Legs Open / Redundant Controls Close Buttons Hand Control Actuator Actuator Information... - Page 12 Hoyer ® English HPL700 Intended Use The Hoyer Smart Monitor is a control system for Hoyer lifts. The Smart Monitor stores useful servicing information about the lift that can be recalled when required. This servicing information includes: • Number of patient lift cycles •...
- Page 13 WARNING If the LCD display screen on your Smart Monitor has recorded an overload, Joerns Healthcare recommend that ALL routine daily checks are carried out on the lift prior to further use (for a list of daily checks, please refer to your lift user manual). Joerns Healthcare also recommend that you contact your authorised Hoyer service provider for additional guidance.
- Page 14 Hoyer ® English HPL700 On-Board Redundant Controls: On-board redundant controls enable the lift to be raised or lowered in the event of an emergency (Fig. 10). Fig. 10 If your lift incorporates powered leg positioning, there are redundant controls to both open and close the legs. (Fig 11). Fig.
-
Page 15: Operating Instructions
Always carry out the daily checklist before each lift use. 1. Leg Adjustment The legs on the Hoyer HPL700 are electrically adjustable for width. The legs can be opened to enable access around armchairs or wheelchairs. For transferring and negotiating narrow doorways and passages, the lift legs should be in the closed position. - Page 16 Complete the lifting operation and place the battery on charge (see charging instructions). 8. Slings The Hoyer HPL700 has a 6-point bari loop spreader bar. The 6-point system uses slings with webbing loops which allow positioning adjustment by selecting different colored straps.
-
Page 17: Point Bari Loop Spreader Bar System
Hoyer ® English HPL700 7. 6-Point Bari Loop Spreader Bar System Follow these instructions exactly ® Your Hoyer HPL700 lift uses 6-point Bari loop spreader bar. The removal of this system is completed easily by the use of a quick-release pin. This is done quickly and easily, but you must read the following safety instructions to ensure the spreader bar is safely locked into position before use. - Page 18 Hoyer ® English HPL700 Figure 11 Once aligned in the boom slot reinsert the quick release pin fully into the sleeve until it locks into position (Figure 11). YOU MUST CHECK THAT THE PIN IS SECURELY FITTED. To do this, press your finger into the barbed end. If the pin remains stationary, the lift is safe to use. Figure 10 HPL700WSC (with scale): Place a plastic washer on each side of scale housing, align holes, align these items within the end...
-
Page 19: Charging Instructions
Hoyer ® English HPL700 8. Charging Instructions When the power pack needs charging it is removed from the lift and fitted to an off board charging unit. 1. Remove the power pack from the lift. The pack is retained by a simple latch at the top of the power pack. -
Page 20: Maintenance Schedule And Daily Check List
- EXAMINE slings for fraying or other damage. DO NOT use any sling if damaged or if the sling shows signs of wear. MAINTENANCE Joerns Healthcare recommends regular inspection and maintenance. Please refer to the chart on the next page. -
Page 21: Lifter Maintenance Checklist
Hoyer ® English HPL700 10. Lifter Maintenance Checklist *THESE CHECKS SHOULD INCLUDE: ü = Recommended 1. SPREADER BAR: Check the spreader bar for freedom of rotation and ü ü ü swing. Check for wear on the central pivot. Check for firm attachment to the boom. -
Page 22: Specifications
Hoyer ® English HPL700 11. Specifications Safe Working Load ................. 700 lbs ....227kg Maximum Overall Length................56" ....1423mm Minimum Overall Length................55" ....1397mm Maximum Overall Height ................81" ....2058mm Minimum Overall Height ................57.75" ....1467mm Height at Maximum Reach ................ - Page 23 Hoyer ® English HPL700 Electrical Specifications: Batteries ..........2 x 12 Volt rechargeable sealed lead acid type Battery Capacity ........2.9 Ampere hours Charger Rated Input ......100-240V AC/24 VDC 50/60 Hz. Max 400MA Charger Rated Output ......29.5 VDC. Max 19W Electric Shock Protection: Charger..........
- Page 24 Hoyer ® English HPL700 KEY SYMBOLS: The following symbols are used on the charger, control box and battery: Type B equipment, as per EN 60601-1 Class 2 equipment The disposal of the charging and control box should not be mixed with general household waste.
-
Page 25: Warranty
Joerns Healthcare’s obligation under this warranty is limited to supplying replacement parts, servicing or replacing, at its option, any product which is found by Joerns Healthcare to be defective. Warranty replacement parts are covered by the terms of this warranty until the product’s original warranty period expires.