Buffalo AirStation Pro WAPS-APG600H User Manual
1n/a & 11n/g/b smart model
Hide thumbs
Also See for AirStation Pro WAPS-APG600H:
- User manual (94 pages) ,
- User manual (105 pages) ,
- User manual (99 pages)

Related Manuals for Buffalo AirStation Pro WAPS-APG600H


Summary of Contents for Buffalo AirStation Pro WAPS-APG600H
-
Page 1: User Manual
User Manual 11n/a & 11n/g/b Concurrent Smart model WAPS-APG600H 11n/a, 11n/g/b Single Smart model WAPS-AG300H www.buffalotech.com... -
Page 2: Table Of Contents
Contents Chapter 1 - Product Overview ......... 3 Package Contents ..............3 Hardware Overview ..............4 Front Panel LEDs ................4 Back Panel ..................6 Chapter 2 - Placing Your AirStation ........ 8 Antenna Placement ..............8 Installation .................8 Connecting Power Sourcing Equipment (Sold Separately) ... 8 Connecting the AC Adapter (Sold Separately) ....... - Page 3 Manual Setup ................29 Windows 7 (WLAN AutoConfig) ............. 29 Windows Vista (WLAN AutoConfig) ..........30 Windows XP (Wireless Zero Configuration) ........33 Mac OS X (Wi-Fi) ................34 Chapter 4 - Checking Wireless Signal Quality ....35 Chapter 5 - Default Configuration Settings ....38 Appendix A - Specifications ..........
-
Page 4: Chapter 1 - Product Overview
Chapter 1 - Product Overview Package Contents The following items are included in your AirStation package. If any of the items are missing, please contact your vender. • Wireless LAN access point ......................1 • Antennas (Dual band 2.4 GHz / 5 GHz) ................2 •... -
Page 5: Hardware Overview
Chapter 1 Product Overview Hardware Overview Front Panel LEDs Power LED Power is on. Off: Power is off. This LED is off when the “LED setting” is set to Off. Diag LED (Red) This indicates the status of this unit depending on the number of blinks per cycle. - Page 6 Chapter 1 Product Overview 3 blinks Wired Ethernet LAN error. 4 blinks Wireless LAN error. 5 blinks: USB error. 9 blinks System error. Continuously Updating firmware, saving settings, or initializing settings. blinking *1 Never unplug the AC adapter while the Diag LED is blinking continuously. *2 Turn off AirStation first, wait for a few seconds, then turn it back on.
-
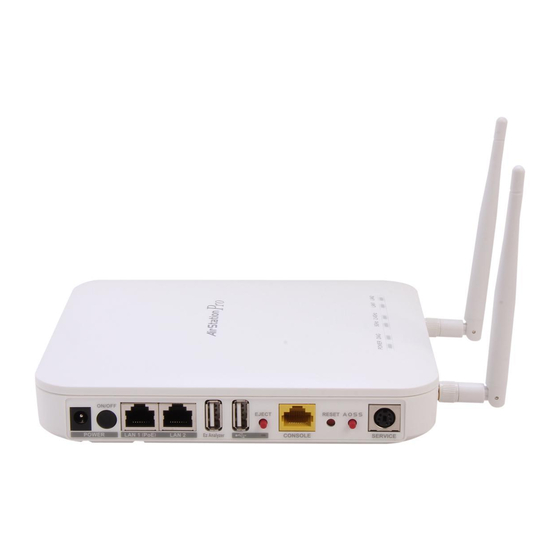
Page 7: Back Panel
Chapter 1 Product Overview Back Panel 13 14 15 DC Connector The AC adapter (WLE-OP-AC12, sold separately) is connected here. Power button This button turns the power on and off . LAN Port The AirStation LAN port is connected to a computer, hub, or other network device using a LAN cable. - Page 8 Chapter 1 Product Overview USB LED (Green) USB memory device is being used. Randomly blinking: USB memory device can be removed. RJ-45 serial console This is an RJ-45 serial console port for settings. This cannot be used in the port for settings current firmware version.
-
Page 9: Chapter 2 - Placing Your Airstation
Chapter 2 - Placing Your AirStation Antenna Placement Remove the antenna cap, and attach the supplied antenna here. The antenna connector can be easily damaged, and so be careful not to touch it. Note: The supplied antenna supports both the 2.4 GHz and 5 GHz bands. Installation Connecting Power Sourcing Equipment (Sold Separately) If PoE (Power over Ethernet) enabled power sourcing equipment (sold separately) is used to provide... - Page 10 Chapter 2 Placing Your AirStation Use a LAN cable to connect the PoE port of the power sourcing equipment to the LAN 1 port of the AirStation. Note: Be sure that the cable connecting the AirStation and power sourcing equipment is an enhanced Category 5 or higher 4-pair cable.
-
Page 11: Connecting The Ac Adapter (Sold Separately)
Chapter 2 Placing Your AirStation Connecting the AC Adapter (Sold Separately) If the AC adapter (WLE-OP-AC12, sold separately) is used to supply power to the AirStation, perform the procedure below to connect the AC adapter. Connect the AC adapter and AC cable. Insert the AC adapter plug into the DC connector of the AirStation. -
Page 12: Initial Setup
Chapter 2 Placing Your AirStation Initial Setup The AirStation configuration interface can be opened for making the default settings. The AirStation Configuration Tool is used to open the setting screen. Install the AirStation Configuration Tool on your computer, and then open the AirStation configuration interface. Note: The computer that opens the setting screen must be a Windows computer with Internet Explorer 8.0 or later installed. -
Page 13: Setting The Airstation Ip Address
Install by following the on-screen instructions. Setting the AirStation IP Address Start the AirStation Configuration Tool. Click [Start] > [All Programs]> [BUFFALO] > [AirStation Utility] > [AirStation Configuration Tool] to launch it. Click [Next]. Highlight an AirStation to configure and click [Next]. - Page 14 Chapter 2 Placing Your AirStation Click [Configure this AirStation IP Address]. Check “Obtain IP address from DHCP server” to have DHCP obtain an IP address automatically, or you may enter IP address settings manually. Click [Next]. Enter the AirStation administrator password (the default setting is “password”), and click [Next].
-
Page 15: Accessing The Web-Based Configuration Interface
Chapter 2 Placing Your AirStation Click [Finish]. Accessing the Web-based Configuration Interface Start the AirStation Configuration Tool. Click [Start] > [All Programs]> [BUFFALO] > [AirStation Utility] > [AirStation Configuration Tool] to launch it. Click [Next]. - 14 -... - Page 16 Chapter 2 Placing Your AirStation Highlight an AirStation to configure and click [Next]. Click [Open Web Setting screen.]. Click [OK]. - 15 -...
-
Page 17: Enabling The Wireless Lan Functions And Making The Encryption Settings
Chapter 2 Placing Your AirStation When the login screen is displayed, enter “admin” for the user name, and enter “password” for the password, and then click [OK]. The AirStation Configuration Interface is displayed. Enabling the Wireless LAN Functions and Making the Encryption Set- tings In the AirStation default state, all of the wireless LAN functions are disabled. - Page 18 Chapter 2 Placing Your AirStation For the WAPS-APG600H, select “11a & 11g interfaces”. For the WAPS-AG300H, select “11g interface” or “11a interface”. Select the Security Mode (example: WPA-PSK). Select “WPA2 Only” for the WPA Type, and select “AES” for the encryption system, set the Pre- Shared Key, and click [Apply].
-
Page 19: Setting The Password In The Configuration Interface
Chapter 2 Placing Your AirStation Setting the Password in the Configuration Interface A user name and password must be entered to log into the configuration interface. If you log into the configuration interface using the administrator name and password, you are provided with privileges for reading and writing all setting parameters and statistical information. - Page 20 Chapter 2 Placing Your AirStation From the left-side menu, click “Admin Config” > “Name / Password”. Enter a new password for the administrator password and user password (Enter the same password again in the Confirm fields.), then click [Apply]. Notes: ·...
-
Page 21: Mounting To A Ceiling Or Wall
Chapter 2 Placing Your AirStation Mounting to a Ceiling or Wall The AirStation can be mounted to a ceiling or wall. Pay careful attention to the following points when mounting. Notes: · Mount in a location with an ambient temperature range from 0 °C to 45 °C, humidity from 10 % to 90 %, and no condensation. - Page 22 Chapter 2 Placing Your AirStation Use the four wooden screws to secure the wall-mounting fixture. Note: For certain usage environments, you may be able to use items other than the supplied screws. Select the most suitable item for use on your mounting surface. Secure the screws.
-
Page 23: Mounting The Security Case (Sold Separately)
Chapter 2 Placing Your AirStation Mounting the Security Case (Sold Separately) Use the four wooden screws to secure the fixture to the wall or ceiling. Secure the screws. Secure the screws. If mounting to a wall, secure so that this section is on the bottom. As shown in the figure, insert the AirStation so that it clicks into place, and then secure it on the wall-mounting fixture. - Page 24 Chapter 2 Placing Your AirStation Insert the key into the cover, and turn to the OPEN position. As shown in the figure, attach the cover while it is slanted. Turn the key to the CLOSE position, and then remove it. - 23 -...
-
Page 25: Removing The Airstation
Chapter 2 Placing Your AirStation Removing the AirStation To remove the AirStation from the fixture, perform the procedure below. Ejector Insert the supplied ejector into the position shown in the figure so that the clips of the AirStation are raised, and then apply force in the direction of the arrow to remove. If the AirStation is still difficult to remove using this procedure, turn the ejector by about 45 degrees so that the clips on the AirStation are raised, and then apply force in the direction of the arrow to remove. -
Page 26: Chapter 3 - Connect To A Wireless Network
Portable Devices (AOSS Devices) • Before using AOSS/WPS to connect to a Buffalo wireless client, install Client Manager software from the included AirNavigator CD. Consult your wireless client’s documentation for more information. • Buffalo’s Client Manager software can be used with the wireless LAN devices built into most computers. -
Page 27: Windows 7/Vista (Client Manager V)
If you are using Windows 7 or Vista, use the included Client Manager V software to connect wirelessly with AOSS/WPS. Click [Start] > [All Programs] > [BUFFALO] > [AirStation Utility] > [Client Manager V]. Click [Create Profi le]. If the User Account Control screen opens, click [Yes] or [Continue]. -
Page 28: Windows Xp (Client Manager 3)
Chapter 3 Connect to a Wireless Network Windows XP (Client Manager 3) If you are using Windows XP, use Client Manager 3 to connect wirelessly with AOSS/WPS. Right click on the icon in the system tray and select [Profi le]. Click the [WPS AOSS] button. -
Page 29: Mac Os X (Aoss Assistant)
Chapter 3 Connect to a Wireless Network Mac OS X (AOSS Assistant) If you are using Mac OS X 10.7 / 10.6 / 10.5 / 10.4, use the included AOSS Assistant software to connect wirelessly with AOSS. Load the AirNavigator CD in your Mac. From the menu bar, click [Go] >... -
Page 30: Manual Setup
Chapter 3 Connect to a Wireless Network Manual Setup You can also connect to the AirStation without installing Client Manager V or Client Manager 3 by using the utility built-in to Windows. The procedure varies depending on which version of Windows you are using. -
Page 31: Windows Vista (Wlan Autoconfig)
Chapter 3 Connect to a Wireless Network Enter the encryption key and click [OK]. Windows Vista (WLAN AutoConfig) With Vista, use WLAN AutoConfig to connect to the AirStation. Right click on the wireless network icon in the system tray. Click [Connect to a network]. When this screen is displayed, select your network and click [Connect]. - Page 32 Chapter 3 Connect to a Wireless Network If the screen below is displayed, click [I want to enter the network key or passphrase instead]. Otherwise,go to step4. - 31 -...
- Page 33 Chapter 3 Connect to a Wireless Network Enter the encryption key and click [Connect]. Step through the wizard to finish configuration. If the Set Network Location screen is displayed, select [Home], [Work], or [Public location] depending on where you’re using the AirStation. - 32 -...
-
Page 34: Windows Xp (Wireless Zero Configuration)
Chapter 3 Connect to a Wireless Network Windows XP (Wireless Zero Configuration) Windows XP includes Wireless Zero Config, a built-in utility to connect to your AirStation. Note: If Client Manager 3 is installed on your computer, Wireless Zero Config is disabled. Uninstall Client Manager 3 to use Wireless Zero Config, or just use Client Manager 3 to connect to the AirStation. -
Page 35: Mac Os X (Wi-Fi)
Chapter 3 Connect to a Wireless Network Mac OS X (Wi-Fi) Use Wi-Fi on a Mac to connect to the AirStation. Note: In Mac OS X 10.6 and earlier, “Wi-Fi” appears as “AirPort”. Click the icon in the top section of the screen and select [Turn Wi-Fi On]. -
Page 36: Chapter 4 - Checking Wireless Signal Quality
Chapter 4 - Checking Wireless Signal Quality For users of Windows 7, Vista, or Mac OS X (10.4 and later), software supplied with the AirStation can be used to check the quality and strength of the wireless signal. Windows 7/Vista Note: ·... - Page 37 Chapter 4 Checking the Wireless Signal Quality and Strength Parameter Meaning Connection status Signal strength (dBm), link speed (Mbps), and signal quality (%) are displayed in one-minute intervals on a real-time graph. Usage status by channel The 11b/11g display shows usage in the 2.4 GHz band channels 1 to 14.
- Page 38 Chapter 4 Checking the Wireless Signal Quality and Strength The software license screen is displayed when starting for the first time only. Click [Agree] to proceed. Parameter Meaning Network name (SSID) This displays the SSID of the AirStation that is currently connected. Status This indicates the current connection status.
-
Page 39: Chapter 5 - Default Configuration Settings
Enable SSID 802.11g : 1 802.11a : 1 SSID 1 802.11g : BUFFALO-XXXXXX (the last 6 digits of the AirStation’s MAC address) + “_G” 802.11a : BUFFALO-XXXXXX (the last 6 digits of the AirStation’s MAC address) + “_A” - 38 -... - Page 40 Chapter 5 Default Configuration Settings Feature Parameter Default Setting VLAN ID 802.11g : 1 802.11a : 1 Auto Channel 802.11g : Enabled 802.11a : Enabled Auto Channel Range 802.11g : 1 - 11 ch 802.11a : W52 Check Channel Time 802.11g : Half Hour 802.11a : Half Hour Channel Bandwidth...
- Page 41 Chapter 5 Default Configuration Settings Feature Parameter Default Setting Security SSID 802.11g : BUFFALO-XXXXXX (the last 6 digits of the AirStation’s MAC address) + “_G” 802.11a : BUFFALO-XXXXXX (the last 6 digits of the AirStation’s MAC address) + “_A” Broadcast SSID 802.11g : Enabled 802.11a : Enabled...
- Page 42 Chapter 5 Default Configuration Settings Feature Parameter Default Setting QoS (priority control) Disabled WMM-EDCA Parameters For AP For STA (Priority AC_BK (Low) ) CWMin CWMax Aifsn Txop WMM-EDCA Parameters For AP For STA (Priority AC_BE (Normal) ) CWMin CWMax Aifsn Txop WMM-EDCA Parameters For AP...
- Page 43 Chapter 5 Default Configuration Settings Feature Parameter Default Setting Date / Time / Local Time 2012 Year 1 Month 1 Day 0 Hour 0 Minute 0 Second NTP Functionality Disabled Server Name None Update Interval 24 hours Time Zone (GMT-6:00) Central America, or (GMT) Greenwich Mean Time: Dublin, Edinburgh, Lisbon, London Syslog Transfer...
-
Page 44: Appendix A - Specifications
Appendix A - Specifications Wireless LAN Interface Standard Compliance IEEE802.11a / IEEE802.11b / IEEE802.11g / IEEE802.11n Transmission Method Direct Sequence Spread Spectrum (DSSS), OFDM, MIMO 802.11a Frequency Range Available 802.11a frequencies depend on the country of purchase. See the next page for details. - Page 45 Appendix A Specifications USB Interface Interface USB 2.0 Connector Type Type A (plug) Compliance 5.0 V 500 mA (max 1000 mA) Other Power Supply External AC 100-240 V Universal, 50/60 Hz Power over Ethernet Power Consumption About 12 W (Max) Dimensions 152 mm x 182 mm x 35mm (5.98 x 7.17 x 1.38 in.) Weight...
-
Page 46: Appendix B - Tcp/Ip Settings
Appendix B - TCP/IP Settings Windows 7 To configure TCP/IP in Windows 7, follow the procedure below. Click [Start] > [Control Panel] > [Network and Internet]. Click [Network and Sharing Center]. Click [Change Adapter Settings] on the left side menu. Right-click on [Local Area Connection], then click [Properties]. -
Page 47: Windows Vista
Appendix B TCP/IP Settings Windows Vista To configure TCP/IP in Windows Vista, follow the procedure below. Click [Start] > [Settings] > [Control Panel]. Click [Network and Sharing Center]. Click [Manage network connections] on the left side menu. Right-click on [Local Area Connection], then click [Properties]. If the User Account Control screen opens, click [Yes] or [Continue]. -
Page 48: Windows Xp
Appendix B TCP/IP Settings Windows XP To configure TCP/IP in Windows XP, follow the procedure below. Click [Start] > [Settings] > [Control Panel]. Double-click [Network]. Right click on [Local Area Connection], then click [Properties]. Select [Internet Protocol (TCP/IP)], then click [Properties]. To have DHCP set your IP address settings automatically, check [Obtain an IP address automatically] and [Obtain DNS server address automatically]. -
Page 49: Mac Os X
Appendix B TCP/IP Settings Mac OS X To configure TCP/IP in Mac OS X, follow the procedure below. Click [Apple menu] > [System Preferences…]. Click [Network]. Click [Ethernet]. To have DHCP set your IP address settings automatically, select [Using DHCP] in the Configure IPv4 field. -
Page 50: Appendix C - Restoring The Default Configuration
Appendix C - Restoring the Default Confi gura- tion With the AirStation powered on, hold down this button for 3 seconds to return it to factory default settings. - 49 -... -
Page 51: Appendix D - Regulatory Compliance Information
Appendix D - Regulatory Compliance Information Federal Communication Commission Interference Statement This equipment has been tested and found to comply with the limits for a Class B digital device, pursuant to Part 15 of the FCC Rules. These limits are designed to provide reasonable protection against harmful interference in a residential installation. -
Page 52: Industry Canada Statement
Appendix D Regulatory Compliance Information Industry Canada statement: This device complies with RSS-210 of the Industry Canada Rules. Operation is subject to the following two conditions: (1) This device may not cause harmful interference, and (2) this device must accept any interference received, including interference that may cause undesired operation. - Page 53 Appendix D Regulatory Compliance Information EN60950-1: 2006 +A11: 2009 Safety of Information Technology Equipment EN50385 : (2002-08) Product standard to demonstrate the compliance of radio base stations and fixed terminal stations for wireless telecommunication systems with the basic restrictions or the reference levels related to human exposure to radio frequency electromagnetic fields (110MHz - 40 GHz) - General public EN 300 328 V1.7.1: (2006-10) Electromagnetic compatibility and Radio spectrum Matters (ERM);...
- Page 54 Directive 1999/5/EC. Español [Spanish] Por medio de la presente Buffalo Technology Inc. declara que el AirStation WAPS-APG600H / WAPS- AG300H cumple con los requisitos esenciales y cualesquiera otras disposiciones aplicables o exigibles de la Directiva 1999/5/CE.
- Page 55 Buffalo Technology Inc. declara que este AirStation WAPS-APG600H / WAPS-AG300H está conforme com os requisitos essenciais e outras disposições da Directiva 1999/5/CE. Slovensko [Slovenian] Buffalo Technology Inc. izjavlja, da je ta AirStation WAPS-APG600H / WAPS-AG300H v skladu z bistvenimi zahtevami in ostalimi relevantnimi določili direktive 1999/5/ES. Slovensky [Slovak] Buffalo Technology Inc.
- Page 56 Appendix D Regulatory Compliance Information Svensk [Swedish] Härmed intygar Buffalo Technology Inc. att denna AirStation WAPS-APG600H / WAPS-AG300H står I överensstämmelse med de väsentliga egenskapskrav och övriga relevanta bestämmelser som framgår av direktiv 1999/5/EG. Taiwan: SAR compliance has been established in typical laptop computer(s) with CardBus slot, and product could be used in typical laptop computer with CardBus slot.
-
Page 57: Appendix E - Environmental Information
Appendix E - Environmental Information • The equipment that you have purchased has required the extraction and use of natural resources for its production. • The equipment may contain hazardous substances that could impact health and the environment. • In order to avoid the dissemination of those substances in our environment and to diminish the pressure on the natural resources, we encourage you to use the appropriate take-back systems. -
Page 58: Appendix F - Gpl Information
Appendix F - GPL Information The source code for Buffalo products that use GPL code is available at http://opensource.buffalo.jp/ . - 57 -...