Buffalo AirStation Pro WAPS-APG600H User Manual
11n/a & 11n/g/b concurrent or single-band smart model
Hide thumbs
Also See for AirStation Pro WAPS-APG600H:
- User manual (94 pages) ,
- User manual (105 pages) ,
- User manual (58 pages)

Related Manuals for Buffalo AirStation Pro WAPS-APG600H


Summary of Contents for Buffalo AirStation Pro WAPS-APG600H
-
Page 1: User Manual
User Manual 11n/a & 11n/g/b Concurrent Smart Model WAPS-APG600H 11n/a, 11n/g/b Single-Band Smart Model WAPS-AG300H www.buffalotech.com 35020077-03 2014-02... -
Page 2: Table Of Contents
Contents Chapter 1 - Product Overview ..........6 Package Contents .................6 Hardware Overview ................7 Front Panel LEDs .....................7 Back Panel .......................9 Chapter 2 - Placing Your AirStation ........10 Antenna Placement ................10 Installation ..................10 Connecting to PoE Equipment ..............10 Connecting the AC Adapter .................11 Mounting the AirStation on a Ceiling or Wall ........12 Mounting the Security Case ..............14 Removing the AirStation ..............16... - Page 3 LAN Settings ..................26 LAN-side IP Address ..................26 LAN Port ......................27 VLAN ......................28 Network ....................30 Proxy ARP ......................30 Bridge ......................31 Wireless Settings ................33 AOSS.......................33 WPS ........................35 Basic .......................36 Advanced .......................38 Security ......................40 Clients ......................43 WDS ........................44 RADIUS ......................46 MAC Filtering ....................48 WMM ......................49 Wireless Monitor ...................51 EZ Analyzer ....................51...
- Page 4 Update Firmware ..................58 LED Settings ....................59 Diagnostic ...................60 System Information ..................60 Packet Information ..................62 CPU Monitor ....................63 I’m Here ......................63 Ping Test ......................64 Traceroute Test ....................64 USB .........................65 Log .........................66 Chapter 4 - Connect to a Wireless Network ....67 Automatic Secure Setup (AOSS/WPS) ..........67 Windows 8.1, Windows 8, Windows 7, or Windows Vista (Client Manager V) ........................68 Windows XP (Client Manager 3) ..............69...
- Page 5 OS X ........................79 Chapter 6 - Default Configuration Settings ....80 Appendix A - Specifications ..........85 Appendix B - TCP/IP Settings ..........87 Windows 8.1/Windows 8 ..............87 Windows 7 ...................88 Windows Vista ..................89 Windows XP ..................90 OS X .....................91 Appendix C - Restoring the Default Configuration ..92 Appendix D - Regulatory Compliance Information ..93 Appendix E - Environmental Information......99...
-
Page 6: Chapter 1 - Product Overview
Chapter 1 - Product Overview Package Contents The following items are included in your AirStation package. If any of the items are missing, please contact your vender. • Wireless LAN access point ....................1 • Antennas (with protective caps) ..................2 •... -
Page 7: Hardware Overview
Hardware Overview Front Panel LEDs Power LED Power is on. Off: Power is off. Note: You can permanently turn off the power LED in Settings. Diag LED (Red) This indicates the status of the unit depending on the number of blinks per cycle. Note: When the unit is first turned on or restarted, the diag LED will blink for almost a minute during boot. - Page 8 Wireless LAN error. 5 blinks: USB error. 9 blinks **: System error. Continuously blinking *: Updating firmware, saving settings, or initializing settings. * Do not unplug the AC adapter while the diag LED is blinking continuously. ** Turn off AirStation first, wait for a few seconds, then turn it back on. 5 GHz LED (Blue) 5 GHz wireless is enabled.
-
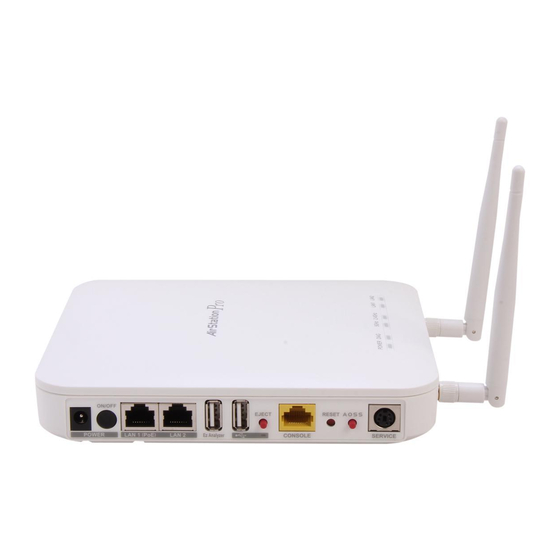
Page 9: Back Panel
Back Panel Power Connector Connect the power adapter here. Power Button This button turns the power on and off . LAN Ports With Auto-MDIX, you can use straight or crossover Ethernet cables. LAN port 1 supports PoE. EZ Analyzer Port This port is reserved for the upcoming EZ Analyzer function. -
Page 10: Chapter 2 - Placing Your Airstation
Chapter 2 - Placing Your AirStation Antenna Placement Remove the antenna caps and attach the antennas. Don’t touch the conductive parts of the antenna connectors because they can be damaged easily. Note: These antennas support both 2.4 GHz and 5 GHz. Installation Connecting to PoE Equipment The AirStation is compatible with PoE equipment (sold separately). -
Page 11: Connecting The Ac Adapter
Use an Ethernet cable to connect LAN port 1 of the AirStation to a PoE switch or other device that supports PoE. Notes: • Be sure that the cable connecting the AirStation and power sourcing equipment is an enhanced Category 5 or higher 4-pair cable. -
Page 12: Mounting The Airstation On A Ceiling Or Wall
Mounting the AirStation on a Ceiling or Wall The AirStation can be mounted to a ceiling or wall. The location where you mount the AirStation should meet the following requirements: • Mount in a location with an ambient temperature range from 0°C (32°F) to 45°C (113°F), humidity from 10% to 90%, and no condensation. - Page 13 Use the four screws to secure the bracket. Note: For certain environments, you may be able to use items other than the supplied screws. Select the most suitable item for use on your mounting surface. Press the AirStation onto the bracket, then push it down until it clicks into place.
-
Page 14: Mounting The Security Case
Mounting the Security Case An optional security case (sold separately) is available for the AirStation. Follow the steps below to mount it. Use the four screws to secure the bracket. Press the AirStation onto the bracket, then push it down until it clicks into place. - Page 15 Insert the key into the cover and turn to the “open” position. As shown in the figure, attach the cover at an angle. Turn the key to the “close” position and then remove it.
-
Page 16: Removing The Airstation
Removing the AirStation To remove the AirStation from the mounting bracket, follow the procedure below. Insert the ejector key to raise the locking clips, then gently slide the AirStation off in the direction shown. If the AirStation is difficult to remove, twist the ejector key 45 degrees to raise the locking clips a little more, then slide the AirStation off the bracket. -
Page 17: Initial Setup
Initial Setup The AirStation Configuration Tool lets you configure your AirStation easily. Download it from one of the links below: WAPS-APG600H: http://d.buffalo.jp/waps-apg600h/ WAPS-AG300H: http://d.buffalo.jp/waps-ag300h/ Note: The AirStation Configuration Tool is intended for use with a Windows computer with Internet Explorer 8.0 or later installed. - Page 18 Select the AirStation to configure, then click Next. Click Change IP Address. Enter the AirStation’s IP address and click Next.
-
Page 19: Settings
Enter the AirStation’s admin password (the default is “password”) and click Next. Note: If the admin password contains 9 characters or more, the IP address of the AirStation cannot be changed using this procedure. In this case, open Settings and set the IP address. Click Finish. - Page 20 Click Next. Select the AirStation to configure, then click Next. Click Go to Settings.
-
Page 21: Wireless & Encryption
Click OK. To log in to Settings, enter “admin” for the username and “password” for the password. Click OK. Settings will open. Wireless & Encryption By default, the AirStation’s wireless LAN is disabled. To configure it, follow the procedure below. Note: This example uses WPA2-PSK AES encryption. - Page 22 For the WAPS-APG600H, select “11a and 11g”. For the WAPS-AG300H, select “11g” or “11a”. Select the security mode (example: “WPA-PSK”). Select “WPA2 Only” for the WPA type, “AES” for the encryption type, set the pre-shared key, and click Apply.
-
Page 23: Changing The Password
Changing the Password To change your AirStation’s settings, you’ll need to log in to Settings. The default username is “admin” and the default password is “password”. After initial setup is complete, it is highly recommended that you change the password as described below. - Page 24 Enter a new administrator password (twice) and click Apply. Notes: • The administrator password should contain between 6 and 32 single-byte alphanumeric characters and symbols. • Passwords should contain between 6 and 32 single-byte alphanumeric characters and symbols. • Passwords cannot be blank. •...
-
Page 25: Chapter 3 - Configuration
Chapter 3 - Configuration Settings Settings is a browser-based GUI where you may configure the AirStation and monitor the network. Home The menu is displayed on the left side of the screen and system information is displayed on the right side. The descriptions in the following pages show screens from the WAPS-APG600H. -
Page 26: Lan Settings
LAN Settings LAN-side IP Address Configure the LAN-side IP addresses here. LAN Settings - LAN-side IP Address IP Address Assignment Choose the method for obtaining the IP address. Enter the IP address when IP address assignment is set to “Static IP IP Address Address”. -
Page 27: Lan Port
LAN Port Configure the wired LAN port here. LAN Settings - LAN Port Wired LAN Port Displays the port number of the wired LAN port. Enable Select whether to enable or disable the wired LAN port. Select the communication speed of the wired Ethernet connection. Speed &... -
Page 28: Vlan
VLAN Configure the VLAN settings for the wired and wireless LAN here. Don’t change VLAN settings unless you know what you’re doing! LAN Settings - VLAN Select the VLAN mode of the wired LAN port (#1, #2) and each SSID (when wireless is enabled). - Page 29 Sets the VLAN ID of the management VLAN. An integer value from 0 to 4094 can be set for the VLAN ID. Note: Limitations are placed on the values that can be set to the management VLAN ID for enabling access to the management VLAN Management VLAN ID from the wired LAN.
-
Page 30: Network
Network Proxy ARP Configure Proxy ARP settings here. Proxy ARP enables the wireless client to improve the performance and power saving feature. Network - Proxy ARP Proxy ARP If enabled, Proxy ARP will work for all VLAN. Disabled by default. Select how long to retain the ARP information monitored by Proxy ARP. -
Page 31: Bridge
Bridge Configure bridge parameters here. Network - Bridge Select whether to enable or disable rapid spanning tree. The default is Rapid STP “Off”. Set the time to hold MAC address learned by frame forwarding of the bridge. If the network configuration is changed frequently, try to set Aging Time smaller value to shorten the time of relearning. - Page 32 Configure the information for each port. This information enables the spanning tree protocol to calculate the best route to reconfigure the bridge. Port Priority Set the priority of each port. Smaller values are prioritized if the path cost of each port is the same. You may enter up to 240. The default value is 128.
-
Page 33: Wireless Settings
Wireless Settings AOSS You can make detailed changes to AOSS settings here. Wireless Settings - AOSS... - Page 34 Start AOSS Click the button to start the AOSS connection. Displayed when AOSS is in use. Click this button to disconnect the AOSS connection. This disconnects from all connected wireless LAN devices. Stop AOSS AOSS clients information and AOSS connected device information will be erased.
-
Page 35: Wps
• If AOSS or WPS connection is not established after 3 minutes, the AirStation will cancel setup and return to nor- mal. • Up to 24 wireless devices can be connected with AOSS. Settings configured by AOSS can’t be modified. To change the settings, either run AOSS again or disable AOSS and configure settings manually. -
Page 36: Basic
After you enter the PIN code and click Start, the internal registrar of the WPS by PIN AirStation waits 2 minutes for the connection request from the enrollee with the PIN code. Displays “Configured” or “Not configured”. “Configured” is displayed if all WPS Status currently-available wireless bands are configured. - Page 37 Enter the SSID and select the VLAN mode. Enter the VLAN ID, and if “Multiple” is selected as the VLAN mode, enter the additional VLAN ID. A roaming environment can be built by installing multiple AirStations with the same SSID over a wide area. SSID1 - SSID5 1 to 32 single-byte alphanumeric characters and single-byte symbols can be entered.
-
Page 38: Advanced
Advanced Configure the detailed information for the wireless LAN here. Wireless Settings - 802.11g or 802.11a - Advanced Select “Short” or “Long”. If “Short” is selected, the communication speed may be improved, but connection may not be possible to wireless Contention Slot devices that do not support short slot time. - Page 39 This performs a RTS/CTS process before sending frames with a size that exceeds the threshold value. This enables improved reliability in RTS Threshold frame transfers when the surrounding environment is poor, where separated from the AirStation by considerable distance, or other adverse conditions.
-
Page 40: Security
Security Configure wireless LAN security information here. Wireless Settings - 802.11g or 802.11a - Security SSID Choose which SSID you will be changing settings for. Broadcast SSID When enabled, you can search for the AirStation. Restricts communication between wireless client devices connected to the same SSID. - Page 41 Select the authentication method used for wireless device connection. No authentication The AirStation does not request authentication. This performs the authentication compliant with WEP. A fixed-length encryption key (shared key) must be set in both the AirStation and wireless device. WPS should be disabled. IEEE802.1x/EAP This performs the authentication compliant with IEEE802.1x/EAP.
- Page 42 Encryption Key 1 Encryption Key 2 Enter the encryption key specified in “Key Type”. Encryption Key 3 Encryption Key 4 Authentication Method: IEEE802.1x/EAP Key Length Select an encryption key length between 64-bit or 128-bit. Authentication Method: WPA-PSK WPA/WPA2 mixed mode-PSK Wireless device authentication by both WPA-PSK and WPA2-PSK can be performed simultaneously.
-
Page 43: Clients
TKIP/AES mixed mode TKIP and AES authentication and communication can be performed simultaneously. TKIP is used for broadcast and multicast communication. TKIP Encryption Type TKIP is an encryption method based on the WEP system with enhanced security features. WPS should be disabled. AES is an encryption method that uses a strong algorithm for encryption. -
Page 44: Wds
Configure the repeater (WDS) that connects AirStations wirelessly here. Wireless Settings - 802.11g or 802.11a - WDS Select whether to enable or disable WDS. To use WDS, WDS must also be set at the other connected AirStation. Disabled WDS is not in use. WDS Functionality WDS with AP WDS is in use. - Page 45 Configure the network ID of the VLAN associated with this WDS connection. Untagged Defined as an untagged LAN port. The AirStation transfers only network communication frames with a preset VLAN ID to this LAN port. The VLAN VLAN Mode ID must be set at the same time. Tagged Defined as the tagged LAN port.
-
Page 46: Radius
RADIUS Configure the RADIUS server used for wireless LAN device authentication and other operations here. In the AirStation, IEEE802.11g and IEEE802.11a can each be registered to 2 (primary and secondary) external RADIUS servers. When the primary and secondary servers are registered, if a communication problem occurs in the primary server, the inquiry target can be automatically switched to the secondary server for continuing the authentication process. - Page 47 Enter the UDP port number of the RADIUS server where the RADIUS Authentication Port authentication protocol is used. Generally, the port number 1812 is used in the RADIUS system. The shared secret used in communication between the RADIUS server and AirStation is set from 1 to 255 characters. Authentication can be Shared Secret accepted only from devices that have the same shared secret as the RADIUS server.
-
Page 48: Mac Filtering
MAC Filtering MAC filtering lets you restrict access your network. Only specific wireless devices will be able to connect. Notes: • You can enter the MAC address like the following. 1234567890AB (No delimiter) 12:34:56:78:90:AB (Colon delimiter) 12-34-56-78-90-AB (Hyphen delimiter) • You can register up to 256 MAC addresses. Wireless Settings - MAC Filtering Enter a MAC address or multiple MAC addresses to add to the MAC Add MAC Addresses... -
Page 49: Wmm
Assign priority to VoIP and streaming data here. Use this setting for communication that requires real-time responsiveness (such as VoIP and other streaming communication) to minimize the effects of other communication. Use the same QoS configuration and settings for all devices on the network. Wireless Settings - WMM Select whether to enable or disable QoS. - Page 50 The default values for the access point (AirStation) and station (wireless client device) are shown below. Priority Parameters CWmin CWmax AC_BK (Low) Aifsn Txop CWmin CWmax AC_BE (Nomal) Aifsn Txop CWmin CWmax AC_VI (High) Aifsn Txop CWmin WMM Parameters CWmax AC_VO (Highest) Aifsn...
-
Page 51: Wireless Monitor
Wireless Monitor Displays information about wireless clients connected to the AirStation. Wireless Settings - Wireless Monitor Displays detected wireless client information. Ch: Displays channels of each SSIDs. SSID: Displays SSIDs of detected wireless clients. Wireless 11g MAC Address: Displays MAC addresses of detected wireless clients. Wireless 11a Security: Displays encryption methods of detected wireless clients. -
Page 52: Administration
Administration Username and Password This is where you configure the AirStation’s username, password, and name (hostname). Administration - Username and Password The name of the administrator account may contain 4-16 single-byte Administrator Name alphanumeric characters and hyphens (-). Don’t use a hyphen as the first or last character. - Page 53 The Settings interface may be accessed through a web browser by normal or encrypted protocol. HTTP HTTP access is recommended for trusted networks only. Management Protocol HTTPS HTTPS encrypts communication for use with any network. SNMP If enabled, the router can be configured using SNMP management software.
-
Page 54: Date And Time
Date and Time Configure the AirStation’s internal clock here. The date and time, NTP server, and time zone can be set for the internal clock. Note: The AirStation doesn’t have a backup battery, so date and time will return to their default values anytime the AirStation is turned off or restarted. -
Page 55: Transfer Logs To Syslog Server
Transfer Logs to Syslog Server Configure the transfer functionality using syslog protocol here. Administration - Transfer Logs to Syslog Server Check to enable the log information transfer functionality. When Transfer Logs enabled, enter the IP address of the syslog server. Check to enable transferring logs information to a USB memory device Copy Logs to Attached USB Device attached to the AirStation. -
Page 56: Save/Restore Settings
Save/Restore Settings Lets you back up the current settings or restore settings from the backup file. Administration - Save/Restore Settings Choose the method to restore settings from a backup file. Note: You cannot restore the configuration in these cases: • You forgot the administrator password. Restore Method •... -
Page 57: Restart
Restart Restarts the AirStation. Administration - Restart Restart Click to restart the AirStation. Initialize This initializes the AirStation settings. Administration - Initialize Initialize Click to initialize all the settings and restart the AirStation. -
Page 58: Update Firmware
Update Firmware Update the firmware to obtain bug fixes, support for the latest functions, and other improvements. Administration - Update Firmware Select the location of the firmware update file; on your PC or on the Update firmware from attached USB device. Select the firmware file. -
Page 59: Led Settings
LED Settings Configure whether the AirStation LEDs are lit. Administration - LED Settings Power LED The power LED is turned off when “Off” is set. LAN LED The LAN 1 LED and LAN 2 LED are turned off when “Off” is set. Wireless LED The 5 GHz LED and 2.4 GHz LED are turned off when “Off”... -
Page 60: Diagnostic
Diagnostic System Information Displays a list of the main settings for the AirStation. Diagnostic - System Information... - Page 61 System Model Displays the product model name. AirStation Name Displays the AirStation’s name. Boot from Displays startup device of the AirStation. Version Displays firmware version. MAC Address Displays the MAC address. Management VLAN ID Displays management VLAN ID. IP Address Displays AirStation’s IP address.
-
Page 62: Packet Information
Packet Information Displays communication statistics of this product and the status of each port. Diagnostic - Packet Information Displays interface names. “()” describes the number of the port for wired port, and wireless band for wireless SSID. Wired Port Displays wired port of this product. Interface Wireless Displays each SSID if you are using multiple SSIDs. -
Page 63: Cpu Monitor
CPU Monitor This will monitor the operational status and displays usage of the CPU by numbers and histogram. Diagnostic - CPU Monitor CPU Usage Displays usage of the CPU by numbers and histogram. I’m Here This will cause your AirStation to beep. If you have multiple AirStations, this can make it easy to determine which one you’re currently configuring. -
Page 64: Ping Test
Ping Test A ping test checks whether the AirStation can communicate with a specific network device. Diagnostic - Ping Test Enter the IP address or hostname of the device that you are testing Destination Address communication with, then click Execute. The result will be displayed below. -
Page 65: Usb
Displays the USB status. Diagnostic - USB Port Displays the port name. Device Displays the USB device name. Displays the rated current consumption. It may differ from the actual Current current consumption. Status Displays the USB device’s status. Click to dismount the USB device. Do not disconnect the USB device first Dismount without clicking this button or pressing USB eject button on the back of the unit. -
Page 66: Log
Displays log information in the AirStation. Diagnostic - Log Save Click to save logs as a text file named “logmsg.log”. Clear Click to clear the log. Refresh Click to refresh the log. -
Page 67: Chapter 4 - Connect To A Wireless Network
Chapter 4 - Connect to a Wireless Network Automatic Secure Setup (AOSS/WPS) AOSS and WPS are systems that enable you to automatically configure wireless LAN settings. Just pressing the buttons will connect wireless devices and complete security settings. Use them to automatically connect wireless devices, computers, or game machines which support AOSS or WPS. -
Page 68: Windows 8.1, Windows 8, Windows 7, Or Windows Vista
Windows 8.1, Windows 8, Windows 7, or Windows Vista (Client Manager V) If you are using Windows 8.1, Windows 8, Windows 7 or Windows Vista, use the Client Manager V to connect wirelessly with AOSS or WPS. Launch Client Manager V. Click Create Profile. -
Page 69: Windows Xp (Client Manager 3)
Windows XP (Client Manager 3) If you are using Windows XP, use Client Manager 3 to connect wirelessly with AOSS or WPS. Right-click icon in the system tray and select Profile. Click the WPS AOSS button. It will take several seconds for your wireless connection to be configured. When the 2.4 GHz and 5 GHz LEDs on the front of the AirStation stop flashing and glow steadily, the connection is complete. -
Page 70: Os X (Aoss Assistant)
OS X (AOSS Assistant) If you are using OS X 10.9, 10.8, 10.7, 10.6, 10.5, or 10.4, use the AOSS Assistant to connect wirelessly with AOSS. Run the AOSS Assistant program that was downloaded from the Buffalo website. The software license screen is displayed. Click Agree to proceed. Click Start AOSS . -
Page 71: Manual Setup
Manual Setup You can also connect to the AirStation without installing Client Manager V or Client Manager 3 by using the utility built into the operating system. The procedure varies depending on which operating system you are using. Windows 8.1/Windows 8 (WLAN AutoConfig) With Windows 8, use WLAN AutoConfig to connect to the AirStation. -
Page 72: Windows 7 (Wlan Autoconfig)
Click No, don’t turn on sharing or connect to devices. Windows 7 (WLAN AutoConfig) With Windows 7, use WLAN AutoConfig to connect to the AirStation. Click network icon in the system tray. Select the target AirStation and click Connect. If you will connect to this device again, check Connect automatically. -
Page 73: Windows Vista (Wlan Autoconfig)
Enter the encryption key and click OK. Windows Vista (WLAN AutoConfig) With Windows Vista, use WLAN AutoConfig to connect to the AirStation. Right-click the wireless network icon in the system tray. Click Connect to a network. When this screen is displayed, select your network and click Connect. If the screen below is displayed, click I want to enter the network key or passphrase instead. - Page 74 Enter the encryption key and click Connect. Step through the wizard to finish configuration. If the Set Network Location screen is displayed, select Home, Work, or Public location depending on where you’re using the AirStation.
-
Page 75: Windows Xp (Wireless Zero Configuration)
Windows XP (Wireless Zero Configuration) Windows XP includes Wireless Zero Config, a built-in utility to connect to your AirStation. Note: If Client Manager 3 is installed on your computer, Wireless Zero Config is disabled. Uninstall Client Manager 3 to use Wireless Zero Config, or just use Client Manager 3 to connect to the AirStation. Right-click on the wireless network icon in the system tray. -
Page 76: Os X (Wi-Fi)
OS X (Wi-Fi) Use Wi-Fi on a Mac to connect to the AirStation. Note: In OS X 10.6 and earlier, “Wi-Fi” appears as “AirPort”. Click icon in the top section of the screen and select Turn Wi-Fi On. Find the AirStation’s SSID on the list. Click it to highlight it. -
Page 77: Chapter 5 - Checking Wireless Signal Quality
Chapter 5 - Checking Wireless Signal Quality Windows 8.1, Windows 8, Windows 7, Windows Vista, and OS X (10.4 and later) users can use software supplied with the AirStation to check the quality and strength of the wireless signal. Windows 8.1, Windows 8, Windows 7, and Windows Vista Notes: •... - Page 78 Signal strength (dBm), link speed (Mbps), and signal quality (%) are Connection Status displayed in one-minute intervals on a real-time graph. For 11b/11g, it shows usage in the 2.4 GHz band channels 1 to 14. Usage Status by Channel For 11a, it shows usage in the W52, W53, and W56 channels. Colors are used to indicate the signal strength of the access point.
- Page 79 OS X Run the WLAN Monitor program that was downloaded from the Buffalo website. The software license screen displays the first time you start the software. Click Agree to proceed. Network Name (SSID) Displays SSID of the currently-connected AirStation. Status Displays current connection status.
-
Page 80: Chapter 6 - Default Configuration Settings
Chapter 6 - Default Configuration Settings Feature Parameter Default Setting IP Address Assignment DHCP Client IP Address Assigned by an external DHCP server Subnet Mask Assigned by an external DHCP server LAN-side IP Address Default Gateway Assigned by an external DHCP server Primary Address Assigned by an external DHCP server Secondary Address... - Page 81 Feature Parameter Default Setting AOSS Button on the AirStation Unit Enabled Allowed Bands 11a and 11g 802.11g: AOSS is disabled. WEP Authentication 802.11a: AOSS is disabled. 802.11g: AOSS is disabled. TKIP Authentication 802.11a: AOSS is disabled. 802.11g (AES/TKIP): Untagged AOSS 802.11g (WEP): Untagged VLAN Mode 802.11a (AES/TKIP): Untagged...
- Page 82 Feature Parameter Default Setting Contention Slot (802.11g only) 802.11g: Short Preamble Type (802.11g only) 802.11g: Long 802.11g: Short GI Guard Interval 802.11a: Short GI 802.11g Protection (802.11g only) 802.11g: Enabled 802.11g: Enabled 802.11n Protection 802.11a: Enabled 802.11g: 1 DTIM Period 802.11a: 1 802.11g: 2347 RTS Threshold...
- Page 83 Feature Parameter Default Setting 802.11g: Disabled WDS Functionality 802.11a: Disabled 802.11g: - Local MAC Address 802.11a: - 802.11g: - Wireless MAC Address of WDS Peer 802.11a: - 802.11g: Untagged port VLAN Mode 802.11a: Untagged port 802.11g: - VLAN ID 802.11a: - 802.11g: None Encryption 802.11a: None...
- Page 84 Feature Parameter Default Setting Administrator Name admin Administrator Password password Username user Password password AirStation Name “AP” + AirStation’s MAC Address HTTP : Enabled Management Protocol HTTPS : Enabled Username and Password SNMP : Disabled SNMP Version v1 / v2c SNMP Get community public SNMP Set community...
-
Page 85: Appendix A - Specifications
Appendix A - Specifications Wireless LAN Interface Standard Compliance IEEE802.11a / IEEE802.11b / IEEE802.11g / IEEE802.11n Transmission Method Direct Sequence Spread Spectrum (DSSS), OFDM, MIMO Available frequencies depend on the country of purchase. See the next page for Frequency Range details. - Page 86 Other External AC 100-240 V Universal, 50/60 Hz Power Supply Power over Ethernet Power Consumption About 7.2 W (Max) Dimensions 152 mm x 182 mm x 35 mm (5.98 x 7.17 x 1.38 in.) Weight 416 g (14.67 oz.) (not including antennas) Operating Environment 0 - 45°...
-
Page 87: Appendix B - Tcp/Ip Settings
Appendix B - TCP/IP Settings Windows 8.1/Windows 8 To configure TCP/IP in Windows 8.1 or Windows 8, follow the procedure below. Open Control Panel. Click Network and Internet. Click Network and Sharing Center. Click Change adapter settings on the left side menu. Right-click the network adapter, then click Properties. -
Page 88: Windows 7
Windows 7 To configure TCP/IP in Windows 7, follow the procedure below. Open Control Panel. Click Network and Sharing Center. Click Change Adapter Settings on the left side menu. Right-click on the network adapter, then click Properties. If the User Account Control screen opens, click Yes or Continue. Select Internet Protocol Version 4 (TCP/IPv4) then click Properties. -
Page 89: Windows Vista
Windows Vista To configure TCP/IP in Windows Vista, follow the procedure below. Open Control Panel. Click Network and Sharing Center. Click Manage network connections on the left side menu. Right-click on the network adapter, then click Properties. If the User Account Control screen opens, click Yes or Continue. Select Internet Protocol Version 4 (TCP/IPv4), then click Properties. -
Page 90: Windows Xp
Windows XP To configure TCP/IP in Windows XP, follow the procedure below. Open Control Panel. Double-click Network. Right-click on the network adapter, then click Properties. Select Internet Protocol (TCP/IP), then click Properties. To have DHCP set your IP address settings automatically, check Obtain an IP address automatically and Obtain DNS server address automatically. -
Page 91: Os X
OS X To configure TCP/IP in OS X, follow the procedure below. Click Apple menu > System Preferences… . Click Network. Click the network adapter. To have DHCP set your IP address settings automatically, select Using DHCP in the Configure IPv4 field. To set your IP address settings manually, select Manually in the Configure IPv4 field and enter values for each setting. -
Page 92: Appendix C - Restoring The Default Configuration
Appendix C - Restoring the Default Configuration... -
Page 93: Appendix D - Regulatory Compliance Information
Appendix D - Regulatory Compliance Information Federal Communication Commission Interference Statement This equipment has been tested and found to comply with the limits for a Class B digital device, pursuant to Part 15 of the FCC Rules. These limits are designed to provide reasonable protection against harmful interference in a residential installation. - Page 94 (1) le dispositif ne doit pas produire de brouillage préjudiciable, et (2) ce dispositif doit accepter tout brouillage reçu, y compris un brouillage susceptible de provoquer un fonctionnement indésirable. Caution: The device for the band 5150-5250 MHz is only for indoor usage to reduce potential for harmful interference to co- channel mobile satellite systems.
- Page 95 EN 301 893 V1.6.1: (2011-11) Broadband Radio Access Networks (BRAN); 5 GHz high performance RLAN; Harmonized EN covering the essential requirements of article 3.2 of the R&TTE Directive EN 301 489-1 V1.9.2: (2011-09) Electromagnetic compatibility and Radio Spectrum Matters (ERM); ElectroMagnetic Compatibility (EMC) standard for radio equipment and services;...
- Page 96 English Hereby, Buffalo Technology Inc. declares that this AirStation WAPS-APG600H / WAPS-AG300H is in compliance with the essential requirements and other relevant provisions of Directive 1999/5/EC. Español Spanish Por medio de la presente Buffalo Technology Inc. declara que el AirStation WAPS-APG600H / WAPSAG300H cumple con los requisitos esenciales y cualesquiera otras disposiciones aplicables o exigibles de la Directiva 1999/5/CE.
- Page 97 zgodny z zasadniczymi wymogami oraz pozostałymi stosownymi postanowieniami Dyrektywy 1999/5/EC. Português Portuguese Buffalo Technology Inc. declara que este AirStation WAPS-APG600H / WAPS-AG300H está conforme com os requisitos essenciais e outras disposições da Directiva 1999/5/CE. Slovensko Slovenian Buffalo Technology Inc. izjavlja, da je ta AirStation WAPS-APG600H / WAPS-AG300H v skladu z bistvenimi zahtevami in ostalimi relevantnimi določili direktive 1999/5/ES.
- Page 98 기종별 사 용 자 안 내 문 이 기기는 가정용 (B 급 ) 전자파적합기기로서 B 급 기기( 가정용 정보통신기기 ) 주로 가정에서 사용하는 것을 목적으로 하며 , 모든지역에서 사용할 수 있습니다 .
-
Page 99: Appendix E - Environmental Information
Appendix E - Environmental Information • The equipment that you have purchased has required the extraction and use of natural resources for its production. • The equipment may contain hazardous substances that could impact health and the environment. • In order to avoid the dissemination of those substances in our environment and to diminish the pressure on the natural resources, we encourage you to use the appropriate take-back systems.