Advertisement
- 1 Common factors of wrong measurements
- 2 Unit and LCD display
- 3 Scope of supply
- 4 What is blood pressure
- 5 How is blood pressure measured
- 6 Blood pressure classification WHO
- 7 Influencing and evaluating readings
- 8 Starting up
- 9 Settings
- 10 Fitting the cuff
- 11 Taking a blood pressure measurement
- 12 Transfer via Bluetooth to VitaDock+ app
- 13 Discontinuing a measurement
- 14 Display stored values
- 15 Memory - clear of measurements
- 16 Error messages and error remedying
- 17 Troubleshooting
- 18 Cleaning and care
- 19 Technical specifications
- 20 Safety Instructions
- 21 Documents / Resources
Common factors of wrong measurements
- Please keep quiet for 5-10 minutes and avoid eating, drinking alcohol, smoking, exercising and bathing before taking a measurement. All these factors will influence the measurement result.
- Remove any garment that fits closely to your upper arm.
- Always measure on the same arm (normally left).
- Measurements should be taken regularly at the same time of each day, as the blood pressure varies even during the day.
- Any effort to support the arm during measurement may increase the measured blood pressure.
- Make sure, you are in a comfortable, relaxed position and do not move or constrict your muscles during measurement. Use a cushion to support your arm if necessary.
- If the arm artery lies lower or higher than the heart, a false reading will be obtained.
- A loose or open cuff causes false readings.
- With repeated measurements, blood accumulates in the arm which can lead to false reading. Consecutive blood pressure measurements should be repeated after 1 minute pause or after the arm has been held up in order to allow the accumulated blood to flow away.
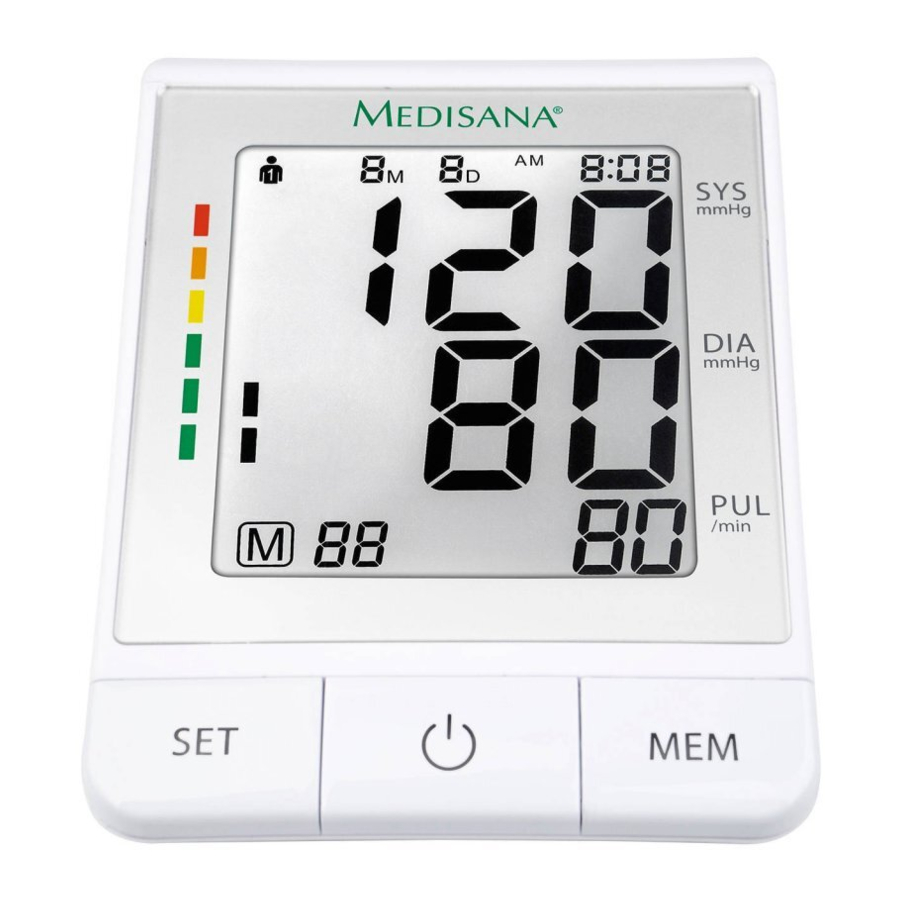
Unit and LCD display

- Socket for mains adaptor
- Blood Pressure Monitor
- MEM button (Memory Recall)
![]() START/STOP button
START/STOP button- SET button
- Battery Compartment (on underside)
- Push-in Connector for air tube
- LCD screen (display)
- Display of Date/Time
- Display of Systolic Pressure
- Display of Diastolic Pressure
- Pulse symbol
- Display of Pulse Rate
- Change Battery symbol
- Arrhythmia display (arrhythmia cordis)
- Memory Location number
- Memory-Symbol
- Bluetooth® symbol
- Blood Pressure Indicator (green - yellow - orange - red)
- User memory 1 / 2 / Guest
 START/STOP button
Scope of supply
Please check first of all that the unit is complete. The following parts are included as standard:
- 1 MEDISANA blood pressure monitor BU 530
- 4 batteries (type AAA, LR03) 1.5 V
- 1 instruction manual
- 1 cuff with air tube
- 1 storage pouch
Please contact your supplier if you notice any transport damage on unpacking the unit.
What is blood pressure
Blood pressure is the pressure created in the blood vessels by each heart beat. When the heart contracts (= systole) and pumps blood into the arteries, it brings about a rise in pressure. The highest value is known as the systolic pressure and is the first value to be measured. When the cardiac muscle relaxes to take in fresh blood, the pressure in the arteries also falls. Once the arteries are relaxed, a second reading is taken – the diastolic pressure.
How is blood pressure measured
The MEDISANA BU 530 is a blood pressure unit which is used to measure blood pressure at the upper arm. The measurement is carried out by a microprocessor, which, via a pressure sensor, measures the vibrations resulting from the inflation and deflation of the cuff over the artery.
Blood pressure classification WHO
These values have been specified by the World Health Organisation (WHO) without making any allowance for age.
| Low blood pressure | systolic <100 diastolic <60 |
| Normal blood pressure | (green display area  ) )systolic 100 - 139 diastolic 60 - 89 |
| Forms of high blood pressure / hypertension | |
| Mild hypertension | (yellow display area ) |
| Moderate hypertension | systolic 140 – 159 diastolic 90 – 99 (orange display area ) |
| Severe hypertension | systolic 160 – 179 diastolic 100 – 109 (red display area )systolic ≥ 180 diastolic ≥ 110 |

Blood pressure that is too low represents just as great a health risk as blood pressure that is too high! Fits of dizziness may lead to dangerous situations arising (e.g. on stairs or in traffic)!
Influencing and evaluating readings
- Measure your blood pressure several times, then record and compare the results. Do not draw any conclusions from a single reading.
- Your blood pressure readings should always be evaluated by a doctor who is also familiar with your personal medical history. When using the unit regularly and recording the values for your doctor, you should visit the doctor from time to time to keep him updated.
- When taking readings, remember that the daily values are influenced by several factors. Smoking, consumption of alcohol, drugs and physical exertion influence the measured values in various ways.
- Measure your blood pressure before meals.
- Before taking readings, allow yourself at least 5-10 minutes rest.
- If the systolic and diastolic readings seem unusual (too high or too low) on several occasions, despite correct use of the unit, please inform your doctor. This also applies to the rare occasions when an irregular or very weak pulse prevents you from taking readings.
Starting up
Insert / replace batteries
You must insert the batteries provided before you can use your unit. The lid of the battery compartment  is located on the underside of the unit. Open it by slightly pushing it and moving it upwards. Remove it and insert the 4 AAA LR03 type 1.5V batteries supplied. Ensure correct polarity when inserting the batteries (as marked inside the battery compartment). Close the battery compartment. Replace the batteries if the change battery symbol
  appears on the display
  if nothing appears on the display after the unit has been switched on.
Using a Mains Adaptor
Alternatively, you can use the unit with a special mains adaptor (MEDISANA Art. No. 51125). This connects to the socket  provided at the back of the unit. In this case the batteries remain in the unit. Inserting the connector into the back of the blood pressure monitor switches the batteries off mechanically.
It is necessary, therefore, to plug the mains adaptor into the mains socket first of all and then to connect it to the blood pressure monitor. If the blood pressure monitor is no longer being used, first remove the connector from the blood pressure monitor and then pull the mains adaptor out of the mains socket. Doing this means that the date and time will not have to be reset each time.
Settings
- User setting:
When unit is switched off, press and hold SET-button![]() .
. ![]() ,
,![]() or
or ![]() appear on the display. By pressing MEM-button
appear on the display. By pressing MEM-button ![]() you may choose between user
you may choose between user ![]() ,
, ![]() or
or ![]() . Press SET button
. Press SET button ![]() to confirm the user setting. Afterwards, you can proceed with the year setting mode.
to confirm the user setting. Afterwards, you can proceed with the year setting mode.
Hint: If you have chosen![]() , measurement results will not be stored.
, measurement results will not be stored. - Year setting: The year figure starts to flash for setting. Keep pressing the MEM button
![]() i until the actual year figure appears. Press SET button
i until the actual year figure appears. Press SET button ![]() to confirm the year 5 setting. Afterwards, you can proceed with the month/date setting mode.
to confirm the year 5 setting. Afterwards, you can proceed with the month/date setting mode. - Month / date setting:
The month figure starts to flash for setting. Keep pressing the MEM button![]() until the actual month figure appears. Press SET button
until the actual month figure appears. Press SET button ![]() to confirm the 5 month setting. Afterwards, the day needs to be set in the same way. Afterwards, you can proceed with the time setting mode.
to confirm the 5 month setting. Afterwards, the day needs to be set in the same way. Afterwards, you can proceed with the time setting mode. - Time setting:
The hour figure starts to flash for setting. Keep pressing the MEM button![]() i until the actual hour figure appears. Press SET button
i until the actual hour figure appears. Press SET button ![]() to confirm the hour setting and proceed in the same way for minute setting. Conclusively, CL appears in the display. You may delete stored values at this point - please check chapter „Memory- clear of measurements". Press SET button
to confirm the hour setting and proceed in the same way for minute setting. Conclusively, CL appears in the display. You may delete stored values at this point - please check chapter „Memory- clear of measurements". Press SET button ![]() to leave the setting mode. If the batteries are changed, the set information is lost and needs to be input again.
to leave the setting mode. If the batteries are changed, the set information is lost and needs to be input again.
 .
.  ,
, appear on the display. By pressing MEM-button
  you may choose between user
  to confirm the user setting. Afterwards, you can proceed with the year setting mode.
 i until the actual year figure appears. Press SET button
  to confirm the year 5 setting. Afterwards, you can proceed with the month/date setting mode.
 until the actual month figure appears. Press SET button
 Fitting the cuff
- Push the end piece of the air tube
![]() into the hole on the left side of the unit7 prior to use.
into the hole on the left side of the unit7 prior to use. - Slide the open end of the cuff through the metal bracket so that the Velcro fastener is on the outside and it becomes a cylindrical form (Fig.1). Slide the cuff over your left upper arm.
![]()
- Position the air hose in the middle of your arm in line with your middle finger (Fig.2) (a). The lower edge of the cuff should be 2 - 3 cm above the crease of the elbow. (b). Pull the cuff tight and close the Velcro fastener (c).

- Measure the pulse on your bare arm.
- Only position the cuff on the right arm if it cannot be used on the left arm. Always carry out measurements on the same arm.
- Correct measuring position for sitting (Fig.3).

 into the hole on the left side of the unit7 prior to use.


Proper use
- The device is intended for measuring the blood pressure from the upper arm of an adult.
Contraindications
- The device is not suitable for measuring the blood pressure of children. Ask your doctor before using it on older children.
- Persons who suffer from arrhythmia, diabetes, cardiovascular problems or who have had a stroke should consult their doctor before using the device.
Taking a blood pressure measurement
After the cuff has been appropriately positioned, the measurement can begin:
- Switch the unit on by pressing the START/STOP button
![]() .
. - If the START/STOP button
![]() is pressed, all display characters are shown 4 (display test). This test can be used to check that the display is indicating properly and in full.
is pressed, all display characters are shown 4 (display test). This test can be used to check that the display is indicating properly and in full. - The unit is ready for measurement. The number 0 flashes for 2 seconds and two short beeps are emitted. The device then automatically inflates the cuff slowly in order to measure your blood pressure. The rising pressure in the cuff is shown on the display.
- The unit inflates the cuff until sufficient pressure has built up for a measurement. Then the unit slowly releases air from the cuff and carries out the measurement. When the device detects the signal, the heart symbol
![]() on the display starts to flash, you can hear the beep for every heartbeat once the heartbeat signal is detected.
on the display starts to flash, you can hear the beep for every heartbeat once the heartbeat signal is detected. - When the measurement is finished, you can hear a long beep and the cuff is deflated completely. The systolic and diastolic blood pressure and the pulse value appear on the display
![]() . The blood pressure indicator
. The blood pressure indicator ![]() is displayed next to the relevant coloured bar depending on the WHO blood pressure classification. If the unit has detected an irregular heartbeat, the arrhythmia display
is displayed next to the relevant coloured bar depending on the WHO blood pressure classification. If the unit has detected an irregular heartbeat, the arrhythmia display ![]() also appears.
also appears.
![]()
Do not take any therapeutic measures on the basis of a self measurement. Never alter the dose of a medicine prescribed by a doctor. - The readings are automatically saved in the previously selected memory (
![]() or
or ![]() ). Up to 120 measured values with date and time can be stored in each memory.
). Up to 120 measured values with date and time can be stored in each memory. - The measurement readings remain on the display. The unit switches off automatically after approx. 30 seconds if no buttons are pressed. The unit may also be switched off using the START/STOP button
![]() .
.
 .
. on the display starts to flash, you can hear the beep for every heartbeat once the heartbeat signal is detected.
 . The blood pressure indicator
  is displayed next to the relevant coloured bar depending on the WHO blood pressure classification. If the unit has detected an irregular heartbeat, the arrhythmia display
  also appears.
Transfer via Bluetooth® to VitaDock+® app
The MEDISANA Blood Pressure monitor BU 530 offers the possibility to transfer your measured values via Bluetooth® to the VitaDock+® app. The VitaDock+® app allow the evaluation, storage and synchronisation of your data between multiple iOS- and Android-devices to have access to it anytime and anywhere. You may share your results with your friends or your doctor. Therefore you need a free user account, which you can create on the website www.vitadock.com. For Android or iOS mobile devices, you may download the respective apps. After each measurement an automatic transfer of the values will take place (provided that Bluetooth® is activated and configurated on the receiving device).
During transmission, the symbol „  "
"  flashes in the display. If the transmission i has been sucessful, „OK" appears - if „Err" appears, a transmission error occurred. You may transfer the data also later on via Bluetooth® manually. Therefore, press and hold START/STOP button
  when unit is switched off for approx. 5 seconds, until the symbol „ " appears. The device will then automatically transmit all stored values for the actual selected user (
  or
or  ).
).
Discontinuing a measurement
If it is necessary to interrupt a blood pressure measurement for any reason (eg. the patient feels unwell) the START/STOP button can be pressed at 4 any time. The device immediately decrease the cuff pressure automatically.
Display stored values
This unit features 2 separate memories, each with a capacity of 120 memory slots. Results are automatically stored in the memory selected by the user. Press the MEM button  when power off, to call up the measured values stored. The average values of the last 3 measurements appear on the display. Press the MEM button again to call up the last measurement value. Repeatedly pressing the MEM button displays the respective values measured previously. If you have reached the final entry and do not press a button, the unit automatically switches itself off after approximately 8 seconds in memory recall mode. Memory recall mode can be exited at any time by pressing the START/STOP button which will also switch the unit off. The oldest value is deleted if 120 measured values have been stored in the memory and a new value is saved.
Memory - clear of measurements
If you are sure that you want to permanently remove all stored memories, press the SET button  (when power off) for approximately 3 seconds. Then press SET button 6 more times until CL appears. Press the START/STOP button
  and CL will flash for 3 times to clear all memory. Afterwards, press MEM button
  and M and "no" will be shown on the display, what means that no memory is stored anymore.
Error messages and error remedying
Error indicators
The following symbol will appear on the display when measuring abnormal:
| Symbol | Cause | Correction |
| E-1 | Weak signal or sudden pressure change | Put on the cuff correctly. Repeat the measurement in the correct way. |
| E-2 | External strong disturbance | When near cell phone or other high radiant device, the measurement may fail. During measurement, do not move and do not speak. |
| E-3 | Error during inflation process | Put on the cuff correctly. Make sure, that the hose is properly connected. Repeat the measurement. |
| E-5 | Abnormal blood pressure | Repeat the measurement after relaxing 30 minutes. If you get unusual readings for 3 times, please contact your doctor. |
 | Weak batteries | The batteries are too low or empty. Replace all 4 batteries with new 1.5 V type AAA LR03 batteries. |
Troubleshooting
| Problem | Check | Cause and solutions |
| No power | Check the battery power and if the polarity is correct. | Replace all batteries and pay attention to correct polarity during insertion. |
| No inflation | Check for proper hose condition and if it is properly connected to the device. | Connect the air hose properly. Use a new cuff. |
| Err appears and the measurement is aborted | Check whether you have moved the arm during inflation or if you have talked during measurement. | Keep your arm and your body still. Do not talk during measurements. |
| Leak cuff | Check whether the cuff is too loose or damaged. | Put on the cuff correctly and close it tightly. Use a new cuff. |
Please contact the distributor resp. the service centre if you can't solve the problem. Do not disassemble the unit by yourself.
Cleaning and care
Remove the batteries before cleaning the unit. Clean the unit using a soft cloth lightly moistened with a mild soapy solution. Never use abrasive cleaning agents, alcohol, naphta, thinner or gasoline etc.. Never immerse the unit or any component in water. Be cautiious not to get any moisture in the main unit.
Do not wet the cuff or attempt to clean the cuff with water. Using a dry cloth, gently wipe away any excess moisture that may remain on the cuff. Lay the cuff flat in an unrolled position and allow the cuff to air dry.
Do not expose the unit to direct sunlight; protect it against dirt and moisture. Do not expose the unit to extreme hot or cold temperatures. Keep the device in the storage case when not in use. Store the unit in a clean and dry location.
Technical specifications
| Name and model | MEDISANA Blood pressure monitor BU 530 |
| Display system | Digital display |
| Memory slots | 2 x 120 measurement values |
| Measuring method | Oscillometric |
| Power supply | 6 V=, 4 x 1.5V batteries AAA LR03 |
| Blood pressure measuring range | 0 – 299 mmHg |
| Pulse measuring range | 40 – 199 beats/min. |
| Maximum error tolerance for static pressure | ± 3 mmHg |
| Maximum error tolerance for pulse rate | ± 5% of the value |
| Pressure generation | Automatic with pump |
| Deflation | Automatic |
| Automatic switch-off | After approx. 30 seconds |
| Operating conditions | +5°C to +40°C, |
| Storage conditions | 15 to 85% max. relative humidity -20°C to +55°C, |
| Dimensions (L x W x H) | 10 to 85% max. relative humidity Approx. 149 x 100 x 60 mm |
| Cuff | 22 - 36 cm for adults |
| Weight (main unit) | Approx. 333 g without batteries |
| Item number | 48661 |
| EAN number | 40 15588 48661 6 |
| Acessories |
|
In accordance with our policy of continual product improvement, we reserve the right to make technical and visual changes without notice.
The current version of this instruction manual can be found under www.medisana.com
Safety Instructions
Read the instruction manual carefully before using this device, especially the safety instructions, and keep the instruction manual for future use. Should you give this device to another person, it is vital that you also pass on these instructions for use.

- The unit is intended only for use in the home. Consult your doctor prior to using the blood pressure monitor if you are concerned about health matters.
- Only use the unit for its intended purpose in accordance with the instructions for use. Warranty claims become void if the unit is misused.
- Please consult your doctor prior to using the unit if you suffer from illnesses such as arterial occlusive disease.
- The unit may not be used to check the heart rate of a pacemaker.
- Pregnant women should take the necessary precautions and pay attention to their individual circumstances. Please consult your doctor if necessary.
- Consult your physician to get more information about your blood pressure. A self-diagnosis and self-treatment based on the measured values may be dangerous. Always follow the instructions given by your physician!
- If you experience discomfort during a measurement, such as pain in the upper arm or other complaints, press the START/STOP-button
![]() to release the air immediately from the cuff. Loosen the cuff and remove it from your arm.
to release the air immediately from the cuff. Loosen the cuff and remove it from your arm. - The device only works correct with the fitting cuff.
- The unit is not suitable for children.
- Do not allow children to use the unit. Medical products are not toys!
- Please ensure that the unit is kept away from the reach of children.
- Do not put the air tube around your neck - danger of suffocation!
- The swallowing of small parts like packaging bag, battery, battery cover and so on may cause suffocation.
- The user needs to check that the equipment functions properly and that it is in proper working condition before being used.
- Only the cuff provided can be used, and cannot be changed to any other branded cuff. It can only be replaced with a cuff of exactly the same type.
- The device may not be operated in rooms with high levels of radiation or in the vicinity of high-radiation devices, such as radio transmitters, mobile telephones or microwaves, as this could cause functional defects or incorrect measurements.
- Do not use the equipment where flammable gas (such as anaesthetic gas, oxygen or hydrogen) or flammable liquids (such as alcohol) are present. No modification of this unit/device is allowed.
- Please do not attempt to repair the unit yourself in the event of malfunctions, since this will void all warranty claims. Only have repairs carried out by authorised service centres.
- Protect the unit against moisture. If liquid does manage to penetrate into the unit, remove the batteries immediately and do not continue to use the unit. In this case contact your specialist dealer or notify us directly.
- Please do not use a dilution agent, alcohol or petrol to clean the unit.
- Please do not hit the device heavily or let if fall down from a high place.
- Do not use mobile phones in the range of the device. This may lead to malfunctions.
- If the unit is not going to be used for a long period, please remove the batteries.
 to release the air immediately from the cuff. Loosen the cuff and remove it from your arm.
SAFETY NOTES FOR BATTERIES
- Do not disassemble batteries!
- Replace all batteries if the unit display shows the low battery symbol.
- Never leave any low battery in the battery compartment since it may leak and cause damage to the unit.
- Increased risk of leakage! Avoid contact with skin, eyes and mucous membranes! If battery acid comes in contact with any of these parts, rinse the affected area with copious amounts of fresh water and seek medical attention immediately!
- If a battery has been swallowed, seek medical attention immediately!
- Replace all of the batteries simultaneously!
- Only replace with batteries of the same type, never use different types of batteries together or used batteries with new ones!
- Insert the batteries correctly, observing the polarity!
- Remove the batteries from the device if it is not going to be used for an extended period of 3 months or more!
- Keep batteries out of children's reach!
- Do not attempt to recharge batteries! There is a danger of explosion!
- Do not short circuit! There is a danger of explosion!
- Do not throw into a fire! There is a danger of explosion!
- Do not throw used batteries into the household refuse; put them in a hazardous waste container or take them to a battery collection point, at the shop where they were purchased!
MEDISANA GmbH, Jagenbergstr. 19, 41468 NEUSS, GERMANY.
For service, accessories and spare parts, please contact:
Andaman Medical Bridge Sdn. Bhd.
Unit 3.3A, 3rd Floor Wisma Leader,
No. 8 Jalan Larut, 10050 Penang, Malaysia
T: +604 609 6480

Documents / Resources
References

Download manual
Here you can download full pdf version of manual, it may contain additional safety instructions, warranty information, FCC rules, etc.
Advertisement
Thank you! Your question has been received!


Need Assistance?
Do you have a question about the BU 530 that isn't answered in the manual? Leave your question here.