Table of Contents
Advertisement
Advertisement
Table of Contents

Related Manuals for Omicron HGT1


Summary of Contents for Omicron HGT1
- Page 1 HGT1 User Manual...
- Page 2 The user is responsible for every application that makes use of an OMICRON product. OMICRON translates this manual from the source language English into a number of other languages. Any translation of this manual is done for local requirements, and in the event of a dispute between the English and a non-English version, the English version of this manual shall govern.
-
Page 3: Table Of Contents
USB connection (when using the HGT1 with PTM) ....... . . -
Page 4: About This Manual
The HGT1 User Manual always has to be available on the site where the HGT1 is used. The users of the HGT1 must read this manual before operating the HGT1 and observe the safety, installation, and operation instructions therein. -
Page 5: Safety Instructions
Before operating the HGT1 and its accessories, read the safety instructions in this User Manual carefully. Do not turn on the HGT1 and do not operate the HGT1 without understanding the safety information in this manual. If you do not understand some safety instructions, contact OMICRON before proceeding. -
Page 6: Operating The Measurement Setup
Orderly measures The HGT1 User Manual must be read and observed by all users of the HGT1. The HGT1 may be used only as described in this manual. Any other use is not in accordance with the regulations. -
Page 7: Compliance Statement
OMICRON test sets are subject to the EU Waste Electrical and Electronic Equipment Directive 2012/19/EU (WEEE directive). As part of our legal obligations under this legislation, OMICRON offers to take back the test set and ensure that it is disposed of by authorized recycling agents. -
Page 8: Introduction
Zoom FFT. The HGT1 works as an add-on device to the CPC 100 and CP CU1. This User Manual describes in detail the OMICRON-specific HGT1 functions and measurements. -
Page 9: Rain Protection
Introduction Rain protection In order to protect the HGT1 from rain it can also be operated in a plastic bag as shown in the image below. OMICRON recommends the A5 Document Bag by Ortlieb (www.ortlieb.de). Figure 2-1: HGT1 with waterproof bag ►... -
Page 10: Carrying Bag
HGT1 User Manual Carrying bag OMICRON provides a belt bag to carry the HGT1 while it is used together with a Windows tablet (only relevant when the mobile PTM (Primary Test Manager) option is used). Figure 2-2: HGT1 carrying bag... -
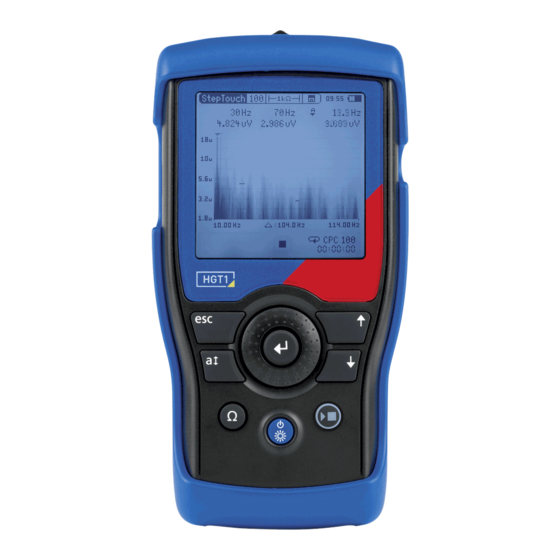
Page 11: Hardware Overview
Escape Cancel an action or place the cursor on top of the screen Auto-amplitude Adapt the voltage range according to the measured voltage Input impedance selection Switch between input impedances of the HGT1 Options: • 1 kΩ • 1 kΩ + 1 kΩ voltage divider •... -
Page 12: Connectors
Not used Voltage input Figure 3-2: HGT1 connectors, top Micro SD slot Not used Figure 3-3: HGT1 connectors, bottom USB connector Not used DC power socket Figure 3-4: HGT1 connectors, left side Not used Figure 3-5: HGT1 connectors, right side OMICRON... -
Page 13: Usb Connection (When Using The Hgt1 With Ptm)
Hardware overview USB connection (when using the HGT1 with PTM) When the PTM option for the HGT1 is used, the HGT1 needs to be connected to the Window tablet running PTM via USB. Figure 3-6: HGT1 with USB cable and USB isolator connected... -
Page 14: Power Supply
► Do not solder directly on to the battery. ► Do not disassemble the battery or insert it in reverse polarity ► Switch off the HGT1 before opening the battery cover in order to prevent any electric discharges. ► Avoid short-circuits. -
Page 15: Using The Hgt1 With Ptm
The HGT1 can be connected to a Windows tablet running PTM (Primary Test Manager). Also see section 3.2 "USB connection (when using the HGT1 with PTM)" on page 13). For further Information on PTM refer to the CPC 100 PTM User Manual. -
Page 16: System And Firmware Settings
System Settings ► To access the System Settings, navigate to the left side of the menu bar and select System Settings. ► Confirm by pressing Figure 5-1: HGT1 System view Table 5-1: Items available in the System view Option Description... -
Page 17: Firmware Update
Uploading a license file to the HGT1 To be able to use HGT1 with Primary Test Manager (while it is connected to a tablet running the software) a license is needed. The corresponding license file needs to be stored in the HGT1’s root directory. -
Page 18: Step And Touch Voltage Meter
Frequency settings Switch between frequency ranges See 6.1 "Frequency range selection" on page 19 Input impedance Change the input impedance of the HGT1 See 6.2 "Input Impedance selection" on page 20 Save icon Start and close datasets; store measurement points See 6 "Recording and saving data"... -
Page 19: Frequency Range Selection
Default setting for frequency axis: 14 Hz … 430 Hz 20 kHz Default setting for frequency axis: 484 Hz … 20.45 kHz The most recent settings applied to the frequency axis are stored and can be re-applied User by selecting User. OMICRON... -
Page 20: Input Impedance Selection
Feature Description Setup The HGT1 allows defining two frequencies at which the maximum value during a measurement is detected. This option is only available for the 100 Hz and 400 Hz selection. In the Setup view the following settings for the two frequencies are available: 50 Hz: default setting for mains frequency at 50 Hz (measurement at 30 Hz and •... -
Page 21: Voltage Axis
► To activate the amplitude zoom, click the top value of the voltage axis. ► Choose the zoom mode (20, 10, 5 or 2.5 dB/div) and adjust the axis using the navigation wheel. ► Press to reset the zoom. Figure 6-4: Amplitude zoom in the StepTouch view OMICRON... -
Page 22: Recording And Saving Data
HGT1 User Manual Recording and saving data The HGT1 saves measurement points consisting of the amplitudes of two measurement frequencies. Measurement points are saved in datasets (1 dataset = 1 TXT file in the device memory). Start new dataset ► To create a new dataset before starting the measurement, click the Save icon and select Start New Dataset. -
Page 23: Saving Data
Note: If you use a measurement ID more than once, new results will not overwrite old results with the same ID (see Figure 7-2: "HGT1 measurement report" on page 24). Alternatively, datasets can be opened after a measurement has been completed. In this case, the icon indicates unsaved data: ►... -
Page 24: Reports
NOTICE Loss or corruption of data ► The XL2 files saved on the HGT1 are system files. Do not edit or move them. Figure 7-2: HGT1 measurement report ► To create a Microsoft Excel report containing the data measured with the HGT1, use the Excel template "Step&Touch using HGT1.xlt"... - Page 25 ► Refer to the CPC 100 and CP CU1 manuals for further information on templates. Enter reduction factor Imported from CPC 100 Enter maximum fault current Imported from HGT1 Figure 7-3: "Step & Touch using HGT1" template OMICRON...
-
Page 26: Step And Touch Voltage Measurements
HGT1 User Manual Step and touch voltage measurements Measurements without PTM (stand-alone) WARNING Death or severe injury caused by high voltage or current possible ► Use a grounding set to ground the power line at the near end whenever you handle the measurement setup inside the danger zone (for example when changing connections at the CP GB1 between measurement loops). - Page 27 Figure 8-2: Output test card of the Step&Touch using HGT1 template on the CPC 100 Figure 8-2 above shows settings in the Output test card of the Step&Touch using HGT1 template. The sequence consists of 3 states, which are applied in an endless loop, since Repeat is activated in the test card: •...
- Page 28 3 of the Output test card to complete. Figure 8-4: Output test card of the Step&Touch using HGT1 template on the CPC 100, adapted for remote-controlled current injection EN 50522 and IEEE 81 consider different ways of testing step and touch voltage.
- Page 29 1. This standard also proposes to consider additional resistances for the assessment of the measurement, which requires a high ohmic input impedance. As an example, Figure 8-5 below shows the touch voltage measurement according to EN 50522. Test probe Figure 8-5: Touch voltage measurement according to EN 50522 OMICRON...
- Page 30 Figure 8-6: HGT1 settings according to EN 50522 Figure 8-6 shows the settings to be considered when measuring step and touch voltage with the HGT1: The 100 Hz range (10 – 114 Hz) is recommended, since frequencies higher than 100 Hz are not important for the measurement.
- Page 31 Note: If the mains frequency is 60 Hz, the current is injected at 40 Hz and 80 Hz respectively. 12.Stop the measurement on the HGT1 as soon as the highest value has been detected at 70 Hz. 13.Remove the probe from the object under test.
- Page 32 0,00669V 0,00337V 1,67V entryFence 0,00341V 0,00385V 1,21V trafo2 0,00232V 0,00500V 1,22V VT2housing 0,00815V 0,00577V 2,31V CT2housing 0,00115V 0,00577V 1,15V CT1housing 0,00298V 0,00311V 1,01V Figure 8-8: Step and touch (using HGT1) Excel template (with the EN 50522 tab active) OMICRON...
-
Page 33: Measurements With Ptm (Using A Windows Tablet)
2. If criterion 3 is met, establish the measurement setup as shown in Figure 8-9 below. Frequency Current 30.00 Hz 30.00 Hz 70.00 Hz 70.00 Hz 90.00 Hz 90.00 Hz HGT1 Ω HGT1 EN 50522:2011 IEEE 81-2012 I AC I AC GROUND CPC 100... - Page 34 HGT1 User Manual a minimum distance of 5 km, no matter the size of the grounding system. In general, the setup must represent worst case conditions, which could occur during a single line fault. This must be clarified for each individual grounding system.
- Page 35 As an example, Figure 8-12 below shows the touch voltage measurement according to IEEE 81. Test probe Ground rod (6 mm diameter) driven 150 mm into moist subsoil, 1 m apart from grounded structure Figure 8-12: Touch voltage measurement with PTM (tablet) according to IEEE 81 OMICRON...
- Page 36 Death or severe injury caused by high voltage or current possible ► Never connect the HGT1 to the tablet without using the provided USB isolator. As soon as the HGT1 is recognized by PTM, it is locked and cannot be operated via its buttons any longer.
-
Page 37: Ground Impedance Measurements With Ptm
2. If criterion 3 is met, establish the measurement setup as shown in Figure 9-1 below. Frequency Current 30.00 Hz 30.00 Hz 70.00 Hz 70.00 Hz 90.00 Hz 90.00 Hz 90° HGT1 Ω I AC I AC GROUND CPC 100 CP GB1 30V : 600V I AC V1 AC V SENSE 2.5A : 100A... - Page 38 HGT1 User Manual Note: In order to measure valid ground impedance values, the distance between the grounding system under test and the remote substation must be taken into account. IEEE 81 recommends a minimum distance of five times the maximum dimensions of the grounding system to avoid overlapping of the ground potential rise of both the grounding system and the current probe.
- Page 39 Death or severe injury caused by high voltage or current possible ► Never connect the HGT1 to the tablet without using the provided USB isolator. As soon as the HGT1 is recognized by PTM, it is locked and cannot be operated via its buttons any longer.
- Page 40 HGT1 User Manual 10.Place the ground rod at the distance from the grounding system you want to start the measurement from. In the present example this would be 1 m. CAUTION Minor or moderate injury caused by tripping on the measurement cable possible ►...
-
Page 41: Technical Data
• FFT repetition rate: 187,5 Hz (one FFT per 5.3 ms). The results of the FFT shown on the HGT1’s screen are updated every 50 ms by averaging the individual FFT results. Table 10-2: FFT parameters for 100 Hz and 400 Hz frequency range selection... - Page 42 HGT1 User Manual Table 10-3: Environmental conditions Characteristic Rating Temperature -10 °C (14 °F) … +50 °C (122 °F) Humidity 5 % to 90 % RH, non-condensing Table 10-4: Mechanical data Characteristic Rating Dimensions (L x W x H) 180 x 90 x 45 mm / 7.1 x 3.5 x 1.8 inch...
-
Page 43: Ce Declaration Of Conformity
We, the manufacturer NTi Audio AG Im alten Riet 102 9494 Schaan Liechtenstein, Europe do hereby declare that the HGT1, released in 2013, complies with the following standards or other standard documents: • EMC: 2004/108/EG • Harmonized standards: EN 61326-1 •... -
Page 44: Support
OMICRON Academy – learn more www.omicronenergy.com/academy Learn more about your product in one of the training courses offered by the OMICRON Academy. OMICRON electronics GmbH, Oberes Ried 1, 6833 Klaus, Austria, +43 59495 OMICRON... - Page 45 ENU 1046 05 02...
Need help?
Do you have a question about the HGT1 and is the answer not in the manual?
Questions and answers