Table of Contents
Advertisement
Advertisement
Table of Contents

Related Manuals for Makita LS1020


Summary of Contents for Makita LS1020
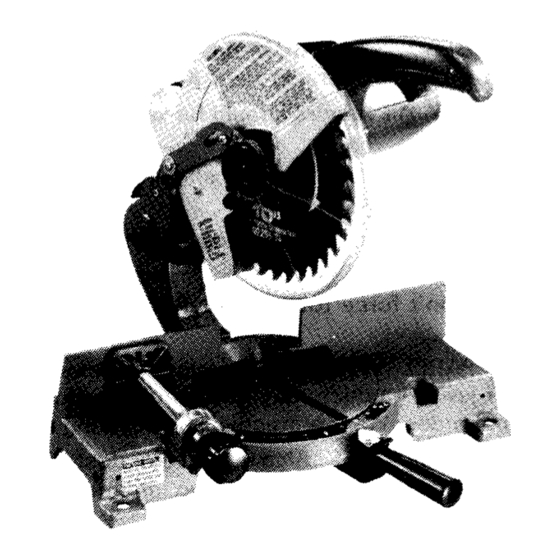
- Page 1 Manufdcturer reserves the right to chdnye specifications w i t h o u t notice ‘ Note Specifications differ from country to country m a y Miter Saw 255 mm (10”) MODEL LS1020 Equipped with Electrical Blade Brake DOUBLE IN SUL ATlON...
- Page 2 Your Own Manual Before Operating Miter Saw GENERAL SAFETY PRECAUTIONS KNOW YOUR POWER TOOL. Read the owner’s manual carefully. Learn the tools applications and limitations, as well as the specific potential hazards peculiar t o it. KEEP GUARDS IN PLACE and in working order.
- Page 3 USE RECOMMENDED ACCESSORIES. recommended accessories. The use of improper accessories may cause risk of injury t o persons. 18. NEVER STAND ON TOOL. Serious injury could occur if the tool is tipped or if the cutting tool is accidentally contacted. CHECK DAMAGED PARTS.
- Page 4 Stop operation immediately if you notice anything abnormal. Do not attempt t o lock the trigger in the o n position. Shut o f f power and wait for saw blade t o stop before servicing or adjusting tool. Don’t abuse cord. Never yank cord t o disconnect it from the receptacle. Keep cord away f r o m heat, oil, water and sharp edges.
- Page 5 When carrying the tool, lock the handle in the lowered position and secure the turn base by means of the grip. Bench mounting miter saw This tool should be bolted with two bolts to a level and stable surface using the bolt holes provided in the tool's base.
- Page 6 Then tighten the hex bolt clockwise to secure the center cover. CAUTION : Use only the Makita socket wrench to install or remove the blade.
- Page 7 Do not use solvents or any petroleum-based cleaners on the plastic cover.
- Page 8 Switch action To prevent the trigger from being acciden- tally pulled, a lock-off button safety feature. To start the tool, press in the lock-off button and pull the trigger. Release the trigger to stop. CAUTION : Before plugging in the tool, always check to see that the trigger switch actuates properly and returns to the "OFF"...
- Page 9 255 mm ( I O ” ) saw blade. When the diameter of the blade has been reduced due to sharpening, loosen the hex nut a t the rear of the gear housing.
- Page 10 Securing workpiece By turning the knob on the vise counterclockwise, the screw i s released and the vise shaft can be moved rapidly in and out. By turning the knob clockwise, the screw remains secured. grip workpieces, turn the knob gently clockwise, until the projection reaches i t s topmost position, then fasten securely.
- Page 11 Operation When cutting with this tool, the thickness of the blade is cut as well. Therefore, your cutting line should be on either the left or right side of the groove in the kerf board. Switch on the tool and wait until the blade attains full speed before lowering gently into the cut.
- Page 12 .After changing the miter angle, cut the wood facing a t that selected angle. I f is a there gap between the blade, the wood facing and the workpiece, move the wood facing slightly in the direction of the arrow and cut it again. When the wood facing i s attached, do not turn the turn base with the handle lowered.
- Page 13 Alignment squareness This tool was carefully adjusted and aligned for squareness of cut a t the factory, but rough handling may have affected the alignment. I f your tool is not aligned properly, perform the following. Loosen the grip and zero degree by turning the turn base and allowing the latch spring to the miter notch.
- Page 14 Cutting fixed lengths When cutting several pieces of stock to the same length, ranging between 250 - 400 mm (10" - 15-3/4"), use of the set plate will facilitate operation. Align the cutting line on your workpiece with either the left or right side of the groove in the kerf board, then move the set plate flush against the end of the workpiece and secure the screw.
- Page 15 To maintain product SAFETY and RELIABILITY, repairs, any other maintenance or adjustment should be performed by Makita Authorized or Factory Service Centers, always using Makita replacement parts. Limit mark...
- Page 16 ACCESS0 R I ES CAUTION : These accessories or attachments are recommended for use with your Makita tool specified in this manual. The use of any other accessories or attachments might present accessories or attachments should be used only in the proper and intended manner.
- Page 17 R I U S J u r i (IO”) 255 mm MITER SAW Model LS1020...
- Page 19 I T E M DESCRIPTION USED...
- Page 20 Makita’s P‘actory the trouble is caused by defective workmanship or material, Makita will repair (or at our option, replace) without charge. This Warranty does not apply whcre: repairs have been made or attempted by others:...