Draytek Vigor2960 Series Quick Start Quide
Dual-wan security firewall
Hide thumbs
Also See for Vigor2960 Series:
- User manual (446 pages) ,
- User manual (366 pages) ,
- User manual (287 pages)
Table of Contents
Advertisement
Quick Links
Download this manual
See also:
User Manual
Advertisement
Table of Contents

Related Manuals for Draytek Vigor2960 Series


Summary of Contents for Draytek Vigor2960 Series
- Page 1 Vigor2960 Series Quick Start Guide...
- Page 2 Vigor2960 Series Dual-WAN Security Firewall Quick Start Guide Version: 1.0 Firmware Version: V1.0.5_RC7 (For future update, contact DrayTek) Date: 13/07/2012 Vigor2960 Series Quick Start Guide...
- Page 3 Web registration is preferred. You can register your Vigor router via Owner http://www.draytek.com. Firmware & Tools Due to the continuous evolution of DrayTek technology, all routers will be Updates regularly upgraded. Please consult the DrayTek web site for more information on newest firmware, tools and documents.
- Page 4 Taiwan 303 Product: Vigor2960 Series Router DrayTek Corp. declares that Vigor2960 Series of routers are in compliance with the following essential requirements and other relevant provisions of R&TTE Directive 1999/5/EEC. The product conforms to the requirements of Electro-Magnetic Compatibility (EMC) Directive 2004/108/EEC by complying with the requirements set forth in EN55022/Class B and EN55024/Class A.
- Page 5 Vigor2960 Series Quick Start Guide...
-
Page 6: Table Of Contents
4.3 Pinging the Router from Your Computer .................. 26 4.4 Checking If the ISP Settings are OK or Not ................28 4.5 Backing to Factory Default Setting If Necessary..............29 4.6 Contacting Your Dealer ......................30 Vigor2960 Series Quick Start Guide... - Page 7 Vigor2960 Series Quick Start Guide...
-
Page 9: Introduction
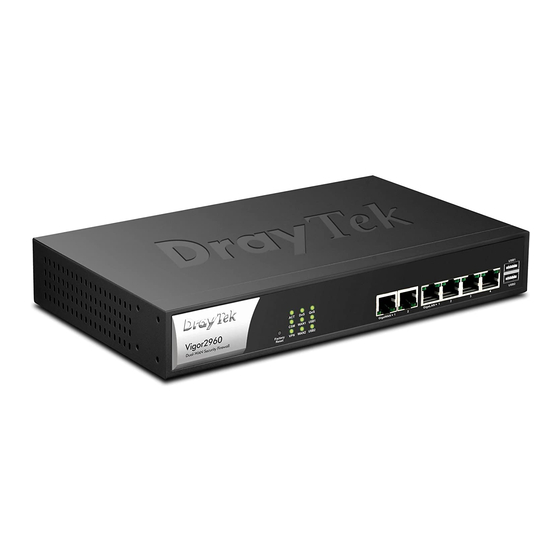
Vigor2960 series, a firewall broadband router with dual-WAN interface, can connect to xDSL/cable/VDSL2/Ethernet FTTx. The WAN and 4-port gigabit LAN switch facilitates unified communication applications in business CO/remote site to handle large data from subscribed fatter pipe. The state-of-art routing feature, VPN security, and Dual-WAN provide integrated benefits for professional users and small offices. -
Page 10: Panel Explanation
The port is connected with 10/100Mbps. Left LED The port is connected. GigaLAN (Green) The port is disconnected. 1/2/3/4 Blinking The data is transmitting. Right LED The port is connected with 1000Mbps. (Green) The port is connected with 10/100Mbps. Vigor2960 Series Quick Start Guide... - Page 11 Then the router will restart with the factory default configuration. GigaWAN 1/2 Connecters for remote networked devices. GigaLAN 1/2/3/4 Connecters for local networked devices. USB1/2 Connecter for Mobile HDD, 3G Modem or printer. Connecter for a power cord. ON/OFF - Power switch. Vigor2960 Series Quick Start Guide...
-
Page 12: Package Content
The type of the power adapter depends on the country that the router will be installed: UK-type power cord EU-type power cord USA/Taiwan-type power cord AU/NZ-type power cord * The maximum power consumption is 20 Watt. Vigor2960 Series Quick Start Guide... -
Page 13: Installing Your Router
LED should be ON. The system starts to initiate. After completing the system test, the ACT LED will light up and start blinking. (For the detailed information of LED status, please refer to section 1.1.) Vigor2960 Series Quick Start Guide... -
Page 14: Wall-Mounted Installation
The Vigor2960 Series can be mounted on the wall by using standard brackets shown below. Choose a flat surface (on the wall) which is suitable for placing the router. Make the screw holes on the short side of the bracket aim at the screw holes on the router. Next, fasten both the bracket and the router with two screws;... -
Page 15: Printer Installation
You can install a printer onto the router for sharing printing. All the PCs connected this router can print documents via the router. The example provided here is made based on Windows XP/2000. For Windows 98/SE/Vista, please visit www.draytek.com. Before using it, please follow the steps below to configure settings for connected computers (or wireless clients). - Page 16 Next. Click Local printer attached to this computer and click Next. In this dialog, choose Create a new port Type of port and use the drop down list to select Standard TCP/IP Port. Click Next. Vigor2960 Series Quick Start Guide...
- Page 17 In the following dialog, type 192.168.1.1 (router’s LAN IP) in the field of Printer Name or IP Address and type IP_192.168.1.1 as the port name. Then, click Next. Click Standard and choose Generic Network Card. Then, in the following dialog, click Finish. Vigor2960 Series Quick Start Guide...
- Page 18 11. Select "LPR" on Protocol, type p1 (number 1) as Queue Name. Then click OK. Next please refer to the red rectangle for choosing the correct protocol and LPR name. Vigor2960 Series Quick Start Guide...
- Page 19 If you do not know whether your printer is supported or not, please visit www.draytek.com to find out the printer list. Open Support >FAQ; find out the link of Printer Server and click it; then click the What types of printers are compatible with Vigor router? link.
- Page 20 This page is left blank. Vigor2960 Series Quick Start Guide...
-
Page 21: Configuring Web
The web page can be logged out according to the chosen condition. The default setting is 5Min, which means the web configuration system will logout after five minutes without any operation. Change the setting for your necessity. Vigor2960 Series Quick Start Guide... -
Page 22: Changing The Password
New Password and retype it on the field of Confirm Password. Then click Apply to continue. 3. Now, the password has been changed. Next time, use the new password to access the Web Configurator for this router. Vigor2960 Series Quick Start Guide... -
Page 23: Quick Start Wizard
Subnet Mask, Gateway IP Address and DNS Server IP Address specified by your ISP, and then click Next. DHCP - It allows a user to obtain an IP address automatically from a DHCP server on the Internet. If Vigor2960 Series Quick Start Guide... - Page 24 PPPoE for this router to get the following page. Enter the username and password provided by your ISP on the web page. When you finish the above settings, please click Next to go to next page. Vigor2960 Series Quick Start Guide...
- Page 25 Type a public IP address as the primary DNS (Domain Name Server). To add a new IP address, simply Add. Four boxes Address will appear for you to type the IP address. When you finish the settings, click Save. Vigor2960 Series Quick Start Guide...
- Page 26 Click it to discard the settings configured in this page. After finishing the above configuration, click Finish. For DHCP type, the page will be displayed as follows: Type a name as the host name for identification (optional) for identification. Click Finish. Vigor2960 Series Quick Start Guide...
- Page 27 Click it to return to previous setting page. Finish Click it to save the configuration and exit the dialog. Cancel Click it to discard the settings configured in this page. After finishing the above configuration, click Finish. Vigor2960 Series Quick Start Guide...
- Page 28 Type a public IP address as the primary DNS (Domain Name Address Server). To add a new IP address, simply Add. Four boxes will appear for you to type the IP address. When you finish the settings, click Save. Vigor2960 Series Quick Start Guide...
- Page 29 Click it to save the configuration and exit the dialog. Click it to discard the settings configured in this page. Cancel After finishing the above configuration, click Finish. Later, you can surf the Internet at any time. Vigor2960 Series Quick Start Guide...
-
Page 30: Check The Connection Status
Device Information, System Information and IPv4/IPv6 configurations. From the above figure, wan1 connection for Internet has been built successfully for the word – up has been displayed on the field of Connection. Vigor2960 Series Quick Start Guide... -
Page 31: Trouble Shooting
Turn on the router. Make sure the ACT LED blink once per second. If not, it means that there is something wrong with the hardware status. Simply back to “2.1 Hardware Installation” to execute the hardware installation again. And then, try again. Vigor2960 Series Quick Start Guide... - Page 32 Go to Control Panel and then double-click on Network Connections. Right-click on Local Area Connection and click on Properties. Select Internet Protocol (TCP/IP) and then click Properties. Vigor2960 Series Quick Start Guide...
- Page 33 Double click on the current used Mac OS on the desktop. Open the Application folder and get into Network. On the Network screen, select Using DHCP from the drop down list of Configure IPv4. Vigor2960 Series Quick Start Guide...
-
Page 34: Pinging The Router From Your Computer
Open the Application folder and get into Utilities. Double click Terminal. The Terminal window will appear. Type ping 192.168.1.1 and press [Enter]. If the link is OK, the line of “64 bytes from 192.168.1.1: icmp_seq=0 ttl=255 time=xxxx ms” will appear. Vigor2960 Series Quick Start Guide... - Page 35 Vigor2960 Series Quick Start Guide...
-
Page 36: Checking If The Isp Settings Are Ok Or Not
Open Online Status to check current network status. Be careful to check if the settings coming from your ISP have been typed correctly or not. If there is something wrong with the configuration, please go to WAN page and choose General Setup again to modify the WAN connection. Vigor2960 Series Quick Start Guide... -
Page 37: Backing To Factory Default Setting If Necessary
Go to System Maintenance and choose Reboot System on the web page. The following screen will appear. Choose Reboot with Factory Default Configuration and click Reboot. After few seconds, the router will return all the settings to the factory settings. Vigor2960 Series Quick Start Guide... -
Page 38: Contacting Your Dealer
If the router still cannot work correctly after trying many efforts, please contact your dealer for further help right away. For any questions, please feel free to e-mail to support@draytek.com. Vigor2960 Series Quick Start Guide...