Buffalo TeraStation WSS 5000 User Manual
Hide thumbs
Also See for TeraStation WSS 5000:
- User manual (229 pages) ,
- Specifications (2 pages) ,
- Specifications (2 pages)
Table of Contents
Advertisement
Quick Links
Advertisement
Table of Contents

Related Manuals for Buffalo TeraStation WSS 5000


Summary of Contents for Buffalo TeraStation WSS 5000
- Page 1 TeraStation WSS 5000 User Manual www.buffalotech.com 35020065-02...
-
Page 2: Table Of Contents
Contents Chapter 1 Installation ............5 Installation ....................5 Turning the TeraStation On and Off............9 Installing Antivirus Software ............10 Chapter 2 Opening Windows Storage Server ....11 Opening Windows Storage Server ............11 Chapter 3 Windows Update ..........13 Windows Update ................13 Chapter 4 Software ............14 RAID Builder ..................14 Chapter 5 Managing Your Storage .........15 Creating Volumes ................15... - Page 3 Creating Simple Volumes (JBOD) ..............21 Hard Drive Replacement Procedure ..........24 Hard Drive Replacement Examples .............25 Chapter 6 Settings ............36 Date and Time ....................36 Server Name, Workgroups, and Domains ...........36 Changing the Password ................38 Adding a User ....................40 Adding a Group .....................41 Creating a Shared Folder ................46 Changing the IP Address ................53 Chapter 7 NAS Navigator2 ..........54...
- Page 4 Notes ....................65 Compliance Information ..............65 FCC Warning ....................65 CE Mark Warning ...................65 Environmental Information .................66 KC ........................66 BSMI .......................66 CCC .........................66 电池警告语......................66 Models ......................66...
-
Page 5: Chapter 1 Installation
Chapter 1 Installation Installation If using OS X 10.4 or later, download and install “Remote Desktop Connection Client for Mac 2” from www.microsoft. com. For OS X 10.3.9, use version 1.0.3 instead. Connect the supplied USB device to your computer. Open the USB device and double-click TSNavi.exe TeraNavigator will launch. - Page 6 Click Finish. NAS Navigator2 will open . You can also open it by clicking icon on the Windows desktop or icon in the Dock on Mac OS. In NAS Navigator2, right-click on your TeraStation’s icon, then select Properties. On the Mac, click the TeraStation’s icon while holding down the control key, then select Configure.
- Page 7 Notes: • If the message “The publisher of this remote connection cannot be identified. Do you want to connect anyway?” is displayed, click Connect. • If “The identity of the remote computer cannot be verified. Do you want to connect anyway?” is displayed, click Yes or Continue.
- Page 8 In Server Manager, click Local Server to set the date and time. Under “PROPERTIES”, click the item shown in “Time zone”. In the “Date and Time” tab, click Change date and time. Select the current date and time, then click OK. Note: In the Internet Time tab, click Change settings, then select Synchronize with an Internet time server.
-
Page 9: Turning The Terastation On And Off
See “Creating a Shared Folder” section in chapter 6 for details. Change the TeraStation’s password. See the “Changing the Password” section in chapter 6 for details. In NAS Navigator2, double-click your TeraStation’s icon. For Mac OS, the TeraStation is mounted as a drive icon on the desktop, or it is displayed in the sidebar of the Finder. -
Page 10: Installing Antivirus Software
Installing Antivirus Software Installing antivirus software on the TeraStation is strongly recommended. Connect a USB CD/DVD drive to the TeraStation’s USB port, load the antivirus software CD into the CD/DVD drive, and install the software. -
Page 11: Chapter 2 Opening Windows Storage Server
Chapter 2 Opening Windows Storage Server Opening Windows Storage Server If using OS X 10.4 or later, download and install “Remote Desktop Connection Client for Mac 2” from www.microsoft. com. If using OS X 10.3.9, use version 1.0.3 instead. Double-click the icon on the desktop. - Page 12 The default username and password are “Administrator” and “password”. Note: Make sure that the same language is configured in “Display language”, “Welcome screen and system accounts”, and system locale. Configuring different languages for these settings may cause unexpected behavior.
-
Page 13: Chapter 3 Windows Update
Chapter 3 Windows Update Windows Update For best results, Windows Storage Server should be updated regularly. Use Windows Update as described below. Note: The TeraStation must be connected to the Internet. In Windows Storage Server, click Control Panel - System and Security - Windows Update. Click Check for updates. -
Page 14: Chapter 4 Software
Chapter 4 Software RAID Builder RAID Builder is used to modify the RAID arrays. See chapter 5 for details. Note: To launch RAID Builder, you must be logged in as the Administrator in Windows Storage Server. -
Page 15: Chapter 5 Managing Your Storage
Chapter 5 Managing Your Storage Creating Volumes Volume Types The features of each volume type are explained below. Notes: • RAID Builder will be used to create a volume, not the Disk Management options in Windows Storage Server. • When volumes are deleted or formatted, or the RAID mode is changed, all data stored in that volume is erased. -
Page 16: Deleting Volumes
Spanned Volumes The unallocated areas of multiple hard drives are joined to create a single logical volume. This allows various drive spaces to be combined efficiently. However, data cannot be recovered if even a single drive fails. Simple Volumes (JBOD) The internal hard drives of the TeraStation are each used as individual drives. -
Page 17: Formatting Volumes
Formatting Volumes In Windows Storage Server, open Administrative Tools, then double-click Computer Management. Click Disk Management. Right-click the volume that you want to format and then select Format. -
Page 18: Creating A Raid 5 Volume
Creating a RAID 5 Volume In Windows Storage Server, click Launch RAID Builder. Select “Create RAID array” from the drop-down menu and “RAID 5” under “RAID structure”. Select at least three drives to create a RAID 5 array. Click OK. Examples: •... -
Page 19: Creating A Mirrored Volume (Raid 1)
• For “n (1 to 4)” identical hard drives in a RAID 5 array, the available space is (n-1)/n times the total drive space. A RAID 5 volume will be created. Next, create a shared folder on the volume as described in chapter 6. Creating a Mirrored Volume (RAID 1) In Windows Storage Server, click Launch RAID Builder. -
Page 20: Creating A Spanned Volume
Example: For a configuration with drive 1 (50 GB), drive 2 (80 GB), drive 3 (58 GB), and drive 4 (100 GB), the usable space on the mirrored volume will be 50 GB x 4 drives = 200 GB. A striped volume will be created. Next, create a shared folder on the volume as described in chapter 6. Creating a Spanned Volume In Windows Storage Server, click Launch RAID Builder. -
Page 21: Creating Simple Volumes (Jbod)
Example: For a configuration with drive 1 (50 GB), drive 2 (80 GB), drive 3 (58 GB), and drive 4 (100 GB), the usable space on the RAID volume will be 50 GB + 80 GB + 58 GB + 100 GB = 288 GB. A spanned volume will be created. - Page 22 Right-click the unallocated area, then select New Simple Volume. Click Next. Enter the volume size that you want to create, then click Next.
- Page 23 Select Assign the following drive letter, then click Next. Select Format this volume with the following settings and Perform a quick format, then click Next.
-
Page 24: Hard Drive Replacement Procedure
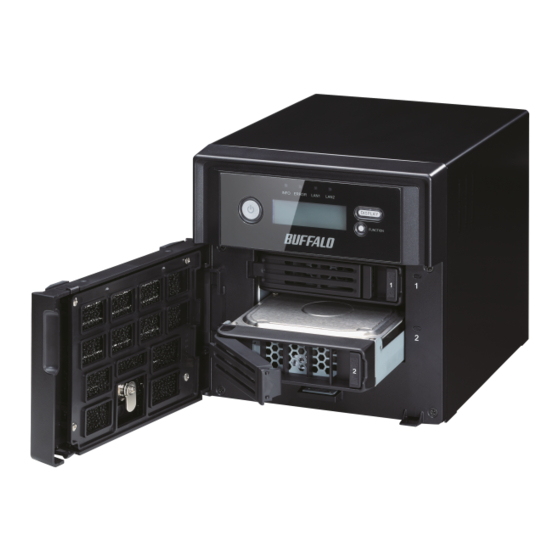
A simple volume will be created. Next, create a shared folder on the volume as described in chapter 6. Hard Drive Replacement Procedure Hard drives in the TeraStation show a green status LED during normal operation. When a drive fails, its error LED will glow red. -
Page 25: Hard Drive Replacement Examples
TeraStation may malfunction. • When changing drives, the replacement drive should be a Buffalo OP-HDS series drive of the same size. • The TeraStation is fragile. Handle it with care. Do not drop or bump the TeraStation. - Page 26 Follow the procedure below. Hard Drive Replacement in Case of Disk Failure Other Than Drive 1 or Drive 2 Double-click the icon on the desktop to start NAS Navigator2. For Mac OS, click the icon in the Dock. Right-click on your TeraStation’s icon, then click Open Remote Desktop. For Mac OS, click the TeraStation’s icon while holding down the control key, then click Open Remote Desktop.
- Page 27 Select Dismount drive, select the hard drive to be removed, and click OK. When the message “The drive is ready to remove. ” is displayed, click OK. The status LED will stop flashing and glow steadily. WS5600D, WS5400D, WS5200D: Open the front cover with the included key. Push the unlock button of the failed hard drive and swing the lock mechanism out.
- Page 28 Pull out the hard drive cartridge and remove it from the TeraStation.
- Page 29 Insert the new hard drive (sold separately) into the empty slot. Slide the drive in with the locking mechanism open.
- Page 30 Swing the lock back down until it clicks into place.
- Page 31 Replace the front cover. If the hard drive was replaced while the TeraStation power was turned off, press the power button on the TeraStation to turn on the power and start RAID Builder by performing steps 1 to 4 on the front page. Select Detect drives, select the new drive, and click OK.
- Page 32 When “Drive detected” is displayed, click OK. In Windows Storage Server, open Administrative Tools, then double-click Computer Management. Click Disk Management. Right-click the new drive, then select Initialize Disk.
- Page 33 Right-click the initialized hard drive, then select Convert to Dynamic Disk. A RAID array cannot be built unless the hard drive is converted to a dynamic disk. Select the step depending on your purpose for a created volume. To create a new volume: (a) Right-click the new dynamic disk and select New Volume.
- Page 34 To restore a Mirrored volume (RAID resynchronization): (a) Right-click the volume labeled “Failed Redundancy” and click Remove Mirror. (b) When “Remove Mirror” is displayed, select the drive with its status missing and click OK. Note: Perform steps (a) and (b) for each volume that requires RAID resynchronization. (c) Select the new volume where mirroring will be performed, then select Add Mirror.
- Page 35 (e) When “Disk Management” is displayed, click OK. If a Mirrored Volume Failed to Restore If a mirrored volume doesn’t restore the first time, try the steps above a second time. If the mirrored volume still cannot be restored, contact Buffalo technical support for assistance.
-
Page 36: Chapter 6 Settings
Chapter 6 Settings Date and Time Click the time in the system tray of Windows Storage Server. Click Change date and time settings - Change date and time, select the current date and time, and click OK. Note: In the Internet Time tab, click Change settings, then select Synchronize with an Internet time server. The date and time can be obtained automatically. - Page 37 Enter the computer name, choose domain or workgroup, and click OK.
-
Page 38: Changing The Password
Note: The computer name should have 16 characters or less. If more than 16 characters are entered, all characters from the 17th character on are ignored. Changing the Password The default password for the TeraStation’s administrator account is “password”. This is public knowledge, so for security, you should change it immediately. - Page 39 Click Proceed. Enter a new password (twice).
-
Page 40: Adding A User
Adding a User In Windows Storage Server, open Administrative Tools, then double-click Computer Management. Click Local Users and Groups. Right-click Users, then click New User. Enter the desired settings, then click Create . -
Page 41: Adding A Group
Note: Accounts not belonging to the Administrators group cannot be connected by the remote desktop. Adding a Group In Windows Storage Server, open Administrative Tools, then double-click Computer Management. Click Local Users and Groups. Right-click Groups and choose New Group. - Page 42 Enter the desired settings, then click Create.
- Page 43 Click Advanced. Click Find Now.
- Page 44 Select the users to be registered to the group, then click OK.
- Page 45 Click OK.
-
Page 46: Creating A Shared Folder
Click Close. Creating a Shared Folder No shared folders are configured by default. Before using the TeraStation, follow the procedure below to create one or more shared folders. In Windows Storage Server, open Administrative Tools, then double-click Computer Management. Click Shared Folders. - Page 47 Right-click Shares, then click New Share. Click Next. Enter the path of an existing folder or a new folder, then click Next.
- Page 48 Notes: • Enter “D:\Share” in folder path to create the shared folder for the first time. • If the message “The system cannot find the specified path. Do you want to create it?” is displayed, click Yes. Enter a name for the share and a description (optional), then click Next.
- Page 49 Check Customize permissions, then click Custom. Choose Everyone, then check Allow for “Change”.
- Page 50 In the Security tab, click Edit - Add.
- Page 51 Enter “Everyone” under “Enter the object names to select”, then click OK. Choose “Everyone”, then check Allow for Modify.
- Page 52 Click OK - OK - Finish - Finish. Click Local Users and Groups in Computer Management. Double-click Users - Guest. In the General tab, uncheck Account is disabled, then click OK. Notes: Enable a guest account: (1) In Windows Storage Server, open Administrative Tools, then double-click Computer Management. (2) Click Local Users and Groups.
-
Page 53: Changing The Ip Address
Changing the IP Address Note: If the TeraStation is being used in a domain environment, the IP address cannot be changed by NAS Navigator2. To change the IP address, the domain environment administrator must change it at the domain server. Right-click on your TeraStation’s icon, then click Properties. -
Page 54: Chapter 7 Nas Navigator2
Chapter 7 NAS Navigator2 NAS Navigator2 is a utility program that makes it easy to display Windows Storage Server, change TeraStation’s IP address, or check its hard drive in remote desktop. If you installed the TeraStation with the TeraNavigator CD, NAS Navigator2 was installed automatically. - Page 55 Name Description Map Share Not available for this product (grayed out). Disconnect Share Not available for this product (grayed out). Assigns all the TeraStation’s shared folders as network Map All Remote Shares to Drive drives. This is available only when a shared folder has Letters been created.
- Page 56 Browse Shares Opens the TeraStation’s shared folder. Open Remote Desktop Opens Windows Storage Server in remote desktop. Properties Opens the TeraStation’s properties page. TeraStation Name Creates a shortcut icon to the TeraStation’s shared Create Desktop Shortcut folder “share” on the desktop. I’m here Causes your TeraStation to beep.
-
Page 57: Chapter 8 Appendix
Chapter 8 Appendix Diagrams WS5600D WS5400D WS5200D... - Page 58 WS5400R Power Button To power on, connect the power cable and wait for 10 seconds. Then press the power button. To power off, follow the instructions in chapter 1. Do not disconnect the power cable without shutting down the TeraStation. Info LED If there is a status message, the amber info LED is lit.
-
Page 59: Lcd Display
Compatible Buffalo USB 3.0 hard drives can be connected. USB hubs are not supported. USB 2.0 Port Compatible Buffalo USB hard drives, USB flash drives, digital cameras, and USB UPS connection can be connected. USB hubs are not supported. LAN Port 1 Use and Ethernet cable to connect this port to your network. -
Page 60: Errors And Status
An error occurred in the fan speed. tweezers, air duster, or Fan Failure other tool to remove them. If the error is displayed again, contact Buffalo technical support for assistance. Do not place objects in the area around the TeraStation. Also, move SYSTEM Error E12... -
Page 61: Default Settings
Move the TeraStation to SYSTEM I10 A rise in the system temperature may have a cool location. Do not exceeded the allowable safety value. place objects in the area TOO HOT ! around the TeraStation. Operation I12 Operating in degraded mode. DEGRADE MODE Rebuilding RAID array X. -
Page 62: Data Backup
While using the TeraStation, you may lose your important data due to sudden accidents, hard disk failure, or accidental misoperation. Back up your data regularly! For best results, back up your data to Buffalo drives like the TeraStation, LinkStation, or DriveStation series. -
Page 63: Troubleshooting
Troubleshooting If you can’t access your TeraStation: Typical problems and when you are unable to search using NAS Navigator2 and when the Remote Desktop screen does not open are described below. Cause 1. The cables are not connected correctly. The cables are not physically connected, or there may be a contact defect. Reconnect the AC cable and Ethernet cable and restart both the computer and TeraStation. -
Page 64: Windows Storage Server Recovery Procedure
Cause 10. “Remote Desktop Connection Client for Mac” is not installed on your Mac. If using OS X 10.4 or later, download and install “Remote Desktop Connection Client for Mac 2” from www.microsoft. com. If using OS X 10.3.9, use version 1.0.3 instead. When TeraStation shared folders suddenly do not open If the TeraStation shared folder is assigned and used as a network drive, access to the TeraStation may suddenly fail if network settings such as IP addresses or groups are changed. -
Page 65: Notes
After the recover process is completed, the TeraStation is set to the state below when used at the default settings. • Drive 1 100 MB (EFI System partition) 100 GB (Basic Disk/Simple) The remaining space is an unallocated area. • Drives 2 to 4 The data on the drives cannot be viewed. -
Page 66: Environmental Information
Environmental Information • The equipment that you have purchased required the extraction and use of natural resources for its production. • The equipment may contain hazardous substances that could impact health and the environment. • In order to avoid the dissemination of those substances in our environment and to diminish the load on natural resources, we encourage you to use the appropriate take-back systems. - Page 67 WS5400R, WS5400R0804, WS5400R1604 WS5600D, WS5600D1206, WS5600D2406...