
Related Manuals for Dell V525W


Summary of Contents for Dell V525W
- Page 1 Dell V525w User's Guide January 2012 www.dell.com | support.dell.com Machine type(s): 4448 Model(s): 4d1, 4dE...
- Page 2 DELL logo are trademarks of Dell Inc.; Microsoft and Windows are registered trademarks of Microsoft Corporation. Other trademarks and trade names may be used in this document to refer to the entities claiming the marks and names of their products. Dell Inc. disclaims...
-
Page 3: Table Of Contents
Understanding the parts of the printer....................11 Ordering and replacing supplies..............14 Ordering ink cartridges..........................14 Replacing ink cartridges..........................15 Recycling Dell products...........................16 Using the printer control panel buttons and menus........18 Replacing the language sheet........................18 Using the printer control panel.......................20 Changing the Sleep timeout........................22 Saving paper and energy.........................22... - Page 4 Contents Printing......................34 Tips for printing............................34 Printing basic documents........................34 Printing on specialty media........................37 Working with photos..........................39 Printing on both sides of the paper (duplexing)..................42 Managing print jobs..........................44 Copying......................49 Tips for copying............................49 Making copies............................49 Copying an ID card...........................50 Enlarging or reducing images........................50 Adjusting copy quality..........................50 Making a copy lighter or darker......................51 Collating copies using the printer control panel..................51...
- Page 5 Contents E-mailing....................62 Setting up the printer to e-mail.......................62 Sending e-mail............................63 Canceling an e‑mail..........................64 Faxing......................65 Setting up the printer to fax........................65 Configuring the fax settings........................76 Creating a contact list..........................78 Sending faxes............................79 Receiving faxes............................81 Faxing FAQ...............................82 Networking....................89 Installing the printer on a wireless network....................89 Advanced wireless setup.........................96 Networking FAQ............................103 Maintaining the printer................117...
- Page 6 Contents Edition notice............................160 Power consumption..........................163 Index......................171...
-
Page 7: Safety Information
Safety information Safety information Connect the power cord to a properly grounded electrical outlet that is near the product and easily accessible. Do not place or use this product near water or wet locations. CAUTION—POTENTIAL INJURY: The lithium battery in this product is not intended to be replaced. There is a danger of explosion if a lithium battery is incorrectly replaced. -
Page 8: About Your Printer
About your printer About your printer Thank you for choosing this printer! We've worked hard to make sure it will meet your needs. To start using your new printer right away, use the setup materials that came with the printer, and then skim the User’s Guide to learn how to perform basic tasks. -
Page 9: Finding Information About The Printer
Setting up and using printer software • Setting up and configuring the printer on a network, For updates, check our Web site at depending on your printer model http://support.dell.com. • Caring for and maintaining the printer • Troubleshooting and solving problems... - Page 10 Installation software CD • Software and Drivers—Certified drivers for your printer and installers for Dell printer software Note: If you purchased your Dell computer and printer at the same time, then documentation and drivers for • Readme files—Last‑minute technical changes, or advanced your printer are already installed on your computer.
-
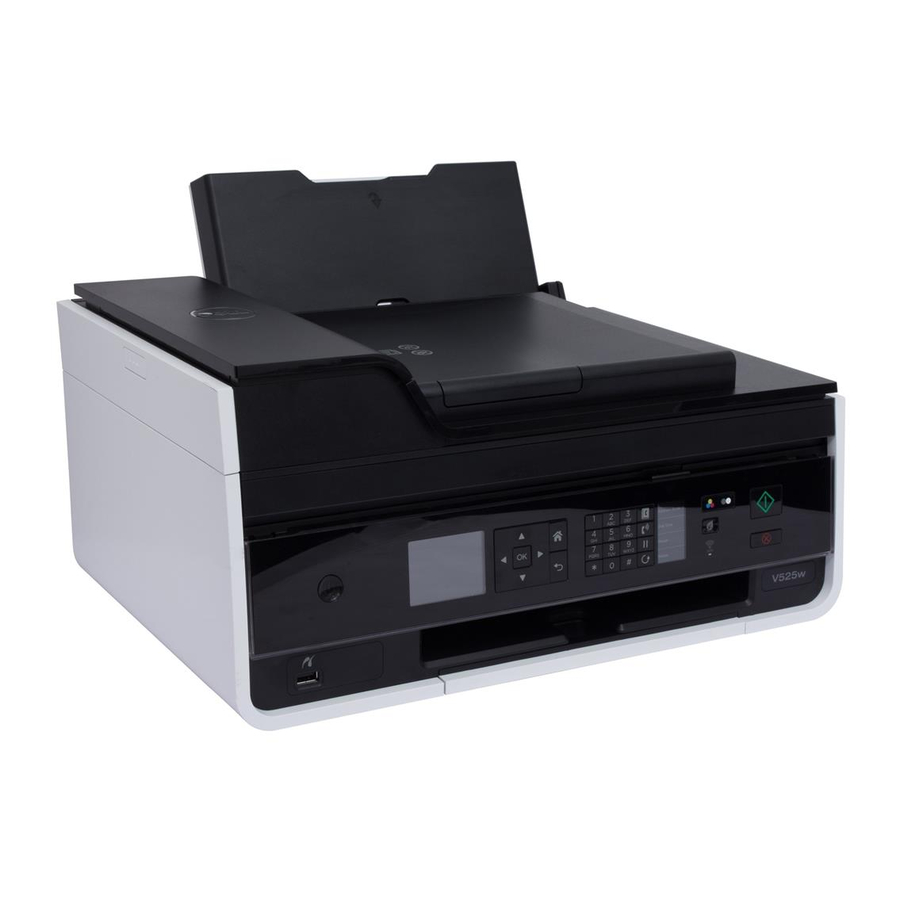
Page 11: Understanding The Parts Of The Printer
About your printer Understanding the parts of the printer Use the Automatic Document Feeder Scan, copy, or fax multiple‑page letter‑, legal‑, and A4‑size documents. (ADF) Paper feed guard Prevent items from falling into the paper slot. Paper guides Keep paper straight when feeding. Paper support Load paper. - Page 12 About your printer Use the ADF paper guide Keep paper straight when feeding it into the ADF. Note: Adjust the paper guide on the ADF tray to the width of the original document. Use the Scanner cover Access the scanner glass. Scanner glass Scan or copy photos and documents.
- Page 13 About your printer Use the Jam clearance cover Access and clear paper jams. Ink cartridge access area Install, replace, or remove ink cartridges. Scanner unit • Access the ink cartridges and printhead. • Clear paper jams.
-
Page 14: Ordering And Replacing Supplies
Series 33R High‑yield magenta color cartridge Licensed for a single use only. After use, return this cartridge to Dell for remanufacturing, refilling, or recycling. For more information on recycling Dell products, visit www.dell.com/recycle. Available only on the Dell Web site at www.dell.com/supplies. -
Page 15: Replacing Ink Cartridges
Ordering and replacing supplies Replacing ink cartridges Make sure you have a new ink cartridge or cartridges before you begin. You must install new cartridges immediately after removing the old ones, or the ink remaining in the printhead nozzles may dry out. Removing ink cartridges Turn on your printer. -
Page 16: Recycling Dell Products
Insert the new ink cartridges immediately after removing the protective cap to avoid exposing the ink to air. Close the printer. Recycling Dell products To return Dell products to Dell for recycling: Click or Start. Click All Programs or Programs, and then select the printer program folder from the list. - Page 17 Ordering and replacing supplies Click Follow the instructions on the computer screen.
-
Page 18: Using The Printer Control Panel Buttons And Menus
Using the printer control panel buttons and menus Using the printer control panel buttons and menus Replacing the language sheet A language sheet is used to label buttons on the printer control panel. Language sheets can be replaced anytime, depending on which language you want to use. Some languages are available only in select printer models. Note: Your printer comes with a preinstalled English language sheet, depending on your country or region. - Page 19 Using the printer control panel buttons and menus Insert the preferred language sheet into the language sheet holder, and then attach the language sheet holder to the printer control panel. Raise the printer control panel until it clicks into place. Close the printer, and then fully extend the paper exit tray.
-
Page 20: Using The Printer Control Panel
Using the printer control panel buttons and menus Using the printer control panel Power • Turn the printer on and off. • Switch to Sleep mode. Note: When the printer is on, press to switch to Sleep mode. Press and hold three seconds to turn off the printer. - Page 21 Using the printer control panel buttons and menus Redial Display the last number dialed. Press the left or right arrow button to view the last five numbers dialed. Pause Insert a three-second pause in a fax number to wait for an outside line or get through an automated answering system.
-
Page 22: Changing The Sleep Timeout
Using the printer control panel buttons and menus Eco‑Mode • Change to Sleep mode after the printer is left idle for 10 minutes. • Reduce the screen brightness. Changing the Sleep timeout The Sleep timeout is the time it takes for the printer to switch to Sleep mode when the printer is left idle. The Sleep feature optimizes energy efficiency by reducing the printer power consumption. - Page 23 Using the printer control panel buttons and menus Press the left or right arrow button to scroll to Yes, and then press The printer restarts automatically after resetting to factory default settings. When prompted to set the initial settings of your printer, make your selections using the printer control panel buttons.
-
Page 24: Using The Printer Software
Mint 10 and 9 • PCLinux OS 2010.12 and 2010.10 The printer driver for this operating system is available only at http://support.dell.com. Using the Windows printer software Software installed during printer installation When you set up the printer using the installation software CD, all the necessary software was installed. You may have chosen to install some additional programs. -
Page 25: Printer Software
• Register the printer. • Contact technical support. • Access the User's Guide. Dell Ink Management System Order ink. Dell Phone Book Manage your fax contacts. (referred to as Phone Book) Abbyy Sprint OCR Scan a document and produce text that you can edit with a word‑processing program. -
Page 26: Using The Macintosh Printer Software
Using the printer software Use the Printing Preferences When you click File > Print > Properties with a document open, a Printing Preferences dialog appears. The dialog lets you select options for the print job, such as the following: • Select the number of copies to print. -
Page 27: Finding And Installing Optional Software
Using the printer software • To take advantage of the full features of your printer, select the custom install option during installation, and then select all packages listed. Finding and installing optional software For Windows users Click or Start. Click All Programs or Programs, and then select the printer program folder from the list. Navigate to: Printer Home >... -
Page 28: Installing The Printer Software
If the installation dialog does not appear after a minute, then click the CD icon on the desktop. Double-click the software installer package, and then follow the instructions on the computer screen. Using the Internet Updated printer software may be available at http://support.dell.com. -
Page 29: Loading Paper And Original Documents
Loading paper and original documents Loading paper and original documents Loading paper Flex the sheets back and forth to loosen them. Do not fold or crease the paper. Straighten the edges of the stack on a level surface. Open the paper feed guard. Place the paper at the center of the paper support. - Page 30 Loading paper and original documents Close the paper feed guard. From the printer control panel, select or confirm your paper settings. Paper and specialty media guidelines Load up to Make sure that 100 sheets of plain paper • The paper guides rest against the edges of the paper. •...
- Page 31 Loading paper and original documents Load up to Make sure that 10 envelopes • The printable side of the envelope is faceup and the flap is on the left. • The paper guides rest against the edges of the envelopes. •...
-
Page 32: Saving Paper Settings
Loading paper and original documents Load up to Make sure that 25 sheets of photo/glossy paper • The printable or glossy side of the paper is loaded faceup. If you are not sure which side is printable, then see the instructions that came with the paper. -
Page 33: Loading Original Documents On The Scanner Glass
Loading paper and original documents Loading original documents on the scanner glass Open the scanner lid and place the document facedown on the scanner glass. Close the scanner lid. Loading original documents into the ADF You can load up to 35 sheets of an original document into the ADF for scanning, copying, and faxing. You can load A4‑, letter‑, or legal‑size paper into the ADF. -
Page 34: Printing
Printing Printing Tips for printing • Use the appropriate paper for your print job. • Select a higher print quality for better prints. • Make sure there is enough ink in the ink cartridges. • Remove each sheet as it is printed when printing photos or when working with specialty media. •... - Page 35 Printing Collated Not collated Notes: • The collate option is available only when you are printing multiple copies. • To prevent smudging when printing photos, remove each photo as it exits the printer, and then let it dry before stacking. For Windows users With a document open, click File >...
-
Page 36: Printing Multiple Pages On One Sheet
Printing Click OK to close any printer software dialogs. Click OK or Print. For Macintosh users With a document open, choose File > Page Setup. From the Page Setup dialog, set the printer, paper size, and orientation. Click OK. From the menu bar, choose File > Print. From the Printer pop‑up menu, choose your printer. -
Page 37: Printing On Specialty Media
Printing Adjust other settings as needed. Click Print. Printing on specialty media Printing envelopes For Windows users With a document open, click File > Print. Click Properties, Preferences, Options, or Setup. Navigate to: Paper/Finishing tab > Paper size list > select your envelope size If no size matches the envelope size, then click Manage Custom Sizes and set a custom size. -
Page 38: Printing On Labels
Printing Printing on labels Notes: • Make sure the top of the label sheet feeds into the printer first. • Make sure the adhesive on the labels does not extend to within 1 mm of the edge of the label sheet. •... -
Page 39: Working With Photos
Printing Printing on custom‑size paper For Windows users With a document open, click File > Print. Click Properties, Preferences, Options, or Setup. Navigate to: Paper/Finishing tab > Manage Custom Sizes > New Type a name and adjust the settings as needed to create a custom size, and then click OK. Click Close, and then click OK to close any printer software dialogs. -
Page 40: Printing Photos From A Flash Drive
Printing Using a flash drive with the printer Make sure the flash drive contains files that are supported by the printer. For more information, see “Supported file types” on page 39. Insert a flash drive into the USB port. Notes: •... -
Page 41: Printing Photos From A Pictbridge-Enabled Digital Camera
Printing To adjust the print settings, press the up or down arrow button to scroll to the option you want to set, and then press the left or right arrow button to scroll to the setting you want. If necessary, press to make a selection. -
Page 42: Printing On Both Sides Of The Paper (Duplexing)
Printing If you want to change the default print settings: Press to access the PictBridge menu. Press the arrow buttons to select the paper source, paper setup, photo size, number of photos per page and print quality. You can also enhance the quality of graphics. Press each time you make a selection. - Page 43 Printing From the Printer pop‑up menu, choose your printer. From the print options pop‑up menu, choose Quality & Media. From the Paper Type pop‑up menu, choose a supported paper type. From the print options pop‑up menu, choose Layout. From the Two‑Sided pop‑up menu, choose Long‑Edge binding or Short‑Edge binding. •...
-
Page 44: Managing Print Jobs
Printing Navigate to: Layout tab > Print on Both Sides (Duplex) area > select a dry time setting Note: Under conditions of high humidity, or if the normal drying time does not allow the ink to dry completely, select Extended. Click OK. - Page 45 Printing Creating a print queue For Windows users From the Printer Tasks area, click Add a Printer. Follow the instructions on the computer screen. For more information, see the documentation that came with your operating system. For Macintosh users From the Print & Fax area, click +. If necessary, click the Default or Default Browser tab.
-
Page 46: Pausing Print Jobs
Printing Changing the default printing mode To conserve ink, you can change the default printing mode for all print jobs to Draft or Quick Print. It uses less ink and is recommended for printing text-only documents. If you need to change to a different print mode to print photos or other high-quality documents, then you can select a different mode from the Print dialog before sending the print job. -
Page 47: Resuming Print Jobs
Printing Resuming print jobs For Windows users Click , or click Start and then click Run. In the Start Search or Run box, type control printers. Press Enter, or click OK. The printers folder opens. Right‑click the printer, and then select Open or See what's printing. Resume the print job: •... - Page 48 Printing For Macintosh users Click the printer icon on the Dock. The print queue dialog appears. Choose the job you want to cancel, and then click Delete.
-
Page 49: Copying
Copying Copying Scanner glass Use the ADF for multiple‑page documents. Note: The ADF is available only in select printer models. If Use the scanner glass for single pages, small items (such as you purchased a printer without an ADF, then load original postcards or photos), transparencies, photo paper, or thin documents or photos on the scanner glass. -
Page 50: Copying An Id Card
Copying Select the copy mode: • Press to switch to color mode. • Press to switch to black‑and‑white mode. When you select color or black‑only printing, the light that corresponds to your choice comes on. Press Note: The selected copy settings are reset to the factory default after two minutes of printer inactivity. Copying an ID card Load plain A4‑... -
Page 51: Making A Copy Lighter Or Darker
Copying From the printer control panel, navigate to: > Copy > > Quality Press the left or right arrow button to set the copy quality. Press Making a copy lighter or darker Load paper. Load the original document faceup into the ADF or facedown on the scanner glass. From the printer control panel, navigate to: >... -
Page 52: Copying Multiple Pages On One Sheet
Copying From the printer control panel, navigate to: > Copy > > Separator Sheets Note: Collate must be set to On for the separator sheets to be placed between copies. If Collate is set to Off, then the separator sheets are added at the end of the print job. Press the left or right arrow button to select a separator sheet setting, and then press Copying multiple pages on one sheet You can copy multiple pages on one sheet by printing smaller images of each page. -
Page 53: Making A Two-Sided (Duplex) Copy
Copying Making a two-sided (duplex) copy Making a two‑sided (duplex) copy automatically The automatic duplex unit supports A4‑ and letter‑size paper. If you need to make two‑sided copies using other paper sizes, then see the instructions for making a two‑sided copy manually. Note: You cannot make two‑sided copies on envelopes, card stock, or photo paper. -
Page 54: Canceling Copy Jobs
Copying Load the next page of the document. • If you are copying a one‑sided document, then load the next page faceup into the ADF or facedown on the scanner glass. • If you are copying a two‑sided document, then flip the original document, and then reload it faceup into the ADF or facedown on the scanner glass. -
Page 55: Scanning
Scanning Scanning Scanner glass Use the ADF for multiple‑page documents. Note: The ADF is available only in select printer models. If Use the scanner glass for single pages, small items (such as you purchased a printer without an ADF, then load original postcards or photos), transparencies, photo paper, or thin documents or photos on the scanner glass. -
Page 56: Scanning To A Network Computer
Scanning Press the up or down arrow button to scroll to the scan option you want to set, and then press the left or right arrow button to scroll to the setting you want. Set the color, quality, original image size, and other scan options. If necessary, press each time you make a selection. -
Page 57: Scanning Photos For Editing
Scanning Press the up or down arrow button to scroll to the scan option you want to set, and then press the left or right arrow button to scroll to the setting you want. Set the color, quality, original image size, and other scan options. If necessary, press each time you make a selection. -
Page 58: Scanning Documents For Editing
Scanning Scanning documents for editing An Optical Character Recognition (OCR) application allows you to edit an original text document that has been scanned. In order for this to work, you must have an OCR application stored on a local or network computer and you must be able to select it from the list of applications when you set up the scan. -
Page 59: Scanning Directly To E-Mail Using The Printer Software
Scanning Scanning directly to e‑mail using the printer software Make sure you have set up your e‑mail settings before proceeding. For more information, see the section on e‑mailing in the User’s Guide. For Windows users Load an original document faceup into the ADF or facedown on the scanner glass. Click or Start. -
Page 60: Scanning Faq
Scanning Navigate to: Printer Home > select your printer > Scan > PDF Scanning starts and the scan progress dialog appears. Save the document as a PDF. For Macintosh users Load an original document faceup into the ADF or facedown on the scanner glass. From the Applications folder in the Finder, launch the application you want to use. -
Page 61: Canceling Scan Jobs
Scanning Canceling scan jobs Do one or more of the following: • From the printer control panel, press , and then press Scanning stops and the printer returns to the previous menu. • If you are sending the scan job using the printer software, then cancel the scan job from the software dialog. -
Page 62: E-Mailing
E-mailing E-mailing Before you can send an e-mail, you must first configure the network connection and e-mail settings of your printer. Setting up the printer to e-mail Setting up the e-mail function For Windows users Click or Start. Click All Programs or Programs, and then select the printer program folder from the list. Navigate to: Printer Home >... -
Page 63: Sending E-Mail
E-mailing Navigate to: Contacts tab > Individuals tab Click to open the Address Book. Note: To add contacts, you need to import contacts from the Address Book on your Macintosh computer. If the contact is not in the Mac Address Book, then first add the contact to the address book and then import it. From the Address Book, click and drag the contacts that you want to add to the Contacts list. -
Page 64: Canceling An E-Mail
E-mailing • Do not load postcards, photos, small items, transparencies, photo paper, or thin media (such as magazine clippings) into the ADF. Place these items on the scanner glass. • To send an e‑mail, see “Scanning directly to e‑mail using the printer software” on page 59. Canceling an e‑mail Do one or more of the following: •... -
Page 65: Faxing
Faxing Faxing CAUTION—POTENTIAL INJURY: To reduce risk of fire, use only the telecommunications (RJ‑11) cord provided with this product or a UL Listed 26 AWG or larger replacement when connecting this product to the public switched telephone network. CAUTION—SHOCK HAZARD: Do not use the fax feature during a lightning storm. Do not set up this product or make any electrical or cabling connections, such as the power supply cord or telephone, during a lightning storm. - Page 66 Faxing Setup 2: Printer is sharing the line with an answering machine Connected to the same telephone wall jack To connect: Connect the cable from the wall jack to the port of the printer. Remove the protective plug from the port of the printer, and then connect the answering machine to the port.
- Page 67 Faxing To connect: Connect the cable from the wall jack to the port of the printer. Tips for this setup: • If you have only one telephone number on your line, then you need to set the printer to receive faxes automatically (Auto Answer On).
- Page 68 Faxing Tips for this setup: • This setup works best if you subscribe to a distinctive ring service. If you have distinctive ring service, then make sure that you set the correct ring pattern for the printer. Otherwise, the printer will not receive faxes even if you have set it to receive faxes automatically.
- Page 69 Faxing To continue using a computer for Internet access, connect the computer to the DSL HPN port on the DSL filter. To connect a telephone to the printer, remove the protective plug from the port of the printer and then connect the telephone to the port.
- Page 70 Faxing Scenario 4: Digital telephone service through a cable provider Setup 1: Printer is connected directly to a cable modem Follow this setup if you normally connect your telephone to a cable modem. To connect: Connect one end of a telephone cable to the port of the printer.
- Page 71 Faxing Setup 2: Printer is connected to a wall jack; cable modem is installed elsewhere in the house Follow this setup if your cable provider activated the wall jacks in your house so that you do not have to plug your devices into the cable modem.
- Page 72 Faxing Connecting the printer to a non‑RJ‑11 wall jack To connect: Connect one end of a telephone cable to the port of the printer. Connect the other end of the cable to the RJ‑11 adapter, and then connect the adapter to the wall jack. If you want to connect another device (telephone or answering machine) to the same wall jack, and if the device has a non‑RJ 11 connector, then connect it directly to the wall jack.
- Page 73 Faxing If the additional device (telephone or answering machine) has an RJ-11 connector, then you can remove the wrap plug and connect the device to the port of the printer. Connecting the printer in countries or regions that use serial connection In some countries or regions, you need to plug all devices into the wall jack.
- Page 74 Faxing To connect: Connect the cable from the wall jack to the port of the printer. Connecting the printer to a wall jack in Germany The German wall jack has two kinds of ports. The N ports are for fax machines, modems, and answering machines. The F port is for telephones.
-
Page 75: Entering Your User Information
Faxing Connect the printer to any of the N ports. To connect: Connect one end of a telephone cable to the port of the printer. Connect the other end of the cable to the RJ‑11 adapter, and then connect the adapter to an N port. If you want to connect a telephone and answering machine to the same wall jack, then connect the devices as shown. -
Page 76: Configuring The Fax Settings
Faxing Setting the fax footer From the printer control panel, navigate to: > Setup > > Fax Setup > > Ringing and Answering > > Fax Footer > > On > Setting the date and time From the printer control panel, navigate to: >... - Page 77 Faxing From here You can 2‑Sided Faxes • Set the printer to print incoming faxes on both sides of the paper. Dialing and Sending • Set your fax name and fax number. • Adjust the dialing volume. • Set the dial method, redial time, number of redial attempts, dialing prefix, and fax sending speed.
-
Page 78: Creating A Contact List
Faxing Creating a contact list You can create a contact list using the Address Book in the printer control panel or the phone book in the fax software. If you create a contact list in the printer control panel, then the fax software automatically saves those contacts as Speed Dial entries. -
Page 79: Sending Faxes
Faxing From the Phonebook field, choose a phone book. Select the contact that you want to add, and then click Add to or change list to import the contact. Note: To add contacts, you need to import contacts from the phone books on your computer that are supported by the fax software. -
Page 80: Tips For Sending Faxes
Faxing Tips for sending faxes • Make sure the printer is on and connected to a working telephone, DSL, or VoIP line. The line is working if you hear a dial tone. • Make sure the paper exit tray is fully extended and the tray extension is flipped out. •... -
Page 81: Receiving Faxes
Faxing Select Include Cover Page with Fax, and enter the appropriate information if you want to include a cover page with the fax. Click OK. For Macintosh users With a document open, choose File > Print. From the Printer pop‑up menu, select the fax version of your printer. Note: In order to see the fax options on the Print dialog, you must use the fax driver for your printer. -
Page 82: Faxing Faq
Faxing Tips: • If the printer is sharing the line with other analog devices (telephone, answering machine), then set the printer to pick up calls two rings after the answering machine. For example, if the answering machine picks up calls after four rings, then set the printer to pick up after six rings. - Page 83 Faxing For Macintosh users From the Applications folder in the Finder, or from the Finder desktop, double-click the printer folder. Double-click Printer Settings, and then configure the fax settings. What is a splitter and what type of splitter should I use? If there are limited wall jacks in your home or limited ports on your adapter, then you can use a phone splitter.
-
Page 84: How Can I Check The Dial Tone
Faxing How many rings should I set? If the printer is sharing a line with an answering machine, then set the printer to pick up after a greater number of rings than the answering machine. For example, if the answering machine picks up calls after four rings, then set the printer to pick up after six rings. -
Page 85: Answering Machine
Faxing How do I adjust the speaker volume on the printer? Listen to the dial tone to check if the telephone line is working and to check if the cables and devices are connected properly in your telephone network. If you set the printer to receive faxes manually, then make sure that you set the ringer volume loud enough for you to hear it. -
Page 86: How Do I Know That The Fax Was Sent Successfully
Faxing Quality Black resolution Color resolution Standard 200 x 100 200 x 200 Fine 200 x 200 200 x 200 Superfine 300 x 300 200 x 200 Ultrafine 300 x 300 (half‑toned) 200 x 200 When sending a fax, after entering the fax number, press the arrow buttons to select a fax quality, and then press How do I send a fax at a scheduled time? From the printer control panel, navigate to: >... -
Page 87: How Do I Forward A Fax
Faxing How do I print the fax history of the printer? You can print reports of sent or received faxes, or both. From the printer control panel, navigate to: > Setup > > Fax Setup > > Fax Reports > Press the arrow buttons to select a report printing option: •... - Page 88 Faxing Use the keypad to enter the fax number, and then press Repeat steps 2b through 2d until you have added all the numbers that you want to block. You can block up to 50 numbers. Block unidentified faxes (faxes without a Caller ID number). Press the arrow buttons to scroll to Block No ID, and then press Press the arrow buttons to scroll to On, and then press to save the setting.
-
Page 89: Networking
Networking Networking Installing the printer on a wireless network Wireless network compatibility Your printer may contain an IEEE 802.11b, IEEE 802.11g, or IEEE 802.11n wireless print server. Your printer is compatible with IEEE 802.11 b/g/n routers that are Wi-Fi certified. Note: If your printer has an IEEE 802.11g wireless print server and you are having issues with an n router, then verify with your router manufacturer that the current mode setting is compatible with g devices, as this setting varies depending on the router brand or model. -
Page 90: Printing A Network Setup Page
Networking A valid WEP key has: • Exactly 10 or 26 hexadecimal characters. Hexadecimal characters are A–F, a–f, and 0–9. • Exactly 5 or 13 ASCII characters. ASCII characters are letters, numbers, punctuation, and symbols found on a keyboard. No Security It is not recommended to use no security at all on a home wireless network. - Page 91 Networking If your wireless network is not using security, then you will not have a security key. Note: If you do not know the SSID of the network that your computer is connected to, then launch the wireless utility of the computer network adapter and look for the network name. If you cannot find the SSID or the security information for your network, then see the documentation that came with the access point, or contact your system support person.
- Page 92 Networking Encryption Check the encryption method used on your network. Note: Some authentication types may be available only in select printer models or operating systems. Authentication type Encryption method Open Mode • None • Shared Mode WPA Personal TKIP WPA2‑Personal •...
-
Page 93: Installing The Printer On Other Computers
Networking Double-click the software installer package, and then follow the instructions on the computer screen. Note: Select Wireless connection when prompted to select a connection type. Installing the printer on other computers Once the printer is set up on the wireless network, it can be accessed wirelessly by any other computer on the network. However, you will need to install the printer driver on every computer that will access it. -
Page 94: Special Wireless Installation Instructions
Networking Indicator light Printer status • The printer is turned off or is powering up. • The printer is not connected to an Ethernet or a wireless network and is in Sleep mode. • The printer has not been configured for an Ethernet or a wireless network. •... -
Page 95: Assigning A Static Ip Address
Networking Enter the details about your wireless network. Note: Your WEP, WPA, or WPA2 key may be obtained from the bottom of the box, the documentation that came with the box, or from the box Web page. If you have already changed the key for your wireless network, then use the key you created. -
Page 96: Advanced Wireless Setup
Networking Advanced wireless setup Adding a printer to an existing ad hoc wireless network Before you begin, make sure: • Your wireless network adapter is properly attached to your computer and is working. • The ad hoc wireless network that the printer will connect to is available. For more information on creating an ad hoc wireless network, see the documentation that came with your operating system. - Page 97 Networking Configuring Wi‑Fi Protected Setup manually Note: Make sure your access point (wireless router) is Wi‑Fi Protected Setup (WPS) certified. For more information, see the User’s Guide. If your printer or device has not yet been configured for wireless connection and you want to configure it using WPS, then push the WPS button on the wireless router.
- Page 98 Networking • CA certificate EAP‑TLS • RADIUS user name • CA certificate • Signed certificate EAP‑TTLS • Appropriate inner authentication • RADIUS user name • RADIUS password • CA certificate Configuring 802.1X Authentication The information to complete is dependent on the 802.1X security mechanism you select. Some require user names, passwords, and/or certificates.
- Page 99 Networking If the printer is currently set up locally (using USB connection) Click or Start. Click All Programs or Programs, and then select the printer program folder from the list. Select your printer, and then navigate to: Printer Home > Settings > Wireless setup utility Follow the instructions on the computer screen.
-
Page 100: Selecting A Printer
Networking If the printer is currently set up for wireless Plug an Ethernet cable into the printer and into an available port on a switch or wall jack. Wait one minute for the Ethernet network adapter to become active and acquire an IP address from the network. Select the Network printer. - Page 101 Networking Double‑click Dell Extras > Dell Setup Assistant. Follow the instructions on the computer screen. Note: There is no need to remove the USB cable connecting the printer to the computer during wireless configuration. If the printer is currently set up for Ethernet Unplug the Ethernet cable from the printer.
-
Page 102: Adding The Printer
Networking Add the printer. See “Adding the printer” on page 102. A second print queue will be created. Remove the wireless queue if you do not want to switch back to accessing the printer over a wireless network. If the printer is currently set up locally (using USB connection) Plug an Ethernet cable into the printer and to an available port on a switch or wall jack. -
Page 103: Networking Faq
Networking Locate the printer from the remote computer: Note: The remote computer is the one that is not attached to the printer. Open the printers folder: Click , or click Start and then click Run. In the Start Search or Run box, type control printers. Press Enter, or click OK. - Page 104 Networking The printer supports the following methods in connecting to a wireless network: • Personal Identification Number (PIN)—A PIN on the printer is entered into the wireless settings of the access point. • Push Button Configuration (PBC)—Buttons on both the printer and the access point are pushed within a given period of time.
-
Page 105: Where Do I Find My Ssid
Networking An SSID can contain up to 32 alphanumeric characters. Alphanumeric characters are a combination of alphabetic (letters A to Z) and numeric (numbers 0 to 9) characters. Where do I find my SSID? • View the settings on the access point (wireless router). Most access points have a built‑in Web server that can be accessed using a Web browser. -
Page 106: How Are Home Networks Configured
Networking – If you are using a proxy server, then temporarily disable it to load the Web page correctly. Enter the user name and password for the access point when prompted. Note: The WEP key or WPA/WPA2 preshared key/passphrase is not the same as the password for the access point. - Page 107 Networking Scenario 2: Wireless network with Internet access • All computers and printers connect to the network using a wireless access point or wireless router. • The wireless access point connects the network to the Internet through a DSL or cable modem. Scenario 3: Wireless network with no Internet access •...
- Page 108 Networking What is a USB cable? A Universal Serial Bus (USB) cable is primarily used to connect a USB device to a host. Common hosts include computers and video game consoles. Through the USB port and cable, it is possible to connect computer peripherals such as mouse devices, keyboards, digital cameras, printers, personal media players, flash drives, and external hard drives.
-
Page 109: How Are Infrastructure And Ad Hoc Networks Different
Networking Firmly plug the rectangular end of the USB cable into the USB port of the computer. Follow the instructions on the computer screen. How are infrastructure and ad hoc networks different? Wireless networks can operate in one of two modes: infrastructure or ad hoc. In infrastructure mode, all devices on a wireless network communicate with each other through an access point (wireless router). -
Page 110: Finding The Signal Strength
Networking Finding the signal strength The signal strength tells you how strongly the computer or printer is receiving the wireless signal from the wireless network. Poor signal quality could affect connectivity during configuration. Checking computer connectivity From your computer system tray, click the wireless icon that corresponds to the software managing your wireless network adapter. -
Page 111: Wireless Network
Networking OVE THE PRINTER CLOSER TO THE ACCESS POINT If the printer is too far away from the access point, then it will not be able to communicate with other devices on the network. For most indoor wireless networks, the maximum distance between the access point and the printer is approximately 100 feet (30 meters). - Page 112 Networking Type ipconfig, and then press Enter. Check the Wireless Network Connection section: • The “Default Gateway” entry is typically the access point. • The IP address appears as four sets of numbers separated by periods, such as 192.168.2.134. Type the user name and password of the router when prompted. Click OK.
-
Page 113: Can I Use My Printer On A Usb And A Network Connection At The Same Time
Networking In the Wireless settings section, look for the SSID. Write down the SSID, security type, and the WEP key/WPA passphrase (if shown). Notes: • Make sure you copy the network information down exactly, including any capital letters. • Store the SSID and the WEP key or WPA passphrase in a safe place for future reference. Can I use my printer on a USB and a network connection at the same time? Yes, the printer supports a simultaneous USB and network connection. -
Page 114: What Is An Ip Address
Networking When installing the printer on a network, make sure you select the printer with the correct MAC address. The MAC address of the internal print server is a series of letters and numbers. Notes: • A list of MAC addresses can be set on an access point (wireless router) so that only devices with matching MAC addresses are allowed to operate on the network. -
Page 115: How Do I Locate Ip Addresses
Networking Every device on a network that uses TCP/IP must have an IP address. IP addresses are essentially unique computer names in a numeric format, used to transfer data around a network. IP addresses allow TCP/IP to confirm requests for, and receipt of, data by various devices on the network. - Page 116 Networking What is the difference between Guided and Advanced setup? Use Guided setup if: • The printer and the computer communicate on the same wireless network. • You want the Wireless Setup Utility to automatically detect the network for you. •...
-
Page 117: Maintaining The Printer
Maintaining the printer Maintaining the printer Maintaining ink cartridges In addition to the following tasks that you can perform, your printer performs automatic maintenance cycles if it is plugged into a properly grounded, working electrical outlet. It will briefly come out of Sleep mode or will temporarily turn on if it is turned off. -
Page 118: Cleaning The Exterior Of The Printer
Maintaining the printer Cleaning the printhead nozzles If you have not been using the printer for a long period, then you may need to clean the printhead nozzles to improve the quality of your prints. Keep your printer plugged to a properly grounded, working electrical outlet to allow it to perform automatic maintenance cycles. -
Page 119: Cleaning The Scanner Glass
Maintaining the printer Cleaning the scanner glass Clean the scanner glass and other related parts when vertical streaks appear on your printed pages or when you see marks or smudges on such parts. Dampen a clean, lint‑free cloth with water. Gently wipe clean the scanner glass and other related parts. - Page 120 Maintaining the printer Press the latch under the printer control panel to release it, and then push the panel back to its shipping position. • Keep the printer in an upright position to prevent the ink from leaking. • Avoid severe jarring movements.
-
Page 121: Troubleshooting
Note: Make sure the printer is not in Sleep mode. Press and hold for three seconds to turn off the printer. If Troubleshooting does not solve your problem Visit our Web site at http://support.dell.com to find the following: • Live online customer support •... -
Page 122: Software Did Not Install
Troubleshooting To confirm the setting, press the left or right arrow button to scroll to Yes, and then press Software did not install If you encountered problems while installing, or if your printer does not appear in the list in the printers folder or as a printer option when sending a print job, then try uninstalling and reinstalling the software. - Page 123 Troubleshooting ELECT YOUR PRINTER FROM THE RINT DIALOG BEFORE SENDING THE PRINT JOB Note: This solution applies to Macintosh users only. With a document open, choose File > Print. From the printer pop-up menu, choose your printer, and then click Print. If your printer does not appear in the Printer list, then choose Add Printer.
-
Page 124: Printer Is Printing Blank Pages
Troubleshooting Printer is printing blank pages Blank pages may be caused by improperly installed ink cartridges. EINSTALL THE INK CARTRIDGES AND DEEP CLEAN AND ALIGN THE PRINTHEAD Reinstall the ink cartridges, see “Replacing ink cartridges” on page 15 for more information. If the cartridges do not seem to fit, then make sure the printhead is properly seated, and then try installing the cartridges again. - Page 125 Troubleshooting Cannot delete documents from the print queue If you have jobs stuck in the print queue and cannot delete them to get other jobs to print, then the computer and printer may not be communicating. ESTART THE COMPUTER AND TRY AGAIN EMOVE AND RECONNECT THE CABLE CONNECTED TO YOUR PRINTER Cannot print through USB...
-
Page 126: Understanding Printer Messages
Troubleshooting Understanding printer messages Alignment Problem Try any of the following: • Check the ink cartridges. Open the printer, and then remove and reinstall the ink cartridges. Load a plain and unmarked A4‑ or letter‑size paper. The printer will read any markings on used paper, which could cause the alignment error message to reappear. Close the printer. -
Page 127: Fax Memory Full
Troubleshooting Fax Memory Full Reduce the resolution or the number of pages of the fax. Touch OK or press OK, depending on your printer model, to clear the message. Note: This deletes the fax job from the printer memory. Ink Cartridge Error The printer is unable to authenticate one or more of the installed ink cartridges. -
Page 128: Ink Low
Troubleshooting Ink Low You may need to replace the specified ink cartridge soon. Try one or more of the following: • Press to clear the message and continue printing. Note: Depending on your printer settings, you may not be allowed to continue printing until you replace the specified cartridge. -
Page 129: Printhead Error
Troubleshooting Printhead Cannot Move Try one or more of the following: • Open the printer to remove any obstructions to the printhead, and then close the printer. • Press to clear the message. Printhead Error Remove and reinsert the printhead Warning—Potential Damage: Do not touch the cartridge contacts with bare hands to avoid damage and print quality problems. - Page 130 Troubleshooting Reinsert the printhead, and then close the latch until it clicks into place. Close the printer. Note: If removing and reinserting the printhead does not resolve the error, then turn off the printer, and then turn it back on. If the problem persists, then contact customer support. Printhead Missing Try one or more of the following: •...
- Page 131 Troubleshooting Printhead Unsupported Try one or more of the following: • Turn the printer off, and then turn it back on. • Install a supported printhead. Open the printer. Press the release tab, and then remove the cartridges. Lift the carrier latch. Remove the unsupported printhead.
-
Page 132: Scanner Disabled
Troubleshooting Insert the supported printhead, and then close the latch until it clicks into place. Note: Make sure to install the ink cartridges into the printhead. For more information, see “Replacing ink cartridges” in the User’s Guide. Close the printer. Printhead Warning One or more cartridges may have been missing for more than two hours since the printer was turned on. -
Page 133: Jams And Misfeeds Troubleshooting
Try one or more of the following: • Restart your printer. • Update your printer firmware. For more information, visit http://support.dell.com. USB Device Not Supported Remove the unrecognized USB device and replace it with a supported device. USB Hub Not Supported Remove the unrecognized USB hub. - Page 134 Troubleshooting Check the jam clearance area Lift the scanner unit. Remove the jam clearance cover. Notes: • Squeeze the snap to lift the jam clearance cover. • Make sure that the printhead is moved to the side and away from the jammed paper. Firmly grasp the paper on both sides, and then gently pull it out.
-
Page 135: Paper Jam In The Paper Support
Troubleshooting Reattach the jam clearance cover until it clicks into place. Close the printer. Touch OK or press , depending on your printer model. Paper jam in the exit tray Firmly grasp the paper, and then gently pull it out. Note: Make sure all paper fragments are removed. -
Page 136: Paper Jam In The Duplex Unit
Troubleshooting Remove the paper support. Firmly grasp the paper, and then gently pull it out. Note: Make sure all paper fragments are removed. Reattach the paper support until it clicks into place. Touch OK or press , depending on your printer model. Paper jam in the duplex unit Note: The parts inside the printer are sensitive. - Page 137 Troubleshooting Push down the duplex latch, and then remove the duplex unit. Firmly grasp the paper, and then gently pull it out. Note: Be careful not to tear the paper while removing it. Reinsert the duplex unit until it clicks into place to clear the message. If necessary, touch OK or press , depending on your printer model.
- Page 138 Troubleshooting Check the ADF Press the ADF button, and then open the ADF cover. Scenario 1 Scenario 2 Firmly grasp the paper on both sides, and then gently pull it out. Scenario 1 Scenario 2 Note: Make sure all paper fragments are removed.
- Page 139 Troubleshooting Close the ADF cover. Touch OK or press , depending on your printer model. Check under the ADF tray Remove the ADF tray. Firmly grasp the paper on both sides, and then gently pull it out. Note: Make sure all paper fragments are removed.
-
Page 140: Print Troubleshooting
Troubleshooting Reattach the ADF tray until it snaps into place. Touch OK or press , depending on your printer model. Paper or specialty media misfeeds These are possible solutions if paper or specialty media misfeeds or skews, or if multiple sheets feed or stick together. Try one or more of the following: HECK PAPER CONDITION Use only new, unwrinkled paper. - Page 141 Troubleshooting HECK MINIMUM PRINT SETTINGS Unless you are using the borderless feature, use these minimum print margin settings: • Left and right margins: – 6.35 mm (0.25 in.) for letter‑size paper – 3.37 mm (0.133 in.) for all paper sizes except letter •...
-
Page 142: Print Speed Is Slow
Troubleshooting AKE SURE THE INK CARTRIDGES ARE PROPERLY INSTALLED LIGN THE PRINTHEAD LEAN OR LEAN THE PRINTHEAD NOZZLES Note: If these solutions do not remove the streaks or lines on the printed image, then contact technical support. Print speed is slow If the "Before you troubleshoot"... -
Page 143: Copy And Scan Troubleshooting
Troubleshooting HECK YOUR COMPUTER PERFORMANCE You may need to change how your computer manages resources and processes. For more information on improving computer performance, see the documentation that came with your operating system. Copy and scan troubleshooting • “Copier or scanner does not respond” on page 143 •... -
Page 144: Scan Was Not Successful
Troubleshooting AKE SURE THE DOCUMENT OR PHOTO IS LOADED FACEDOWN ON THE SCANNER GLASS AND IN THE CORRECT CORNER Partial copies or scans of documents or photos If the "Before you troubleshoot" checklist does not solve the problem, then try one or more of the following: AKE SURE THE DOCUMENT OR PHOTO IS LOADED FACEDOWN ON THE SCANNER GLASS AND IN THE PLACEMENT CORNER ELECT A PAPER SIZE THAT MATCHES THE LOADED PAPER... -
Page 145: Fax Troubleshooting
Troubleshooting AKE SURE THE PRINTER SOFTWARE IS INSTALLED ON THE DESTINATION COMPUTER Fax troubleshooting • “Fax troubleshooting checklist” on page 145 • “Cannot send faxes” on page 146 • “Cannot receive faxes” on page 147 • “Cannot run the fax software” on page 148 •... -
Page 146: Cannot Send Faxes
Troubleshooting Cannot send faxes If the “Fax troubleshooting checklist” does not solve the problem, then try one or more of the following: AKE SURE THAT YOU HAVE REGISTERED YOUR USER INFORMATION IN THE PRINTER If you did not enter your user information during initial setup, then enter your fax name and fax number. In some countries, you cannot send a fax without entering your fax name or company name. -
Page 147: Cannot Receive Faxes
Troubleshooting Make sure that the dial prefix entered in the printer is correct for your network. From the printer control panel, navigate to: > Setup > > Fax Setup > > Dialing and Sending > > Dial Prefix > Press the arrow buttons to create or modify the prefix. If the prefix is not correct, enter the correct prefix, and then press Cannot receive faxes If the “Fax troubleshooting checklist”... -
Page 148: Cannot Run The Fax Software
Troubleshooting AKE SURE THAT YOU HAVE THE CORRECT MANUAL ANSWER CODE If you set the printer to receive faxes manually (Auto Answer Off), then you need to press the correct code when a fax comes in so that the printer can receive it. From the printer control panel, navigate to: >... - Page 149 Troubleshooting Error Message: What it indicates: Possible solutions: The fax modem of the receiving fax Unsupported Compression • Lower the transmission speed of the machine does not support data fax modem, and then resend the compression. Fax modems compress fax. data to speed up transmission, but the •...
-
Page 150: Network Troubleshooting
Troubleshooting Error Message: What it indicates: Possible solutions: Auto Answer may have been turned off No Answer • Verify the number, and then resend on the receiving fax machine. the fax. • Set the printer to redial. Note: Depending on your country or region, there may be a limit on the number of redial attempts, regardless of the redial settings... - Page 151 Troubleshooting Notes: • Your port may be working fine, but certain conflicts can occur with multiple USB devices. Try disconnecting one of your other USB devices. • If the USB port on the computer is not working, then try using the other USB ports on the computer. AKE SURE THE CABLE IS WORKING Try using a different USB cable.
-
Page 152: Wireless Troubleshooting
Troubleshooting Watch the Device Manager window while connecting a USB cable or another device to the USB port. The window refreshes when the Device Manager recognizes the USB connection. • If there is activity on the Device Manager but none of the previous solutions worked, then call customer support. -
Page 153: Wireless Troubleshooting Checklist
Troubleshooting Wireless troubleshooting checklist Before beginning to troubleshoot the wireless printer, verify the following: • The printer, the computer, and the access point (wireless router) are all plugged in and turned on. • The wireless network is working properly. Try accessing other computers on your wireless network. If your network has Internet access, then try connecting to the Internet over a wireless connection. - Page 154 Troubleshooting AKE SURE ODE IS TURNED OFF Select printer features are not available when Demo Mode is turned on. From the printer control panel, navigate to: > Setup > > Demo Mode > > Off > HECK YOUR KEY OR PASSPHRASE If your access point is using WEP security, then the WEP key should be: •...
- Page 155 Troubleshooting HECK YOUR ADVANCED SECURITY SETTINGS • If you are using MAC (Media Access Control) address filtering to limit access to your wireless network, then you must add the printer MAC address to the list of addresses allowed to connect to the access point. •...
-
Page 156: Wireless Print Server Not Installed
Troubleshooting Wireless print server not installed You may see a message during installation indicating that the printer does not have a wireless print server installed. If you are sure the printer is capable of wireless printing, try the following: HECK POWER Make sure the light is on. -
Page 157: Resolving Intermittent Wireless Communications Issues
Troubleshooting • Temporarily turn off any unnecessary wireless devices on your network and pause any network‑intensive activities, like large file transfers or network games. If the network is too busy, then it is possible that the printer is not receiving the IP address within the allowed time. •... - Page 158 Troubleshooting To check if the computer is currently connected to a VPN, open your VPN Client software and check your VPN connections. If you do not have a VPN Client software installed, then check the connections manually using the Windows VPN Client. If you would like to have the ability to connect to your local network and to a VPN at the same time, then request the system support person for the VPN to allow split tunneling.
- Page 159 Troubleshooting SSIGN STATIC ADDRESSES TO ALL DEVICES IN THE NETWORK Most wireless networks use a DHCP server (Dynamic Host Configuration Protocol) built in to the wireless router to assign IP addresses to clients on the wireless network. DHCP addresses are assigned when they are needed, as when a new device is added to the wireless network or when it is powered on.
-
Page 160: Notices
Notices Notices Product information Product name: Dell V525w Machine type: 4448 Model(s): 4d1, 4dE Edition notice January 2012 The following paragraph does not apply to any country where such provisions are inconsistent with local law: THIS PUBLICATION IS PROVIDED “AS IS” WITHOUT WARRANTY OF ANY KIND, EITHER EXPRESS OR IMPLIED, INCLUDING, BUT NOT LIMITED TO, THE IMPLIED WARRANTIES OF MERCHANTABILITY OR FITNESS FOR A PARTICULAR PURPOSE. -
Page 161: Modular Component Notice
Notices harmful interference to radio or television reception, which can be determined by turning the equipment off and on, the user is encouraged to try to correct the interference by one or more of the following measures: • Reorient or relocate the receiving antenna. •... -
Page 162: Product Disposal
Notices Waste from Electrical and Electronic Equipment (WEEE) directive The WEEE logo signifies specific recycling programs and procedures for electronic products in countries of the European Union. We encourage the recycling of our products. Product disposal Do not dispose of the printer or supplies in the same manner as normal household waste. Consult your local authorities for disposal and recycling options. -
Page 163: Power Consumption
Notices Power consumption Product power consumption The following table documents the power consumption characteristics of the product. Note: Some modes may not apply to your product. Mode Description Power consumption (Watts) Printing The product is generating hard‑copy output from electronic inputs. 16.1 Copy The product is generating hard‑copy output from hard‑copy original documents. - Page 164 Notices Avis de conformité aux normes de l’industrie du Canada Cet appareil numérique de classe B est conforme aux exigences de la norme canadienne relative aux équipements pouvant causer des interférences NMB-003. European Community (EC) directives conformity This product is in conformity with the protection requirements of EC Council directives 2004/108/EC, 2006/95/EC, 1999/5/EC, and 2005/32/EC on the approximation and harmonization of the laws of the Member States relating to electromagnetic compatibility, safety of electrical equipment designed for use within certain voltage limits, radio equipment and telecommunications terminal equipment and on the ecodesign of energy-using products.
-
Page 165: Notice To Users Of The Canadian Telephone Network
Notices Connection to party line service is subject to state tariffs. Contact the state public utility commission, public service commission, or corporation commission for information. If your home has specially wired alarm equipment connected to the telephone line, ensure the installation of this equipment does not disable your alarm equipment. -
Page 166: Notice To Users Of The New Zealand Telephone Network
Notices agréé de type NRTL (Nationally Recognized Testing Laboratory) ou un organisme de certification agréé dans votre région ou pays. Ceci prévient tout endommagement de l’équipement causé par les orages et autres surtensions électriques. Cet équipement utilise des prises de téléphone CA11A. Notice to users of the New Zealand telephone network The following are special conditions for the Facsimile User Instructions. -
Page 167: Verwendung Dieses Produkts In Der Schweiz
Notices Verwendung dieses Produkts in der Schweiz Für dieses Produkt muss ein schweizerischer Billing Tone Filter zur Zählzeichenübertragung für jede Leitung installiert werden, über die in der Schweiz Zeitsteuertakte übertragen werden. Die Verwendung des Filters ist obligatorisch, da in allen analogen Telefonleitungen in der Schweiz Zeitsteuertakte vorhanden sind. Uso del prodotto in Svizzera Questo prodotto richiede un filtro toni Billing svizzero, a installare su tutte le linee che ricevono impulsi remoti in Svizzera. - Page 168 Notices This device has been designed to operate only with the antenna provided. Use of any other antenna is strictly prohibited per regulations of Industry Canada. To prevent radio interference to the licensed service, this device is intended to be operated indoors and away from windows to provide maximum shielding.
- Page 169 Notices Tower III, 1095 Budapest HUNGARY, A declaration of conformity to the requirements of the Directives is available upon request from the Authorized Representative. This product satisfies the Class B limits of EN 55022 and safety requirements of EN 60950. Products equipped with 2.4GHz Wireless LAN option are in conformity with the protection requirements of EC Council directives 2004/108/EC, 2006/95/EC, 1999/5/EC, and 2005/32/EC on the approximation and harmonization of the laws of the Member States relating to electromagnetic compatibility, safety of electrical equipment designed for use within...
- Page 170 Notices Magyar Alulírott, Lexmark International, Inc. nyilatkozom, hogy a termék megfelel a vonatkozó alapvetõ követelményeknek és az 1999/5/EC irányelv egyéb elõírásainak. Íslenska Hér með lýsir Lexmark International, Inc. yfir því að þessi vara er í samræmi við grunnkröfur og aðrar kröfur, sem gerðar eru í...
- Page 171 Index Index cannot run fax software 148 Numerics cannot scan to computer over a 2‑sided, fax background, removing 52 network 144 setting 76 backing material cannot send faxes 146 802.1X authentication 98 cleaning 119 certificate requests 98 bidirectional communication Change to [Size] [Type] Paper 126 enabling 156 Change to [Size] Paper 126 black and white scanning 60...
- Page 172 Index contact list defaults enlarging an image 50 setting up 78 restoring factory defaults 22 entering contact list, e‑mail dial method, fax fax user information 75 creating 62 setting 76 envelopes 31 setting up 62 dial tone loading 37 Continue button unavailable 150 checking 84 printing 37 copier or scanner does not...
- Page 173 Index Unsupported Compression 149 sending using the control Unsupported Resolution 149 panel 80 conserving 8 fax footer setup 82 ink cartridge access area 13 setting 76 tips, receiving 81 Ink Cartridge Error 127 fax forwarding 87 tips, sending 80 Ink Cartridge Missing 127 fax header two‑sided 87 ink cartridges...
- Page 174 Index paper jam in the printer 133 paper or specialty media key index 115 N9UF Box 94 misfeeds 140 Network [x] Software Error 128 paper support 11 network connection partial document or photo with USB 113 labels 31 scans 144 network indicator light 93 printing 38 parts...
- Page 175 55 USB Device Not Supported 133 recycling 8 to a flash drive 56 USB Hub Not Supported 133 Dell products 16 to a local computer 55 printer printing blank pages 124 WEEE statement 162 to a memory card 56...
- Page 176 Index to a network 56 software did not install 122 transparencies 32 to a network computer 56 shared printing 103 tray extension 11 using the printer control panel 56 sharing printer in Windows 102 troubleshooting using the touch screen 55 Short Paper 133 checking an unresponsive scanning takes too long or freezes...
- Page 177 Index incorrect language appears on voice mail, fax settings 85 signal strength 110 display 121 Voice over Internet Protocol (VoIP) SSID 104 page does not print 122 fax setup 69 troubleshooting 153 printer does not respond 124 VoIP adapter 69 types of wireless networks 109 printer printing blank pages 124 volume, adjusting...